Gas ignition methods
Columns have several types of ignition, but they all have one thing in common - the main burner of the device is ignited using a water unit, which sends a signal to supply gas.
Otherwise, all speakers can have the following types of ignition.
- Ignition from a piezoelectric element. A manual control option in which the power button is located on the external panel of the device. When it is pressed, the piezoelectric element ignites the igniter, which ignites the main column. This ignition method has one drawback - the igniter must be turned off manually. If this is not done, it will continue to burn, which will lead to excessive gas consumption and the formation of scale on the walls of the tubes.
- Battery powered. In such models, a signal is first sent from the rod, and then an electric spark ignites. In such designs, the role of the igniter is played by special electrodes - the main burner is ignited directly from them. One of the disadvantages of such models is the need to regularly change batteries. At a minimum, this should be done once every 10 months, and with regular use - every 2 months.
- From a hydraulic turbine. In some cases, gas ignition can be achieved using a rotating turbine, which is driven by water pressure. In such columns, the main burner is also ignited by an electric spark, but there is no need to monitor the batteries. This is due to the fact that the turbine itself generates the necessary electricity when rotating. Dispensers with a hydraulic turbine are not very common in Russia. This is due to the need to ensure sufficient pressure in the pipes. The column will operate at a pressure of at least 0.3 bar. But this condition is not guaranteed everywhere.
I smell gas from the dispenser, what should I do?
In order to remove the gas and water units, you will need a 19 key. Disconnect the heat exchanger from the unit, then disconnect the ignition electrodes, unscrew the screws that secure it to the rear wall.
READ MORE: Do-it-yourself alternative energy for the home, a review of the best developments
There is a rod inside, with seals (small rubber seals) put on it; if you smell gas, it means it is leaking. It is likely that the seals have deteriorated and need to be replaced.
The second reason is a leak in the connecting elements of gas pipes. To check, you will need to make a soap solution and treat all connections. If you find a leak, replace the gaskets or tighten the connecting nuts tighter.
Combustion chamber type
Regardless of the method of gas ignition, in all columns the combustion chambers can be of two types: open or closed.
If the design of the combustion chamber is open, then air enters it directly from the room, and all combustion products are removed using an ordinary hood. Such devices have several advantages:
- simple design;
- makes virtually no noise during operation;
- Most often they do not need electricity.
However, such cameras have one significant drawback. When the hood does not work properly, air pollution in the room can occur.
Closed combustion chambers are typical for gas water heaters with a turbine. The design of such chambers, with the exception of pipes for air supply and exhaust, is completely sealed. Air is supplied using built-in fans and removed through a chimney.
The closed combustion chamber in the column is completely sealed
The closed design of the combustion chamber is characteristic of more modern models of dispensers with automatic operation. Due to the presence of various sensors, such models are considered the safest.
Types of brand speakers
Based on the type of water heating, columns are divided into two types: flow-through and storage.
The former heat a continuous stream of water passing through an internal coil under the pressure of the plumbing system.
The work of the latter involves pre-filling the tank by analogy with electric boilers.
Heating the water takes a certain time depending on the tank capacity. This type of water heater is extremely rare and is not in demand among domestic buyers.
Flow-through geysers have become most widespread, primarily due to the rapid heating of water. This article will discuss exactly this type of column.
Depending on the method of removing combustion products, Oasis geysers are: chimney and turbocharged (flueless).
A distinctive feature of the latter is its own ventilation system, made in the form of a coaxial double-circuit chimney. Consists of two pipes nested one inside the other.
Combustion products are removed through the internal pipes, and air from the street enters into the gap between the pipes.
Forced ventilation of turbocharged speakers is carried out by an internal fan. This requires increased power supply compared to conventional chimney devices. Therefore, many chimneyless models are powered from the network.
Safety sensors - where they are located and why they are needed
Any geyser can be dangerous if used incorrectly. This is due to the fact that it is simultaneously connected to gas and water supply pipelines, which even separately can create problems. Especially to prevent dangers, the devices are equipped with sensors and valves that, in case of problems, turn off the device and shut off the supply of water and gas.
Standard geysers can withstand a sharp jump in water pressure up to 10-12 bar, which significantly exceeds the pressure in city water supply pipelines. However, at a pressure of 0.2 bar and below, the device simply will not work.
Important! Before buying a speaker, be sure to familiarize yourself with its main characteristics. It is important to pay special attention to the water pressure at which it will work.
All modern speaker models are equipped with various sensors. The following varieties can be distinguished.
- Traction sensor. It is located in the unit connecting the chimney to the column. Turns off the device if there is no traction.
- Gas valve. If problems arise with the gas supply, turns off the column. Located in the gas supply pipe.
- Ionization sensor. Necessary to turn off the device when the flame goes out while the gas supply is active. Located in the combustion chamber.
- Flame sensor. If the flame does not appear during ignition, the sensor blocks the gas supply. Located in the chamber.
- Relief valve. It is used to shut off the water supply in the event of a sudden surge in pressure. Located in the water supply pipe.
- Flow sensor. Turns off the device if the water supply stops.
- Temperature sensor. Located on the heat exchanger pipes. A sensor is needed to control water heating. If the temperature exceeds +85°C, it turns off the burner.
- Pressure meter. If the pressure drops in the water supply pipes, the sensor is responsible for turning off the column.
Unit design
Gas water heaters, regardless of the manufacturer, have similar components, the presence of which may differ slightly between different models. For example, we can consider the construction of the Neva gas water heater.
Device structure from the outside
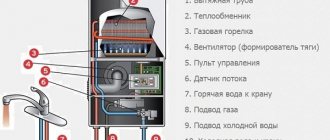
The diagram of the gas water heater is shown in the figure below.
Gas water heater diagram
The front part and sides of the water heater are covered with a metal casing (1). There is an observation window (2) on the facade of the device for visual monitoring of the operation of the unit. Under the window there are regulators: a knob that regulates gas flow (3) and a water flow regulator (4). Between the handles there is an LCD display (5), which displays the temperature of the water supplied to the consumer.
At the very bottom of the device there are pipes for water supply and outlet, as well as for gas supply. On the right side of the water heater there is a pipe (6), to which cold water from the water supply is connected, and on the left, a pipe (7) is connected to drain the heated liquid. Next to it, but a little closer to the center, there is a pipe (8). A hose is connected to it, connecting the dispenser to the gas main, and in some situations, to a gas cylinder. At the very top of the water heater, there is a flange (9) for connecting the gas outlet pipe (chimney).
All elements of the unit are fixed to a metal base (10), which serves as the rear wall of the device. It has 2 holes for hanging the unit on the wall using brackets.
The new Astra gas water heater model has a similar design.
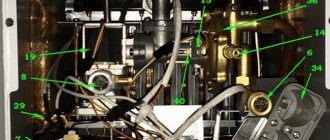
Internal structure of the unit
Now let's look at how the geyser works from the inside, with the outer casing removed. As mentioned above, pipes numbered 6, 7 and 8 are intended for connecting cold water, discharging heated water and connecting gas.
The water block of the unit (12) is connected to the water supply pipe (6). A rod (13) comes out of the water block, on which a handle is attached to adjust the water pressure. Below is a cylindrical part (14), which has a notch on the walls. It functions as a plug that can be removed to drain liquid from the device if repairs are required. The plug also has a safety valve that opens when there is excess pressure in the water supply.
In the center of the unit there is an electronic control unit (16). Wires are routed from it in different directions, going to various elements of the unit and sensors.
Column structure from the inside
On the left, symmetrically to the water block, there is a gas block (17). Both modules are assembled in such a way that they represent a single structure. From it, like from the water one, comes a rod (18) to adjust the gas supply. In the middle between the gas pipe and the control valve there is a valve (19) (electromagnetic).
There is also a microswitch (15) on the gas block, which is pressed by a special pusher when it is turned off. Above you can see the manifold (20), connected to the gas block using a pipe fitted with flanges. The manifold is attached to the body using 2 screws (21). The nozzles are located at the rear of the manifold. Through them, gas is supplied to the burner (22), which has 10 rows. A pair of elements are attached to the front of the collector, similar in appearance, but performing different roles. On the right is the spark plug (23), which ignites the burners, and on the left is the flame sensor (24).
Above the collector there is a copper heat exchanger (25). It just gives off the heat obtained from the combustion of gas to the water passing through it. A water unit (26) is connected to the heat exchanger on the right, and a pipe for discharging heated water (27) is connected to the left side. The heat exchange module is attached to the unit body using 2 screws (28). There are 2 sensors installed on the pipe for discharging heated water. The top one (29) protects the water heater from overheating, and the one below (30) serves as a thermometer. Wires go from it to the LCD display mounted on the casing of the unit.
At the top of the apparatus there is a device for removing waste combustion products (31). Thanks to a system of jumpers of different shapes, the flow of hot exhaust gases is directed towards the chimney channel. A draft sensor (32) is installed on the left, which is connected to the overheating sensor (29) via an electrical circuit. At the bottom of the water heater body there is a block (34) for 2 power elements (batteries). To fasten the outer casing of the device, there are places for screwing in screws (33) on both sides of the housing.
The diagram of the internal structure of the Oasis geyser is no different from the one shown above, except for the presence of a “winter-summer” switch on the front panel. It is designed to turn off half of the operating burners in the summer to save gas.
You may be interested in: how to repair a gas water heater.
User reviews
Sergey: “I bought myself an Oasis B12W boiler for my dacha. It functions normally, there are no disputes, except for one thing - low power, not enough performance for a shower stall. For a kitchen faucet - more than that. I’m happy with the choice – for the price, it’s an excellent water heater.”
Konstantin: “For more than 10 years I used the Astra VPG in a private house, but due to the fact that I did not clean the nozzle, the column became unusable. After consulting with a sales consultant, I decided to buy an inexpensive Oasis Glass 20VG water heater. It’s been working great for over 2 years now, I’m happy with the purchase.”
Svetlana: “Oasis are excellent boilers, I bought them for my apartment, they look beautiful in the kitchen. I chose a water heater with a pattern and settled on the Eiffel Tower. I’m happy with the use, I didn’t notice any shortcomings.”
- How to set up (adjust) a gas water heater?
Important! Oasis gas water heaters have a lot of advantages, and their low price and availability make them even more popular.
You can buy an excellent HSV either by choosing from popular models or by considering lesser-known options. Oasis boilers are not the only product; it also produces other water heaters: Halsen, Zerten, Alecord - also with many advantages. German quality at an affordable price is what the manufacturer adheres to.
The optimality of its operation, the economical use of resources, and the longevity of its operation depend on the correct settings of the geyser. Let's consider the adjustment of devices that have two toggle switches on the front panel - water and gas regulators, the device type is semi-automatic.
Setting up any gas heater should begin with adjusting the water. The nominal value of this parameter is indicated in the technical data sheet supplied with the device, usually 6, 10, 12 liters. In order to correctly set the device to the required value, you need to open the hot water valve; it is important to comply with the condition - you should open only one tap if you have several water intake points. Using the water toggle switch, set the value corresponding to the nominal value. After setting, the tap closes.
But we must take into account the fact that the flow pressure of the main line is different for everyone and there are no general rules for setting it up.
Some experts advise that when the system pressure is weak, but the heater turns on, the water toggle switch should be set to maximum, and the gas switch should be gradually turned from minimum until a temperature that suits you is reached.
In order to adjust the gas supply to the device, you need to set the gas regulator knob on the front panel of the device to the minimum setting. After connecting to the power supply (for models such as Ariston and Electrolux), or installing batteries (Neva, Neva Transit, Selena, Ladogaz, Oasis, Junkers, Bosch Therm, etc.), you need to open the gas valve. Then you need to open the hot water tap, the water heater will turn on and start heating.
The next step is to use a temperature measuring device and set the gas regulator to such a position that the temperature difference at the inlet and outlet of the device corresponds to 25 degrees.
- How to set up and adjust a gas water heater
It should be taken into account that heating does not occur immediately; you should wait a while. During subsequent operation of the column, the temperature at the outlet of the device is changed using a hot water valve. By turning on a larger flow, it decreases, and a smaller flow increases.
If after the above steps you are not satisfied with the set temperature, changes must be made only using a water toggle switch. It should be taken into account that to increase the service life of the column, it is not recommended to set the temperature above 50 degrees.
Instantaneous water heaters are quite inertial; when turned on, do not expect a hot stream to flow immediately; you should wait for some time.
Conversely, if you turn on hot water in the tap, it will become hot after a while
If a short time passes between turning off and turning on, you need to be careful not to put your hands under the tap so as not to get burned, since after turning off a certain amount of liquid remains in the system. Inertia should be taken into account when setting the temperature in order to obtain the nominal difference at the input and output; there is no hurry here; it is necessary to accurately select the appropriate position of the regulator when the result does not change for several minutes.
When the water heater runs on liquefied gas and the pressure does not correspond to the nominal pressure, it is adjusted in front of the nozzle. To do this, remove the casing, loosen the locking screw, and connect the pressure gauge to the measurement pipe. Next, remove the seal from the adjusting screw, turn on the column, setting the regulator to maximum, and open all hot water taps. The pressure is adjusted using the adjusting screw. This procedure should be performed by a specialist.
Upper center knob for Winter-Summer mode
Some devices, such as Ariston, Oasis, Dion, Vector JSD20-W, etc. have a winter-summer mode, are equipped with a temperature corrector, on the Ariston column it is located at the bottom, on the Dion, Oasis - on the front panel. Depending on the season, the knob is set to the “plus” position in winter and “minus” in the summer. This option allows you to optimally use resources.
Let's consider the method of setting up an automatic gas heater using the example of Ariston fast evo ont b 14, JUNKERS Bosch WR. The main difference is that there is only one control toggle switch built into the control panel - adjustment of water temperature and power, which is also an on-off control. Turning the knob clockwise increases the temperature, counterclockwise decreases it.
When the device is turned on, self-diagnosis of the gas-water unit and other dispenser systems occurs. In the event of a malfunction, the device is locked and the red LED lights up. Before turning on for the first time, it is necessary to adjust the gas pressure at the inlet. To do this, you need to close the gas valve, loosen the screw in the gas block and insert a pressure gauge into the gas pressure tap. Then open the gas tap, turn on the water heater, opening the water outlet and make sure that the pressure corresponds to the specified figure in the instructions.
To adjust the maximum and minimum values, you need to do all the above manipulations, then remove the batteries, put the microswitch in the off position, and insert the batteries into the compartment. Open one hot water valve, turn on the microswitch, adjust the maximum pressure on the burner using the orange screw. Then turn it off again, adjust the minimum in the same way, move the microswitch to the off position, if the indicator lights up orange, it means the settings are saved.
Setting up the Neva 4511 involves regulating the flow rate of the stream flowing through the device using a water toggle switch. By setting it to minimum, the flow rate decreases; the device turns on at a value of at least 2.5 liters per minute.
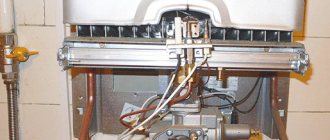
Neva 4511 – control panel
When set to the maximum value, the flow increases, and the column turns on when the flow is at least 6 liters per minute. In intermediate positions, switching occurs in the interval between these numbers. If there is low pressure in the line, the manufacturer recommends setting the regulator to minimum flow.
The Termet 19 01 water heater is equipped with water-gas fittings, which automatically maintain the set temperature at a constant level. This unit has an automatic flow regulator with smooth adjustment. When the knob is set all the way to the right, a small flow flows, 5.8 liters per minute, at the highest possible temperature.
If you need to reduce the flow, you need to tighten the tap. By turning the knob all the way to the left, a large flow flows, 11.5 liters per minute, with a reduced temperature. By setting the toggle switch to the middle position, the temperature changes in inverse proportion to the amount of water. If the flow control toggle switch is set arbitrarily, it can be changed using the gas control knob. If the Termet gas water heater does not light up, we recommend reading the article at the link.
In addition, watch the video on setting up (adjusting) a Bosch gas water heater:
Those who recently purchased the speaker are faced with some problems. They appear when the adjustment is incorrect during installation of the water heater. But companies found a way out and created devices with automatic adjustment. Today we will talk about how to adjust the gas water heater.
Content
Although there are instructions for the Bosch, Selena and Neva gas water heaters on how to set them up correctly, not everyone understands how to do this. Having made a mistake at the very beginning, the device begins to work not as it should. You should start by regulating the water supply.
First of all, adjust the water regulation. If you do it at the last moment, then all the settings will be incorrect. The flow must be the smallest . The values can be found in the documentation, they are usually 6, 10 and 12 liters.
The main thing is that there is only one tap for work.
Principle of operation
To understand the principle of operation of a geyser, you must first consider what security system it is equipped with. When the unit is in the off state, the control unit (16) does not receive electricity, since the circuit is broken in the microswitch (15). The switch plate is pressed by the pusher, and while this happens, it is in the off state.
The solenoid valve (19) is also closed and cuts off the gas supply from the inlet pipe, since it is not receiving power. But this is not the only place that shuts off the gas - it is also shut off using a spring valve, which is located in the gas module (35). The inoperative state of the valve is characterized by pressing the disc gasket against the seat, which ensures complete shutoff of the supply of the combustible mixture to the manifold.
The water section consists of a two-chamber module (36), colloquially called a “frog”, with an elastic rubber membrane. Using a special channel, the “frog” cameras can communicate. When the water supply is turned off, the pressure in the chambers is equalized and the membrane is in an equilibrium position.
The principle of operation of a gas water heater
Water is supplied to the heat exchanger through the bottom of the chamber. At the top there is a rod with a plate made of plastic, which is adjacent to the membrane. The rod comes out through a hole in the middle, towards the gas block. Opposite this rod, in the gas module, there is the same one, but connected to a spring valve, to which is attached a pusher coming from the switch.
What happens when the water starts
How does a gas water heater work if you dig up water? When you open a water tap at the point of consumption (water intake), the following happens.
- When a liquid flow passes through the “frog”, a vacuum is created in its chamber. The rubber membrane, under the influence of increased pressure, bends and pushes the plate out. The latter transmits the pushing movement to the rod. The water module rod pushes the opposite gas module rod (37).
- Next, the pusher, which is connected to the rod, no longer holds the switch plate, and it is released. In this case, the switch closes the circuit, and power begins to flow into the electronic control module from the battery section.
- The movement of the rod also forces the spring of the mechanical valve to depress, as a result of which the plate moves away from the seat, and the gas supply channel to the manifold becomes open.
- The solenoid valve, receiving power from the batteries, opens and does not interfere with the passage of gas through the spring valve towards the manifold.
- Meanwhile, the control unit generates and sends an electrical impulse to the spark plug (23) to create a spark discharge that can ignite the flame. When all components operate normally, the burner lights up.
The ignition process is controlled by an ionization sensor (24). If the burner does not ignite within 6-7 seconds, then, in order to avoid the accumulation of a high concentration of an explosive mixture, the electronic module, without receiving a pulse from the sensor, will shut off the gas supply . If there is combustion, the sensor will generate a pulse to turn off the spark plug. If, after the water heater starts operating, the flame goes out, then the impulse from the sensor will stop coming to the control module, after which it will immediately respond to this by shutting off the gas using the solenoid valve.
Performing all these functions in the Neva gas water heater is possible only if one condition is met: the circuit between the two sensors must not be broken, namely, between the outlet water temperature control sensor (29) and the draft sensor (32). These relays are connected in series and their contacts are closed when the sensors are operational. Therefore, in order for the control module to receive power, both sensors must complete the circuit.
If a weak draft is formed in the smoke exhaust unit, then the combustion products, due to the special design of the exhaust unit, cannot pass towards the central channel, and are directed to the side cavities. Since the temperature sensor is located on the left, it will “detect” a sudden rise in temperature, breaking the power supply circuit to the control module. This will stop the supply of the combustible mixture and turn off the burners.
By analogy, the relay, which is located on the pipe for removing heated water from the heat exchanger, is also activated. When the water heats up to 90°C, and this is considered a critical level, the power supply circuit of the electronic unit will be broken.
If scale has formed in the heat exchanger.
One of the signals that a blockage has occurred is insufficient heating of the water. The cause of this breakdown is hard water in the water supply, which prevents the water from heating to the required temperature, reduces the flow of water at the outlet, and, as a consequence, increases gas consumption. The deposition process occurs when heating water exceeds 80 degrees.
To remove scale, you can use special liquids that are sold in the store. There are also devices that can be used for cleaning. The mechanism of action of the devices is simple; the device itself is a kind of reservoir with a built-in pump for extracting water. The tubes of the cleaning device are connected to the radiator tubes of the geyser.
You can also carry out cleaning in a more economical way with your own hands, without the use of automatic means. You need to remove the radiator and remove all water from it. Cleaning is done using a purchased reagent or prepared independently using vinegar or citric acid (dilute 150 grams of acid with 750 ml of hot water).
READ MORE: 10 ways to purify the air in your home, appliances, recommendations and tips
The radiator is immersed in a tank filled one-third with water, and the heat exchanger pipe is filled with the prepared liquid. It is necessary to pour into the pipe from the end of the lower turn in order to displace all the air. Place the container on the stove and bring to a boil, boil for about fifteen minutes, turn off and let cool. Then install it in its original place and connect it to the pipe that supplies water to the outlet pipe of the heat exchanger, attach the hose, and lower the other end into a sink or other container. Open the water tap; the flowing water will displace the existing solution along with the scale. If necessary, repeat the procedure again.