Instructions: how to use an electric stove
Due to its small dimensions, the oven will not take up much space in the kitchen. The models have intuitive controls that are understandable even to inexperienced cooks.
To start using an electric stove:
- Turn on the device and select the desired temperature mode.
- Wait 15 minutes for the inside of the oven to heat evenly.
- Place the dish inside and turn on the timer.
- Wait for the beep, check the food is ready and turn off the oven.
Electric models are safe to use, but place a large load on the electrical network. The service life of the devices is limited to 3-5 years, because heating elements quickly fail.
How to choose
The theoretical justification for choosing a particular model is very large-scale, because in addition to the presented characteristics, there are a number of certain little things that rarely anyone pays attention to when purchasing.
Multifunctional device
Among such little things may be a protective coating on the inner surface. It will protect the oven from exposure to temperatures and mechanical treatment when washing the appliance. The question of how the door opens is rarely asked, but over time, users begin to leave reviews indicating that the safest way is to rotate the door relative to the vertical axis.
If there are children in the house, then the “cold glass” option will come in handy. This is a special thermal protective coating installed on the inside of the door. As a result, you can safely touch the glass from the outside.
The presence of an extension cord will allow you to install the electric oven in any place in the kitchen, regardless of the distance from the outlet, but when connecting the plug, a switching phenomenon is inevitable, which results in loss of electricity and heating of the contacts. Therefore, you should pay attention to the length of the device's own cable.
Good to know: Stove-fireplace with stove, we are considering brick and cast iron options
It is not possible to calculate power consumption. A similar calculation based on the number of family members will help you navigate it. It is believed that you can prepare a full meal for 2-3 people in an oven with a power of 0.6-0.8 kW. Further, this value increases linearly, depending on the number of eaters. The remaining indicators are selected in accordance with the presented list of device characteristics.
Stove from an Italian brand
Main functions of an electric furnace
Use an electric oven to cook and heat food: meat, baked goods, desserts. For convenience, the models are equipped with additional functions:
- Timer. Allows you to set the exact operating time. When it is finished, the oven will beep or turn off automatically.
- Convection. This function is necessary for uniform baking of dishes. Depending on the model, it can be dry or wet.
- Built-in grill. Additional heating elements are installed in the upper part of the oven. They help create a crispy crust on meats and baked goods.
You can use an electric oven to defrost food, dehydrate vegetables and fruits, and sterilize dishes.
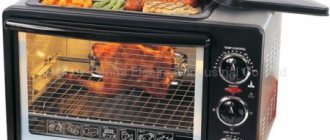
Review of mini oven (oven) Redmond RO-5705
The mini-oven is a longtime friend of those who live in dorms, small apartments and all those places where there is either no kitchen or it is too small to install a stationary oven in it. With different volumes and different fillings, mini-ovens help cook pies, casseroles and boiled pork even in the tiniest area. And after the process is completed, the mini-oven can be placed on the mezzanine or on the refrigerator.
We received a volumetric and multifunctional mini-oven Redmond RO-5705 for testing: with convection, top and bottom heating, as well as a grill and spit. We cooked several different dishes in it and noted both its advantages and some disadvantages. What outweighed? We'll find out at the end of the article.
Characteristics
| Manufacturer | Redmond |
| Model | RO-5705 |
| Type | mini oven |
| Country of Origin | China |
| Guarantee | 2 years |
| Life time* | 3 years |
| Power | 1500 W |
| Protection against electric shock | class I |
| Chamber volume | 38 l |
| Grill | There is |
| Convection | There is |
| Selecting a heating element | top, bottom, top+bottom |
| Number of operating modes | 5 |
| Timer | There is |
| Constant heating function | There is |
| Maximum cooking time (by timer) | 1 hour |
| Adjusting the cooking temperature | 90—230 °C |
| Control type | mechanical |
| End of cooking signal | There is |
| Housing/door material | steel/glass/plastic |
| Weight | 8.6 kg ± 3% |
| Dimensions (W×H×D) | 550 × 328 × 428 mm |
| Network cable length | 0.8 m |
| Retail offers | find out the price |
* To put it very simply: this is the period during which parts for repairing the device are supplied to official service centers. After this period, any repairs in official service centers (both warranty and paid) are unlikely to be possible.
Equipment
The box, standard for the Redmond company, is black and made of glossy cardboard. On the top plane there is a picture of a mini-oven, the model name is written in large size and the warranty period is highlighted - 2 years. The oven volume (38 liters) and voltage - 1500 W are also indicated. This contradicts the description of the model on the website, which states that the power is 1400 W, but corresponds to the instructions. So let's trust the box and instructions.
In addition, the main advantages of the oven from the manufacturer’s point of view are listed here: timer up to 60 minutes, temperature control, convection, grill, steel body and recipe book. The same information is duplicated on the front and back walls of the box.
The side walls are more interesting: on one of them, let’s call it the right one, there are illustrations and explanations about why this mini-oven is so good. In particular, among its advantages are temperature changes from 90 to 230 degrees, a convection mode for uniform cooking and a curved upper heating element, which, due to its shape, heats both the edges of the oven and its middle with equal intensity. This information is duplicated in English.
On the left side wall the technical and design features of the furnace are described in more detail. Here information is also provided in Ukrainian, Kazakh, Uzbek, English and Romanian.
When we opened the box, we took out the oven itself (it is quite heavy, be careful with your back when lifting and moving). It came with a deep baking tray, which can also serve as an additional tray for collecting fat and juices. It has a ribbed bottom, so baking pies on it will have to be creative.
The kit also includes a grate, a spit and two grab handles for removing the hot spit or grate from the oven.
After some time, the keen eye of the tester discovered that the kit also included a removable sheet - a tray, which for the time being pretended to be the bottom of the oven. It can be used both as a baking tray and as additional protection for heating elements when cooking on the grill.
All components are of good quality, without flaws, scratches, burrs or design flaws. At least in appearance. Let's check it in action - let's be more precise.
The manufacturer's website states that you can purchase additional accessories for this model: a smooth baking sheet and a disposable aluminum foil pan. Something is not enough. Where are the rotating baskets, the multi-skewers, the bread and cake tins? You'll have to look in your kitchen cabinets to see what you can adapt for this stove from what you have.
At first sight
At first glance, the mini-oven seemed almost as big as a built-in oven. No, you can’t bake seven kilos of pork there, but three kilos is definitely possible.
The difference from the built-in oven is in a good way - the oven can be put away in the pantry or on the refrigerator so that it does not take up useful space. The downside of this solution is that it is quite difficult to take it out and put it away.
On the downside, a mini-oven differs from a stationary oven in that you need to choose the location for it very carefully: the top and back walls of the oven get very hot and can damage cabinets or other kitchen furniture if placed too close to them.
On the front wall of the mini-oven there is a control panel and a large glass door with a massive metal handle. The door opens forward smoothly, without much effort, closes tightly and in this case, too, you do not have to use force.
The only thing that can cause inconvenience in operation: the door does not have a lower stop, so it can open almost 180 degrees down. If the oven is placed on the edge of a table, the door may hit the edge. Well, you shouldn’t put a baking sheet on an open door either. But the door is securely fixed in the open position at an angle of 30 degrees. This is important for some recipes.
The control panel knobs rotate with little effort required to lock them in the desired position. The mode knob switches between modes with a characteristic sound, temperature and time can be set smoothly.
On the back wall there are ventilation holes (in one row on the right, when viewed from the “face” of the stove) and a small protrusion. There are also plastic stoppers on it that will not allow you to place the mini-oven close to the wall. We would have made them longer, to be honest, because (getting ahead of ourselves) when we tried to place the oven at a distance equal to the length of the stopper, the wall behind the oven got too hot.
The row of ventilation holes continues on the top panel, the rest of the surface is flat. The top panel is quite thin and flexes a little when you press on it.
The side walls are the same: they only have ventilation holes along almost the entire surface.
The bottom panel also has ventilation, legs on which the mini-oven stands quite firmly and stably, and a power cord outlet. This arrangement of the cord did not seem safe enough to us, since during prolonged use it can fray and can be easily damaged when moving the mini-oven from place to place.
The stainless steel colored body is symmetrical and smooth. By design, this is a standard kitchen appliance that will fit into any kitchen interior.
There are three grooves inside the oven. If you place a baking sheet on the bottom one as an additional tray, then there are two positions left for the grate: middle and top. If you cook in a mold that is placed on a wire rack, then the upper position will be available depending on the height of the mold.
The lower heating elements (heating elements) are straight - there are two of them, at the door and at the back wall. The top one is curved over the entire surface of the oven.
There is a skewer mount on the side walls. It consists of two asymmetrical parts: on the right wall there is a receiving hole, into which you need to get with the end of a skewer with a round top. On the left is a stand for the other end of the spit.
Instructions
If you do not want to use paper instructions, then there are PDF instructions especially for you on the company’s website.
The paper user manual is a very tiny, smaller than other devices we tested, horizontally oriented brochure, in which it is written in three languages (Russian, Ukrainian and Kazakh) how to operate the mini-oven correctly and safely.
The instructions turned out to be quite short, since a significant part of the information is presented in pictures: what the oven consists of and how to operate it, how to use the spit (and remove it using a handle), what additional accessories are included in the package.
The same picture with explanations gives a list of modes in which the mini-oven can operate.
The largest part of the instructions is occupied by standard safety precautions and technical specifications. And working with the mini-oven is described briefly, but at the same time clearly and comprehensively: we put in the food, set the mode, time and temperature, and wait for the end signal. Ready!
The appliance also comes with a cookbook, which contains dishes specifically for this mini-oven. This is a thick, horizontally oriented booklet on coated paper with good print quality and color rendition. The only thing missing is a bookmark system, like in an address book.
The first part of the cookbook, as usual with Redmond, consists of a description of the appliances that the company still produces.
Then the technical characteristics of our particular model are indicated, as well as all the accessories that come with it as standard. Then the chefs who work in the company described the main advantages of the oven from a professional point of view: flexible settings (two opinions), convection (one opinion) and grill mode (one opinion).
Several pages are occupied by such undoubtedly useful information as a table of calorie content of different foods. Recommendations for cooking boil down to pointing out the importance of accurately observing the weight and proportions of products in the recipe. Plus a few more useful tips on the actual preparation and selection of ingredients.
Finally we move on to the recipes. First, the table of contents: a list of all recipes with names of dishes, photographs and recipe numbers (without specifying the page). There are a total of one hundred recipes in the book, which are divided into the following sections: appetizers, baked dishes, grilled dishes, bread, pies and pies; sweet pastries and desserts.
Each recipe takes one page. It not only provides a beautiful photograph of the result, a list of ingredients and a description of the preparation, but also indicates whether additional utensils are needed for this dish. Also, each recipe is marked with standard notes about cooking time, the approximate number of servings from the described amount of ingredients and the degree of difficulty of preparation.
The recipes are quite varied, but all are quite applicable in the average kitchen. Nothing overly complicated from haute cuisine and, we would even say, a course has been taken towards the simplicity of preparing dishes from available ingredients. True, the variety of dishes on the spit is not very large - this can be written down as a minus, albeit an insignificant one.
All searchable recipes are available on the company’s website, where you can search for them both by name and by ingredients.
And, of course, the kit includes a warranty booklet.
Control
On the control panel of the mini-oven there are three mechanical rotating knobs with which you can set the mode, temperature and cooking time. The top one is responsible for the temperature: a choice from 90 to 230 degrees (less is possible, as practice has shown) in numbered increments of 30 degrees. Temperatures from 180 to 210 °C, for example, must be set approximately, dividing the scale between two values into three parts or six, depending on the required accuracy.
The middle handle selects the cooking mode: which heating element will be used - upper, lower or both at once - and whether convection or grill will be turned on. Or both at once. The meanings of the pictograms can be seen in the instructions, but, to be honest, they are already well remembered.
Except, perhaps, for the difference between the last two: the mode when both heating elements, grill and convection are turned on, and the top heating and grill mode. Note that the spit rotates only in these two modes.
The lower handle controls the time. The timer operates from 1 to 60 minutes, and the time from 1 minute to 10 minutes is set by turning to a higher value and then returning counterclockwise to the desired values.
If you turn this knob counterclockwise at once, you can set continuous cooking and regulate it according to an external timer. This is necessary if you have a large piece of meat that needs to be baked for four hours. Or for any similar cases.
If you need to turn off the mini-oven in the middle of the work process, use the same handle: you just need to turn it to the Off position. The appliance also turns off if it is operating during continuous cooking without a timer.
You cannot program several programs sequentially, press a button and go about your business: if the recipe requires cooking for 30 minutes at a temperature of 210 degrees with convection, and then another 40 at a temperature of 150 without convection and only with top heating, then you need to wait for the signal to complete the first stage , and then set the conditions for the next one.
In addition, there is no quite necessary option: displaying the temperature inside the mini-oven. In many recipes, the dish is supposed to be placed in an oven preheated to the desired temperature, and each time it is determined with an external thermometer when the oven is warmed up, it soon becomes tiresome.
At the very bottom of the panel there is a large red LED that shows whether the oven is on or not.
Exploitation
Turning on the mini-oven for the first time, we installed it on a dry, flat, horizontal surface away from cabinets and other closely located furniture elements, wiped it with a damp cloth and washed all components with water and detergent.
We waited for everything to dry completely and started it in run mode, as the manufacturer advises: at a temperature of 230 degrees (maximum), we turned on the operating mode of the upper and lower heating elements for 20 minutes. During this time, the protective coatings and lubricants burned away, introducing a romantic note of a man-made disaster into the kitchen... Actually, no: there was a slight smell of burnt lubricant, much more of heated metal. It's OK.
During operation, the mini-oven, of course, makes some noise, but it is not critical. While the oven is running, you can listen to music, talk or watch TV. Sounds are produced by the turned on convection (soft hum) and the timer (quiet clicks). When the oven operates without a timer and without convection, it is virtually silent. The rotation of the spit contributes to the operating sounds, but it is insignificant.
After some time, the mini-oven heats up from all sides. It does not have walls that are safe in this regard, so during operation you must carefully monitor children, pets and other unconscious elements that may touch or smell the stove body.
The top part of the mini-oven and the door heat up the most, then the back wall. But the side ones are relatively cold: nevertheless, you can also get burned on them.
The handle practically does not heat up, and it is quite safe to open the device until it has completely cooled down. But just in case, we still used hand protection (mittens).
Carefully! If the mini-oven is below eye level, then when removing a pot or mold - something for which there is no grip included - the upper edge of the door poses a danger to your hands. Use protective gloves or remove the entire rack and pan.
There is no need to turn food that is being cooked on the grill if the heat is on on both sides. But if you are using one-sided heating and think it would be nice to turn it over, use grill tongs.
If you open the door of the mini-oven during operation, it does not stop and does not stop running the set program (unlike microwave ovens). If you need to open the door frequently, increase the cooking time on the timer a little.
There is an internal backlight in the chamber: it is quite bright and works all the time while food is being prepared. Immediately after the bell, signaling the end of work, it turns off. There is nothing to force it to turn off or on.
At the end of the operation, the mini-oven emits one rather delicate bell, which is easy to miss. If a dish requires immediate removal immediately after stopping cooking, you need to monitor the state of the mechanical timer or install an additional electronic one.
In general, like any stove or oven, you just need to get used to the Redmond RO-5705. For example, adding a little time to heat the oven to operating power - we set aside 10 minutes to be sure, but in general, judging by the thermometer, after just seven minutes the oven was ready for use. It is worth leaving more space around the food if convection is turned on, since otherwise the hot air will not be able to freely flow over the food being prepared.
Care
The inner coating of the oven can be washed well from soot and carbon deposits if you do this regularly: at least twice every third time. Both internal and external surfaces, including heating elements, should be wiped with a damp cloth or sponge with a minimal amount of mild detergent.
However, due to the fact that the mini-oven has a fairly large chamber, the fat does not settle too much on the walls, and even if you skip washing a couple of times, this will not create problems.
The lower part of the mini-oven, which gets dirty the most from dripping juices, is additionally protected by a flat tray sheet, which can be removed and washed separately. The grooves in the sheet collect fat and juices, preventing a drop from spilling onto the bottom of the stove when cooking, but you need to be careful when removing it: here the flat sheet can drop some of what was spilled on it.
If necessary, this sheet can be placed above the heating elements to protect them from contamination.
The baking tray, sheet and rack can be washed in the dishwasher - on the most gentle setting.
Our measurements
In the oven, from the housewife’s point of view, the main thing is the ability to quickly heat up and maintain the stated temperature.
We set the timer for 15 minutes, selected the maximum temperature, and measured how quickly the oven reached a number of intermediate results important for recipes. For testing, we used the “heating from above and below, with convection” mode, the thermometer probe was placed on the grill in the middle position, and the door was kept closed. The results were tabulated.
| Time (min.) | Temperature (°C) | Consider warmed up for (°C) |
| 1 | 38 | |
| 2 | 63 | |
| 3 | 92 | 90 |
| 4 | 120 | 120 |
| 5 | 144 | 150 |
| 6 | 163 | |
| 7 | 179 | 180 |
| 8 | 192 | |
| 9 | 203 | |
| 10 | 212 | 210 |
| 11 | 215 | |
| 12 | 222 | 220 |
| 13 | 224 | |
| 14 | 226 | 230 |
As we can see, in the last 3 minutes the oven heated up very slowly and did not reach the maximum in a reasonable time. The same thing was noticed when cooking food at 180 °C: we did not achieve temperatures above 172-173 °C.
Thus, when preparing dishes that are critical to the exact temperature, it is worth considering that the mini-oven slightly lowers the temperature, and set its values accordingly. Or keep the dish in the oven longer.
As for electricity consumption, in 10 minutes in the “everything except the grill is on, maximum temperature” mode, the mini-oven consumed 0.233 kWh.
Practice tests
We tested the Redmond RO-5705 mini-oven for ease of use, uniform heating, grill, spit and convection operation. And also for operation in a mode that is not stated in the instructions - less than 90 °C. Let's start with that.
Drying apples
We check the operation of the mini-oven at a temperature below the minimum stated by the manufacturer. It’s good to do this in the drying mode, so you’ll have to cut kilograms of apples again.
We placed the apples cut into slices (with or without peel) on parchment, placed the sheets on the wire rack and on the tray and turned on the minimum temperature in the mode without a timer. After seven hours and 0.75 kWh of energy spent, we had a beautiful bowl of dried apples. True, some pieces could still be dried, but they did not find fault with the result.
To shorten the drying process, you can open the oven, taking advantage of the fact that the door is fixed in the open position (30 degree gap).
Conclusion: drying fruits, vegetables and herbs works best at night. And it would be nice to take another baking sheet or wire rack somewhere for better performance.
Result: good.
Impromptu stew: bake chicken with root vegetables in sour cream and cheese sauce
The same stew can be prepared in portions in pots, but if you have a deep form, then it makes sense to take it.
We put potatoes, carrots, and onions cut into thin slices in layers in a greased form. Medium-sized pieces of chicken fillet were placed on a vegetable bed and covered with another layer of potatoes. The top was generously brushed with sour cream, olive oil and dried herbs and sprinkled with grated cheese.
Notes:
- You can use any other meat, but then the cooking time must be changed.
- The composition of vegetables can also be changed according to time.
- Mushrooms (champignons or dried if there are no fresh forest ones) are perfect for this stew.
- You can salt each layer, or you can add salt through each layer.
- Any spices and herbs to taste are allowed (we used black pepper)
- There is no need to add water, there will be enough sauce as is.
For cooking, we set the temperature to 210 degrees, the time to about 33-35 minutes and the “heating from above and below, without convection” mode. Cover the pan with foil and place on a medium rack in a preheated oven. In fact, the cooking lasted half an hour or a little more, since we included the heating time into the total cooking time.
When the program worked and signaled us about this, we removed the foil from the pan with grill tongs, closed the oven and turned on the maximum temperature and heating on all sides with convection for three minutes - to brown the crust.
The juicy stew pleased us with its delicate taste and complete readiness of the ingredients.
Result: excellent.
Buzhenina
Of course, you can’t take a mini-oven for testing and not bake meat in it. We took a good piece of pork weighing one and a half kilograms, lean. They stuffed it with garlic and carrots. The recipe allows for variations with prunes, but we decided not to complicate it.
Then they coated the piece with a thick layer of marinade, consisting of honey and mustard in equal parts, as well as salt and pepper to taste, wrapped it very carefully in foil and left it to soak and rest for half an hour.
After the break, we preheated the oven to 230 degrees, using the mode with the top and bottom heaters running. Place a wire rack on the middle level and a baking tray on the bottom level. Place the future pork on the grill and cook for 20 minutes. Then they lowered the temperature to 180 degrees and baked for another hour and a half. After the timer rang, we left it in the oven until it cooled completely.
The result: tender juicy meat, evenly baked on all sides, and a lot of aromatic juice in foil.
In order to minimize the risk of it burning if it leaks, you can place potatoes, carrots or other vegetables on a baking sheet. If it leaks, it will be stewed in the sauce; if it doesn’t leak, it will simply be baked. The main thing is to get them out and change them in time so that they don’t burn out.
Result: excellent.
Baking: A Good Way to Test Even Heating
In case guests are already ringing the intercom, and there is nothing to serve for tea, the hostess may have a ready-made cake mix in stock. To check the uniformity of baking in the convection mode with top and bottom heating, we decided to prepare a cupcake - this type of dessert is most often not baked.
Pour the contents of the package into a bowl, add 160 ml of water and one hundred grams of soft butter according to the instructions. We kneaded a fairly thick, appetizing-colored dough and put a couple of handfuls of chopped prunes in it (raisins would also be nice).
While the dough was kneading for the last and decisive time, the oven, set to heat at 230 degrees in the “top heat, bottom heat and convection” mode, warmed up to approximately the calculated temperature (about 179 ° C - and it took 7 minutes).
We put the dough in a mold greased with butter, put a wire rack in the middle groove and placed the mold on it. After 40 minutes, we had a golden-brown, fragrant cake that was evenly baked, got a golden brown crust, and didn’t burn on the bottom. And its flesh was large-pore and not sticky, but not too dry.
We re-checked the heating uniformity using the same cake and puff pastry strudel. They are cooked at the same temperature for the same time - so we looked at how evenly a cake in a mold is heated and baked on a wire rack in the middle position and a strudel made from ready-made puff pastry with apples and raisins on a baking sheet placed in the lower grooves.
Note: there is only one deep baking tray included, and it is ribbed. Grilling is exactly what you need for cooking meat or vegetables, but for pies it is better to cover it with baking paper, otherwise removing the pie from the baking sheet will be problematic. But the baking sheet can be easily removed from the oven using a special grip (a smaller one, the so-called chapelnik). No need to frantically look for oven mitts and burn your hands. The main thing is to grab the baking sheet exactly in the middle.
In 40 minutes at 180°C, the cake was baked exactly as it should, but the strudel was a little dry. From this we concluded that the baking sheet below gets a little hotter.
Result: good.
Grilled chicken: testing the skewer
To check the operation of the grill and the spit at the same time, there is nothing better than good old rotisserie chicken.
This dish is also in the recipe book included with the mini-oven, but it suggests coating the chicken with mayonnaise. We couldn’t do this and made our own marinade - a fantasy.
In vegetable oil put dried (or fresh) herbs, red Turkish pepper (or ground black), salt, juice of half a lemon and a little mustard. Beat with a brush and let sit for 10 minutes. Then they coated a one and a half kilogram chicken carcass with the same brush and left it to lie for half an hour.
We placed the chicken on a spit, as indicated in the instructions, secured it with two forks and sent it to the oven for 60 minutes at a temperature of 220 degrees. Mode – “top heat + grill mode”. Let us remind you that the spit rotates only in those modes in which there is a grill.
After an hour, we coated the chicken with the remaining marinade, without removing it from the spit, and baked for another ten minutes. And under the chicken they placed a baking sheet with zucchini slices sprinkled with salt and Parmesan.
We got perfectly fried chicken and a quick, tasty side dish to go with it. True, we kept the zucchini under the grill for another ten minutes after we took out the chicken.
Result: excellent.
conclusions
Based on the testing results, we came to the conclusion that the Redmond RO-5705 mini-oven, even if it is inferior to a conventional oven in terms of volume, is not inferior in terms of the quantity and quality of the dishes prepared in it. This is a reliable and simple kitchen appliance that allows you to save space in the kitchen and eat healthy, tasty food.
And if someone doesn’t like baked food, there’s also a grill mode!
The variety of modes and ease of control will make this mini-oven a good option for a bachelor’s home or for a family that cooks small amounts of food in the oven. And after use, you can put it away in the pantry or on the closet.
pros
- large chamber volume
- comfortable, non-heating handle
- bright interior lighting
Minuses
- location of the cord at the bottom of the device
- very hot and unprotected walls
- no flat baking tray included
Selecting a mode for an electric oven
The maximum temperature of most electric ovens is 290 °C. Choose the operating mode based on the size and type of dish.
Top and bottom heating
This is the classic operating mode of an electric furnace. The upper and lower heating elements turn on simultaneously. The heat they generate creates a convection effect. The lower heating element is usually more powerful than the upper one. Hot air rises and cold air sinks. In this mode the following is prepared:
- savory baked goods;
- lasagna;
- fish;
- lean beef and poultry;
- stuffed vegetables.
The process occurs slowly, so the dish has time to bake evenly.
If you need to fry a dish from below, turn on only the lower heating element.
Top and bottom heating with convection
In this mode, heating elements work together with a convection fan located on the rear wall of the electric furnace. When it rotates, hot air is distributed faster inside the oven. Heat is applied to the dish more evenly, which allows it to bake better.
When cooking food using convection mode, reduce the indicated temperature by 30%. To maintain their juiciness, reduce the baking time. Use a fan for large dishes: cakes, casseroles, meat and fish rolls.
Characteristics
When purchasing any model, preference is given to it, for some reasons. The buyer selects a product so that it fits the formed requests. Therefore, each model has a number of characteristics that you need to consider when purchasing a stove for your home.
The first characteristic in terms of significance, and also in terms of clarity, is the volume of the chamber. According to volume indicators, it is customary to secretly distinguish between three types of stoves.
- Mini ovens with a volume of up to 15 liters are usually chosen by those consumers who already have a stationary oven.
- The average volume is considered to be in the range from 15 to 25 liters.
- Everything that exceeds the specified limit belongs to professional ovens.
Do not think that choosing the maximum volume will provide a solution to all problems. Firstly, due to its dimensions, the stove may not fit the chosen location. Secondly, larger ovens have more power, which means you will have to pay more each time you fire up the appliance.
The manufacturer, taking into account a number of factors, installs heating elements of a certain power. This happens consciously and expediently, which is why you cannot find electric furnaces with a volume of 9 liters and a power of 2 kW. Most potential buyers believe that the greater the power of the device, the better. This is not always the correct opinion.
If cooking a certain dish requires a set temperature and time, then increasing the power will lead to a violation of the recommended parameters. When cooking for one or two people in a mini oven, the excessive power reserve will simply remain unclaimed.
The simplest furnace models lack even a basic control interface. As additional functions are added, the capabilities of the device also change. Most housewives choose options that provide for changing operating modes.
Beautiful pastries
Smoothly adjusting the temperature of the heating element or turning it off and on allows you to efficiently implement even the most capricious recipes. The radiation from the top and bottom panels is ideal for roasting meat or fish. In this process, an important factor is high temperature, but acting evenly. The heat from the top panel alone will replace the grill and cope with flour products. The included bottom panel is suitable for heating ready meals.
Good to know: Heating and cooking brick stoves and their use in homes
To control functions, you definitely need a panel, and the more functions the device has, the more complex the control algorithm. A distinction is made between mechanical control based on a change in a certain parameter due to mechanical action on the element. In simple words, when you have to turn knobs, press buttons, move sliders. Electronic and touch control involves transmitting a control signal using a pulse. All tabletop ovens with such controls are priced higher than their analogue counterparts. They also do not shine with reliability, which is why mechanical models are still in demand as inexpensive, reliable and repairable devices.
An important characteristic that you need to familiarize yourself with before choosing a mini oven is the package of additional options. It can include any combination of functions for programmed heating of ready-made dishes, defrosting food, and boiling milk. The intelligent system itself sets the time and temperature conditions, depending on the mass entered by the user. Once the process is complete, a signal will sound and the oven will turn off automatically. Manual programming includes setting the temperature, time and number of heating elements. A modern mini electric tabletop oven allows you to remember the configured program in case of frequent use.
Another characteristic is the presence of electric burners on the horizontal surface of the body of certain stoves. This addition was invented in order to make the device more versatile. This oven with burners can cook two dishes at the same time. One is cooked in the oven, and the other on the burner.
How to use the grill
The grill is a tubular element that is placed on the top panel of the electric oven. It generates heat using infrared radiation. The grill does not heat the air, but the surface of the food. Use it at the final stage when you need to brown the crust of dishes.
Place food directly under the grill. Warm it up before starting work.
Safety requirements
Using an electric oven is not difficult, but it is important not to neglect safety.
Observe the following rules:
- do not use the oven without grounding;
- do not leave operating equipment unattended;
- do not cook in containers that are not intended for high temperatures;
- do not keep flammable objects and liquids nearby;
- Only process and wash the oven when it is de-energized.
Check the oven's power cord periodically. If there are wiring problems or malfunctions, do not use the device until the problem is resolved.