A meat grinder is one of the most basic and in-demand cooking tools. And despite the wide selection of household appliances today, even super-fashionable food processors or blenders have not been able to supplant this device.
And if literally 10-15 years ago every apartment had only a mechanical type of meat grinder, today almost every housewife has an improved electric model. How to properly assemble an electric meat grinder, and are there any nuances to the assembly process?
Types and features of designs
Thanks to the significant rise in the market of household appliances and modern appliances, the choice of meat grinders is quite wide, and allows everyone to choose the most suitable option for themselves in many respects. Theoretically, they can be divided into two types - electric and manual, that is, mechanical.
Thanks to the large number of attachments and knives, these devices are very multifunctional and convenient to use. With their help, you can not only twist minced meat, but also make many different dishes, for example, sausages or sausages, prepare freshly squeezed juice, vegetable puree, you can even make your own pasta (pasta).
Today, the electric type of meat grinder is very popular. Firstly, working with such a device does not require any physical effort. Secondly, it will take much less time to process food using such a device, because you just need to place the product in the meat receiver and press the start button. In just a few minutes, minced meat or any other product will be ready. And thirdly, unlike mechanical devices, this device has many different attachments.
However, there are also negative sides. And the first of them is the lack of control over the presence of bones in the meat. If manual meat grinders are not afraid of this problem, then in the case of their modern analogues, the device may simply deteriorate. The second disadvantage is that the entire cooking process is directly related to electrical power. Therefore, if the power is turned off or the motor in the device burns out, or some other part breaks down, then it will simply not be possible to prepare food using an electric meat grinder.
Unlike the manual type, when working with an electric meat grinder, it is possible to select the degree of minced meat grinding, thanks to different grinding speeds.
How does a meat grinder work?
A meat grinder is a universal device that will not be replaced by any new gadgets. With its help, not only excellent homogeneous minced meat is made, but also other dishes: the utensil is used for preparing homemade sausages and frankfurters, pates, various purees, original cookies and even pasta. A meat grinder replaces a juicer, blender, grater and other mechanisms, if you show your imagination and stock up on special attachments.
Many people are familiar with the mechanical design of a cast iron meat grinder from the times of the USSR. The device has undergone many modifications over time, becoming more aesthetic and functional, but the essence of its structure has hardly changed. Therefore, the rules for assembly and maintenance of the mechanical and electrical versions are almost identical.
What does a mechanical meat grinder consist of, all the details:
- A housing with a connector for introducing meat or other products (sometimes the meat receiver is inserted into the housing separately).
- Handle and screw - attached to the body to rotate the mechanism.
- The auger is a spiral-shaped element that is inserted into the housing and ensures the movement of products to the knives of the meat grinder.
- A knife is a four-blade or disk-shaped small element responsible for slicing.
- The grid is a round disc with holes, it can be regular or shaped and is needed to control the degree of grinding and the shape of the minced meat/dough that comes out.
- Round clamping piece for integrity of the entire structure.
Electronic versions are equipped with a drive and a special push-button control panel or on/off toggle switch. Pressing a button replaces the process of manually grinding food. Also, in modern small-format meat grinders, the body is made of special food-grade plastic.
The models are lighter and prettier, unlike the old ones, but otherwise they are identical. More powerful devices are usually closed with a steel case. In any case, due to the motor, such a device weighs more and is larger in size than the Soviet model. In principle, the versions work identically.
The advantage of mechanical models is independence from the network, a longer service life, but working manually with large volumes of products and veins is difficult. This is where the automatic analogue comes to the rescue.
Improved models of meat grinders from Redmond, Aksion, Polaris, Scarlet, Bosch, etc. also include additional elements for preparing homemade sausages and other dishes. These are conical nozzles on the body and special washers instead of a grid and four-bladed knives.
We recommend: 8 best ways to relax after work without alcohol or illegal substances
For sausages, racks with three or four holes of 12 mm in diameter are sold; for minced sausage, buy racks with 8 mm connectors. Pate lattices are the smallest, their diameter is 3 mm. The standard part of the kit has a hole diameter of 4-4.5 mm.
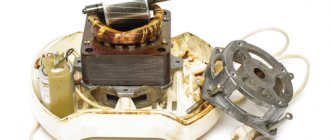
What does an electric meat grinder consist of?
The design of this type of kitchen appliance consists of durable plastic. And if in the case of a manual one, the entire body consists of metal, then in this case there are only individual metal elements. A motor is built into this body, which performs the main function. By pressing the start button, the device is activated and begins to work.
Another difference is the absence of a handle. There is simply no need for it here, since the machine performs the main function independently, from the operation of the engine. Almost all models have a removable meat receiver, which must be attached to the main body before starting work.
The kit usually includes a special pusher for the food being processed, with which it is convenient to move the food towards the knife. At the end of the screw there is a corrugated plastic rod that provides fixation. And thanks to the convexities on the knife, more gentle and high-quality chopping of meat occurs. This is one of the differences between the new model and the old one.
How to properly assemble an electric meat grinder?
If you have already encountered assembling a manual meat grinder, then assembling an electric product will not bring any difficulties. As a rule, the assembly process is described precisely and in detail in the instructions for a particular model, and depending on different manufacturers, some nuances may vary slightly.
Algorithm for assembling an electric meat grinder:
- The first step is to connect the gearbox housing to the metal housing of the auger. The end of the auger must be immersed in the plastic groove of the gearbox. Afterwards, you need to smoothly scroll it counterclockwise until you hear a characteristic click. If the parts are not connected tightly, the motor simply will not be able to turn the auger during operation.
- When inserting the auger, pay special attention to ensure that the protrusion clearly aligns with the hole on the body. Otherwise, the screw shaft simply may not work.
- It is necessary to put a blade and a grid on the other end of the auger, paying attention to the coincidence of the protrusions and holes. At this stage, it is important to place the knife blade on the correct side.
- Secure all parts with a clamping nut, as if using a manual meat grinder.
- Install the loading bowl, after which you can begin working directly with the device.
According to the principle of operation, a manual and electric meat grinder are almost identical. And if you have experience in mechanical assembly, then the modern version of this technique will not cause problems at all.
Assembling the device: stages
If the instructions for your old mechanical meat grinder were lost, don’t worry. Even after examining all the parts, it is easy to guess what is attached to what and how it works. Check out these step-by-step instructions to make sure your conclusions are correct.
How to properly assemble a mechanical Soviet meat grinder:
- Insert the screw part into the body so that the cone for fastening is in front, and the place for attaching the handle is in the back.
- Examine the knife. It is important to install this part with the correct side facing the grille - flat. For glide, the knife is polished to a shine. It is the incorrect installation of the knife that is the most common assembly problem. If the food is not cut well, you will have to disassemble the device and reinstall the knife.
- In the protrusion on the main body there is a slot for installing a grille. This part has a special groove. Screw the grill so that it fits tightly next to the cutting element.
- Now close everything with the clamping device and connect the handle to rotate the mechanism.
- To prevent a mechanical meat grinder from sliding on the table, secure its body with a special clamp, which is built directly into the body. You can additionally place a piece of fabric or newspaper under the foot.
- Done, now place the food in the meat receiver and turn the handle to chop it. On the way out, place a plate to collect the minced meat.
In post-Soviet mechanical meat grinders, not only clamps were made, but also vacuum fastenings to the table - the surface under them must be smooth, clean and dry. But if the rubber suction cup has lost its elasticity, it will not be possible to fix the device in any way. Another nuance is the plastic bushing, which replaced the thickening on the rear of Soviet augers.
It is needed to improve the sliding of the auger along the housing seat. This sleeve is put on first, then only the spiral part is placed into the device. The oil seal usually has a protrusion that should align with a groove on the housing.
The assembly of an electric meat grinder is carried out in the same order as a mechanical one. Some differences:
- The screw part is connected to the electrical part. Insert it into the connector and turn it counterclockwise until it clicks (for Moulinex and Bosch models). If the auger shaft is not seated tightly, the motor will not be able to turn it.
- The set includes special trays for loading products. They are convenient for dipping large quantities of ingredients at once. Simply insert the element into the socket of the main body before starting work.
Advice: To keep the body of a cheap electric meat grinder stable, place thick fabrics underneath it during operation.
If the mechanism is assembled incorrectly, the products will not be ground, but will come out back through the meat receiver. The models are accompanied by an assembly diagram indicating all the details. Study it, as some meat grinders may have their own characteristics.
We recommend: How and with what can you quickly wash off Finalgon from the skin and mucous membranes?
How to disassemble and clean a meat grinder?
After each use, it is important to completely disassemble and clean the household appliance to avoid food drying out and the proliferation of bacteria and pathogenic microorganisms. This can lead not only to a number of diseases, but also to the unsuitability of equipment. Washing the assembled device is not permitted!
It is simply impossible to completely clean a mechanical meat grinder when assembled, and in the case of an electric one, a short circuit and fire may occur.
Algorithm for disassembling an electric meat grinder:
- In the case of a removable meat receiver, the first step is to get rid of this particular part by pulling it out of the neck.
- Next, you need to turn the clamping nut, carefully holding all the contents.
- Take out the grate and knife blade.
- Remove the auger from the body of the electric meat grinder.
After disassembling the device, you must thoroughly rinse all parts with detergent and running water, and the grille can be cleaned with a match or toothpick. After washing the parts, it is recommended to place them on a napkin or spreader, leaving them to dry completely.
The electric meat grinder and all its parts must be stored in a dry place. Otherwise, fungus and rust may form, which will render the device unusable.
It is not recommended to wash knives with hot water, as this reduces their sharpness, rendering the device inoperable. And the body of the meat grinder, into which the motor is built, can be simply wiped with a damp cloth or cloth. It is forbidden to lower the housing under running water, as this will render the meat grinder unusable and may subsequently cause a fire, electric shock or short circuit.
How to disassemble a meat grinder for cleaning after use
After use, the household appliance must be cleaned. To wash all the parts, the meat grinder should be disassembled. It is strictly forbidden to wash it when folded! You will not be able to remove food residues from a mechanical meat grinder, and wet cleaning of assembled electrical equipment may result in an electrical short.
- Disconnect the meat receiver, if the design provides for it.
- Unscrew the clamping nut with a smooth movement. It is better to hold it gently with your hands, as the remaining meat will fall out.
- Remove the knife and ring.
- Unscrew the screw and remove the handle if it is a mechanical model of the meat grinder.
- Pull the auger out of the housing.
- Wash all elements with warm water and leave them to dry completely.
Advice! It is not advisable to wash knives with hot water. This reduces their severity. Discs can be effectively cleaned of minced meat with ordinary toothpicks or matches. The body of the electric meat grinder should be wiped with a damp cloth.
After several times, you will be able to fold the meat grinder in a couple of seconds, since this process will become automatic. But at first, it is better to keep the instructions for the household appliance at hand. The principle of assembling the meat grinder and attaching additional elements must be indicated there. If you still can’t assemble the device, you will definitely find some help pictures there.
Installation of additional components
Most modern meat grinders come with additional knives, grates with various holes and attachments for preparing sausages or kebbe. If it is necessary to use them, the order of assembling the meat grinder may vary, which is also usually specified in detail in the instructions for the device from the manufacturer.
In this case, you should adhere to the following algorithm for assembling an electric meat grinder:
- installation in the middle of the auger body;
- attaching a ring with the largest holes to the auger (their number may vary depending on the meat grinder model and manufacturer);
- installation of a double-sided knife;
- installation of a grille with medium-sized holes;
- fastening the remaining knife;
- installation of the last grate;
- securing the clamp nut.
In the case of preparing sausages, instead of knives and grates, you will need to attach a special attachment to the auger, which is secured with a clamping nut. And for the purpose of making cookies or pasta, you can use metal or plastic shaped rings.
Often, such household appliances include a nozzle for juice and pasta. Usually they are already assembled and you just need to attach them to the main body of the meat grinder.
When assembling an electric meat grinder, it is better to follow the factory instructions from the manufacturer. If a household appliance malfunctions, it is recommended to contact a service center for diagnostics and repair if necessary.