The presence of a juicer on the farm will sooner or later confront the owner with the need for repairs. The relatively simple design does not always require the intervention of a specialist and allows you to repair the juicer yourself. The main thing is to have an understanding of the structure of such devices and have some experience working with electrical appliances.
Design
The nuances of the device depend on the operating principle of household spinning appliances. Most of them relate to:
- centrifugal,
- screw,
- intended for processing citrus fruits.
Centrifugal models are driven by an electric motor. Their screw analogues and options for citrus fruits can be made with manual or electric drive. Manual mechanisms are much easier to repair; electrical appliances cause more difficulties, especially when there are engine problems.
Possible faults
The most reliable branded juicers can suffer and stop functioning properly due to:
- neglect of operating rules;
- mechanical damage;
- wear of structural elements;
- voltage drops in the network.
Among the operating rules that are most often violated by users, the following prevail:
- an attempt to process products that do not meet their intended purpose;
- exceeding the loading volume for one processing;
- excessive load on the working mechanism;
- improper care after use.
All malfunctions can be divided into breakdowns that can be eliminated by simple repairs yourself and malfunctions that require the involvement of a specialist to eliminate. The first includes breakdowns as a result of mechanical damage and wear, which can be eliminated by simply replacing parts. The latter are associated with engine damage.
Trouble-shooting
If the device fails during operation, before eliminating the failure, you must disconnect it from the network and wait until it stops completely. Common malfunctions include:
- lack of response to connecting to the network;
- hum in the engine compartment and lack of shaft rotation;
- extraneous vibrations.
| the device does not turn on | Check the switch, power wire, motor windings |
| Engine noises and lack of rotation | Loosen the stator fastening and check its condition |
| vibration | Check the fastening of structural elements (filter, bowl, other removable elements) |
Frequent and intense dynamic loads can accelerate the wear of structural parts and cause mechanical damage. In this case, after disassembling the structure, it is necessary to install the failed part and replace it.
Usually this:
- oil seals,
- gears,
- bearings,
- nozzles,
- net.
Malfunctions and their elimination
There are basic malfunctions of any type of juicer:
- If the device does not turn on, then most likely there are problems with the integrity and serviceability of the cord, switch or motor winding.
- If the shaft does not rotate and the engine hums, you should loosen and secure the starter pack ties. You also need to check the bearings and add grease to them if necessary.
- If the juicer vibrates strongly, check the reliability of fastening of the grating disk and basket on the platform shaft, as well as the assembly of parts.
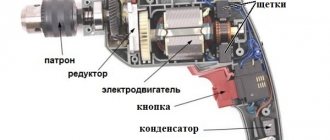
The engine is the basis of the juicer. There are asynchronous and commutator electric motors. Often repairs are associated precisely with a failed motor. Any type of engine is equipped with impellers, which are used to blow the stator coil. If during a breakdown it is discovered that these parts are missing, then you can buy them and install them yourself.
In addition, the performance of the electric motor can be increased. A juicer often has multiple speeds.
Juicers often do not have a starting winding, but use a coil-dividing circuit. In order for the motor protection to work, it must fully comply with the installed relay.
A large assortment of juicers allows you to choose a convenient, high-quality model that will last a long time and if it breaks, it will not happen soon.
In order to find out the cause of the malfunction and subsequently eliminate it, it is necessary to disconnect the device from the electrical network. Then the windings are called. Next, the coil is wound onto the stator again. It should be noted that the rotor will not burn out, since the current that passes through it is quite small. The mechanism of any type of juicer is so simple that only the seals, bearings and gears are subject to damage.
The question of whether a juicer can be made with one’s own hands is primarily of interest to owners of summer cottages and garden plots who annually harvest fruits and berries, which need to be quickly processed and preserved. Adding even more relevance to this issue is the fact that juices obtained independently are much tastier and healthier than those sold in stores.
Today, purchasing a juicer of any capacity does not present any particular problems, but such equipment is not cheap. That is why it is advisable to make a juice press with your own hands, especially since the design of such devices is not very complex.
Drive repair
Replacing such parts is relatively easy. More serious problems include drive failure. To fix it you will need:
- remove the engine from the housing;
- conduct an external inspection;
- ring the windings.
If external parts fail, they are replaced. Most of them can be selected and reinstalled yourself. Problems with the winding will require it to be updated.
If operating rules are followed, engine failure is a relatively rare occurrence. Their occurrence may require serious intervention, which is not always justified from an economic point of view. In such cases, the best way out of the situation is to take your device to a service center and/or consult with specialists.
But in any case, to find out the causes of the malfunction and perform repairs yourself, you will need to dismantle the structure.
DIY juicer repair (video)
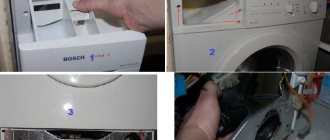
Whether it’s spring, summer, autumn or winter, the body will always need juice. And it doesn’t matter what kind of juicer you have: Bosch or Scarlett, Philips or Mulinex, the main thing is to understand the basic principles of assembling/disassembling this device. To, if necessary, replace a failed element. Let your juicer serve you long and productively. Make yourself and your loved ones happy every day.
The Polish company Zelmer has long been known in the market for its quality and wide selection of models. Juicers of this brand are reliable and have a long service life.
This company has been given international awards more than once and has been awarded the European Quality Mark. How to choose the right juicer model for you? Let's figure it out.
Citrus juicers come in single-speed and two-speed types.
Single-speed devices are the cheapest and easiest to use. A striking example is the Zelmer 377 juicer. They have a power of 85-250 W, and the kit does not include a container for the finished juice. Additional features include overheating shutdown and accidental activation protection.
Two-speed devices for soft fruits, berries and vegetables, have a power of up to 400 W. Among the additional functions, there is an automatic Turbo mode, which cleans the strainer from pulp.
Another model from the same series, Zelmer 486, has speed level protection and does not turn on if the lid is not tightly closed. Most of these juicers can easily be turned into a blender or coffee grinder.
Universal models have a power of up to 800 W, a two-speed mode and a Turbo option for cleaning the filter and foam separator. A good example is Zelmer 496. The advantage of such models is that the process is completely automatic. You don't even need to peel fruits and vegetables - they can be loaded inside the juicer directly with their skins on. The speed of such devices is the fastest - a liter per minute.
Disassembly
This procedure should be performed regularly after each use to remove residual cake and pulp and rinse the device. Regardless of the design features, dismantling for maintenance is usually straightforward and relatively quick. To disassemble the rotor apparatus you must:
- remove the pusher from the loading hole;
- unlock the mount;
- remove the chopper cover;
- remove the basket with the grater from the pulley and remove it from the housing;
- remove the spin tank.
A vertical squeezer with an auger is disassembled in a similar way. To dismantle its horizontal analogue, you will need to disconnect the assembly with the spin mechanism from the housing with the motor, then remove:
- feed tray;
- juice and pulp dispenser;
- auger or augers.
After dismantling, you can proceed to servicing or repairing the device by replacing the corresponding elements.
Features of disassembling centrifugal and screw devices
Using the method described above, you can disassemble centrifuge juicers from any manufacturer. There may be nuances in the design, but they do not fundamentally affect the dismantling procedure. This procedure is performed in a similar way with vertical screw analogues. The difference is that instead of a grater there is a volumetric auger in a protective casing. Horizontal screw devices resemble a meat grinder in design. Their dismantling is carried out:
- removing the installed nozzle;
- disconnecting the receiving device with the auger from the main body;
- removing the auger itself;
- In most cases, the drive is also accessible from below.
The described installation/disassembly options are not a guide to action and are for informational purposes only. Each specific model of the device is disassembled in accordance with the manual included with the device, which will avoid accidental breakdowns.
D. Lepaev
Drinking a glass of fruit or vegetable juice is pleasant at any time of the year. but preparing it using a grater and then squeezing it out is not so easy. A considerable investment of effort and time is required. And an electric juicer handles this task almost instantly.
This compact device is easy to use and consumes negligible electricity. An hour of continuous operation of a juicer costs a few pennies.
Electric juicers are designed to extract juice from fresh fruits and vegetables by grinding the product and centrifuging. In addition, they are used for chopping and cutting fruits and vegetables into slices.
The following classification of electric juicers has been adopted in Russia (Table 1).
Electric juicers, depending on the additional operations performed and structural elements, are manufactured in four degrees of comfort (highest, first, second, third). Comfort elements include the following: devices for grating raw vegetables, chopping and cutting vegetables, mixing liquids, chopping vegetables and fruits; electric brake; device for storing the connecting cord; speed controller; additional filter for better juice purification. Juicers have a permanent connecting cord 1.5 m long. The sound level for a device of the highest quality category should be no more than 72 dBA and for a device of the first quality category - no more than 74 dBA.
Technical characteristics of domestic electric juicers are given in table. 2.
Electric juicer “Juice”
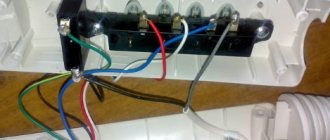
type SVMR consists of an electric drive housing 1 (Fig. 1), in which an asynchronous electric motor 2 is secured with four screws. A platform 8 is mounted and secured with fonts on the electric motor shaft, on which a mesh
basket 4 and a grating disk 5 are installed and fixed using a plastic nut. plastic perforated tape 7 is placed on the mesh basket along its walls. The housing 3 of the juicer is installed on the housing 1 of the electric drive. To fix it on the electric drive housing there is a special protrusion. The juicer body is closed with a lid 6, which has a loading window for storing products. The lid is latched using a carrying handle set to a vertical position. Using switch 9, the electric motor rotates the mesh basket and the grating disk.
Products loaded through the loading window are fed by a pusher to the knives of the grating disc. The crushed products are thrown onto the walls of the basket under the influence of centrifugal force. The juice enters tray 3 through the holes in the belt and basket and flows into the prepared dishes.
When preparing the juicer for operation, it is necessary to install housing 3 so that the flats on the holes of the basket and disk coincide with the flats on the platform shaft. The grating disc and mesh basket are secured with a nut.
Disassembling the juicer
comes down to disassembling the electric drive.
To do this, place the drive on the table, unscrew the four screws securing the bottom and remove it. Place a support under the output shaft of the drive (so as not to bend the shaft) and, using a bit or tube, knock out the pin securing the platform hub 8 to the shaft. Remove the platform. Unscrew the screw of the clamp securing the power cord to the drive housing. Remove the two screws securing the switch. Remove the four screws securing the electric motor to the housing. Remove the electric motor from the housing along with the switch and cord. To disassemble the engine, unscrew the four nuts that secure the front shield, stator package and rear shield using studs. Disconnect the switch and connecting cord. Replace the faulty part or assembly. Reassemble in reverse order. While doing this, lubricate the bearings by placing a few drops of mineral oil into each bearing.
If the juicer does not turn on, check the serviceability of the cord, switch, and electric motor windings. If the electric motor hums, but the shaft does not rotate, check to see if the rotor is stuck. If necessary, ensure free rotation of the rotor by loosening the tie of the stator package and then securing it. Check the condition of the bearings and add grease. If there is strong vibration, check the quality of assembly of all parts, as well as the reliability of fastening the grating disk and basket to the platform shaft.
Electric squeezer “Zhuravushka-2” SVSP-301.
The juice is obtained by grinding the product with a grating disk and centrifugation.
The pulp is periodically removed by bringing the blades of the ejector mechanism to the inner surface of the rotating centrifuge. The electric juicer consists of an electric motor 25 (Fig. 2), a sieve 3 for centrifugal filtration, housings 13 and 16 with a loading hopper, a fan 18, a grating disk 2, a tray 5 and an ejector 12.
Engine dismantling
Removing it from the case is a more complicated procedure. It is performed less frequently and is associated with the need for complex repairs. Typically the drive bay is accessed from below. To extract it you need:
- remove the cover by first unscrewing the screws;
- if there is a protective casing, unlock the fastening and remove it from the housing;
- remove the engine itself.
The design diversity of models from different manufacturers does not allow us to formulate a universal disassembly/assembly scheme for the device. The best way to avoid errors and damage to the device is to follow the instructions.
How to disassemble a juicer +
Lovers of freshly squeezed juice and happy owners of devices for squeezing it inevitably face the problem of how to disassemble their favorite juicer without fatal consequences for its functionality. There are many such household appliances available in the market under different brands.
They can be made in four options:
- centrifugal type,
- with screw extraction,
- combined,
- devices for citrus fruits.
Reasons for disassembly
Regardless of the model, device, brand and quality of workmanship, they all require regular maintenance. During the extraction process, pulp and juice residues accumulate inside the machine, which must be removed after each use.
Delaying this may negatively affect the functionality of the device and lead to its premature failure. Despite the reliable design of most branded devices, they can fail. Depending on the nature of the breakdown, the repair can be complex, requiring special knowledge and the participation of an expert, or simple.
In the latter case, you can do it yourself, which will require dismantling the structural elements of the juicer.
Device
To disassemble/assemble the device, you must have at least a general understanding of its design. Spin devices can have different designs and design features. But in general terms their structure is approximately the same. Each juicer is equipped with:
- housing for mounting structural elements;
- a metal (less often made of plastic) basket with a grater, where the product is crushed;
- container for accumulating cake;
- removable tank for collecting juice;
- a lid with a hopper for loading vegetables or fruits;
- pusher;
- motor unit with power cable;
- control unit with switch.
Instructions
A condition for proper operation and disassembly/assembly of the unit is to carefully read the instructions.
Our traditional neglect of this document and the desire to solve problems using the “scientific poke” method often becomes the cause of unforeseen defects and failure of the device.
Such a document, translated into the consumer’s language, is included in the kit of any device from a more or less well-known manufacturer. It usually includes a description:
- a device with a schematic or photographic demonstration of each element;
- rules of use indicating measures for safe operation;
- procedure for preparing for use;
- the sequence of dismantling structural elements and their reassembly;
- features of functioning.
General disassembly rules
Before disassembling the device, make sure to turn off the power. This is not only moving the switch to the “Off” position, but also removing the power cord from the network.
The statement is banal, but relevant, given the potential danger of the device and the forgetfulness of some housewives. You should begin dismantling the device for maintenance only after the mechanism has completely stopped.
In the most general form, regardless of the model, the disassembly sequence can be as follows:
- removing the pusher from the loading hopper;
- removing the cover, with preliminary detachment of the fastening;
- removing the chopper;
- dismantling the container for collecting juice.
The removed elements should be washed, dried and returned to their place in the reverse order.
Engine access
Most serious malfunctions are associated with engine failure. Before repairing it, you should correctly assess your strength and experience. If there is none, it is better to use the services of professionals. Before dismantling the engine, you need to make sure that the problem is really related to the drive. To do this you need to check:
- presence of voltage in the network,
- the power cord is in good condition,
- plug.
If there is still a need for complex repairs, you will need to perform the disassembly described above, plus remove the pulley, which most often twists from the shaft in the direction opposite to the operating rotation. Access to the engine compartment is from below. To do this you need:
- unscrew the fastening screws of the protective cover of the engine compartment;
- if the engine is placed in a protective casing, it must be removed;
- remove the engine mount and pull it out;
- conduct a visual inspection, determine the nature of the malfunction and begin eliminating it.
Manual
The manual is a required part of the kit. In most cases, such documents are translated into the language of the consumer's country. The instructions should include sections:
- a general description of the device and its detailed diagram;
- operating rules and list of safety measures;
- preparation for use;
- disassembling and assembling the device.
If your own experience and the contents of the instructions were not enough to understand the design in detail and troubleshooting is an impossible task, it is better to contact a specialist.