Differences in dishwasher models
One of the most common differences between dishwashing machine models is the banal name of the buttons.
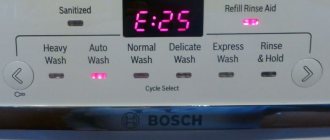
For example, Power SCRUB PLUS or REGULAR WASH may be called WASH or ECO depending on the dishwasher model as well as the country in which you are located. Another important difference is the presence of a display that can display error codes or its absence. In this case, the program indicator button lights up to tell you there is a problem.
As a reminder, model numbers are usually found on the top or lip of the door.
See also -
Aquastop system in dishwasher hoses to protect against leaks
Design and principles of operation
We continue our conversation about Bosch repairs. There is very little information about this written on the Internet. As we know, in the design of any dishwasher
available:
- module control board for all washing processes - water intake and drainage hoses - inlet valve - washing pump - water sprayers (rocker arms) - flow-through heating element (heating element) - various sensors (water level, contamination, water flow) - drain pump
So, in the design of the Bosch dishwasher circuit, everything is implemented at a high level. Various technologies and innovations protect against voltage surges, save electricity and water. Undoubtedly, this creates some difficulties when repairing units.
Knowing the features of devices is the key to success in troubleshooting.
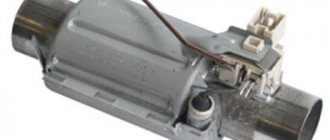
1. Protection in the water intake system - aquastop:
It is located at the end of the inlet hose and is screwed with a 3/4 inch nut to the pipe or faucet. The aquastop system is not tricky:
A - Solenoid valve, C - inlet hose B - control cable D - Leaks (water hoses)
The valve consists of two solenoid valves (A) in series, a filler and safety valves. These valves are actuated in parallel. At the water inlet there are two filters per screw connection for the tap. Below the filters is a flow limiter. Safety functions can be activated via a sensor or via a sump float.
2.Water flow sensor:
Integrated into the water supply system and records the volume of incoming water.
Consists of a housing, a fan impeller with a permanent magnet and a printed circuit board with a reed switch. Water sets the fan impeller in motion. A magnet attached to the fan impeller drives the reed switch 2 times to the (North/South/North) position. The generated pulses are counted by the electronics of the control module.
3.Water temperature sensor:
Used temperatures, safety relay (>85 C) in combination with NTC sensor. If a malfunction occurs, the heater switches off to heat water at a temperature of 85 C (operates in switching mode).
4.Water softening and regeneration system:
The regeneration valve is located at the inlet of the water softener. A container (ion exchanger) is a container that is filled with fine-grained synthetic salt. Due to its property, it replaces calcium and magnesium ions in water with sodium ions.
5.Dispenser device:
An optical sensor assists in opening the dispenser lid and dispensing detergent or tablets. It consists of a transmitter and a diode receiver.
The light beam is transmitted from the transmitter LED (A) to the receiver diode (B) through a prism (C). If the dispenser is full, the light of the beam is scattered in the prism. The received signal is weaker than the transmitted one and the control module recognizes that water has arrived. If the distributor is empty, the light beam is reflected in the prism.
Next, the mechanism for opening the dispenser lid is activated.
6.Water level sensor with protection function:
A - maximum water level (overflow) B - Safe water level C - connector to the pump E - water supply pipe from the softening system D - input signal to module F - - -
The drain pump is switched on via the safety level sensor (A). Water continues to drain until the level sensor (A) returns to its original position. In case of any leakage in the hose, the water supply is supplied to the board through the water leakage from the hose. When the overflow mechanism is triggered, the processor gives a command to drain the water.
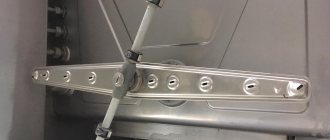
7.Water spray device in the washing chamber:
The rotor spray system consists of three levels of rocker arm, lower spray (E), upper spray (F) and shower roof (A). Water is supplied to the top spray (F) and shower roof (A) through the supply pipe (C) and is fixed inside the washing chamber on the rear panel.
Pressure pumping and spraying are shown in the figure.
8.SGS model (click to enlarge):
When repairing an electronic module, we inspect the control triacs and their circuits. Often, by replacing these elements, performance is restored.
- Diagnostics of Bosch dishwashers
- DIY dishwasher repair articles
Starting a test cycle
Bosch dishwashers have a test mode that can be run as a troubleshooting measure. The method to run this test process is similar across the Bosch range, so if your machine's functions seem to differ from those described below, it's worth experimenting as the process is similar with only minor differences.
To start the test mode, hold down the POWER SCRUB PLUS and REGULAR WASH buttons. Holding down the ON/OFF button may also help. The indicator above them should blink.
You can now check the status of each program by clicking a button, or you can run a full testing period.
Press the Power SCRUB PLUS and REGULAR WASH buttons. The electronic device will start and when the selected mode has ended, if you do not have a display, the indicator on your dishwasher model will light up if a fault has been detected.
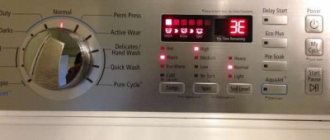
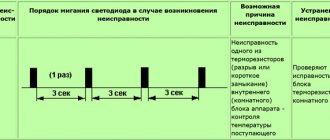
Meaning of fault indicators
CLEAN
Temperature sensor malfunction. If this is the case, the test cycle will be very short as the instrument will stop testing as soon as this is detected.
RINSE/DRY
Water/tank fill sensor. If this problem occurs, the test cycle will not be completed due to the fact that the dishwasher cannot determine the correct water level simply by filling/draining over and over again.
WASH
Heating fault. Check the heating element.
Meanings of error codes on the display
If your Bosch dishwasher has a display panel, after completing the test cycle, an error code will be displayed if a fault is detected.
Error codes are interpreted as follows:
0 – no errors were detected.
1 – Water sensor or filling fault.
2 – Heating fault.
4 – Water filling error. This may also appear as an F on the display during a normal cycle.
8 – Temperature sensor malfunction.
When troubleshooting a Bosch dishwasher, performing the test cycle above is a good start in diagnosing the problem. The result will give you an idea of where the problem lies and what repairs will be needed to fix the problem.
Electrical fault messages
Modern models of Bosch dishwashers are equipped with sensors, electromagnetic shut-off and control valves, microswitches, and pumps. Signals are exchanged between them and the control board via wires, connecting parts, and contacts. The slightest damage in the electrical circuit leads to error messages.
E01; E30 signals damage to electronics or electrical circuits. The easiest way to restart the dishwasher is to use the on/off button. In case of a simple program failure, the messages disappear from the screen. The dishwashing process can be resumed. If the reboot does not give a positive result, you should call a service center specialist to your home. He will carry out diagnostics using special devices, identify faults, and begin to eliminate them.
Code E27 appears on the displays of Bosch dishwashers as a result of a power surge. To protect your device from short circuits, you need to acquire a stabilizing device.
Basic troubleshooting
If something goes wrong when starting a wash cycle on your Bosch dishwasher and it doesn't work, stay calm. This could be a minor issue, especially if you just installed it.
Power check
Make sure the power cord is connected correctly and the switch does not trip.
Airing the hose
After this, check whether the hose is airy, especially if it was not purged before installation, it may have air bubbles inside, which retains water.
To do this, disconnect the water supply hose from the dishwasher and run some water through it before reinstalling the hose.
The wash cycle is interrupted
The Bosch dishwasher does not fill with water if the previous cycle was interrupted. Reset your dishwasher by pressing and holding the “Start” button for at least three seconds.
Depending on the model, you can also press the “Cancel-Reset” button to reset. Select a new cycle and click “Start”.
Water supply
Check the water supply hose under the sink. If it is turned off or blocked for any reason, the dishwasher will generate a program error and will not be able to fill the tank with water, even if the water supply returns within a few seconds.
Filter hose
Most Bosch dishwashers have a small filter inside the hose to prevent foreign particles from the water supply from entering the dishwasher.
Disconnect the hose and remove the filter inside. Then clean it thoroughly to remove foreign elements and reinstall it.
Water pressure
Make sure you have enough water pressure to start the dishwasher and operate the pump.
To test, take a 4 liter container and turn the tap to maximum to fill it. If you have enough water pressure to run the dishwasher, the container should fill within 30 seconds.
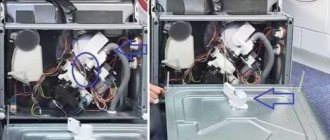
Fill valve problem
Inside the bottom of the dishwasher, on the back of the panel, there is a water inlet fill valve that operates using electricity.
Unplug the power cord from the outlet or turn off the power to the device using the machine. Remove the panel by unscrewing the two screws on both sides.
Remove the screws that hold the front door panel inside the dishwasher; Pull the door panel down and set it aside.
Close the door to access the water inlet valve. The fill valve has two wires that connect it to the block circuit. Check to make sure they are securely fastened.
Also check the valve for damage or leaks. If it is damaged, buy a new one using your dishwasher model number and replace it; otherwise, contact an appliance repair specialist to do it for you.
Basic faults
Doesn't turn on
- Faulty wires, plugs, sockets. Damage to the dishwasher wires or plug may cause the dishwasher to shut down or short out. If kinks, breaks or breakage of the fork is detected, they need to be replaced, which you can do yourself or call a specialist. In order to make sure that the outlet is working properly, you need to plug in another device: an iron or a kettle.
- Malfunction of the surge protector located inside the housing. Damage or burning of the contacts in the surge protector leads to the dishwasher turning off, the housing receives an electric current, the plugs “fly out” and the RCD turns off. The element can only be replaced as a whole, it cannot be repaired.
- The buttons on the control panel are broken, do not press, dangle or sink when pressed. It is necessary to disassemble the front panel of the dishwasher and check the bolts and latches on the back side. If the fasteners break and the pushers fly out, the buttons must be replaced or the control module must be reflashed. Repairs cannot be carried out without calling a specialist.
- The control module is faulty - the LEDs do not light up and there is no indication, there is no response to pressing buttons. Most often you have to replace the assembled module; repairing electrical boards is usually not economically feasible, but you can try.
- There is no switching on due to chafing of the wires in the housing. Damage to the wiring inside the dishwasher can cause not only a failure to turn on, but also a short circuit. It is difficult to fix the problem yourself, since the entire equipment must be disassembled.
Does not heat or overheats
- The heating element has burnt out. To check or repair the heating element, you need to turn the device over, remove the back wall and visually check the heating element, having first removed it. We recommend ringing the heating element using a tester. You can replace the element yourself, since it is considered a consumable item.
- The power contacts on the control board are burnt. If the contacts are faulty, the on-board computer of the dishwasher does not transmit the command to heat the water. Sometimes mechanical cleaning of the contacts is enough to restore functionality.
- Problems with the thermostat or temperature sensor. For diagnostics, the disconnected and freed from the baskets PMM is disassembled, dismantling the lower sprinkler and debris filter. The equipment is installed upside down, the side fastenings are removed and the drain pipe is disconnected. When the bottom of the car is raised, the thermostat will be accessible, which is disconnected from the wires. You can test the thermostat and try cleaning the contacts. If the tester shows a breakdown of the temperature sensor, it is replaced. If possible, additionally check the wiring leading to the thermostat.
- If the water overheats, the control unit or temperature sensor is faulty.
Doesn't drain water
- The garbage filter is clogged. Residues from the dishes gradually collect in the filter cavity, preventing normal water circulation. To normalize operation, it is necessary to clean the filter. You can do this yourself.
- The drain pump is jammed or burned out. A characteristic sign is silence when the wash cycle ends and the water starts draining. The part is practically beyond repair and requires replacement entirely.
- If there is the sound of an electric motor running, but the fluid is standing still, large debris has entered the snail pipe. We disassemble and mechanically clean.
Water is not pouring
- Overfill protection is activated. When the dishwasher is empty, the overflow protection sensor may activate, which turns on the drain pump to protect against flooding. It is necessary to disconnect the PMM from the power and water supply, drain the water from the pan and clean the drain filter, dry the dishwasher with a hairdryer or leave it open for several hours. If the problem repeats, you need to call a technician - there may be a malfunction of the pump or pan.
- The inlet valve burned out - a small electromagnetic element that controls the flow of fluid. It burns out due to wear, voltage surges or clogging. Contact in cable connections between parts may also be lost. In this case, it is necessary to call a technician and replace the inlet valve.
Doesn't wash well
One of the most common problems when dishwashers break down is clogged impeller nozzles, or spray arms. If they become heavily clogged, the pressure of the flushing jets is not enough to maintain rotation and the mechanism stops.
The dishes remain dirty on one side. The spray arms are easily removed and washed with a stream of water. More details here.
Stops during operation
- The Aquastop system is activated. Some modern dishwashers are equipped with the Aquastop leak protection system. If water leaks into the dishwasher tray, the drain pump will turn on and stop operation. As a rule, the equipment reports this with a certain code on the display or by flashing indicators. To unlock the PMM, turn off the power supply, remove water from the pan and dry the internal parts of the equipment. After drying, the PMM is restarted; if the problem persists, a technician must be called.
- Another problem could be glitches or failure of the Aquastop sensor itself, which erroneously reports a leak if there is none. In this case, the sensor needs to be replaced.
- The float switch is activated. Modern dishwashers are usually equipped with a float switch to protect against overfilling. If it does not work correctly, it needs to be checked. Remove the front bottom cover, get to the pan and check the float for sticking manually. Tapping helps fix the problem. If this does not help, you need to call a technician and replace the switch.
- If the equipment often does not complete the cycle even after repairing the above-mentioned modules, the main control module is faulty.
Leaking
- Door seals are torn. If the seals are damaged or dry out, the door does not close tightly, causing water to leak from the bottom. Minor damage to the rubber does not affect the operation of the PMM in any way. Repairs are carried out by replacing the upper and then the lower seal. The equipment is disconnected from the network, the door is fully opened, and the loading trays and baskets are removed. The seal is carefully pulled out of the recess. The gutter is wiped with cotton swabs and a dry rag, then a new seal is installed, pushing the rubber bands all the way.
- Broken lock on the door. If there is no characteristic click when the door closes, the lock is most likely faulty. The door does not close tightly, causing water to leak. A breakdown should be accompanied by an error code with a corresponding indication in the form of an icon, which does not always happen. To replace the lock, de-energize the device, remove the facade and control panel, unscrew the lock and replace it with a new one.
- The door or fastening to the body is deformed. If used carelessly, the door fastening bracket can be deformed, a couple of degrees not noticeable to the eye, enough for the rubber band to begin to let water through. For diagnostics, the door is visually inspected for the presence of dents or loose fit to the PMM. We recommend replacing the mount with a new one.
The door won't close
- The lock is broken. The door does not hold or lock in the closed position. The lock can jam even when the door is open, which will not allow the PMM to be hermetically sealed. You can solve the problem one-time using a screwdriver by wedging the lock tongue, but it is better to completely replace the latch element.
- When opened, the door suddenly “falls out”. Most likely, the cable or the tensioner itself (2 small springs) broke. You can replace the tensioners yourself, but you will have to disassemble the housing. During self-repair, the old cable and spring are replaced with new ones, preferably original ones.
Burnt out intake or exhaust valve
- The inlet valve is burnt out. If the inlet valve fails, the PMM will not take in water, the part will not respond to controller commands, or, conversely, will not ensure closure of the membrane. The equipment is disconnected from the network and water supply, the bottom or base panel is removed, and the reservoir with the hose is disconnected. The reservoir is opened and the inlet valve is replaced. In some machines you won’t be able to do this yourself; you need to call a technician.
- The water discharge recirculation valve has burnt out (usually installed on expensive models, such as Bosch). If the outlet valve fails, water does not leave the PMM, error e19 lights up on the panel. The part requires replacement.
Debris gets into the main motor
If debris gets into the high-pressure motor (pump), the machine will make a characteristic noise, grinding, whistling, and the electric motor may jam, causing a hum. A burning smell appears and fuses trip. This happens due to loading dishes into the PMM that are contaminated with large food debris, such as seeds from berries and fruits. We take out the module and try to wash it, it usually helps.
The pressure switch (water pressure sensor) is broken
- The pressure sensor is broken. If the pressure sensor breaks down, continuous circulation of water occurs, there is no heating and automatic, continuous drainage of the liquid occurs. The problem can only be solved by replacing the sensor.
- When the air tube connecting the water tank and the sensor is clogged, water overflow or underfill occurs. The part requires removal and mechanical cleaning.
The turbidity sensor is clogged
A turbidity sensor, or aquasensor, allows equipment to “understand” how well the dishes have been washed by assessing the light conductivity of the water. If the surface of the aquasensor becomes clogged, the machine automatically extends the cycle without completing the wash and increases water consumption.
- If the sensor is covered with grease, you can disassemble the equipment and degrease the sensor.
- The sensor may become clogged due to salt deposits (scale) - take a screwdriver and “pick out” the hard white crust.
If mechanical cleaning does not help, we replace the module ourselves or call a technician.
No grounding
- The surge protector that protects electrical circuits from burning during power surges is broken. Damage or weakening of the contacts in the surge protector causes “glitches” in the control module, causing incorrect operation, and ultimately leading to equipment shutdown. Also, a malfunction of the SF leads to an electric shock through the housing.
- The body is electrocuted. It is necessary to fix the outlet or connect the PMM to another outlet equipped with grounding. The socket for connecting the dishwasher must be connected to the circuit breakers using a three-wire wire.
- Knocks out the circuit breaker or RCD. If there is no grounding, the circuit breaker may be knocked out due to spurious interference. Another reason may be inappropriate, old electrical wiring that requires replacement.
Doesn't dry out
- The thermal fuse of the air heating element trips. The problem appears over time when the condensation dryer housing overheats. The thermal fuse needs to be replaced, most often together with the dryer module.
- The air heating element has burned out. If the heating element fails, a burning smell may appear. A part needs to be replaced.
- The warm air circulation motor has burnt out. The problem occurs when there is a power surge, a dirty air filter, and often appears in conjunction with a broken mains filter. The assembly is changed or the winding is rewound (rarely helps and is not cost-effective).
Hoses become clogged
Do not place dishes that are excessively soiled with food debris into the dishwasher. All fat, bones and other biological residues accumulate in the pipes and hoses. To eliminate the problem, the PMM is disassembled and the hoses are cleaned manually.
Sprinkler does not spin
- Impeller clogged. Remove the nozzles and rinse the nozzles in the opposite direction under running water.
- Loss of tightness. If the impeller loses its tightness, water can fly out into the gaps that appear. Sprinklers need to be replaced.
- The secondary plastic gasket has worn out. It is necessary to remove the impeller and replace the gaskets.
- High pressure pump malfunction. If the nozzles are OK, you need to inspect the pump. If the motor hums but does not rotate, the problem is most likely in the pump. Disconnect the machine from the network, open the case, loosen the pipe clamps and disconnect the connectors. Release the latches and unscrew the mounting screws. Next, release the fastenings of the other pipes, move them to the sides and remove the pump from the housing. Now install the new motor and reassemble the structure in reverse order.