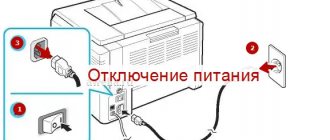
Checking the settings in the operating system
It happens that the parameters of printing devices in the OS are reset to the basic ones. Most often this happens when installing a new printer or fax machine. In this case, it is worth checking the correctness of the settings through the control panel.
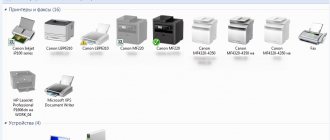
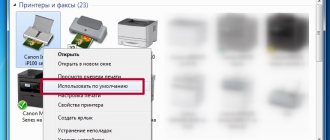
Selecting the desired device:
- Call up the search bar (Win + S) and enter “Control Panel”.
- Go to the “Devices and Printers” section.
- From the presented equipment, select the desired model and right-click on it.
- In the context menu, click on the line “Use as default”.
Another related problem is an overloaded print queue. This point is especially relevant for models connected via a local network.
Clearing the print queue:
- In the “Devices and Printers” section, double-click on the desired model with the left mouse button.
- Next, open the “View Print Queue” item.
- We remove unnecessary tasks from the list or completely clear it (“Document” -> “Cancel all”).
Advice! A more radical way to reset files sent for printing is to restart the computer. But this option will not work if the printer has an independent memory unit.
The main causes of problems in inkjet devices
Before troubleshooting the cartridge, you need to check the USB cable. Oddly enough, sometimes this cable is the cause of problems. If you don't have a spare cord, try moving all the connectors or connecting the cable to another USB port on your PC. If these actions do not improve the situation, then you need to look for other reasons why the printer does not print.
Ink has dried out in the nozzles
Inkjet printers have one big drawback: after a short period of time, the ink in the print head nozzles dries out. To prevent this from happening, you need to print something all the time, or turn on the printer once every few days (from 3 to 7) so that it “blows out” the nozzles.
Air got in when refueling
Air in a cartridge filled with ink will not cause much harm. Unless the paint begins to leak out of it, since there will be no necessary vacuum inside the container to keep the ink from leaking.
It's another matter when the ink runs out and air gets into the print head nozzles. In this case, the paint in the capillaries of the head may dry out. Air can also get in and dry out the head if it is parked incorrectly after the printer has finished running. It is important to check that the carriage always reaches the parking space. Only in this case will the nozzles be protected from drying out.
Air can damage the print head, especially on Epson printers since it is non-removable. The problem is that when changing ink tanks, if this is done leisurely, or when installing a CISS when the head is outside the parking unit, the nozzles have time to dry out.
Ink is not selected correctly
Some users think that ink is the same for all printer models. But in fact, even for devices of the same brand, ink may differ. The cartridge may not print due to incompatible ink being filled into it, which entails a complete flushing of the print head.
When choosing a paint, it is very important to read the instructions for it, which indicate the devices for which it can be used.
You should also pay attention to the expiration date of the ink.
The cartridge is not installed correctly
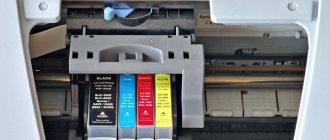
Sometimes a situation arises when the printer does not see the cartridge. This is explained by the fact that there are electrical contacts on it, which, when installed, must perfectly coincide with the contacts located inside the carriage. If for some reason there is a contact failure (dust, dried paint), the device will not work normally. It is also necessary to peel off the protective film from the contacts if the ink tank is new.
Some devices, especially MFPs, will not start working while the cover is open. The cause of equipment failure lies in a special lid sensor. Therefore, if you have installed a CISS, and the cable from it prevents the lid from closing tightly, then this sensor must be blocked, for example, with a piece of foam plastic (blocking methods may differ for different printer models).
Excess paint
Many users, when refilling the next time, try to fill the cartridge almost to the brim, which cannot be done. If the box is transparent, then you need to focus on the paint volume being approximately 90%. If the cartridge is darkened, then the operating instructions must clearly indicate the maximum permissible displacement.
It is also worth inspecting the box for microcracks. There should not be any fresh drops on the body after refueling. It doesn’t hurt to wipe it dry with a rag and leave it somewhere dry for a few minutes to make sure there are no leaks.
The most common malfunctions of inkjet devices
Checking the cartridge after refilling
To make sure that the cartridge is successfully refilled and ready for use, it should be tested. Find some white napkins and press the bottom of the inkwell onto the napkin with little force. You should see a clear trace of black or colored blue, pink, yellow. If the print is uneven with gaps or is barely visible at all, then we can say that the ink passages are dirty or there is air in the cartridge.
Paint drying in nozzles
Inkjet printers use special inks to do their job, namely printing text and graphics onto sheets of paper. Such ink contains water in its composition, which entails its tendency to thicken and dry out. If this process occurs in very small nozzle channels, the passages become clogged, making it impossible for further ink to pass through.
For preventive purposes, depending on the brand and model of the device, it is recommended to carry out a test print every 3-7 days. This can be a printout of any color design, which will prevent the paint passages from drying out and becoming clogged. If drying does occur, then the “consumables” should be soaked and cleaned. It is more difficult to clean the print head, which is located separately from the ink bottles.
Flushing the ink cartridge Detailed instructions for several ways to perform the procedure.
Cleaning the printer print head All quick, effective methods for home use.
Air getting into the cartridge
The second, according to statistics, reason a printer refuses to print immediately after refilling is air getting into the cartridge or continuous ink supply system. Conventional cartridges are more relaxed about this problem and experience it less capriciously. Air causes more problems if it gets into the channels through which ink moves. In such cases, you should apply the bleeding instructions specifically to your model of ink tanks, although they all boil down to forcing air out.
In CISS, air pockets most often appear in the tubes that go from the paint cans to the head inside the printer. In such circumstances, it is necessary to remove the cartridge block from the printer, open the plugs, insert a syringe filled with air, open the holes on the ink cans and blow out the channel. This procedure is suitable for most models of inkjet technology with CNC systems.
Unsuitable consumables
Each printer model is compatible with cartridges of a certain type and modification, so you won’t be able to use others. An alternative to original consumables may be identical substitutes. Unfortunately, not all printers can have a non-original set of cartridges. If you previously used the ink tanks that were in the device when you purchased it, and now you have installed a new cartridge, but it does not print, then most likely the problem is incompatibility.
The ideal solution to this problem would be to purchase new original cartridges, but this is expensive and not always advisable. It’s better to search the Internet for more detailed information about the possibility of using substitutes for original consumables for your printer model.
Another fatal supplies mistake that can stop a device from printing even if ink is present is using the wrong ink. It would seem that they are all the same, but this is not at all the case. Select your paints very carefully so that later you don’t have to completely flush the cartridges, or even the entire system and printer.
Excess ink
When refilling a cartridge with a new portion of ink, you should not fill in as much as possible. Such good intentions can only cause harm. If the walls of the box are transparent, then use the visible level as a guide. Do not fill to the very edges to the maximum, but fill to 90%. If the level is not visible, then before starting work you need to find out the maximum capacity of consumables from the instructions or documentation for the equipment.
The paint should not drip from the cartridge.
Incorrect cartridge or printhead installation
Cartridges in an inkjet printer are installed in a special compartment called a carriage. Over time, after intensive use, the place becomes not as strong as it was before, so the cartridge begins to move freely in it. Because of this, a loss of contact is possible, which entails an error when the equipment does not see the “consumable”. In such cases, you can use thick cardboard or folded paper several times to firmly and securely hold the inkwells in place.
If you removed the head for cleaning or other manipulations, then its correct installation back into the printer will guarantee its continued printing without surprises. When problems arise in such cases, it is better, before starting any manipulations, to read the instructions for installing the PG. It can be easily found in the technical documentation for the equipment or on the Internet.
The chip, counter or diaper is damaged
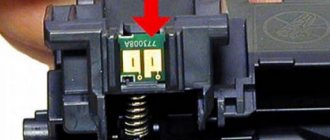
- On each cartridge you might notice a small, very tiny microcircuit. This is the chip that supplies the consumables. They won't work without it. With prolonged use, the microcircuit may become damaged, scratched, have poor contact, or simply fail. In the first two cases, no repair will help. Needed a complete replacement for a similar product. But it is still possible to restore the quality of contact. To do this, use a regular stationery eraser. Use it to thoroughly wipe away any dirt on the surface of the microcircuit.
Some cartridge models may require periodic replacement of the chip, regardless of its condition. Find out if your model is one of these.
- A lot of different service information is recorded in the chip's memory. Among other data, there is information about the number of printing processes performed. It simply counts how many pages were printed. If the counter reaches the set limit, then the possibility of further operation is blocked by the software of the equipment. The user has three options to resume the printer's operation: purchase a new cartridge, replace the chip, or reset it. Find out in more detail which option is applicable to your equipment.
- The “diaper” in the printer acts as a collector of ink residues that left the cartridge but did not get onto the paper during the nozzle cleaning process. To prevent them from clogging or damaging the printing device, they are collected in a special gasket. If the printer is used for a long time and intensively, then over time the “diaper” collects the maximum possible amount of ink residue. It needs to be cleaned or replaced with a new one.
Features of devices of different brands
There are separate articles on our website about how to clean an inkjet printer cartridge or wash the print head. You will find links to them above in the “Drying of paint in nozzles” section. Be sure to carry out these procedures if there are reasons described in the “Checking the cartridge after refilling” section.
Canon.
- Many models of the popular IP series in terms of counter reset work perfectly in this direction with the IPTool program. It is free, easy to set up and use, and can be easily downloaded from the Internet.
- For other series, manual reset instructions should be used. Press and hold the sheet feed button for a few seconds and hold down the triangle button for 10 seconds. Also try this option: with the device turned off, press “Continue”, while holding down “Power”, without releasing “Power”, release and press “Continue” twice. We release all the buttons, wait until the lights on the case stop blinking, press “Continue” four times, then “Power on” once. Turn on the printer and try to print.
Troubleshooting error 5b00 on Canon printers Detailed instructions.
HP.
For HP equipment, a method is used to seal the contacts on the cartridge chip. Cover the contact marked in light green, insert it into the printer and print a test page. Then, one by one, together with the already sealed one, close the contact marked in blue, pink and red. No more than two should be closed at the same time, as in the figure. Then you need to take it out, peel off the green one, and return it with the second one taped. The printer must have a cartridge with green and blue, blue, green and pink, pink, green and red, red contacts sealed. After each insertion of the “consumable” inside, we make a test print.
If this option is not successful, then try gluing four contacts simultaneously using this scheme.
It is advisable to wipe the areas where there was adhesive tape with alcohol before installing it in the printer.
Epson.
Resetting the ink control counter and diaper overflow counter for Epson printers can be done using the special “PrintHelp” utility. It is easy to find and download from the Internet. The settings and interface are quite simple, which will allow even an inexperienced user to master working with it.
Instructions on how to reset the Epson L ink level. Sequence of actions for models L110, L210, L800, L355 and others in this series.
Laser cartridge
Sometimes after refilling the cartridge refuses to work normally or shows no signs of life at all. The cause of all problems lies, as a rule, in inept user actions, and at the same time deviations from instructions.
Procedure for replacing toner in a laser cartridge:
- Unscrew/remove the cover to access the toner compartment.
- We clean the box from accumulated old powder.
- We fill in a new toner (it is highly desirable to use a branded one, keeping in mind the brand of the printer).
- We remove any remaining powder (especially from the photocell and dosing blade).
- We assemble the cartridge and install it in place.
Advice! To clean the box from powder, it is more convenient to use a vacuum cleaner. If the cartridge is refilled more than a dozen times, then you should pay attention to the condition of the magnetic shafts and the cleaning blade (squeegee). If necessary, the latter are replaced.
Cartridge device
Just as with inkjet printers, laser cartridges are equipped with control chips. In some boxes they are brought out and can be accidentally damaged during the next refueling. The proprietary software of the equipment should notify you of this problem.
If the laser does not print after refilling
Similar problems with laser printers do not happen so often, but there are cases and they are not isolated. It is logical to assume that the fault was caused by deviation from the instructions for correct toner replenishment. The sequence of actions should be like this:
- We disassemble the cartridge by unscrewing all the necessary screws.
- We clean the waste powder bin. This procedure should be carried out regardless of the amount of residue in the sump.
- We add new toner of the appropriate quality and brand that matches your printer model.
- We wipe off paint residues from all parts that were removed.
- Separately, it is worth cleaning the dosing blade and photocell. You can use an old household or special vacuum cleaner.
If the cartridge has previously been refilled many times, then there is a high probability of wear of some of its parts. First, they need to be inspected, and if signs of damage or failure are found, they must be replaced with new ones. Such parts include a squeegee, a cleaning blade, a photo and a magnetic roller.
If you carried out all the procedures yourself, you might notice the presence of a small microcircuit on the cartridge body. Many manufacturers complete their consumables with such a “device”. In professional circles, this part is called a chip. It remembers the number of printed pages and when a certain value is reached, it can block the operation of the device.
Features of laser models from different companies
Samsung, Xerox, Oki.
Models from these companies are equipped with built-in counters, which must be updated after each procedure for replenishing powder in “consumables” containers. To reset, you can perform the following procedure: turn on the device, wait for a notification that the limit has been reached, turn off the printer, and after 5-10 seconds turn it on again. If this does not help, then with the device turned on, open and then close the cover of the cartridge compartment again.
Unfortunately, not all models react positively to such actions. But the user has two more options to resume printing: reset the counter programmatically using special utilities, or buy a new chip or cartridge.
Brother.
Resetting the toner counter of Brother DCP 1512r, 1510r and 1110r Separate step-by-step manual.
For popular models from this manufacturer, use the following procedure:
- Activate the printer by pressing the power button on the body.
- Remove the cartridge from the inside.
- Separate the drum and powder compartment.
- Insert the photo roll back into the device.
- Press and hold the release lever while reaching through the sheet tray after removing paper from the tray.
- Close the printer cover.
- As soon as the printer starts working, release the lever for a few seconds, and then press and hold again until the device stops making sounds.
- Assemble the cartridge by connecting the ink hopper and the photo roller.
Problems with the chip or diaper counter
Inkjet printers use two types of cartridges: disposable and refillable. In disposable ones, the manufacturer installs a special chip that blocks the operation of the device after the ink in the container runs out. The printer also refuses to print if the diaper counter indicates that it is full.
Control chip
Each cartridge is equipped with a small chip that contains a variety of service information. The chip is quite fragile, and it is easy to damage it, for example, during the next ink refill. Most proprietary applications that service the printer signal a failure of the chip.
Chip on cartridge
If such a message appears, then the first thing you need to do is inspect the chip for contamination. Dried paint can be removed with a cotton swab dipped in alcohol or a regular rubber band if there is not much dirt. In other cases, you will need to replace the chip or the entire cartridge.
The chips also read the number of pages printed. Some boxes are limited by limits, after which they simply stop working. Reflashing the microcircuit, or again replacing it, helps.
Absorber
Most often, this element is called a “diaper” or absorbent pad. The absorber is necessary to remove excess ink while cleaning the cartridge nozzles. By means of a mini-pump, a zone of low pressure is created in the nozzles, while in the body itself it is close to normal. Due to the difference in pressure, the paint clots are pushed out and fall on the gasket.
Many devices can monitor the level of absorption of the absorber and issue appropriate messages or an error code. If the diaper is completely clogged with ink residue, the printer may refuse to print.
Diaper filled with ink
In a good half of cases, replacing a gasket is a rather labor-intensive procedure, so it is better to leave this matter to specialists. In addition, not every utility allows the user to reset the pollution indicator counter.
There is no universal method for eliminating problems with diapers and chips, since the design of the devices is different. Different printer models have their own troubleshooting methods.
Troubleshooting Brother printers (MFPs)
Brother printers do not have sensors that monitor the overfilling of the diaper with waste ink, and therefore the adsorber is controlled at the software level. The calculation is made based on the number of prints that came out of the machine, as well as on the number of head cleanings (forced and regular). After some time of operation of the unit, the program counter determines that it is time for the diaper to be overfilled and blocks the printer, while the message “Cleaning” or “Error 46” is displayed on the device display. To reset the counter, no additional software is required. The device has a reset function through the service menu. To get into it, do the following.
- Unplug the device's power cable from the outlet.
- While pressing and holding the “MENU” key, connect the power cable to the electrical outlet.
- Wait for the “Maintenance” message to appear on the screen for a couple of seconds. At this moment, you need to have time to remove your finger from the “MENU” key. If that doesn't work, unplug the outlet and do it all over again.
- By clicking on “+”, wait until the number 8 appears, then click “OK”.
- Using the “+” key, select number 2, and then “OK”. After these steps, you should see the message “MACHINE ERROR” or “MACHINE ERROR 00”. If such a message does not appear, but some other message is displayed, then you will not be able to reset the diaper counter.
Brother printer
Next, you need to move on to the soft reset procedure itself:
- follow the steps above up to point 3 (inclusive);
- then use the “+” button to select the number 0 and then press the “OK” button, the image “00:00 XX:XX” will appear, where XX:XX is the time;
- Now you need to press the “BLACK AND WHITE” key (it, as well as the “COLOR” key, can be found near the “START” button) until the inscription “PURGE: xxxxxx” appears (instead of xxxxxxx there can be any numbers).
At the next stage, for the inscription “PURGE” you must enter the special code “2783”:
- Use the “+” key to find the number 2 on the display and press “OK”;
- further, “+” → “7” → “OK”;
- “+” → “8” → “OK”;
- “+” → “3” → “OK”.
- after this you should see the message “PURGE:00000”;
- by pressing the “BLACK AND WHITE” key, select “FLUSH: xxxxxx”;
- repeat all the actions that were done after selecting the “PURGE” inscription;
- after selecting number 3 and clicking “OK”, you will see the message “FLUSH:00000”, then turn off the printer, unplug it and turn it on again.
After the counter is reset, the printer will continue to operate. It is also recommended to remove the diaper itself, rinse it and dry it, but this will require disassembling the device. Understanding how to do this will require a separate article.
Solution for Canon printers
Canon ink tanks have a chip installed that counts the amount of ink remaining in them. When, in the “opinion” of the chip, the ink runs out, an error message appears or about an empty cartridge. Therefore, you need to turn off the counter.
If Canon PG510 / 440 / 426 ink tanks are installed, then press “OK” in all messages that appear on the device’s display. Press “OK” until a message appears asking you to press the button to enable paper feed. Hold it down for a few seconds and the paint counter will be reset. For other cartridges, the reset occurs after pressing the button with the image of a triangle in a circle for 5-10 seconds. or in the printer settings on your PC.
Printing equipment manufacturer Canon uses 2 types of print heads in its devices: non-removable and removable, located directly on the cartridge.
We revive Epson printers
Ink accounting in Epson printers is done by their own software (firmware). Therefore, no matter how much ink you add, the program will consider that the container is empty and block printing.
To return the device to operation, it is customary to use the PrintHelp program, which is freely available on the Internet and is free. In addition, it can be used for most Epson printing equipment.
Using this program, you can not only reset the ink to zero, but also monitor its quantity. The program is also able to detect the overflow of a diaper and, if necessary, reset it.
Restoring HP printers
It's no secret that HP 121, 27, 28, 56, 57, 21 and 22 ink tanks are refillable. In this case, you need to be careful and not allow the ink to be completely depleted by refilling it on time. When the chip detects that the ink is running out (but there is still paint), a message is issued about this: an exclamation mark appears next to the problem ink tank. In this case, you need to click on “Continue”, thereby turning off monitoring of the paint level. The disadvantage of this method is that you will not be able to see the ink levels.
If you do not add ink after this and continue to print, then after it is used up, a sensor that determines the actual amount of ink will work and block the operation of the printer and the chip itself. And a cross will already appear opposite the cartridge. If this happens, you will have to replace the chip or ink tank. Although there are several ways to reset the chip so that the paint level is displayed.
Place the inkwell on the table with the contacts facing up and do the following.
- You will need to seal 1 contact, highlighted in green in the figure, with tape. It is important that only 1 contact is sealed.
- After this, you need to insert the ink tank into the machine, click “OK”, which will appear in the message window, and print the internal test of the unit.
- Remove the ink tank from the printer again.
- Next you need to close another contact. You can choose any one (blue, purple, red) without removing the sticker from the previously closed contact.
- Insert the part back into the printer, click “OK” and print a test page.
- Remove the ink tank from the machine again.
- Remove the sticker from the first contact, then return the part to the machine. You should wait until the unit “sees” the ink tank, and then remove it.
- You will need to remove the sticker from the second contact, wipe all contacts with alcohol, and put the ink tank back into the printer.
The meaning of these manipulations is this: four different cartridges are replaced, after which information about the identifier of the refilled ink tank is erased from the device’s memory, and it, inserted fifth, is considered as new . After this, the printer will assume that there is paint and display its level in the containers.
The second method is suitable if the first one was ineffective:
- seal the first contact, insert the inkwell into the machine, and print the test as in the first method;
- Without removing the sticker from the first contact, you need to glue three contacts with a rhinestone, as shown in the figure;
- insert the part into the machine and print the test;
- remove all stickers and return the ink tank to its place, remembering to clean the contacts with alcohol.
Defects in laser printer cartridges
The main reason laser printers fail to operate when replacing a cartridge is an incorrect refill procedure. The technological process generally includes the following operations:
- container disassembly;
- removing toner residues from the surface of all parts;
- polishing the drum, squeegees and other elements with a special polishing compound;
- refilling with fresh toner;
- container assembly.
The cartridge can be refilled no more than 4 times, after which it must be subjected to a restoration procedure, during which the main parts are replaced . These include: drum, cleaning blades (squeegees), magnetic shaft, PCR shaft. In addition, all worn or mechanically damaged parts must be replaced. Therefore, a properly loaded and installed laser printer container should produce high-quality prints.
However, it happens that after installing a newly filled (restored) container, the printer “does not want to print.” This happens due to the fact that the devices' counters for counting printed pages and counting toner block the operation of the printer. You can reset data in various ways, depending on the design features of different models.
Samsung and Xerox printers
Samsung and Xerox devices have a built-in page counter that blocks printing when the toner is supposed to be “low.” You can use a newly refilled cartridge only after resetting the existing data. In most cases, information is reset if you turn off the printer and turn it on again after 5 seconds. Sometimes it is necessary to additionally open and close the cover of the compartment where the cartridge is installed.
Advice! It is recommended to perform any manipulations with the device to reset the page counter only after first reprogramming the printer itself (flashing) and sealing the chip built into the container with tape (if any). Another option is to reflash the built-in chip itself, but this procedure will have to be repeated during each refueling.
Brother printers
Containers for Brother brand models are equipped with a special flag designed to reset the previous toner quantity data. After each refill of the cartridge, it must be cocked. If it was not possible to reset the counter data the first time, the procedure is repeated.
Some Brother models require special procedures to reset data. For example, to reset data on the Brother DCP-1512r (HL-1110r, etc.) MFP you need to:
- turn on the device;
- remove the toner container;
- separate the photo roll from the container and insert it inside the MFP;
- through the paper feed tray, press your finger on the reset sensor located on the left side (there should be no paper in the tray) and close the top cover;
- after the engine starts, the sensor must be released and after 2-3 seconds pressed again. You should keep it pressed until the device warms up and quiets down;
- opening the top cover, remove the block with the photo roller and assemble the container;
- install the assembled cartridge in its original place and turn on the MFP.
If the device does not start working, the operations are repeated in the same sequence again.
Advice! Resetting data from the photo roll counter is carried out using the prompts from the “Device Information” menu item.
As can be seen from the above, basically the problem of no printing when the cartridge is refilled is eliminated on its own. The only exception is for printers with a permanently installed print head in case it becomes clogged with dried ink. And, despite the fact that many manufacturers strive to force users to buy original cartridges or refill them in accredited service workshops by installing tricky counters and chips, even such tricks can be circumvented. The main thing is to carefully refill the cartridge, adhering to a certain technology, and insert it correctly.
Checking the cartridge with proprietary software
In this case, there is no need for direct user contact with the cartridges: the procedure is controlled through the printer software. You can find it on the official website of the equipment manufacturer in the “Drivers and Utilities” section.
Nozzle cleaning and calibration:
- Open the “Control Panel”.
- Go to "Devices and Printers".
- Click on the desired model.
- Select the line “Setting Printing Options”.
- In the window that appears, find the “Service” section (“Maintenance”, etc.).
- Click on the icon of the required procedure.
Checking the nozzles
Most utilities allow you to check the nozzles, clean the print head and calibrate it. Blowing out the nozzles takes about 1-2 minutes, actively consuming ink. Therefore, the cartridge must be filled at least 50%. If necessary, the procedure can be repeated.
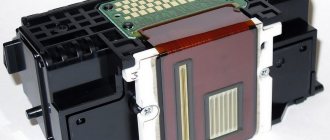
Cleaning Fixed Printheads
Before you start washing this part, you will need to prepare a small container in which the washing process will take place. This could be a saucer, a plastic box with small sides, a photo bath, etc. You will also need: gauze or bandage, a pair of syringes (10 ml), plastic and rubber tubes, which are found in medical droppers. Rubber bands will be needed if a strong blockage is found that cannot be removed by soaking.
For flushing, it is recommended to use flushing liquid, sold at ink stores. But, since the price of liquids is quite high, you can use household chemicals, namely “Mr. Muscle” (MM) for washing glass, containing ammonia.
Please note that the color of the chemical is either green or blue. Other colors of liquid are not suitable for flushing.
Next, you need to remove the print head itself. Since there are a great variety of devices of this type, each case has its own nuances. A video of the process of removing the head for any printer can be found on the Internet.
Easy way
So, when everything is prepared, do the following.
- Draw MM into the syringe.
- Cut 2 small pieces of gauze. Fold the first one so that it is the size of the lower platform of the PG, then place it in a saucer and soak it in the MM. Crumple the second piece and also soak it a little with glass liquid.
- Turn the PG over with the nozzles up and use a crumpled (moistened) piece of gauze to remove all dirt from it. You may need to change several gauze pads.
- Place the PG on the prepared area of gauze in the saucer. Use a moistened MM gauze swab to remove dirt from the intake grates (be careful not to break them).
- After removing the rubber bands from the inkwells, rinse them under water to remove dried ink, and wipe the areas where they were with gauze.
- Next, you need to drop one drop of MM onto the intake grids using a syringe.
- Once the MM is absorbed, add 1 more drop onto the grates. This needs to be repeated many times, and the piece of gauze under the head should be changed as it gets dirty. When the moment comes that the liquid flowing through the nozzles will not stain the gauze, it means that the washing can be completed.
- To check the quality of washing, fold a small piece of gauze in half, moisten it well with MM, and place the PG on it for about 1 hour. If after time the gauze remains clean or with faint ink stains, but without areas of intense contamination, then the PG can be inserted into the device.
- After installing the head into the printer, it is necessary to run the PG cleaning 2-3 times to remove MM residues.
If a drop of liquid is not absorbed into the grate, leave it to soak for a while. From time to time, remove it with a napkin and reapply.
For severe blockages
When the napkin stops staining, but the liquid still does not pass through, you will have to use the following flushing method, which is used for severe blockages.
- Select tubes of suitable diameter so that they can be placed on the pipes through which the ink enters the head. The tubes should be about 5 cm long and fit tightly.
- After installing the tubes, place the head on the cheesecloth in a saucer and pour MM into them. From time to time, liquid should be added to the tubes, which will gradually flow out through the nozzles. Also, do not forget to change the gauze in the saucer as soon as a puddle appears near it.
- If in one or more tubes the MM descends very slowly or stands still, then it is recommended to leave the head in this position for several hours, or better yet, overnight.
Before installing it in the printer, the head must be “dried” so that it is not dry. To do this, place a few drops of washing liquid into the ink channel grids.
Don't forget to run a hardware print head cleaning to fill it with ink.