Common signs of breakdown and troubleshooting methods
If your electrical friend is broken, a diagnosis can be made based on the symptoms. Below are common vacuum cleaner breakdowns and how to fix them. When can you cope on your own, and when will you need the intervention of a specialist and how much will his services cost?
Weak draft (the device does not draw in air)
A decrease in suction capacity can be caused by several reasons:
- clogged garbage bag;
- unregulated power;
- dirty engine dust filters and exhaust filters;
- clogged or damaged hose;
- engine problems.
You should start with something simple: look at the position of the power regulator and the filling of the dust container. Is everything okay there? It is worth unscrewing the hose and checking if the rod is at the place where it is attached. If the problem really lies there, it is worth inspecting the elastic tube for damage. Provided that the hose is intact, it should be carefully cleaned. To do this, you can use a long stick or a flexible cable.
If a gap is detected, there are several options:
- Cut off the damaged area - this method is suitable if the hole is located close to one of the ends of the corrugation. It is necessary to remove the end cap, cut off the problem area with scissors or a sharp knife and remove any remaining material from the internal area. Then you should treat the edges with sealant and screw the end cap back on.
- Apply a patch. If the gap has formed in the middle or you don’t want to sacrifice the length of the hose, you can use a pad from a bicycle inner tube or heat shrink. Please note that a piece of the chamber must be glued in place of the torn section (that is, it will still have to be removed), and the heat shrink is pulled upward, over the tear site, and dried with a hair dryer.
- You can seal a small hole with tape or tape, but this method will only help for a short time. After a few cleanings, the problem will likely return.
- And the most radical measure is to buy a new corrugated hose.
The cost of a new hose starts from 1500 ($23) and can reach up to 5000 rubles ($77). The price for 1 m of heat shrinkage is around 300 rubles ($5).
If there is no suction coming out of the vacuum cleaner itself, the filters may be clogged or worn out. Cleaning and blowing in most cases can correct the situation.
Cleaning didn't help, does the filter still look unusable? You'll have to fork out for a new one. The price of filters for various models ranges from 300 ($5) to 2300 rubles ($35).
If the above steps do not help, you will have to contact the service center. Possible problems with the engine. Diagnostics at various organizations can be free or cost about 300 rubles ($5). Engine repair – from 1100 rubles ($17).
The vacuum cleaner draws in air but does not pick up debris.
If the device has good traction, but it still does not collect debris, most likely the problem is in the brush. Sometimes it is enough to simply adjust the height of its landing. But it is also possible that the part may become excessively worn, in which case the roller will have to be replaced.
A new nozzle will cost approximately 1000 rubles ($15).
Burning smell when turned on
If just an unpleasant smell from a vacuum cleaner can be caused by a dirty filter or a clogged bag, then a burning smell during operation or when turned off is not a very good sign. This usually indicates a problem with the motor, probably with the rotor or stator windings.
It can be difficult to unwind and repair a burnt-out vacuum cleaner motor with your own hands without special skills.
Attention! Self-disassembly is allowed only after disconnecting the device from the power supply, otherwise electric shock cannot be avoided. It is better to entrust such repairs to specialists.
Engine repairs in the cabin can cost 1,100 rubles ($17) or more.
The vacuum cleaner does not turn on
Perhaps the most frightening situation is that the vacuum cleaner stops turning on, or suddenly turns off during operation. The thought of the need to buy a new one immediately scrolls through my head. And the reasons for this may not be so terrible:
- A sudden shutdown of the vacuum cleaner may be caused by the thermal switch tripping due to overheating of the device. Excessive heating may be due to clogged filters or garbage bags. Simply clean or replace them.
- The power cord is broken. It happens that the wire breaks at the point of attachment to the plug or to the vacuum cleaner, causing contact to be lost. During the repair process, the cord will have to be completely replaced.
If you have some soldering skills, it won't be too difficult to do it yourself. The cost of 1 m of cord averages 200-300 rubles (3-5 $).
- The fuse has blown.
Replacement will cost 600-900 rubles ($9-14), including the cost of the element itself.
- The button doesn't work.
Restoring the part will cost around 900-1200 rubles ($14-18).
More serious breakdowns, such as a faulty motor, are also possible, but they are less common.
Increased noise and vibration
If the vacuum cleaner makes a lot of noise and begins to vibrate during cleaning, this most often indicates a breakdown of the fan. This problem is more complex than it may seem: the cost of replacing the part can be as high as the price of a new vacuum cleaner.
However, everything may not be so scary. It is possible that worn out roller bearings require replacement. To eliminate the hum, in this case, you will need about 1000 rubles ($15).
The power cord does not wind up
The fact that the power cord no longer retracts automatically does not in any way affect the quality of cleaning, but nevertheless causes some inconvenience during storage. Usually the problem is in the winding drum: the springs, supports, or poor wire tension may be deformed.
For a person who knows how to use a screwdriver, it will not be difficult to get to the winding mechanism and repair the cord. After this, you need to loosen or tighten the spring, it is also advisable to take out the drum and rewind the power cord to correct the tension.
Such repairs will also be inexpensive at a service center - approximately 400 rubles ($6).
Other possible malfunctions
This section will discuss faults that are not typical for all vacuum cleaners, but for some modern models.
Cordless vacuum cleaners begin to require recharging more often over time. This is due to the natural “aging” of the battery, the battery capacity is lost. When the charge is no longer enough to clean, it's time to replace it.
The cost of a new battery reaches 3,500 rubles ($54).
The smell of dampness during operation is a problem with vacuum cleaners with an aqua filter. If the filters (water and HEPA) are not washed after each use or are not dried enough, over time, due to constant humidity, fungus develops on the HEPA filter and mold appears, which is blown out during use. A damaged filter will have to be replaced.
Breakage of the bag full indicator can be caused by deformation of its spring or jamming of the piston system of the mechanism.
Robot vacuum cleaner malfunctions
Modern robotic vacuum cleaners are just as prone to malfunctions as their predecessors.
If such a device does not turn on, does not charge or does not collect dust, you should proceed in the same way as with a regular vacuum cleaner. But this technique also has its own “diseases”:
- the robot does not return to base. The infrared sensors on the dock panel may be blocked or dirty;
- problems with orientation in space - the vacuum cleaner spins in one place, bumps into obstacles, etc. This usually indicates a breakdown of the navigation system: the obstacle and fall sensors may be damaged or dirty. Another reason could be a worn-out battery.
Repair: from simple to complex
However, the cases in the video above are quite serious and not so frequent. We will return to what happens to the engine and what can be done with it. As with the winding drum for the power cord - it sometimes gives external signs like a coil short circuit and to get to the drum, you also need to completely disassemble the vacuum cleaner. In the meantime, let's deal with what is accessible from the outside without tools - filters and a hose. Most often, repairing a vacuum cleaner comes down to them.
Filters
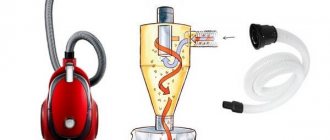
Vacuum cleaner air filter
The “thin” and HEPA filters of the vacuum cleaner are designed similarly, see fig. on right; The only difference is the filter element. The frames of both are detachable (you need to tuck them into the slot on the side). The HEPA filter is simply removed from its slot using the handle. To remove the fine filter, it is usually enough to remove the dust bag. But in some models the fine filter becomes available only with the motor, so see below.
Let's tell the reader a secret: the filter elements of auto filters are perfect for vacuum cleaner filter inserts (except for the fog one). Moreover, they are made by the same manufacturers. The fine filter is worse: it requires a motor air filter insert, which is not sold separately. But the cabin air filter insert of any SUV is suitable for the most expensive and quickly clogged HEPA filter. The cheapest ones are UAZ ones, and they are no worse than a “cool company”.
One cabin filter is enough for several HEPA, so the original packaging must be opened by carefully cutting off the edge with scissors. Then the HEPA filter frame is separated and the dirty liner is thrown away. The frame is washed and wiped dry. A piece is cut out of the cabin filter to the size of the frame, and the rest is put back into the bag and the cut is sealed with tape so that the insert does not suck up dust from the air. The cut piece is placed in a frame, glued along the contour (preferably with a glue gun), the frame is snapped into place - the new HEPA filter is ready.
Hose
Detecting the location of a vacuum cleaner hose break
If the hose sheath breaks, the vacuum cleaner behaves in the same way as if the filters, impeller or small permanent short circuit are clogged: it pulls poorly, the sound of the motor changes, and overheating is possible. Detecting a malfunction is simple: you need to lightly pull the hose at the rod holder (the pipe on which the brush is attached) or the connecting fitting (the thing that inserts the hose into the vacuum cleaner).
Most often, the hose breaks at the rod; in this case, repairs are possible with improvised means and very quickly, literally without interrupting cleaning:
Video: quick repair of a torn vacuum cleaner hose
Note: For repairs to the hose of a vacuum cleaner with cleaning functions, see below. section.
It is much less common for a vacuum cleaner hose to break in the middle. It is also possible to restore it very quickly, but you need a heat-shrinkable tube (HERE). It is not necessary to sit HERE over a flame; you can warm it up with air from a household hair dryer at full power. How to repair a vacuum cleaner hose using heat-shrinkable tubing, see next. video.
Video: repairing a vacuum cleaner hose with heat shrink
Disassembly
Now let’s take on a more complicated repair, for which the vacuum cleaner must be disassembled. This may be necessary if the measures described above have been taken, the problems have been corrected, but external signs of a problem remain. Before disassembling the vacuum cleaner you must:
- Disconnect it from the power supply.
- Disconnect the hose.
- In vacuum cleaners with a cyclone or aquafilter, remove and empty the dust container.
The internal structure of the vacuum cleaner is shown in more detail on the left in the figure:
Internal structure and procedure for operating the vacuum cleaner
The vacuum cleaner is disassembled as follows. order:
- Open the lid, pos. 1 in Fig.
- Loosen the latches or remove the screws securing the lid hinge to the body, and remove the lid if the hinge is on the front.
- If the lid tilts back, remove the HEPA filter, pos. 2.
- Remove the screws under the HEPA filter.
- Raise the carrying handle. If a screw is visible underneath, remove it.
- If the fastening screws of the upper half of the housing are visible from above (red arrow on item 2), remove them.
- If the mounting screws are not visible from above, turn the vacuum cleaner over and inspect from below. It is possible that the screws holding the halves of the housing together are hidden under the hinged technological cover, pos. 3.
- Remove the top housing cover. Now there will be access to the motor, drum with cord and, possibly, to the fine filter, pos. 4.
- In some models of vacuum cleaners, after the housing connector, 2 more screws and a latch are found. By unscrewing the screws and releasing the latch, you can remove the tray with the motor and drum, pos. 5.
- The fan motor is secured in the compartment with long screws (shown by arrows in position A).
- Do not twist the screw heads, they sit on the threads and in the motor! You need to unscrew the nuts on the studs, then the motor will come out, pos. 6.
- A possible option for mounting the motor is that instead of nuts on threaded rods, screw heads are visible behind it. This means that the impeller casing is a tight fit, see below. In this case, unscrew the screws and remove the fan motor.
- By removing the motor power connector from the socket, we get full access to the power cord reel, pos. 7.
Motor: what can be done
Electric motors of vacuum cleaners, for the sake of compactness, are made as commutator motors with sequential excitation: a silent and economical 1.5-2 kW asynchronous motor will be larger than any vacuum cleaner and will pull several tens of kilos. In order to obtain an acceptable efficiency of the commutator motor (on alternating current, generally speaking, for electric machines, it is very bad), more or less decent performance of the impeller and reduce the noise of the vacuum cleaner, its motor is designed to have a high rotation speed, more than 10,000 rpm. In this case, balancing the rotor (which in a commutator motor is called an armature) together with the impeller becomes of great importance. If, for example, you go into the compressor for “no reason” and slightly dent the impeller (or break a plastic blade), you will end up with a new compressor. Or, let’s say, the vacuum cleaner rattled, but pulled. Then I stopped pulling. We take it apart and look - the bearing seats in the housing are broken. Again I fell for the same thing. Therefore, the immutable rules that must be followed if suddenly the vacuum cleaner is acting up and there is a suspicion about the mechanics are as follows:
- Suddenly, a hum, vibration, clanging, knocking, and other sharp extraneous sounds appeared in the operation of the vacuum cleaner - do not delay repairs, it will cost more.
- If the vacuum cleaner gets hot and, especially, smells of burnt insulation, turn it off immediately and see before. paragraph.
- Before getting to the motor, carefully check all the possible sources of problems described above and the power cord drum, see below.
- Make sure that the voltage in the sockets corresponds to that indicated in the passport or on the nameplate of the vacuum cleaner. Its household norm is 185-245 V, but powerful AC commutator motors do not tolerate supply voltage fluctuations within such large limits; for them the norm (unless the manufacturer indicates otherwise) is 195-235 V.
- If you don’t know the ford, don’t go into the water - take on electromechanics, only knowing exactly what and how you will do there and what it will lead to.
We will further try to provide information on how and when it is possible to repair the vacuum cleaner engine with your own hands.
The internal structure of the vacuum cleaner fan motor is shown in pos. 1 pic. below, and at pos. 2 and 3 – variants of its execution. Pos. 2 – fastening with short screws from the back and the impeller casing with a tight fit (see also above) is used primarily. in modern vacuum cleaners; the entire air flow washes over the motor. Pos. 3 – the casing with a seal is secured with hairpin screws; this is an old, but still quite common option. In this case, there are no problems: unscrew the screws, pry up the casing with a screwdriver (it is stuck on the seal), and the casing falls off on its own.
Construction and disassembly of the vacuum cleaner motor
If the casing is a tight fit, very, very carefully, slowly, slowly tap its protruding side until the casing slides off. It would be better to place a steel strip 3-4 mm thick: without weakening the impact, it will distribute its force over the greater length of the side. By the way, assembly is in reverse order, just tap the neck. If it is not there, then the assembly is assembled on a special stand. Then – stop! We won’t go any further on our own.
But let’s say the casing is removed and we see the impeller, pos. 5. Dented or beaten - a new compressor, nothing can be done. At such a rotation speed, if a push pin gets into the impeller, the bearing seats will definitely become loose; what this means, see above.
Brush-collector assembly of the vacuum cleaner motor
Okay, the impeller is intact. We unscrew the fixing screws of the brush holders (shown by red arrows in the figure on the right) and take out the brush holders with brushes (green arrows). For now, we put it aside and check the impeller: without brushes it should rotate freely, easily, smoothly and make several revolutions with a sharp push with your finger. No - see below, but for now let’s take care of the brush-collector assembly.
We check the stubs of the brushes, they should remain at least 1-1.5 cm in length and exactly the same. If a hole is visible in the middle of the end of the brush, and there is some kind of copper in it, that’s it, the brushes are completely worn out. Brushes are replaced only and only in complete pairs. If one is worn even a millimeter more than the other, the pair of brushes is replaced regardless of the degree of overall wear.
We clean the collector with chamois moistened with alcohol and wipe it dry with flannel. God forbid you rub with sandpaper! The lamellas of vacuum cleaner motor collectors are made of copper-plated aluminum. The copper layer is thin: I sanded it until white - a new compressor. The same applies if a ring groove is found on the collector, burnt out by a circular fire. A circular fire surrounds the collector if you run the vacuum cleaner for a long time with clogged filters.
Now let’s say that the impeller rotates a little stiffly and/or not smoothly, as if it’s clinging to something. Actually, it can be removed using a pneumatic or hydraulic puller, but first you need to unscrew the nut with the left-hand thread holding the impeller. It is stuck tightly: every time you turn on the vacuum cleaner, the inertia of the impeller tends to tighten the nut. Having no skills in working with mechanics and electromechanics, it’s better to stop here and honestly tell the craftsmen: I don’t know how to do it myself, but I’m completely afraid of breaking it. But for amateurs who are fully proficient with the tool and with their own hands, we provide a video on how to unscrew the nut of the vacuum cleaner impeller:
Video: unscrewing the vacuum cleaner impeller nut
If the nut gives way, you can try to remove the impeller by carefully turning it left and right on the shaft with your hands. The shaft can be fixed with a nylon cord: one end of it is tied to some hole, the cord is tightly wrapped around the shaft under the impeller, then the assistant constantly pulls the free end of the cord, and you try to tear off the impeller. But under no circumstances jam the shaft with something hard! The silumin motor housing may crack, and then again - a new compressor. Some people even manage to turn the shaft in the anchor, which is imaginable, but with great difficulty.
Okay, the impeller has slipped. For what? To check the bearings. Add 1-2 drops of kerosene or brake fluid into the gaps between the bearing races and their seats in the housing. We take a nail, rest its tip against the hole on the shaft shank and try to push the anchor (see figure below) forward. If it doesn’t stick tightly, it will work out, because... The front bearing is larger than the rear. You can lightly tap the nail head with a light hammer, but be very careful - the silumin body may crack!
Armature (rotor) of the electric motor of the vacuum cleaner
Checking the rotation of the bearings. It will be difficult to remove the unusable ones, because... They are placed on the shaft journals with a cold tension, i.e. The armature is cooled before installing the bearings. You can try to warm up the bearings with a household hairdryer and, while they are hot, push them together with the ends of scissors. There are other ways, see, for example, how to replace the motor bearings of the rather popular Samsung SC4325 next. video:
Video: replacing the bearing of a Samsung SC4325 vacuum cleaner
What not to do
“Restore” broken bearings with lithol, fiol, etc. The engine speed is not right for such a trick to work. Also, there is no need to rewind the anchor yourself, due to the same rotation speed. After rewinding, its dynamic balancing is required. Not static in the centers! If there is a specialist who can rewind with a guarantee and will charge you less for it than a new compressor, you can try it. But you don’t need to do it yourself.
Drum
The power cord reel may have mechanical and electrical faults. Mechanical - damage to the locking lever and spring inside. In both cases, the cord either does not pull out or does not tighten back, completely or partially. The lever is usually flat, L-shaped; the new one is made from a piece of metal, no special precision is needed. To get to the spring (and contacts, see below), you need to completely wind the cord and disassemble the drum; All mounting screws are on the outside. Usually the spring breaks off. To bend a new one, the end of the spring is released by heating it over a fire. When reassembling the drum, wind the spring 2-3 turns and check the course of the cord. Does not extend completely - the initial winding needs to be loosened. The whole thing is not retracted - on the contrary, it should be strengthened.
The power cord in the drum is most often connected to the vacuum cleaner assembly using sliding contacts. Symptoms of their malfunction are that the vacuum cleaner works intermittently or does not turn on at all. It may coincide with the signs of a turn short circuit: it gets hot, it doesn’t draw well, it has burnt insulation. However, it is useless to check contacts with a tester: it will not detect intermittent point non-contacts.
The drum contacts are checked with a homemade probe from any earphone and a AA battery, well known to radio amateurs. See Fig. for verification diagram:
Checking the drum contacts of the vacuum cleaner power cord
The procedure is:
- One probe (no matter which one) is placed on the contact pad of the drum (shown by red arrows).
- With another probe, click the earphone to find the corresponding pin of the power plug.
- One person listens to what is in the earphone, holding the plug to himself, and the other person pulls the cord completely through the loop and releases it.
There should be dead silence in the earphone all the time. The slightest rustle - the drum needs to be sorted out, cleaned, straightened or the contacts changed. The current through the earphone is only a few mA, but what will happen when the standard 5-10 A flows through the circuit?
Wiper blades
Malfunctions of the vacuum cleaner are also possible in the active tips, i.e. performing cleaning functions. How their main varieties are structured and operate is shown in Fig. below. In the wet mopping handpiece (left in the figure), the main source of failure is the user. The detergent pump is not designed to run dry. If you do not prime the vacuum cleaner before cleaning, its motor will fail. The pump is structurally integral to the detergent tank and cannot be repaired. As for the tubes for supplying the detergent and its sprayer, they are outside, transparent, and blockages in them are immediately visible. To clean, the supply tube is simply pulled off the fitting on the vacuum cleaner and sprayer, and simply put back on. Replacement is also easy: any plastic tube of suitable diameter.
The design of active tips of a vacuum cleaner for wet cleaning and sweeping
To see the structure of the dry (sweeping) active tip (on the right in the figure), you need to remove the side covers that sit on friction or latches on the tip hinge (in the center in the figure) or directly on the sides of the brush. The low-power, dust-proof brush motor rarely fails. Somewhat more often, the drive belt sags and slips (green arrow on the right in the figure) or the bristles of the throwing drum wear out; it should protrude beyond the lower plane of the tip by at least 8-9 mm. The throwing drum cannot be restored; it must be replaced with a new one. Quite often there is also a break in the power supply wires of the sweeping drum drive. The wires run inside the hose; how to replace them in the fairly widespread Samsung SC-6573 vacuum cleaner, see the story:
Video: repairing wires in a hose with a regulator (Samsung SC-6573)
The main malfunctions of vacuum cleaners from different manufacturers
For each manufacturer, we can identify the most common problem encountered in manufactured models. The analysis below is based on online customer reviews.
Samsung
Samsung vacuum cleaners are quite reliable, but they also require careful treatment and timely maintenance. It is necessary to monitor the condition of the filters and dust collector and clean them regularly. There are also problems with the motor and the power button.
LG
Judging by user reviews, vacuum cleaners from this manufacturer quickly clog filters and lose suction power; fragile attachments break faster than wear out. There are cases of excessive heating and shutdown during operation.
Philips
Those who at one time preferred vacuum cleaners from this company say that over time the suction ability is lost and the noise during operation increases. There are complaints about an unpleasant odor during operation and a poorly winding cord.
The Philips vacuum cleaner caused the following reaction from our author: Philips FC 9184
Bosch
Over time, the rubber seals of these vacuum cleaners suffer, and the parts fit less well to each other. Bosh often releases cordless models, and the batteries also sometimes require replacement. Often the engine also fails.
Dyson
In reviews of Dyson vacuum cleaners, there are practically no complaints about their performance. The only thing is that with wireless models, the battery discharges faster and faster over time and it has to be replaced (which, in principle, is natural).
Thomas
The Thomas company mainly produces vacuum cleaners with an aqua filter, and they require increased care - washing after each cleaning and drying thoroughly, otherwise they quickly fail and an unpleasant odor appears during cleaning. Also in the reviews there are complaints about the easily torn hose.
Typical vacuum cleaner breakdowns
What breaks in a vacuum cleaner.
- brushes;
- bearings;
- motor windings;
- power cord;
- fuse.
Other vacuum cleaners have two motors. The second is located on the brush, where it makes the bristles move. Cyclone models use turbos and move air to do the work. The design refinement simplifies the manufacture of the hose and eliminates one big problem when the wire breaks in the thickness of the rubber. Of course, modern tools will allow you to accurately determine the location of the incident; it is better to avoid breakdowns altogether. The idea of the designers who placed a motor inside the brush is easy to understand: there is no need to press when cleaning, the weight is decent. Decide for yourself whether you like it. In the opinion of the editors, the brush should be light to make it easier to operate.
Repair of washing vacuum cleaners is no different from that described above. However, the units house a pump that supplies water to the hose. We will return to the issue in the reviews later. As for the input path, the configuration does not differ from the usual one, except for the presence of a water filter. Most look like sad boxes filled with water. In some vacuum cleaners with an aqua filter, thin streams of water flow at the junction of the hose and the body. Primary dust collection works. However, it is difficult to notice the malfunction. It’s another matter if the vacuum cleaner is equipped with a self-diagnosis option, which will tell you the location of the breakdown.
Repairing robotic vacuum cleaners closely affects the field of electronics. There are no service mechanisms at all. However, you will find the engine in a reduced size. Most of the functions are implemented by microcircuits, the memory can accommodate various programs. Repairing Electrolux vacuum cleaners will seem like child's play compared to the task of getting Rumba or Scuba working from the American company iRobot (developer of US army and police automatic equipment). A significant disadvantage of robots is the inability to clean uneven surfaces. Electronic servants lack the ability to create a vacuum... they use a rotating brush to sweep away dust.
The main causes of breakdowns and recommendations for safe operation of the vacuum cleaner
The main causes of breakdowns are incorrect or careless operation of the device and insufficient care. In order for the vacuum cleaner to last longer, it is important to perform simple preventive actions:
- Monitor the cleanliness of the filter elements - collect dirt, wash if necessary and change on time. Using a vacuum cleaner with damaged filters will sooner or later lead to engine failure;
- lubricate and promptly replace bearings with new ones;
- do not drop or hit to avoid mechanical damage - chips, cracks;
- store correctly. A suspended or unsuccessfully twisted corrugated hose will sooner or later break, high humidity in the room or too low temperatures contribute to the failure of electrical contacts, etc.;
- read and follow the operating instructions.
It is important to protect not only the vacuum cleaner, but also yourself: under no circumstances use a device with a damaged housing or power cord insulation - this could result in electric shock.
© obzorok.ru