Household appliances break down over time as a result of wear and tear or improper handling. If the vacuum cleaner does not turn on, then a problem arises with cleaning; it is difficult to keep the apartment clean without such an assistant. In such a situation, there is a need to quickly resolve the issue of troubleshooting.
You can get rid of the problem in the following ways: take the vacuum cleaner to the nearest service center and try to deal with it yourself.
The vacuum cleaner may turn off during operation, have poor suction, buzz loudly, or not turn on. It is necessary to understand the cause of the equipment malfunction and, if possible, eliminate it. This will require patience, simple electrical appliances and tools. The complexity of the repair depends on the type of fault. First you need to find out the reason why the vacuum cleaner does not turn on. In most cases, the task can be completed without outside help. To do this, you need to carefully inspect the vacuum cleaner for visible damage. And if they are missing, disassemble the body and diagnose the parts.
Why doesn't the vacuum cleaner work?
Vacuum cleaners differ in design, power, and manufacturer. The main part of the device is an electric motor; it creates a vacuum, which leads to the absorption of dust. Different models use different types of filters and dust bags, which must be kept clean. But the principle of operation of the products is similar, so identifying the causes of failure is carried out according to the same scheme.
Before starting work, turn off the vacuum cleaner, this will help avoid electrical injuries.
It is necessary to find out the cause of the breakdown in order to decide on further actions. To do this, you need to remove the case; each model has its own characteristics. Before removing the filters, unscrew the housing screws. Then you need to carefully inspect the device for the presence of hidden fasteners, otherwise when removing the part you can break it.
The device may not work for the following reasons:
- Faulty socket.
- The cord is damaged or kinked.
- The problem is the plug.
- The power button does not work.
- The thermal protection of the electric motor is disabled.
- The motor is broken.
Often the main cause of device malfunction is engine overheating. This problem in most cases occurs on hot summer days, when the device is used for a long time. The vacuum cleaner is disassembled in the off state, the motor is found and then the device is plugged in.
If the engine sparks, this is possible for the following reasons: wear of the graphite brushes, a short circuit in the armature winding, or the load on the engine is exceeded. In such a situation, the filters could become clogged and need to be cleaned, or the bearings could wear out and need to be replaced. If a short circuit occurs due to overheating, the motor may burn out. In this case, it cannot be repaired; only replacement is possible.
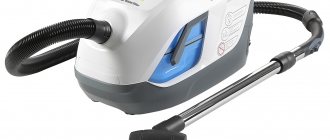
Samsung vacuum cleaner won't turn on
Among the reasons when professional repair is necessary are factors that seem simple at first glance, but they cannot be identified without disassembling and diagnosing the vacuum cleaner.
The inability to start the device motor may be due to the following malfunctions:
- The start button doesn't work. Of course, the manufacturer expects that the vacuum cleaner start button will be pressed many times, so wear-resistant material is used in this part of the vacuum cleaner. Button malfunctions are among the top reasons why a Samsung vacuum cleaner does not turn on.
- disturbances in the motor winding. This problem can be identified when disassembling the device. The solution method is to eliminate the root cause. as well as restoration of the engine winding fabric.
- The control board has defects and has failed. Depending on related factors, the element will need to be replaced or repaired.
- device power cable is broken. At first glance, this is a simple situation, but to indicate it you will need to test the cable with a special device - a multimeter.
- violation of contacts between the brush terminal and the winding. The problem is solved by strengthening the connection points and sealing the wires.
Tweet
Diagnosis and Troubleshooting
Check the functionality of the outlet by connecting other household appliances to it or connecting the vacuum cleaner to another source. It is possible to use indicators showing the voltage in the electrical network. Another way to check is to use a voltage detector. The power connection cord is movable, so during operation kinks occur, contact is lost and the device stops turning on. Carry out a thorough inspection of the cord, especially the place where it enters the vacuum cleaner and the plug for mechanical damage and kinks. If defects are found, it must be replaced.
If visual damage cannot be found, you will have to disassemble the device. After opening the vacuum cleaner body, remove the panel with the power and cable rewind buttons. It is necessary to inspect the cable to the point where it is connected to the control board. We plug the device into the outlet and check for voltage at the connection points. If it is absent, the cable is checked for kinks and damage. The damaged cord is removed from the housing, a new one is soldered to the contacts, you must ensure that it passes through the hole in the cover. All elements of the device are put in place, all that remains is to check the operation of the device.
If no faults are found, then after disconnecting the device from the network, disconnect the plug. You need to unscrew the screws and inspect it inside if it is disassembled. In many models it has a monolithic structure and is checked for external damage. If the part cannot be disassembled, a knife will do; check the cord and plug for voltage using a special device.
The faulty part should be found or the broken contact in the plug should be corrected. The part must be separated from the cord, the cable sheath removed, the wires disconnected and the insulation removed. Then the wires are stripped, a connection is made, and the ends of the wire are twisted. After a simple procedure, the plug must be carefully connected to the cord. After the work has been done, the electrical appliance is turned on to check its functionality.
The power button often breaks at the contact point. To repair it, you need a soldering iron, which can be used to desolder the part and install a new one. If you cannot purchase such a spare part, you can try to repair it yourself. The contact may be broken, or it may simply be clogged. If the button turns out to be working, then look for a triac on the board. The device is connected to the network and the voltage at the output to the engine is measured; if there is no voltage, the part should be replaced.
How to replace spare parts on a Samsung vacuum cleaner yourself?
To replace the graphic brushes, you need to unscrew and remove all the plastic caps, then remove the springs. Be sure to clean the springs with sandpaper. Next, replace the old brushes with new ones. We reassemble in reverse order.
To replace the bearing, the same disassembly steps are performed as with the brushes. After you have taken out all the brushes, you need to unscrew all the covers from the engine, one by one. It is better to do this with a small screwdriver, very carefully so as not to damage the electrical winding. After all the covers are removed, carefully, helping yourself with a screwdriver, replace the bearings with new ones. We reassemble in reverse order.
If you decide to replace the bearing yourself, it is recommended that during disassembly you sketch out all your actions, especially the wiring diagram. It's better to play it safe and not mix anything up.
It is also important, when repairing a Samsung vacuum cleaner, to use high-quality parts and spare parts. If you are not confident in your abilities, it is better to seek help from a specialist.
Checking the serviceability of the electric motor
If there is voltage at the output of the triac, the reason is in the motor. But before drawing such a conclusion, check the thermoregulation relay. It is responsible for protecting the engine from overheating. When the device operates for a long time, the housing heats up, which leads to the device turning off. To fix this problem, just let the engine cool down. After this, the vacuum cleaner will work again.
If the reason is not in the relay, then check the brushes. When worn, the chain between the winding and the rotor disappears. The parts must fit tightly to the rotor and have some margin along the way. Over time, the brushes grind in, the core wears off, which leads to an increase in the area of contact with the commutator. They work until they wear off.
In some cases, to restore the functionality of the mechanism, it is enough to replace the brushes. You can complete the task yourself. Next, the stator circuit, rotor, and brushes are checked. If everything is fine with it, then the reason may be in the rotor winding. This is an expensive part.
The fact that the electric motor has burned out is indicated by the appearance of a burning smell. If there is no smell, then there is a chance to fix the breakdown without buying a new motor. The engine cannot be disassembled, so the wire connections are checked through the holes in the housing. Check the connection points of the windings to the terminals and brushes. During intensive use, the product experiences constant vibrations, the wire may break and the circuit will be open.
What you can do on your own
What should I do if the vacuum cleaner turns off during cleaning and does not turn on again, or when it does not turn on after storage? First you need to understand what happened. The algorithm of actions (and it must be performed sequentially) will be the same for all devices, regardless of the type of dust collector, be it a container, bag or aquafilter.
- Check the power source. If there is electricity in the apartment, try plugging the vacuum cleaner into a different outlet. Perhaps the breakdown did not happen to him, but to the socket.
- Inspect the power cord and plug for breaks, kinks, or other defects. The plug should not be melted, there should be no visible damage in connection with the cord or on it itself.
- The next likely problem is the dust collector. If it is clogged, a safety shutdown may be triggered. Empty the dust container or change the bag. Check the hose to see if it is clogged with large debris.
Dust container is full
If the vacuum cleaner does not come to life at any stage of the diagnosis, the problem is a broken or burnt out motor. In this case, only service technicians will help, who will test the device on professional equipment and repair it.
Checking the serviceability of the electric motor
If there is voltage at the output of the triac, the reason is in the motor. But before drawing such a conclusion, check the thermoregulation relay. It is responsible for protecting the engine from overheating. When the device operates for a long time, the housing heats up, which leads to the device turning off. To fix this problem, just let the engine cool down. After this, the vacuum cleaner will work again.
If the reason is not in the relay, then check the brushes. When worn, the chain between the winding and the rotor disappears. The parts must fit tightly to the rotor and have some margin along the way. Over time, the brushes grind in, the core wears off, which leads to an increase in the area of contact with the commutator. They work until they wear off.
In some cases, to restore the functionality of the mechanism, it is enough to replace the brushes. You can complete the task yourself. Next, the stator circuit, rotor, and brushes are checked. If everything is fine with it, then the reason may be in the rotor winding. This is an expensive part.
The fact that the electric motor has burned out is indicated by the appearance of a burning smell. If there is no smell, then there is a chance to fix the breakdown without buying a new motor. The engine cannot be disassembled, so the wire connections are checked through the holes in the housing. Check the connection points of the windings to the terminals and brushes. During intensive use, the product experiences constant vibrations, the wire may break and the circuit will be open.
Try to tighten the wire and secure it. If this cannot be done, solder another piece of a few centimeters. This is quite difficult to do; you have to solder through a small hole. But it is possible to complete the task, as a result of which the device will work again. This is much cheaper than purchasing a new motor, which is the most expensive part of the device. If the product has already served its service life, then replacing the engine is unprofitable; it is better to purchase a new vacuum cleaner.
Damaged wire
The most loaded place is the wire entrance to the housing. In this part it is reinforced with a special casing. But this does not always help against damage.
If when you turn on the vacuum cleaner there are no signs of life, but when you move the cord near the body it starts working, the problem has been identified.
We need to ring the wire. First, one core, bending it in all suspicious places, then the second. The damage can be determined immediately; it will be clear from the sound.
The damaged piece is cut off and replaced.
Power button
If the power button is broken, it can be repaired without outside help.
Attention! You should not carry out repairs yourself if the vacuum cleaner is under warranty. In this situation, it would be correct to take the device to a service center, since this problem is covered under warranty.
Incorrect operation of the device, the habit of turning on the vacuum cleaner with your foot, leads to the start button getting stuck and breaking down. A button that does not lock needs to be replaced.
Microswitch
If the problem is a worn microswitch, then there are 2 possible solutions.
- Complete replacement of the switch with the same one.
- Repair. You will need to clean the oxide deposits from the button by first disassembling it. When it is not strong, wipe the contacts with ethanol without disassembling them. This requires a strong press on the button.
You can handle the problem yourself.
Clogged filters
Before you start cleaning filters, you should understand their classification. There are several categories:
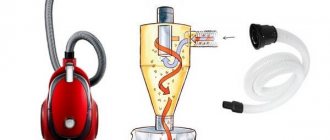
- Water - located above a reservoir of water. Once on the surface of the filter, the dust gets wet and settles to the bottom of the container, which not only cleans but also humidifies the air.
- Cyclonic - equipped with special blocks in which, under the influence of a whirlwind, dust settles.
- Fine cleaning - thanks to the use of special impregnated fibrous material, they are the most effective dust absorbers.
- Bags—disposable (paper) or reusable (made of synthetic fabric)—keep dust inside.
The filter cleaning process consists of several stages:
- the vacuum cleaner is disconnected from the network;
- open the housing cover and take out the filter;
- washed with water and dried;
- a completely dry filter is installed in place.
However, each type of filter has its own nuances:
- Filter bags are not washed with water, but are emptied as they are filled. Disposable ones are replaced with new ones.
- Cyclone filters should be cleaned after each cleaning - all elements are washed under cold water.
- Water filters are disassembled into two parts (the container and the filter itself), after which each element is washed under running water.
- Fine filters can be disposable, made of paper, or reusable, made of polymer. In the first case, the filter can be purged with air. In the second - wash.
How to prevent vacuum cleaner breakdown?
Modern technology has protection that controls the operating parameters of the device. Automation can turn off the operation of the device for the following reasons:
- Filling a garbage bag. This is evidenced by the appearance of the smell of dust, which enters the room through the holes in the mechanism body.
- If a large object hits the air duct.
- The hose is clogged. In this case, you may notice a change in sound when the engine is running.
- The motor protection filter is dirty. A specific smell of burnt dust appears.
To fix such problems, you don’t need to call a technician; just unplug the device and clean it of any debris accumulated inside. A completely filled garbage bag must be replaced or cleaned; it is not recommended to turn on the device without a dust collector. The vacuum cleaner is disconnected from the network, the cover is removed to provide access to the container. If your model does not have a self-closing neck valve, close the neck and then remove the bag. It is replaced with a new dust collector or cleaned of dirt, then it is installed in place. When installing the bag, make sure that the neck fits well to the bag holder. If this is not done, the motor may overheat.
The instructions indicate how many filters the model has; they must be periodically checked and cleaned of debris. Before this operation, the device is disconnected from the power supply, the filter is removed and cleaned; in some models this element can be washed. It must be dry before installation. The filter is replaced in accordance with the manufacturer's recommendations. The hose is checked after it is disconnected from the device. If a blockage is found, it is removed. To do this, remove the nozzle and straighten the hose, then connect it to the device and turn on the vacuum cleaner. If the air duct is clogged, disconnect the pipe and remove debris, if any, there.
The bulk of all device breakdowns occur as a result of motor overheating. Do not overload the mechanism or operate it continuously for more than 40 minutes. After working for 20 minutes, the device requires rest, which eliminates the possibility of overheating. If the model uses a dust bag, it must be cleaned in a timely manner. When it is filled to 100%, air does not flow freely, which creates additional conditions for overheating. In cyclone-type models, you should monitor the cleanliness of the plastic container (read more about maintenance procedures - an eternal vacuum cleaner, or rules for caring for household appliances).
How to prevent the possibility of breakdown?
Because In most cases, breakdowns occur due to engine overheating; at a minimum, the load must be reduced. No need to vacuum for 30-40 minutes continuously. After every 20 minutes, the vacuum cleaner must be given a well-deserved rest, which will eliminate the possibility of severe overheating. If you have a model with a dust bag, then it is highly not recommended to wait until this bag is 100% full. Even if 50% of its possible volume of dust has accumulated, you should clean it and remove the contents. Why is this necessary? The fact is that when the bag is full, air cannot pass through it freely, which creates additional conditions for overheating. Our task is to reduce these conditions to a minimum.
Even if you have a cyclone-type model with a dust collector in the form of a plastic container, you should not delay cleaning it. And in general, read the operating instructions - this is sometimes very useful.
Sources
- https://ubratdoma.ru/bytovaya-tehnika/ne-vklyuchaetsya-pylesos.html
- https://chistoclub.com/sovety/chto-delat-esli-pylesos-ne-vklyuchaetsya/
- https://obzorok.ru/neispravnosti-pyilesosov/613-osnovnyie-polomki-pyilesosov-raznyix-proizvoditelej-prichinyi-vozniknoveniya-i-puti-ustraneniya.html
- https://tehnika.expert/dlya-chistoty-i-poryadka/pylesos/pochemu-otklyuchaetsya-vo-vremya-raboty.html
- https://tehnika.expert/dlya-chistoty-i-poryadka/pylesos/ne-vklyuchaetsya-chto-delat.html
- https://1V.kz/almaty/pylesosy/prichiny-po-kotorym-ne-vklyuchaetsya-pylesos/
- https://PyleSOS.tech/ne-vklucaetsa-pylesos.html
- https://kliningovyj-raj.ru/tehnika-i-sredstva/pochemu-greetsya-pylesos/
- https://tehnika-soveti.ru/kogda-py-lesos-ne-vklyuchaetsya/
Results and recommendations
Read the instructions for use of the device carefully, this will help you avoid problems with its operation. Strictly adhere to the instructions specified by the manufacturer to prevent problems with the operation of the device. When equipment breaks down, a person is faced with a dilemma: to sort it out on his own or immediately contact a service center. To repair a vacuum cleaner yourself, you may need simple skills in handling electrical appliances and the most basic knowledge of electrical engineering. The choice always remains with the consumer: disassemble the device at your own peril and risk or seek help from specialists. If there are fears that attempts to eliminate the malfunction will lead to permanent breakdown of the equipment, then it is better not to take risks.
A vacuum cleaner is a fairly simple device, and in many cases you can repair it yourself. The only exception is a short circuit inside the electric motor. It will not be possible to eliminate damage by rewinding the windings due to the non-separable motor housing. In this case, you will have to change the entire electric motor, which is not cheap.
If you are not sure that you can cope with the task of identifying and repairing a vacuum cleaner, then it is better to contact professionals.
They will be able to quickly cope with the task and restore the functionality of the device.
Should I do it myself or take it to a service center?
A similar dilemma faces every owner who has at least once encountered the problem of a home assistant failing. By following the above instructions, you can easily determine the cause of the breakdown and take appropriate measures to eliminate it.
To carry out repairs, you may need certain skills in handling electrical appliances and knowledge of the basic fundamentals of electrical engineering, at least at the level of school physics. If for any reason you doubt your own abilities and awareness on any issue, it is better to use the services of real specialists and professionals. Remember - the choice is always yours, as is the responsibility for the result. If you are afraid that you could make things even worse and completely ruin your broken vacuum cleaner, also contact the service center or support center.
The vacuum cleaner does not turn on
Perhaps the most frightening situation is that the vacuum cleaner stops turning on, or suddenly turns off during operation. The thought of the need to buy a new one immediately scrolls through my head. And the reasons for this may not be so terrible:
- A sudden shutdown of the vacuum cleaner may be caused by the thermal switch tripping due to overheating of the device. Excessive heating may be due to clogged filters or garbage bags. Simply clean or replace them.
- The power cord is broken. It happens that the wire breaks at the point of attachment to the plug or to the vacuum cleaner, causing contact to be lost. During the repair process, the cord will have to be completely replaced.
If you have some soldering skills, it won't be too difficult to do it yourself. The cost of 1 m of cord averages 200-300 rubles (3-5 $).
- The fuse has blown. Replacement will cost 600-900 rubles ($9-14), including the cost of the element itself.
- The button doesn't work.
Restoring the part will cost around 900-1200 rubles ($14-18).
More serious breakdowns, such as a faulty motor, are also possible, but they are less common.