Shock absorbers (dampers) are devices included in the design of a washing machine, designed to dampen (dampen) vibrations that occur during washing. If the washing machine has strong vibrations or uncharacteristic knocking noises, then most likely the shock-absorbing devices have failed. Shock absorbers were used in old car models, but modern cars use dampers, they are similar to each other, their only difference is the absence of return springs. Dampers are located at the bottom of the unit under the tank, and springs are installed at the top of the housing to suspend the tank.
The device of shock absorbers and dampers of the washing machine
The friction shock absorber (1) is designed for centrifugal drum washing machines. The shock absorber contains a housing (2) and a movable pusher (4) installed in it parallel to its longitudinal axis (2a) and removed from the housing (2); at its end, located in the housing (2), a friction lining is movably installed. The friction lining (8) or the body carrying the friction lining (8) is equipped with an installation socket (22) for receiving a spacer (23). The friction lining (8) is movably mounted on the pusher (4), the guide element (20) is pre-tensioned between the friction lining (8) and the guide surface or sliding surface (21) matched with it, and a spacer (23) is provided. to establish a frictionally effective geometric parameter (24) and/or to tension the friction lining (8) to influence the frictional force between the friction lining and the matched sliding surface. The spacer (23) is made in the form of a fixing or fastening element of the guide element (20) matched with the friction lining (8). 2 n. and 21 salary f-ly, 9 ill.
Link to source of schematic description: https://findpatent.ru/patent/248/2486299.html
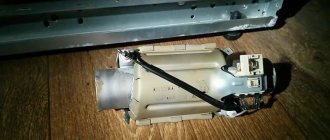
Each damper operates due to the resistance that arises during the mutual movement of its components. Most shock absorbers have a classic configuration and consist of a fixed body, a cylinder and a movable rod (piston) that runs in the cylinder.
Various polymer and rubber gaskets (O-rings) lubricated with a special lubricant are installed on the rod or inside the body, ensuring tight interaction of the surfaces. The damper body is attached to the bottom of the machine through a special silent block (rubber-metal hinge), and the rod is connected to the tank of the machine. To ensure longitudinal movement, both parts are secured using sliding metal pins, and the pin itself is secured against axial displacement with keys of various types.
Shock absorbers in different models of washing machines may differ:
- Dimensions (length, width);
- Material (plastic, metal);
- Shape and type of fastening.
For example, dampers for the Candy washing machine have a rather specific housing mount. It is fastened with rivets to the bottom of the unit, and the rod is attached to the tank through a bushing using a bolt.
Dampers for Bosch washing machines have a durable plastic body and a cylinder with a metal base. They are attached to the drum with a bolt through a metal rubberized bushing, and to the body through a polymer bushing with a plastic pin.
Damper: design
In design, it is not much different from the part described above.
As for damping tank vibrations, dampers have much better performance in this area. They are more reliable because the springs that return the piston to its place are located outside. Often a broken damper can be repaired if it breaks, which is not the case with shock absorbers.
They are located in pairs below and perform two functions at once:
- Support the tank.
- They dampen tank vibrations.
In such designs, the tank is fixed on top by two additional springs.
Repair and replacement of damper with pressed liner
These dampers are widespread and used by many manufacturers of washing machines.
The damper dampens vibrations due to the friction of the piston, which is tightly clamped by the liners. The liners are clamped using a bracket, the design of which resembles the letter “P”. The latter is secured inside the SM with a special gasket.
It happens that the adhesion force of such liners noticeably weakens. Vibrations are suppressed more and more poorly, but replacing the damper is not required - repairs will help.
If the vibrations become stronger, you need to tighten the bracket or replace the liners if they are worn:
- Unscrew the 4 fasteners securing the bracket.
- Remove the bracket.
- Unbend the “whiskers” of the part.
- Remove the old liners.
- Install new ones.
- Reassemble the damper.
Replacement features
The dampers have specialized holes to which they are attached.
The fixing elements are most often bolts. Removing such bolts, like any fastener, is not difficult. Having done this, you can easily remove the broken part and install a new one in its place.
In this video, a technician from the UK shows how to change the damper by working through the bottom of the washing machine. If you are the owner of a similar model, then do the same:
Causes and symptoms of malfunction
Malfunctions in the operation of washing machine dampers occur for the following reasons:
- Wear of mating elements (o-rings);
- Long-term loads and vibrations;
- Drying of the lubricant inside the cylinder and violation of operating rules. Branded shock absorbers in Samsung, LG, Siemens, AEG, or Ariston washing machines usually last 5-7 years without any visible disturbances in their operation.
With constant overload of the washing drum, especially in spin modes, the service life of the damping elements decreases. You can determine that the shock absorber is faulty based on several signs:
- strong vibration of the washing machine body, especially at high speeds; characteristic knocking sound when washing;
- The engine drive belt constantly weakens and falls off;
Due to the beating of the drum, its sealed connection with the rubber cuff is broken (for washing machines with horizontal loading) leading to water leaks.
There are several ways to check dampers for working condition:
- Remove the top cover of the washing machine. After removing the cover, press firmly on the washing tank, it should smoothly return to its place, but if the tank returns jerkily, this means that the devices are not working properly and require replacement.
- The second, more reliable way to check is to completely remove the shock absorbers from their seats.
How to remove and check shock absorbers from a washing machine
All damping elements are protected by the body and lining; in order to get to the damper mounts for different models of washing machines, different disassembly approaches are required.
When replacing dampers on a washing machine, there is no need to completely disassemble it. For example, to provide access to shock absorbers on Bosch washing machines, simply remove the front cover. In these models, the dampers have a classic single-bolt mount, located at the bottom of the unit. The upper part of the attachment to the tank is held on by latches that are part of it.
In order to remove the shock absorber from the tank, the connection is drilled with a long drill with a diameter of 13 mm, then you need to remove the part through the front of the machine.
On some LG models, you do not need to remove any covers to remove the damper. To do this, just put the unit on its side, having previously disconnected it from the power supply, water supply and sewerage. The shock absorber is secured on both sides with plastic pins with locking latches. By pressing the latch, you can easily remove your finger from the hole, freeing it from the fastening. If the finger is very difficult to remove, you can use a special tool such as a car VD shk.
In Samsung washing machines, bolts of size M8 or M10 are most often used to secure dampers. They are unscrewed using spanners or socket heads, 12-13 mm in size. Bolt-on mounting is used on models from Miele, AEG and many other manufacturers. In Wirhpool models, the shock absorbers on both sides are fastened with special latches; by pressing them, you can freely remove the damping elements.
Regardless of the mounting method, removal must be done carefully, without using impact tools that could damage the plastic tank or other elements of the device. Checking the damper is carried out by simply pressing the rod and pulling it out of the body. In this case, there should be noticeable resistance to pressing by hand. If the rod fits in freely, or in some cases simply falls out of the body, the shock absorber requires replacement. In some dampers, a special sealing lubricant is placed in the internal cavity of the housing.
If the rod extends freely and there is no lubrication, and traces of rust are visible inside, we can talk about wear and tear and unsuitability of the shock-absorbing devices.
Algorithm
Modern washing machines are disassembled according to one principle. The main difference is in the design of the tank. For example, LG has a collapsible one. Similar ones are installed in Electrolux, AEG, Samsung. To remove the drum, you need to release the mounting screws.
Cars like "Ariston" or "Indesit" have a solid tank. Replacing the entire structure is quite expensive, so experienced craftsmen use several tricks that allow them to replace or lubricate bearings and other parts without updating the entire tank.
First stage:
- First of all, you need to open the door slightly and unplug the machine.
- The easiest way to replace pumps in modern devices. They are located at the bottom of the machine and are accessible through the bottom. Therefore, the first thing to do is to put the car on its side or tilt it back and rest it against the wall.
- Remove the front lower panel.
- In many models, shock absorbers and other elements are attached to the bottom. If inspection and repair of defenders is not necessary, it is better not to touch such a bottom, but to remove the face shield. To do this, remove the powder tray (it is secured with self-tapping screws and the water supply valve).
- Remove the control panel.
- Unscrew the screws of the front shield.
- Using a screwdriver, carefully pry off the clamp that holds the cuff, so as not to damage the rubber, and remove it.
- Press the cuff inside the drum and remove the panel.
- Disconnect the wires and set the shield aside.
- Now you can easily disconnect the pump. The most common breakdown in this unit is a blockage or a hole in the pipe (which causes water to leak under the machine) and wear of the armature/motor (which causes vibration when spinning and draining water).
- Clean the pipe and filter from accumulated debris.
- If there is a gap or defect in the motor, replace the pump parts.
We recommend: What do you need to know about the first launch of a new washing machine?
After the first stage, access to the shock absorbers/defenders opens. The simplest case is grease abrasion. To restore it, you need to unscrew the parts, extend the rod as much as possible, apply a thick, high-temperature, wear-resistant lubricant to its base and fold and unfold the mechanism several times.
After 10 years of operation, most often the depreciation fails completely. The drum begins to “beat” and make noise during the spin cycle, the machine begins to vibrate and “jump,” and leaks are possible. In such cases, experts recommend replacing the shock absorbers.
LifehackHome craftsmen have found a way to restore defenders and shock absorbers. To do this, you need to remove the rod, as well as the sealing ring-locker. Pour out the “dust” of the gasket and replace it with a piece of leather belt, 2-3 mm thick and approximately 21 mm wide. The section is inserted into the defender body as a ring, with the smooth side facing the body. Next, the gasket together with the rod is treated with a wear-resistant and necessarily viscous lubricant. Machine oil will quickly drain and wear out; such repairs will only last for a couple of months.
Second phase:
- Remove the back panel.
- Remove the weight - the layer that lies on top of the tank.
- Next, remove the clamp that transmits rotation to the tank.
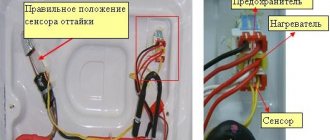
- Using a small screwdriver, press the tabs on the plugs to disconnect the wires from the heating element, tank and motor.
- Unscrew and set aside the motor.
- Disconnect the heating element and water sensors.
- Loosen the fasteners of the tank itself and carefully remove it.
- Remove remaining weight.
After the second stage, the tank is opened, which contains the drum of the washing machine. The detachable one can be easily disassembled, but most modern machines have a one-piece design. It will have to be opened by first treating the seam with sandpaper.
Third stage:
- Cut or unscrew the tank and set aside the top half.
- Remove the gasket or sealant, if there was such a layer.
- Turn the structure over and remove the flywheel on the rear wall of the tank.
We recommend: TOP 5 best washing machine models in 2019-2020: artificial intelligence and new features
Finally the bearing opened. But in order to remove it and lubricate or clean it, you need to free the drum. To do this, place the screw where the flywheel was, and use a hammer to knock the structure out of the “saddle” through the fabric. The pin will come out of the tank and the drum will be separated.
Tip: If you have little experience in disassembling washing machines, take pictures of each significant step and sort the screws so as not to confuse them later. This is especially important when connecting wires.
Fourth stage:
- Remove the oil seal.
- Use a pipe of suitable diameter to pull out the bearing.
It's easier to throw away a broken part. The collapsible one should be washed in oil or gasoline, and then filled with semi-liquid lubricant. Most often the bearing is simply replaced.
Important: If you want your work not to be in vain, buy replacement high-quality German or Polish bearings that are resistant to moisture and high temperature, vibration and wear.
Often the problem is found in the oil seal - the gasket remains without lubrication and breaks or becomes deformed. The faulty part must be replaced with a new one. When assembling, be sure to apply moisture-resistant grease (it is applied to the inner diameter along which the bearing will slide.
Having removed everything, you need to carefully inspect the bushing (the pulley on which the bearing and oil seal are actually put on). All rust and limescale must be wiped off. If scratches are exposed, it is useless to mask and polish them - the bushing will have to be replaced. The same thing happens if the original bearing has become stuck. Trying to cut it with a grinder will only risk the drum. Most likely, trying to free the bushing will damage it - it’s easier to install another one.
If the bearing is non-separable, it can be washed. To do this, the part is spilled with oil, placing a bag and rotating the disk to remove as much dirt as possible.
How to assemble a cut tank A cut tank along the cut is covered with polyurethane or silicone sealant, and then closed with screws, nuts and self-tapping screws strictly along the entire perimeter. If the fastening is not secure, the tank will separate during startup!
According to experts, there is nothing difficult about disassembling a car. It is enough to be careful and know exactly what needs to be done. In practice, inexperienced craftsmen often make mistakes that cause the machine to fail. Miss Clean magazine suggests that novice repairmen start by replacing components that are easier to dismantle, such as pumps or shock absorbers, and try more complex operations first on an old machine that needs to be recycled.
How to repair washing machine shock absorbers
New vibration dampers for modern cars cost from 500 to 3,000 rubles per pair, depending on the model. Although this amount is not critical, in some cases it is possible to restore the old shock absorber. Owners of washing machines simply remove the remaining sealing elements from the body. Using the selection method, homemade parts from cut rubber pipes, leather belts or pieces of linoleum are installed in their place.
The main thing with such a restoration is to achieve a high-quality seal of the connection of the rod in the body. The cut parts are fixed in the body; for smoother operation, the connection is lubricated with technical or other grease. This type of repair can hardly be called reliable. In the best case, such a damper will last several dozen washing cycles, and malfunctioning or jamming will lead to breakage of other parts.
With modern repairs, the faulty damper element assembly is replaced with a new one, and both shock absorbers must be replaced, even if one of them is in perfect condition!
How to change shock absorbers in a washing machine
The ideal option when repairing shock absorbers is to replace them with an original spare part with the same characteristics. It happens that the necessary original spare parts are not on sale, or they need to be ordered and wait a long time. In this case, you can select dampers with similar characteristics. First of all, the following parameters are taken into account:
- Resistance created during operation. In most cases, this parameter is marked on the element body in the form of a digital designation in newtons. Most often it is in the range from 80 to 120 N;
- The distance between the mounting axes in a fully folded and compressed state;
- Mounting type. If there are no special latches on the shock absorbers, then it is secured either with bolts or plastic pins. Typically, silent block bushings have a hole for an M10 or M8 bolt.
The video is not really about replacing shock absorbers, but more about the description and subtleties when choosing and selecting!
Having selected an analogue that is similar or similar in characteristics and remade the mount, it is easy to install it in place. Dampers are replaced in the reverse order of disassembly.
What shock absorbers should I buy to replace?
As a rule, shock absorbers fail one at a time, and not all at once, but experts recommend replacing them as a set. The number of shock absorbers depends on the equipment. For small models with a small load volume, two devices are enough. While powerful equipment with good returns will require four or even more shock-absorbing mechanisms.
According to the principle of their operation, the devices differ little from each other. The difference is observed in some design nuances. The angles of inclination, the dimensions of the cylinder and the methods of attachment to the drum may be different. Almost all shock absorbers are complemented by reinforced springs, which help maintain the centrifuge at rest, working in tandem with the counterweight.
It is advisable to buy new shock absorbers of the exact same model or, in extreme cases, take ones with similar characteristics. You can buy or order the right version online if your local parts stores don't stock the model you need.
As you can see, anyone can handle replacing the shock absorbers of a washing machine. All you need is one suitable screwdriver and a strong desire to save money on repairs or simply do something useful with your own hands.
Replacing suspension springs
Another shock-absorbing element is steel springs, with the help of which the drum is suspended inside the housing. They are located in the upper part of the machine body. These are quite reliable elements, the replacement of which is required extremely rarely. Sometimes the spring hooks pop out of the eye holes due to vibration; to easily install them in place, just lift the drum.
Not only the quiet operation of the washing machine, but also protection from vibration loads of other elements depends on the reliable operation of the dampers. If shock absorbers break down, it is best to replace them in a service center with a warranty.
Typical causes of breakdowns
Depending on the settings, the brand of the unit and the functions performed, the washing machine drums make from 700 to 1800 revolutions per minute. Such an impressive load, and even with the application of rotational force, can easily damage contacting parts and weaken components and connections.
If shock absorbers had not been developed to dampen the vibration of the drum and the tank containing it during the spin period, the machine would have to be repaired after each washing “session”. Their purpose is no different from the functions of similar car devices.
Shock-absorbing devices of washing machines perform work equivalent to similar parts of cars. They are designed to dampen the vibrating movements of the tank during the spinning/washing process (+)
Shock absorbers, coupled with suspension springs, prevent direct contact between the machine drum and its metal body, steel and plastic parts. In the form of original supports, they are located under the main rotating part of the equipment, which is fixed in the upper part of the unit by hanging springs.
During operation of the washing machine, the supports and springs are unstable, due to which the tank, rotating at breakneck speed, can slightly shift relative to its resting position. Those. These devices, performing spring movements, provide the drum with the ability to make the required rotations according to its status, without transferring the load to adjacent parts and assemblies.
The tank of the washing unit is suspended from above using springs, from below it rests on shock absorbers or dampers, which prevent the transmission of vibration from the drum to the body of the machine
The structural components of the washing machine, protected from vibration by shock absorbers, last much longer and are less likely to fail. True, the shock-absorbing devices themselves gradually lose their original strength during the execution of the assigned task.
Worn-out devices may require repair or replacement at an extremely inopportune moment, for example, before an evening wash, the timing of which does not allow calling a technician urgently. Or we will have to wait quite a long time for his arrival. This is where you will need information about the specifics of restoring shock absorbers and their structure.
If there is an urgent need to repair shock absorbers, work on their repair or replacement can be done with your own hands