- Repair of washing machines
- Note to the hostess
For complex household appliances, which includes a washing machine, preventive maintenance is necessary. Otherwise, active use will quickly damage the machine.
One type of regular equipment maintenance is cleaning the washing machine filter. It is needed for the normal operation of the drain pump. The filter serves as a barrier that protects the pump from foreign objects entering the tank, lint from fabrics, wool, hair and other debris. A clogged filter makes it difficult to pump water out of the tank and can cause pump failure.
Therefore, we have prepared an instructional article about cleaning the filter and the main problems that washing machine owners encounter during cleaning.
Where is the drain filter in the washing machine?
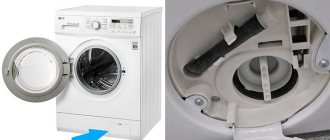
First, let's figure out where to look for the node we need. Everyone's cars are different, both in brand and model. They also differ in the type of laundry loading. But with all the variety of types of equipment, its manufacturers install filters at the bottom of the washing machine next to the pump.
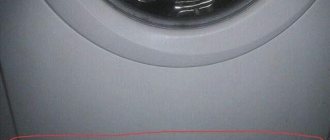
Since this is an internal part of the machine, it is closed from the outside with a hatch or removable panel.
To make it easier for you to understand your washing machine, we have put together a photo table with the location of the filter for the main brands of SMA.
| For LG washing machines, the pump filter is located at the bottom left behind the hatch. | |
| For machines of the Indesit and Ariston brands, look for the filter behind the lower removable panel on the right. | |
| For Candy washing machines, the drain filter is located on the left side behind the hatch. | |
| For Bosch and Siemens cars, the unit is located on the right behind the hatch or decorative strip. | |
| In the Electrolux or Zanussi brands, the filter is located at the bottom right and covered with a plastic hatch. | |
| In Samsung washing machines, look for the filter in the lower right corner behind the plastic panel or behind the hatch. | |
| On top-loading washers, such as the Whirlpool, the part is located at the bottom left. | |
| In the Atlant washing machine, the filter is hidden behind the hatch at the bottom right. | |
| In Electrolux and Zanussi washing machines with vertical (top) loading, the drain filter is built into the edge of the machine drum and is removed from inside the drum. |
Attention! Some small-sized washing machines with a load of laundry up to 3.5 kilograms may not have a catch filter. But such models are very rare.
Cleaning the drain filter
Using a drain filter, waste water is purified from various debris (coins, buttons, etc.). The filter element can become clogged due to the presence of impurities and heavy elements in the water.
Cleaning is necessary to prevent small organic and inorganic impurities from entering the pump and pipes, which can damage the parts.
A clogged filter reduces the throughput of the drain channel, and at the same time increases the load on the system pump. As a result, the pump wears out faster
Signs that cleaning is needed
A drain filter is also called a drain filter, a waste filter, and a pump filter.
Signs indicating the need for the procedure are:
- termination of all functions;
- difficulty draining liquid, during which it slows down or stops completely;
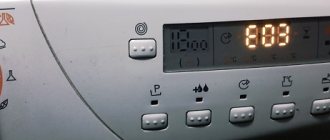
- when switching to the “Spin” mode, the system immediately turns off;
- The “Rinse” function does not work.
Each of the listed signs is a signal to take action to clear the filter of debris.
Procedure sequence
Before removing the filter, you need to stock up on a container for draining water and dry rags, covering the car with them and slipping them under the bottom. The fact is that even after draining, a certain amount of water remains in it. The rags will absorb the liquid and protect the floor from moisture.
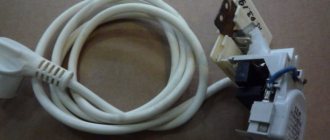
To ensure safety, you will need to turn off the water and disconnect the machine from the electrical network, then drain the water from the washer tank
This is done because some models have components that cannot be disconnected from the power supply instantly. Once you are sure that the machine is completely turned off, you can start working. Before removal, the filter cover is unscrewed and pulled out of the socket.
After this, the following manipulations are carried out:
- Rinsing under running water.
- Cleaning contaminated areas with a brush.
- Cleaning limescale and getting rid of unpleasant odors by soaking in a solution of citric acid and water.
The filter seat in the machine is also cleaned, as debris may get stuck in it. To make the procedure easier, use a flashlight to illuminate dark areas.
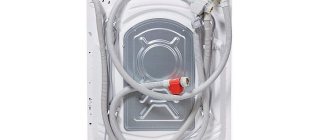
The water from the washing machine tank is drained through the drain filter, slightly loosening its connection to the pumping system, or through the emergency hose that is equipped with the latest models from Bosch and Samsung
After removing debris and rinsing under running water, the clean part is installed in place.
Problems and solutions
When cleaning the filter element, you may encounter a problem. It consists in the fact that the lid does not turn.
The drain filter cover should turn freely counterclockwise and clockwise. It does not move when the washing machine has never been cleaned after purchasing it, and the filter has become stuck as a result of long-term use.
In such a situation, if you have an Indesit , lay the machine on its side and remove the pump. If the model is without a cover, you will see the pump. If there is a cover, it must be removed. After this you need to disconnect the wires. Next, you will need to unscrew the bolts holding the part and detach the electrics from the pump.
The filter is then treated with WD-40 liquid, opened and cleaned. After completing the procedure, the steps are carried out in the reverse order. When screwing on the cap, pay attention to how tightly it is screwed on. A poorly screwed lid will let water through.
Machines of different brands and models have different characteristics, so before carrying out work, you must read the relevant section in the instructions. Knowing their features will help you avoid difficulties. For example, in washing machines whose filter is secured with a screw, you will need to first unscrew the screw.
The drain filter, as well as the emergency hose, if the model has one, are located below behind the decorative hatch covering the machine maintenance components
If the design does not include a drainage filter, remove the washing machine body and check the volute, drain pump and pipes. Read more about disassembling units from different manufacturers in this article.
For machines such as Samsung , Ariston and Indesit , the drain filter is located at the bottom on the front side. LG and Bosch models
How to clean the drain filter in a washing machine - step-by-step instructions
We will clean the trap filter step by step, as our service technicians do.
1. For safety, turn off the water supply and disconnect the machine from the network. You may have to lift the equipment or move it from its place. Agree that you don’t want to flood the floor with water or get an electric shock while working.
2. Find where the filter is on the washing machine and open the hatch cover, or remove the false panel from the bottom of the body. The hatch is usually fixed with a latch, and the lid is held tightly. Use a flathead screwdriver or a flat-edged cutlery knife to pry the lid open. In some models, the lid can be easily opened by hand.
The false panel is held on by latches or hooks and can be removed in two ways:
- moving towards you (sometimes you first need to pry off the top of the panel with a screwdriver)
- sideways, usually from right to left.
3. Prepare a rag and drain the remaining water from the washing machine. The water in the car is completely pumped out only from the tank. There is always some water left in the drain system, of which the filter is part. It will spill out when you unscrew the filter. Therefore, to avoid flooding the floor, place a rag under the machine or lift the body and place a flat basin or other container. In some models, there is no need to lift the body of the washing machine; the hatch or folding handle of the filter is a chute through which water flows into the attached container.
Advice! Use the emergency hose to drain most of the remaining water from the tank. Most models from Bosch, Siemens, Samsung, AEG, Electrolux and Zanussi have it. Pull it out of the fastener and remove the plug, then lower it into the prepared container and drain the water. Replace the plug and secure the hose.
Even if you used the emergency hose, a little liquid will still remain in the washing machine. To drain it completely, carefully turn the drain filter plug 45-60 degrees counterclockwise and let the remaining water drain into a nearby container or onto a rag. If the plug is additionally secured with a special screw, as, for example, in Candy Holiday 181 machines, then first loosen or unscrew it using a screwdriver.
4. Completely unscrew and pull out the filter.
For some brands, for example, AEG, LG, Electrolux, Zanussi, you first unscrew the plug, which acts as a water stopper, and then pull out the filter.
5. Clean and rinse the filter. First, we take out large debris - wool, threads, foreign objects. Then we take a regular dish sponge with an abrasive layer and clean the surface of plaque. Then rinse the filter thoroughly under running warm water.
Attention! Washing in very hot water is not recommended; the plastic may become deformed and the rubber seal may lose elasticity.
Be sure to check the hole in the machine and clean it of any remaining debris. At the same time, wipe off dirt and plaque with a damp cloth or sponge.
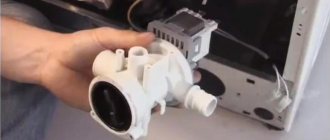
6. Check the drain pump. Don’t forget to look into the drain pump, there may also be dirt left there. Shine a flashlight into the hole and remove any debris that has slipped into the pump. To check, rotate the impeller; nothing should interfere with its rotation.
7. Put the filter in place. We insert it into the hole evenly, without distortions and tightly, but carefully. Tighten the filter plug clockwise. We screw in the fixing bolt, if there was one (for example, in Candy Holiday 181). In some models of AEG, LG, Electrolux, Zanussi, you must first insert the filter into the slot and then screw on the locking cover.
8. Turn on the machine and check for leaks. To avoid flooding the floor during washing, we check the equipment for water leakage from the filter. We put on a test rinse and see if there are any drops or streams from under the filter cover. If everything is dry, close the hatch or replace the false panel and the washing machine itself.
Information on how to properly clean the drain filter in your washing machine model is in the user manual. If you forget where it is, use our database of instructions for washing machines. For cleaning information, see the “Cleaning and Maintaining Your Washing Machine” section of the manual.
What if you can't unscrew it?
But unscrewing a spare part does not always go smoothly. Sometimes attempts to remove the filter do not lead to the desired result, because the spiral is stuck to the body or the thread is clogged. In the first case, a white or yellow coating is visible from under the rubber gasket, and in the second, you feel that the “trash can” is holding something. In such situations, the standard scheme does not work - you will have to go a different way. So, if the filter cannot be removed, you must:
- prepare pliers or round nose pliers;
- “grab” the “handle” of the filter with the tool;
- carefully turn the part.
You cannot press too hard, otherwise the fragile plastic will break off and the desired effect will not be achieved. If there is still no result, we change tactics: tilt the washing machine back about 15-20 cm from the floor, leaning the body against the wall. We return to the filter again and try to “knock” it out with our fist several times. With a strong push, foreign bodies holding the nozzle can move and free the thread from being “captured”.
It is not recommended to try to pry the garbage filter out of its seat using a screwdriver. There is a high risk of damaging the cochlea and complicating the repair with a new problem.
When the fist method does not work, you will have to follow the difficult, but most fruitful path - cleaning the debris filter on the side of the pump. It is necessary to get to the volute through the bottom of the machine, remove the clamps from the adjacent pipes, loosen the clamps and remove the drain pump. For convenience, you can also unscrew the front panel of the case. Then the removed parts are soaked in hot water, and the cleaned filter is easily unscrewed.
Removing the filter on an LG washing machine is easy if you prepare wisely, take your time and remember safety precautions. Regularity is also important - prolonged stagnation will block the thread and complicate the task.
Interesting:
- How to remove the filter in a Bosch washing machine?
- Water leaks from the washing machine when washing
- How to clean an LG washing machine filter
- How to clean the drain pump filter of a washing machine...
- How to unscrew and remove the filter in a washing machine
- DIY LG washing machine pump repair
Reader comments
- Share your opinion - leave a comment
How often should you clean the drain filter in your washing machine?
Manufacturers recommend cleaning the filter every 2 to 4 months . Focus on the frequency of washing. That is, the more often we use the machine, the more often we clean the filter. For example, when using a machine daily in a large family with children, it is better to clean the filter once a month.
In addition, based on experience in servicing washing machines, it should be noted that the frequency of cleaning the drainage trap also depends on the type of fabric. For example, in winter, woolen and pile fabrics are washed more often: flannel, flannel. They produce a lot of tissue substrate in the form of lint, which clogs the filter. Therefore, the trap should be cleaned more often.
If you are washing something completely trashy, for example, a feather pillow or a down jacket made with natural down, then we recommend cleaning the filter immediately after washing.
What happens if the filter is not cleaned?
A dirty trap filter creates serious problems over time:
- Unpleasant odor from the machine and washed clothes . Debris and dirt stuck in the filter are an excellent breeding ground for germs. The dirty lump begins to sour and smell bad. The smell can penetrate into the tank, and after washing the laundry, instead of a pure aroma, receives a very unpleasant aroma.
- Bad drain. A clog in the washing machine filter prevents normal draining. If the debris is not removed in time, the filter may become so clogged that the washing machine will completely stop draining water from the tank.
- Pump failure or breakdown. There is a possibility that a foreign body may slip from the filter into the pump. This can cause the pump to jam and stop pumping water. In some cases, metal objects break the impeller blades or damage the pump body. As a result, repair or complete replacement of the pump will be required.
Drain pump filter for LG washing machine - 383EER2001A
- Description
- Installed on the model
Drain pump plug for LG washing machine.
LG:
F1069FD6 F1069FD6 (F1069FD6.ABWQEUK) F1081TD F1081TD (F1081TD.ABWPCOM) F1255RDS7 F1255RDS7 (F1255RDS7.ASSPCOM) F1255RDS7 (F1255RDS7.ASSPEEC) F1280QDS F1280QDS (F128 0QDS.ABWPCOM) F1280QDS5 F1280QDS5 (F1280QDS5.ALSPCOM) F1281TD F1281TD (F1281TD.ABWPCOM) F1281TD5 F1281TD5 (F1281TD5.ALSPCOM) F1402FDS F1402FDS (F1402FDS.ABWPBWT) F1402FDS5 F1402FDS5 (F1402FDS5.ALSPBWT) F1402FDS6 F1402FDS6 (F1402FDS6.ABPQERO) F1403FDS6 F1403FDS6 (F14 03FDS6.ABPQEMK) F1403TD F1403TD (F1403TD.ABWPBWT) F1403TD (F1403TD.ABWPRUS) F1403TD5 F1403TD5 (F1403TD5 .ALSPBWT) F1403TD5 (F1403TD5.ALSPRUS) F1403TDS F1403TDS (F1403TDS.ABWPRUS) F1403TDS (F1403TDS.ABWQEMK) F1403TDS5 F1403TDS5 (F1403TDS5.ALSPBWT) F1403TDS5 (F1403T DS5.ALSPRUS) F1403TDS5D F1403TDS5D (F1403TDS5D.ALSPCOM) F1403TDS6 F1403TDS6 (F1403TDS6.ABPPBWT) F1403TDS6 (F1403TDS6.ABPQECZ) F1403TDS6D F1403TDS6D (F1403TDS6D.ABPPCOM) F1406TDS5 F1406TDS5 (F1406TDS5.ATSPBWT) F1406TDS6 F1406TDS6 (F1406TDS6.ABPPBWT) F1406TDS6 (F140 6TDS6.ABPPEAK) F1406TDSA F1406TDSA (F1406TDSA.APSPBAL) F1406TDSA (F1406TDSA.APSPBWT) F1406TDSE F1406TDSE (F1406TDSE. ADRPBAL) F1406TDSE (F1406TDSE.ADRPBWT) F1409TDS F1409TDS (F1409TDS.ABWPBAL) F1409TDS (F1409TDS.ABWPBWT) F1409TDS (F1409TDS.ABWQECZ) F1409TDS5 F1409TDS5 (F1409TDS5.AL SPBWT) F1409TDS5 (F1409TDS5.AMSPBAL) F1409TDS5 (F1409TDS5.AMSPBWT) F1443KDS F1443KDS (F1443KDS .ABWPCOM) F1443KDS7 F1443KDS7 (F1443KDS7.AESPCOM) F1443KDS7 (F1443KDS7.ASSPCOM) F1480FD9 F1480FD9 (F1480FD9.ACRQECZ) F1480RDS F1480RDS (F1480RDS.ABWPCOM) F1480RDS29 F1480RDS29 (F1480RDS29.ACRPEIL) F1480TD F1480TD (F1480TD.ABWPCOM) F1480TD5 F1480TD5 (F1480TD5.ALSPCOM ) F1480TD6 F1480TD6 (F1480TD6.ABPQEUK) F1480TDS F1480TDS (F1480TDS.ABWPCOM) F1480TDS5 F1480TDS5 (F1480TDS5.ALSPCOM) F1480YD F1480YD (F1480YD.ABWQEUK) F1480YD 6 F1480YD6 (F1480YD6.ABPQEUK) F1495BDS F1495BDS (F1495BDS.ABWPCOM) F1495BDS (F1495BDS.ABWPKIV) F1495BDS7 F1495BDS7 (F1495BDS7.AESPCOM) F1495BDS7 (F1495BDS7.AESPKIV) F14A8FD F14A8FD (F14A8FD.ABWPCOM) F14A8FD5 F14A8FD5 (F14A8FD5.ALSPCOM) F14A8FDS F14A8FDS (F14A8FDS.ABWPCOM) ) F14A8FDS (F14A8FDS.ABWPKIV) F14A8FDS5 F14A8FDS5 (F14A8FDS5.ALSPCOM) F14A8FDS5 (F14A8FDS5. ALSPKIV) F14A8JD F14A8JD (F14A8JD.ABWPCOM) F14A8JDS F14A8JDS (F14A8JDS.ABWPCOM) F14A8RDS F14A8RDS (F14A8RDS.ABWPCOM) F14A8RDS (F14A8RDS.ABWPKIV) F14A8TDA6 F14A8TDA6 ( F14A8TDA6.ABPQEUK) F14B3PDS F14B3PDS (F14B3PDS.ABWPCOM) F14B3PDS (F14B3PDS.ABWPKIV) F14B3PDS7 F14B3PDS7 (F14B3PDS7.AESPCOM) F14B3PDS7 (F14B3PDS7.AESPKIV) F14U1JBH2N F14U1JBH2N (F14U1JBH2N.ABWPCOM) F14U1JBS6 F14U1JBS6 (F14U1JBS6.ASSPCOM) F1695RDH F169 5RDH (F1695RDH.ABWPCOM) F1695RDH7 F1695RDH7 (F1695RDH7.AESPCOM) F1K2CH2T F1K2CH2T (F1K2CH2T.ASSPCOM) FH495BDS2 FH495BDS2 ( FH495BDS2.ABWPCOM) FH495BDS6 FH495BDS6 (FH495BDS6.AESPCOM) FH4A8FDH2N FH4A8FDH2N (FH4A8FDH2N.ABWPBAL) FH4A8JDH2N FH4A8JDH2N (FH4A8JDH2N.ABWPCOM) FH4A8JDS2 FH4A8 JDS2 (FH4A8JDS2.ABWPCOM) FH4G1JCH2N FH4G1JCH2N (FH4G1JCH2N.ABWPCOM) FH4G1JCH2N (FH4G1JCH2N.ABWQKMR) FH4G1JCS2 FH4G1JCS2 (FH4G1JCS2. ABWQKMR) FH4G1VCS2 FH4G1VCS2 (FH4G1VCS2.ABWPCOM) FH4G1VCY2 FH4G1VCY2 (FH4G1VCY2.ABWQKMR) FH4U1JBH2N FH4U1JBH2N (FH4U1JBH2N.ABWPKIV) FH695BDH2N FH695BDH2N ( FH695BDH2N.ABWPCOM) FH695BDH6N FH695BDH6N (FH695BDH6N.AESPCOM) FH6F9BDS2 FH6F9BDS2 (FH6F9BDS2.ACWPCOM) FH6G1BCH2N FH6G1BCH2N (FH6G1BCH2N.ABWPCOM) ) FH6G1BCH2N (FH6G1BCH2N.ABWPKIV) FH6G1BCH6N FH6G1BCH6N (FH6G1BCH6N.ASSPCOM) S44A8TDS S44A8TDS (S44A8TDS.ABWPBAL) S44A8YD S44A8YD (S44A8YD.ABWPBAL) TW7000DS TW7000DS (TW7000DS.ASSPCOM) TW7000WS TW7000WS (TW7000WS.ASSPCOM) WD-10467BD WD-10467BD (WD -10467BD.ATTPCOM) WD-1069BD2S WD-1069BD2S (WD-1069BD2S.SSPCOMO) WD-109BD3S WD-1069BD3S (WD-1069BD3S.SSPCOM) WD-12210BD WD-12210BD (WD-12210BD.*) WD-WD-WD-WD-WD-WD-WD-WD-WD-WD-1 2210BD (WD- 12210BD.ABWPBWT) WD-12220FD WD-12220FD (WD-12220FD.AOWPEAK) WD-12270BD WD-12270BD (WD-12270BD.*) WD-12270BD (WD-12270BD.ABWPEAK) WD-12275BD WD-12275BD (WD-122 75BD .*) WD-12275BD (WD-12275BD.ABPPEAK) WD-1247ABD WD-1247ABD (WD-1247ABD.*) WD-1247ABD (WD-1247ABD.APSPBWT) WD-1247EBD WD-1247EBD (WD-1247EBD.*) WD -14310FD WD-14310FD (WD-14310FD.*) WD-14311FD WD-14311FD (WD-14311FD.*) WD-14370TD WD-14370TD (WD-14370TD.*) WD-14370TD (WD-14370TD.ATWPBAL) WD- 14370TD (WD-14370TD.ATWPBWT) WD-14370TD (WD-14370TD.ATWPVLA) WD-14375TD WD-14375TD (WD-14375TD.*) WD-14375TD (WD-14375TD.ATSPBAL) WD-14375TD (WD-14375TD.ATSPBWT ) WD-14375TD (WD-14375TD.ATSPVLA) WD-14376TD WD-14376TD (WD-14376TD.*) WD-14376TD (WD-14376TD.ABPPBAL) WD-14376TD (WD-14376TD.ABPPBWT) WD-14376TD (WD- 14376TD.ABPPVLA) WD-14377TD WD-14377TD (WD-14377TD.*) WD-14377TD (WD-14377TD.ATBPBAL) WD-14377TD (WD-14377TD.ATBPBWT) WD-14377TD (WD-14377TD.VLA) WD-14378TD WD-14378TD (WD-14378TD.*) WD-14378TD (WD-14378TD.ATPPBAL) WD-14378TD (WD-14378TD.ATPPBWT) WD-14378TD (WD-14378TD.ATPPVLA) WD-14379TD WD-14379TD (WD-14379TD .*) WD-14379TD (WD-14379TD.ATRPBAL) WD-14379TD (WD-14379TD.ATRPBWT) WD-14379TD (WD-14379TD.VLA) WD-F069BD2S WD-F069BD2S (WD-F069BD2S.ASSPCOM) WD-F069BD3S WD -F069BD3S (WD-F069BD3S.ASSPCOM) WD-H069BD2S WD-H069BD2S (WD-H069BD2S.ASSPCOM) WD-H069BD3S WD-H069BD3S (WD-H069BD3S.ASSPCOM) WD991276RCS WD991276RCS (WD991276RCS. ASSPELF) WM4070HVA WM4070HVA (WM4070HVA.ASSEEUS)
The manufacturer reserves the right at any time and without notice to change the appearance, configuration and technical characteristics of the product Drain pump filter for LG washing machine.
You can always buy a drain pump (pump) filter for an LG (ElG) washing machine with delivery throughout Moscow and all of Russia in the network of retail stores of our partners or in the online store.
What to do when the filter does not unscrew or cannot be pulled out
Sometimes cleaning the washing machine pump filter is difficult because it is impossible to get it out of the machine:
- you try to turn the handle to no avail;
- or the filter is stuck in the hole and cannot be pulled out.
Such situations occur if the drainage unit has not been cleaned for a long time.
The filter may not unscrew for two reasons. Firstly, a foreign object (for example, a piece of bra wire) can prevent rotation, and secondly, scale formed on the threads and gasket.
Most often, pulling out the filter is prevented by a foreign object stuck across it or a lint ball of debris inside.
If you find yourself in this situation, you can act in two ways:
- Use pliers if the filter does not unscrew. Try using them to turn the filter knob. Do this very carefully, without fanaticism, so as not to break the part.
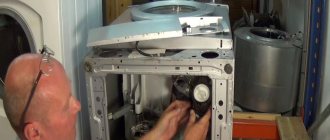
- Clean the filter through the removed pump if the pliers did not help to unscrew it or the filter cannot be pulled out. Depending on the make and model of the machine, you will need to remove the back or front wall of the machine body, disconnect the wiring, remove the clamps that secure the drain pipe and hose to the pump volute, and pull out the pump itself with the volute. Next, it is most convenient to clean the filter through the hole for the drain pipe. Or disconnect the pump from the volute (it is secured with screws or latches) and clean the filter through the pump hole. After this, it should easily unscrew and pull out.
Attention! The described method of cleaning the filter through the drain pump requires knowledge about the structure of the washing machine, and is therefore difficult for average users. If you are not sure that you can handle this operation yourself, then call a specialist, for example, from our RemBytTech service.
For those who nevertheless decided to deal with the stuck unit on their own, we recommend the article “How to get the drain filter if it cannot be unscrewed.”
Drain pump filter, D64mm, H95mm, LG, 5230EN3003
Replacement codes 5230ER3002, 5006ER3001, 5230ER3002A, 383EER2001F, 506EN3017, 383EER2001A, 5230ER300A, 5230EN3003A.
Suitable for LG Direct Drive Inverter washing machines.
Compatible Models F1003ND F1003NDP F1020ND F1020ND5 F1020NDP F1020NDP5 F1020TD F1020TD5 F1021ND F1021TD F1022ND F1022NDP F1022SDP F1022TD F1023ND F1047ND F1048ND F1048ND1 F 1048QD F1056LDP F1056MDP F1056ND1 F1056NDP1 F1056QD F1066LP F1068LD F1068LD9 F1068QD F1073ND F1073ND3 F1073ND5 F1073TD F1081ND F1081ND5 F1081TD F1088LD F1091LD F1091LD1 F1091QD F1092MD F1092MD1 F1092MD5 F1092ND F1092ND1 F1092QD F1094ND F1096ND F1096ND3 F1096ND5 F1096NDA F1096QD3 F1096TD F1096WD F1096WD3 F10A8HD F10A8HD5 F10A8HDS F10A8HDS5 F10B8MD F10B8MD1 F10B8ND F10B8ND1 F10B8ND5 F10B8NDA F10B8QD F10B8QD1 F10B9LD F10B9QD F10C3LD F10C3LDP F1220ND F1220ND5 F1220NDP F1220NDP5 F1220TD F1220TD5 F1221ND F1221TD F1222ND F1222ND5 F1222NDP F1222SDP F1222TD F1223ND F1247TD F 1247TD5 F12480TD6 F12481TD5 F1248QD F1248QDP1 F1256MD1 F1256MDP F1256ND F1256ND1 F1256NDP1 F1256QD F1256QD1 F1268LD F1268LD1 F1268QD F1273ND F1273ND5 F1273TD F1273TD5 F1280ND F1280ND5 F1280NDS F1280NDS5 F1280QDS F1280QDS5 F1281HD F1281HD5 F1281TD F1281TD5 F1291LD1 F1294TD F1 296CDP3 F12A8CDP F12A8HD F12A8HD5 F12A8HDS F12A8HDS5 F12A8NDS F12B9LD F12U1HBM2N F12U1HBS2 F12U1HBS4 F12U1HBS6 F12U1HDM1N F12U1WDS0 F12U1WDS1 F12U2HDM1N F12U 2HDM1NH F1402FDS F1402FDS5 F1402FDS6 F1403FD F1403RD F1403RD6 F1403TD F1403TD5 F1403TDS F1403TDS5 F1403TDS5D F1403TDS6 F1403TDS6D F1403YD5 F1403YD6 F1406TDS5 F1406TDS6 F1406TDSA F1406TDSE F1409TDS F1409TDS5 F1421TD5 F1443KDS F1443KDS7 F1480RDS F1480TD F1480TD5 F1480TDS F1480TDS5 F1480YD F1480YD6 F1481TD5 F1495BDS F1495BDS7 F1496AD3 F14A8FD F14A8FD5 F14A8FDS F14A8FDS5 F14A8TD F14A8TD5 F14A8TDS F14A8TDS5 F14B3PDS F14B3PDS7 F14U2TDH1N F2H7HG1W F2H7HG2S F2J7HG1 W F4J7FH1W F4J7TH1W F4J8FH2W F4J8JH2W F4J8JH2WD F4J9JH2S F4J9JH2T F50C3LD F6096ND F60B8ND F8066LP F8068LD F8068LD9 F8088LD F8091LD F8092MD F80B8MD F80B9LD F80C3LD FH096WD3 FH0B8LD0 FH0B8MD1 FH0B8ND1 FH296TD FH296WD FH2A8HDM2N FH2B8MD FH2B8ND FH2U1HBS2 FH2U1HBS4 FH2U2HCN2 FH2U2HDM1N FH4U2TCN4 FH4U 2TDH1N FH8C3LD S00C3QDP TW4J8JH2W WD-10120ND WD-10130N WD-10130NU WD-10130T WD-10131N WD-10131NU WD-10132N WD-10132T WD-10150FB WD- 10150N WD-10150NU WD-10150S WD-10150SU WD-10154N WD-10160N WD-10160NU WD-10160S WD-10160SU WD-10170TD WD-10175ND WD-10175SD WD-10180NU WD-10180S WD-10180SU WD-10180T WD-10180TU WD -10200ND WD-10200SD WD-10202TD WD-10205ND WD-10205SD WD-10207TD WD-10230N WD-10230NU WD-10230T WD-10230TU WD-10240N WD-10240T WD-10260N WD-10260T WD-10264N WD-10340ND WD-10342TD WD-10344ND WD-10360ND WD-10360NDK WD-10361TDK WD-10362TD WD-10384N WD-10384T WD-10390ND WD-10390NDK WD-10390SD WD-10391TDK WD-10392TD WD-10395NDK WD 10396ND WD-10396TDK WD-10401TDK WD-10406TDK WD -10467BD WD-10480N WD-10481N WD-10482N WD-10490N WD-1069BD3S WD-1074FB WD-11230FB WD-12101FD WD-12120ND WD-12170TD WD-12175ND WD-12175SD WD-1220 0ND WD-12200SD WD-12202TD WD-12205ND WD-12205SD WD-12207TD WD-12210BD WD-12220FD WD-12270BD WD-12275BD WD-12330ND WD-12331AD WD-12331ADK WD-12340ND WD-12340NDK WD-12341TDK WD-12342TD WD-1 2344ND WD-12360ND WD-12360NDK WD- 12361TDK WD-12362TD WD-12390ND WD-12390NDK WD-12390SD WD-12391TDK WD-12392TD WD-12395ND WD-12395NDK WD-12396TDK WD-12401TDK WD-12406TDK WD-12411TDK WD-12430NDK WD-1247ABD WD-1247EBD WD-1255FB WD -1274FB WD-1276FB WD12A9 WD-13235FB WD-14124RD WD-14310FD WD-14311FD WD-14370TD WD-14375TD WD-14376TD WD-14377TD WD-14378TD WD-14379TD WD-16101FD WD -80130N WD-80130NU WD-80130T WD- 80131N WD-80131NU WD-80132N WD-80150N WD-80150NU WD-80150S WD-80150SU WD-80154N WD-80155N WD-80155NU WD-80155S WD-80155SU WD-80156N WD-80156NU WD-80156S WD-80156SU WD-80157N WD -80157NU WD-80157S WD-80157SU WD-80160N WD-80160NU WD-80160S WD-80160SU WD991276RCS Compliance codes: FIL001LG
What to do if the filter leaks after cleaning
It happens that when checking for leaks after cleaning the filter, it leaks. Or water begins to seep in after one or two washes. There are 3 reasons for the leak:
- The filter is inserted unevenly or is loosely screwed in . The part must be inserted straight to avoid movement along the thread. And also tighten it more tightly, fixing the filter. But this must be done carefully. Plastic threads can be easily stripped if you press too hard. If there is a leak, unscrew the filter, insert it straight and tighten it again. Do not forget to place a rag or a container to collect water before removing it.
- Gasket defect. Tight contact of the filter with the socket is ensured by a rubber gasket, as in taps or hoses. It may dry out over time or become damaged if you remove the filter carelessly or clean it with a sharp tool. To eliminate a leak, you need to change the gasket, when possible, or the entire filter, if sealing rubber bands are not sold separately.
- Damage to thread or filter. The filter or the walls of the cochlea are damaged if the part is removed or unscrewed by force. The thread on the snail filter or glass can be torn off if you tighten the plug with significant force. In both cases, the contact becomes not tight enough to hold water. Replacing the filter or the “volute and filter” pair helps to get rid of leaks in such situations. If you can’t handle it yourself, call a professional.
Instructions - how to clean the drain filter of an LG washing machine
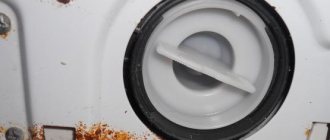
The drain filter of the LG model is located at the bottom of the washing machine under a decorative plastic cover.
The panel is secured with latches and can be easily removed without any effort; just pull it towards you, hooking it with your fingers. The filter plug (cover) is located behind the plastic cover.
In the absence of constant maintenance of the filter, dirt accumulates and it becomes difficult to unscrew the device from its standard socket.
There is no need to use force and try to turn the filter counterclockwise, as this will only break the plug. In this case, you need to turn the washing machine around and clean it through the back cover.
Disconnect the washing machine from power, turn off the water supply and ensure clear access to the rear panel. Open the cover and locate the filter. Disconnect the hoses leading to the pump and filter (they are latched).