Construction and design of electrical and gas surfaces
The hob consists of a completely flat surface, which is located at the level of the countertop. Consists of 2–6 burners. Heats up quickly unlike other types of burners. A glass-ceramic hob has a more complex structure than a cast-iron one (you can view repair instructions for glass-ceramic hobs here).
It includes burner spiral terminals, maximum temperature protection contact, pusher, adjusting bolt and residual heat indicator terminals. Gas hobs consist of the following parts and elements:
- electric ignition transformer;
- insulators made of ceramic material;
- the hob itself;
- faucet handle;
- electric spark plug;
- flame sensor;
- thermocouple;
- spring;
- electromagnet;
- gas supply;
- tap.
Tip
Heating elements are the main components of the entire structure. They are placed in a housing. When it is necessary to check their serviceability, the slab is disassembled into its component elements.
By heating elements we mean rapid and halogen. They can be ribbon or pancake type. There are also induction burners. The device body is made of metal or glass-ceramic, control is electronic or mechanical.
They work according to the following scheme:
- electric current is supplied by turning on the control element attached to the burner;
- passing through the heating element, the current heats it to the required value, which is set by the regulator;
- the temperature is kept automatically within the specified range.
Types of heating elements of cooking surfaces:
- Induction. The work area remains cool, and only the dishes placed on a specific zone are heated. If there is no coating around the edges, then they do not heat up. All the heat is transferred to the pan, and evenly (read about common causes of breakdowns of induction cookers and their repair here).
- Rapid. Such spirals can heat up quickly and cool down immediately. The approximate time is no more than 10–12 seconds.
- Halogen. The spiral is illuminated with red light and heats up in 2 seconds. Such surfaces emit the maximum amount of heat, unlike other types of heating elements.
- Gas-burners. Fuel is supplied automatically. At the same time, heating and adjustment occur very smoothly, gradually (how to repair a gas stove with your own hands?).
- Electrical. They have a bright red circle in the center. The “pancake” in the middle contains cast iron (we talked about how to repair electric stoves of different models with your own hands here, and how to repair an oven here).
Gas hob
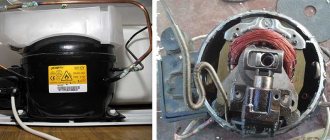
The latest type of cooking appliance is a gas surface. One of the simplest and easiest to repair with your own hands. Less electronics are used, so there are not many malfunctions and all are easily fixed.
- Gas does not ignite or ignites poorly. Immediately check the electric ignition (piezo) for any blockage or liquid. In 90% of cases, it is enough to wash it thoroughly and dry it. If this does not help, check the presence of electricity in the circuit supplying the piezo coil.
- The gas hob does not turn on because gas is not reaching the burner. Repair of hobs in these cases is not necessary; prevention is sufficient. We check the gas pipe, if the valve is open and there is gas in the system, we proceed to checking the injectors. The blockage occurs due to fat or food debris; it is enough to clean it. Do not forget to wipe dry after cleaning; no moisture should remain. If moisture remains, the piezo will not ignite.
Modern cookers are equipped with fault detection sensors and diagnostic modules; an error code appears on the screen. We find the code in the instructions and follow the specified recommendations to eliminate a specific malfunction. Use the forums, where you can find real reviews and experience in DIY repairs from specialists and other users, specifically for your model with detailed instructions and photos.
If we analyze all the malfunctions of hobs that may occur during operation, we can confidently say that most of them can be repaired with our own hands.
Advice:
Basic faults
Damage to electronic circuits
Electronic systems may not work if the following symptoms occur:
- The hob does not turn on because there is insufficient voltage in the socket or there is no voltage at all . The microcircuit parts may be faulty. A multimeter is used to check the condition of the socket, the absence of current or its shortage. If everything is fine, then you need to check the serviceability of the fuses. Electronic circuits can burn out due to contacts being chafed or the cord being crushed. Sometimes the heating element may break down.
- If one or two burners are faulty, the heater contact may be broken. They are soldered and contact is returned. In this case, a burnt-out heating element must be replaced with a new one. If the contacts are broken, the control unit switch is repaired or replaced with a working one.
- If the burner heats up poorly, the heating element, thermostat or thermostat may overheat. The parts can be repaired, but the thermostat only needs to be replaced with a new one.
- When a fuse blows, the electronic circuits are disrupted. In this case, fluctuations may occur due to voltage drops on electric mains. The part is inexpensive, so it is easier to replace it with a new one.
- The sensor stopped responding. Use a multimeter to check the suitability of the part. If there is no response from the device, then the part is completely removed and replaced with a working one. In rare cases, simply cleaning the sensor with a soda solution helps to improve its operation.
- Hob overheating. It stops turning on or gets very hot. Following this, the thermostat fails. The part cannot be repaired. It needs to be replaced with a new one.
Heating elements are broken
If the equipment does not turn on, you need to check the voltage. The hob may not turn on due to low voltage. To prevent such situations, a stabilizer is installed.
Heating elements break for various reasons.
- First you need to inspect the power cord. In 80% of cases, heating elements break due to a pinched, bent or broken cord. It is inspected after first removing the equipment from the network, and then it is checked for the integrity of the wires.
- The cause may also be a faulty fuse. It is located at the entrance, but can easily burn out if more important parts are protected from power surges. Its resistance is checked with a multimeter. An infinitely high resistance or a break in the indicators indicates a blown fuse.
A brief introduction to the types of hobs and their operation
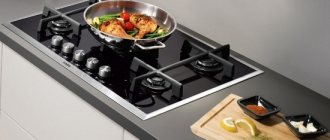
Cooking surfaces (panels) are electric heating kitchen appliances (electric stoves) with a glass-ceramic outer coating. Glass ceramics have great strength, allowing them to withstand significant weight of cookware, and have good thermal conductivity.
The attractive appearance, which some manufacturers (for example, Hansa) complement with artistic decorations, allows the stylish hob to fit well into the modern kitchen design.
Artistic hob design
Hob burners
Heating elements hidden under the glass-ceramic surface come in several types:
- Spiral, working like conventional heating elements;
- Corrugated tapes (modified filaments);
- Halogen infrared lamps (HaloLight technology);
- Induction coils that heat only the material of the cookware.
Various designs of thermoelectric burners
The first three types of burners convert electric current into heat according to the Joule-Lenz law on the same principle as the filament in a regular light bulb or the coil in a regular electric heating element is heated. The principle of heating using induction is described in detail in the article on induction boilers. Do-it-yourself repair of induction hobs will be discussed below.
Thermoelectric heaters have a heat-releasing corrugation or spiral laid in a heat-resistant material, connection terminals, as well as heating sensors, presented in the form of a bimetallic plate located on the line of the radius or diameter of the burner. Expanding, the bimetallic plate affects the contacts, closing or opening them.
Hob burner design
Depending on the design of the hob, the temperature sensor contacts can be power (acting like a thermostat) or signal contacts included in the electronic control circuit. Faulty sensors (thermostats) are a common reason why the hob burner does not turn on.
Controls
In general, repairing hobs is not much different from repairing electric stoves, which is described in detail in one of the articles on this resource. The main visual difference is the presence of a glass-ceramic surface and the type of heaters, the spirals of which are visible through the transparent surface. Another distinctive feature is the touch-sensitive electronic unit and the complete absence of conventional control levers.
Hob touch control unit
Therefore, the greatest difficulty in repairing electric hobs is the electronic touch control unit, which is also a display. To repair it yourself, you will need knowledge in radio engineering and special equipment.
But otherwise, the hob is not much different from an electric stove - the heating elements are turned on by power relays controlled by an electronic control board, which receives signals from the sensor.
But first, even without disassembling the hob body, you can determine the malfunction of the touch display and electronic control unit. As a rule, the receipt of a command from the user is accompanied by a sound signal and is displayed on the display. If there is no reaction to touch, then it becomes clear that the sensor is faulty.
Indication of a properly working hob
The sensitivity of the sensor may deteriorate due to heavy surface contamination. It should be remembered that the entire glass-ceramic surface of the hob requires careful care and cleaning, otherwise cracks may form from the accumulation of scale and burning.
Operating a stove with cracked glass ceramics will lead to its further destruction and breakage, so timely care and cleaning of hobs is necessary, as shown in the video:
If cleaning the surface above the sensor does not bring results, you should disconnect the hob from the mains, having previously de-energized the line, disassemble the case and remove the electronic board with the sensors.
Electronic board with indication elements and control sensors
As can be seen from the figure, the electronic board of the control unit has many small parts, including microcircuits, so repairing such a module with your own hands requires deep knowledge of radio engineering. If a malfunction of the touch control unit is reliably established, then it is better to take this board to a specialized repair shop.
Diagnostics of power units of the hob
If superficial diagnostics do not produce results (the command turns on, but heating does not occur), you should look for a fault in the power switching unit. Some models of hobs can independently diagnose certain problems, signaling them using error codes displayed on the display. You should carefully study the user manual and these codes - this will save time when troubleshooting.
Error codes for some hobs
The power control (switching) unit of the hob consists of a group of relays controlled by an electronic touch unit. When an operating mode is selected, one or more relays are turned on, providing power to the corresponding heating elements.
Arrows indicate power relays
Even for a novice craftsman, it will not be difficult to disassemble the panel body with your own hands in order to independently determine the malfunction of the heating element or power relay. For this purpose you will need a multimeter and skills to work with it. You will also need to determine the type of heating element itself in order to check it correctly (for example, the resistance of the induction coil is close to zero).
More experienced craftsmen often use another method - they check the voltage supply to the main components, moving from the power terminals through the power relays to the heating elements. Power relay contacts can burn out due to frequent activation, and checking the presence of voltage at the input terminals of the burner will determine whether the relay is activated.
Measuring the burner supply voltage
It should be remembered that many elements inside the housing are under voltage, dangerous to life. Working under pressure requires concentration, attentiveness and clear-headed thinking.
Insufficient heating of the hob
normal at the burner terminals , you can check the functionality of the heating element visually - the filament should warm up. But, if the burner turns on, but does not heat up to the required temperature, you need to measure the current flowing. The easiest way to do this without breaking the circuit is to use a multimeter equipped with a current clamp.
Using current clamps to check the current in the power circuits of the hob
Knowing the maximum power of the burner and the supply voltage, you can calculate the rated current using Ohm's law. In the case of heating elements operating like heating elements, a decrease in current and heating temperature may be associated with malfunctions in the electronic control unit, temperature control elements or power relays.
If a halogen burner does not heat well, then internal chemical changes in the composition of the gas in the heating element or degeneration of the spiral are possible. In this case, if all other possible problems have been ruled out, the HaloLight heater should be removed and replaced.
Appearance of hob burners without glass-ceramic coating
It happens that the burner turns on, but after working for some time, it turns off ahead of schedule. Incorrect operation of the heating element may be due to a malfunction of the temperature sensor installed on the burner. In order not to change the entire expensive burner, you need to disassemble the sensor yourself, clean or bend its contacts, as shown in the video:
Diagnostics of breakdowns
Diagnostics can be carried out by disassembling the device or without it. In case of disassembly, the check is carried out in the following sequence:
- use a multimeter to determine the voltage level;
- turn off the stove from the power grid, inspect the power cord;
- the cable is checked by ringing for integrity and the presence of holes;
- oxidized contacts are identified by unwinding and inspection;
- the fuse also needs to be inspected for flaws, breaks, bends and fusion;
- an important part of the diagnosis is examining the outer pad for damage;
- The multimeter is used in almost all external inspections of parts.
Diagnostics by analysis occurs in the following sequence:
- the power plate is turned off;
- use screwdrivers to dismantle the panel;
- The fasteners are removed from the panel and the surface is removed;
- the wire is inspected for integrity;
- The thermal relay is checked by tracing the wiring;
- A multimeter is used to evaluate the condition of the transformer and thermal fuse.
Important
Increased resistance of the burner indicates its burnout. If the multimeter does not respond to changes in vibrations, then the burner is intact.
Do-it-yourself hob repair: what to do if the burner does not turn on
If the burner does not turn on, there may be several reasons:
- burning or weakening of contacts;
- thermal relay malfunction;
- problems with the wires going to this burner;
- heating element burnout.
All these problems can be fixed with your own hands. Repairing a hob begins with disassembling . It must be unplugged and disconnected from the countertop. Transfer the hob to a table covered with a clean cloth, turn it glass side down, unscrew the fastening bolts located on the sides, carefully, holding the ceramics, turn them over and remove the ceramic panel. This way we get access to the insides and can repair the hob with our own hands.
We begin repairing the hob: remove the glass-ceramic hob
The first thing to do is to inspect the wires that go to the non-working burner, check the contacts . Violation of the integrity of the wires and burning of contacts is a very common cause of breakdown. In private homes, wiring can be chewed by mice, and contacts can burn due to poor quality assembly. If everything is visually in order, we pull the wires, checking the quality of the contact. If traces of soot are visible somewhere, we disassemble the contact, clean it to bare metal, pack it back, install it and clamp it well. The last stage of checking wiring and contacts is measurement. We take a multimeter, check the wires for integrity (we call) and for insulation breakdown (on the body and between each other). Read how to use a multimeter here.
If no deviations are found in the wiring, inspect the thermal relay . It is located next to the burner (electromechanical), covered with a plastic cover. In some models, the relays are located in the control unit (electronic). Then, in order to determine which relay is responsible for heating the burner we need, we track it through the wires.
On some models, thermal relays are installed on the control board
If the relay is electromechanical, pry off its cover with a screwdriver and inspect the contacts. There may be charred, bent or fused contacts. It must be replaced. If the relay is electronic, there is no point in opening it. We measure its resistance and compare it with the serviceable ones standing nearby. There is a deviation - a replacement is needed.
Read also: Molar mass of zinc g mol
If everything is fine with the relay, the burner may have burned out . To check, measure the resistance. If it is large or tends to infinity (break), the problem is in the spiral, heating element, etc. To find a replacement, look for the burner number (written on its body). With this number we go to the store or search on the Internet. Next, repair the hob - replacing the burnt burner. We unsolder all the wires, remove them, install a new one, and connect.
Instructions for eliminating defects
Required Tools
Repair work is carried out using the following tools:
- Screwdrivers. It is necessary to have installation tools with tips of different diameters on hand and purchase a screwdriver with an indicator to check the voltage.
- Stationery knife. It is needed for stripping cable cores or trimming them.
- Pliers. Needed for biting veins.
- Multimeter. Electric current parameters are measured.
- Soldering iron. Important at the stage of detaching parts.
Specifics of repair work
Repairing the hob occurs in several stages:
- The blocking is removed. You can unlock the hob by pressing the key button. It must be held for several seconds until the indicator becomes active. In this case, the lock disappears from the panel. Access for subsequent work is considered open.
- The device is disconnected from the network.
- Dismantle the device with screwdrivers, after laying it on a smooth surface and laying a blanket.
- By removing the fasteners, carefully remove the surface.
- All removed parts are checked for damage.
- Install screw terminals or rivets on the burnt spiral.
- The necessary parts are replaced with new ones. The power relay, thermostat, and halogen burners may need to be replaced.
- Wiring is being replaced. By selecting an identical wire, the wire is assembled and installed. This can be done using a limit switch.
- A working power supply is installed.
- The control circuit of the hob is changing. The procedure is performed through a hand block placed outside the body.
- The hob is assembled in a similar manner and installed in place.
Attention
All work must be performed with the power turned off. You must follow the step-by-step repair instructions to avoid assembly errors.
Repair practice
To diagnose and repair hobs, you will have to dismantle the equipment from the countertop, disconnect the power terminals and disassemble the housing. It must be remembered that glass-ceramic coating is vulnerable to pinpoint impacts and loads. Therefore, when turning the hob over, you should avoid getting small objects under the surface so that the weight of the body is not applied to one point.
Obligatory care in the workplace when repairing a hob
It goes without saying that knocks, scratches and careless handling should be avoided. You should carefully examine the fastening mechanisms of the equipment - these could be bolted connections, screws or latches. Some elements, such as an electronic board, can be additionally fixed with glue or adhesive tape. When disassembling a particular hob model, you should first study the articles, images, and videos available on the Internet.
Experienced craftsmen always check the physical strength of the terminal connections (with the voltage removed) - very often it is poor contact that is the reason that some burner does not turn on. If a faulty burner is detected using a multimeter, or a breakdown is identified in the electronic board, then you can turn it off with your own hands, without the help of a soldering iron, and take it to a workshop, where replacing radio elements or relays will require skills in working with a soldering iron and the ability to work with radio components.
In another video below, the wizard describes troubleshooting, shows the process of dismantling and disassembling equipment and identifying a faulty relay, implying that desoldering and soldering a relay is a well-known action.
You should check the circuits very carefully so as not to confuse anything. In the video above, the author mixed up the relay, but nothing bad happened. But not always an error during radio installation can do without consequences, such as a short circuit, burnout of power circuits and failure of radio components.
Induction heaters
The operating features of induction heaters can very often be interpreted as a breakdown - a command is given, but the burner does not turn on, there is no characteristic glow, and heating does not occur. The fact is that the metal of the cookware and the burner coil form a single oscillatory circuit, due to which high-frequency oscillations occur, inducing currents in the metal kitchen utensils.
Eddy and surface currents in the metal of the cookware heat it up, causing the cooking process to occur. The hob itself does not emit heat, but can be heated by dishes standing on it. The induction hob's security system will not allow it to turn on if there is nothing metal on it.
As mentioned above, the physical processes and principle of heating using induction are described in detail in the previous article on induction boilers - you should familiarize yourself with this material in order to have an understanding of the operation of such equipment. In the case of cooktops, induction heating is used to heat the cookware, but the principle remains the same.
The working surface of the induction heater does not burn immediately after turning off
Repairing induction hobs requires an understanding of the operation of the high-frequency generator and the self-oscillating processes occurring in the electronic circuit. The most susceptible to breakdowns are power switches (transistors), diodes and high-voltage capacitors that are part of the circuit. Such transistors are often field-effect transistors (MOSFETs), and are not called bipolar semiconductor devices, but their failure can be determined.
You should find a diagram of an induction heater with designations of element ratings. For craftsmen who own an oscilloscope, it will be very useful to have the oscillograms shown in the diagram, measured at control points. Without a circuit diagram and laboratory equipment, you can find a fault in an electronic board by visual inspection and identifying individual components.
As shown in the video, technicians in service centers can identify faults in electronic circuits, relying on experience, having available equipment and a large supply of various components in order to carry out repairs by replacing failed elements. Superficial diagnostics of the main components is carried out using the breakdown test method.
Recommendations and advice from experts
Experts recommend adhering to the following tips:
- Major breakdowns of gas stoves are repaired manually using minimal available tools. It helps to install traverses and tighten the screws when the burner axis shifts. If the switches are loose, just remove the handle and use a screwdriver to press out the slots on the rod. If the oven does not close tightly, it is enough to tighten the spring and put the axle in the eye (read about the signs and causes of malfunction of a gas oven and its repair here, and from this article you will learn how to repair the oven glass of gas stoves).
- If you smell gas, you need to check the tightness of the contacts with a soap solution: tighten and lubricate the taps.
- Screw terminals and spiral rivets are temporary measures.
- The main reason for 90% of breakdowns is non-compliance with the operating conditions of the equipment.
You must carefully follow the instructions for using the hob. - If you don’t have a multimeter to check individual parts of the system, you can use an induction screwdriver; its use is justified if you carry out repairs yourself and have a good knowledge of the components of the hob. Otherwise, it is better not to approach the repair yourself, but to call a specialist.
Before repairing the stove, you should carefully study the instructions. Read articles from our experts and learn how to repair the timer and oven doors.
You can repair the hob yourself if you know about its structure. To do this, you need to study the instructions supplied with the device and follow them. If it is impossible to carry out the work yourself, you need to call a specialist to your home.
Induction hob repair
If your induction hob does not work, then there may be several reasons for the breakdown. Now we will tell you how to repair induction hobs:
- The stove turns off and does not turn on. If this device is modern, then perhaps it has power-on protection. In this case, the power may turn off due to the fact that the diameter of the cookware is not suitable for it. Also, you should not worry if the surface does not heat up, but only the dishes heat up.
The induction cooker only heats the cookware
- Heats for a long time or weakly. If the cookware heats up slowly, then this may be the reason. In order for the cookware to heat up quickly, its bottom must be flat. Otherwise, the hob simply will not notice the dishes.
The instructions for the hob usually indicate which cookware is best suited
- Turns on independently and without utensils. The malfunction may be that there may be a metal object on the hob that triggers the operation. In addition, the cause may be salt that remains on the surface.
- Doesn't work at all. If your device does not work completely, then you will have to disassemble the equipment and check the entire circuit. Typically the repair will involve replacing the fuse.
In the video below you can study all the features and causes of failure of induction hobs.
If it doesn't turn on at all
If the equipment does not turn on at all, check the voltage immediately . If the voltage is low, the hob may not turn on. To avoid such situations in the future, it is advisable to install a stabilizer. This will significantly extend the life of the equipment, since electronics are very sensitive to power quality, and electronics are the most difficult to repair (and more expensive).
If the voltage is normal, we will continue repairing the hob by inspecting the power cord . Oddly enough, many breakdowns are associated with its damage - frayed, bent, crushed, insulation burst/melted, etc. First, we inspect the cord (disconnecting it from the network), then we check for the integrity of the wires and for insulation breakdown (each wire to the ground and to each other).
What to do if the hob does not turn on? First of all, check the cord and contacts
The next step is to check the contact in the terminal block . A loose or oxidized contact can also cause the hob to not turn on. What to do in this case? Unscrew the contact, clean it from oxides, and tighten it well again.
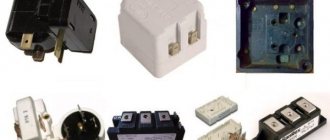
If the stove still shows no signs of life, find the fuse . It stands at the entrance, burns out during power surges - to protect more expensive parts from damage. It can look different, but most often it is a glass or ceramic tube with metal caps on the edges. Some types of fuses are shown in the photo below. There may be such options.
Types of fuses
We found the fuse, then take a multimeter and measure its resistance. It should be small. If the device shows an open circuit (infinitely high resistance), the fuse has blown. Another way is to put the multimeter in test mode and touch the probes to both ends of the fuse. The device is silent - it has burned out.
We take out the blown fuse and replace it with a similar one. Exactly a similar one - with the same parameters (indicated on the case). It is not recommended to install a “bug” or one with less sensitivity - with the next power surge the breakdowns will be much more serious.
The only easy check left is to check whether the power is reaching the control unit from the terminal block. Maybe the wiring is damaged or the contact is loose/lost somewhere. Do this again using a multimeter. We check the wires for integrity (you can do this by testing, you can by measuring the resistance) and the presence of insulation breakdown (on the body and between each other). If all parameters are normal, you can turn on the power and carefully measure the voltage at the input of the control unit. The voltage is normal, but the hob still does not turn on - the problem is in the control unit. Further repairs to the hob are related to this unit.
Users prefer electric, induction and gas stoves for cooking. If they malfunction, it is better to contact specialists. But, if you have the skills, knowledge and ability to work with tools, you can repair household kitchen hobs yourself.