Repair is an integral part of the operation of any equipment, since any device tends to break down over time. Before turning to a specialist for help or throwing away a device that has become unusable, you can try to figure out the cause of the breakdown and try to repair the vacuum cleaner yourself.
The vacuum cleaner is rightfully considered the most popular household appliance.
Vacuum cleaner device
The ability to repair a vacuum cleaner with your own hands lies in its simple design.
There are three main types of devices:
- with a dry dust bag;
- with aquafilter (air-water mist filter);
- with a non-replaceable cyclone dust collector (stationary).
In this case, a model of any type consists of the following basic components:
- the main body, where the engine, dust collector and filtration system are installed;
- dust collection unit (bag, tank);
- waste transportation system (hoses, nozzles).
The availability of self-repair is due to the simple design of the vacuum cleaner
Also, regardless of the type of vacuum cleaner, the package usually includes hoses, adapters and nozzles, which are also subject to wear and tear during operation, just like the motor.
Next, we will separately consider the engine design.
Engine design features
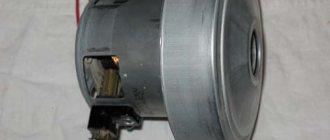
Behind the filtration system there is a tangential fan. The blade is covered with a lid; the element is made in the form of aluminum curved partitions between a pair of metal planes. This is how closed channels are formed. The engine itself is covered by a plastic casing, in which the output air flow path is made.
Interesting! Since the devices use a tangential type fan, the efficiency of the vacuum cleaner is no more than 20-30%. In other words, with a power consumption of 1600 W, the actual suction power will be about 350 W.
Graphite (carbon) brushes are fixed in the shafts. If necessary, the parts can be sharpened and adjusted to size so that they fit in place. Each brush is pressed by a spring through which electric current flows. Carbon has a long lifespan and will last until it wears out completely. At the same time, it is recommended to clean the copper collector.
Vacuum cleaner motor
The shaft is attached to the stator using two bearings of different sizes (front - large, rear - small). This feature is provided to facilitate engine disassembly. The bearings are equipped with boots that can be carefully removed using a screwdriver to lubricate them.
Solution
Each of the above reasons has its own solution. At the same time, almost all the work can be done at home, on your own.
Clogged filters
Before you start cleaning filters, you should understand their classification. There are several categories:
- Water - located above a reservoir of water. Once on the surface of the filter, the dust gets wet and settles to the bottom of the container, which not only cleans but also humidifies the air.
- Cyclonic - equipped with special blocks in which, under the influence of a whirlwind, dust settles.
- Fine cleaning - thanks to the use of special impregnated fibrous material, they are the most effective dust absorbers.
- Bags—disposable (paper) or reusable (made of synthetic fabric)—keep dust inside.
The filter cleaning process consists of several stages:
- the vacuum cleaner is disconnected from the network;
- open the housing cover and take out the filter;
- washed with water and dried;
- a completely dry filter is installed in place.
However, each type of filter has its own nuances:
- Filter bags are not washed with water, but are emptied as they are filled. Disposable ones are replaced with new ones.
- Cyclone filters should be cleaned after each cleaning - all elements are washed under cold water.
- Water filters are disassembled into two parts (the container and the filter itself), after which each element is washed under running water.
- Fine filters can be disposable, made of paper, or reusable, made of polymer. In the first case, the filter can be purged with air. In the second - wash.
Expert opinion
Nikolai Petrovich
Subpage for an expert
Filters should be washed under running cold water, without using detergents.
Flexible hose clogged
If the reason the vacuum cleaner turns off is a clog in the hose, you can get rid of it in several ways:
- The hose is disconnected from the vacuum cleaner and the accumulated debris and dust are removed from both ends with long tongs. The brush undergoes the same procedure.
- If a foreign object is stuck in the middle of the hose and cannot be reached with pliers, you can use a thin wire. It is passed through the entire hose, thus pushing the debris out.
- Water will also help get rid of dust and accumulated dirt. The disconnected hose is taken to the bathroom and the drain is closed with a stopper. A stream of water is directed inside the hose, preferably under high pressure.
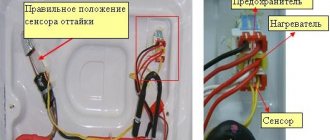
Poor contact, socket failure
If, when you try to turn on the vacuum cleaner, the engine shows no signs of life, the first thing you need to do is check for voltage in the outlet. This can be done with a multimeter, an indicator screwdriver, or using a control relay.
When using a multimeter, the permissible voltage deviation is considered to be 10%. This means that 198 V is considered within normal limits.
There are frequent cases of creases forming in the places where the cord is attached to the plug, which leads to a lack of contact. This problem requires a complete replacement of the network cable. In this case, during the repair work the following manipulations are carried out:
- remove the back cover of the vacuum cleaner;
- unscrew the screws holding the diaphragm;
- remove it with all precautions;
- move the block with the gasket to the side;
- Replace wiring and damaged elements as necessary.
Next, the vacuum cleaner is assembled according to the same scheme, in reverse order.
Electric motor blockage or failure of its elements or the entire assembly
We have already written a detailed article on the topic of how to disassemble the motor of a vacuum cleaner with your own hands.
General rules for disassembling a vacuum cleaner
If you notice one of the following symptoms when the device is operating, then you should think about the breakdown of one of the structural components:
- Reduced suction power.
- The product does not collect small debris.
- During operation, an unpleasant odor appears.
- Loud noise and vibration.
- Inability to adjust engine speed.
- Problems with the cord.
- Smoke, fire, short circuit.
- Work from time to time, collector sparking.
Healthy! Before you begin disassembling the product yourself, you need to study the most common types of faults.
Main malfunctions of the vacuum cleaner
Like any other type of household appliance, vacuum cleaners have the most typical list of faults:
- The filtration system is dirty.
- The motor is defective or its winding is damaged.
- Damage to the hose.
- Wear of rotor bearings and electric brushes.
- Loosening or falling out of fastening screws.
- Broken power wire.
- Impeller displacement.
The corresponding specific signs, which we will consider below, will help you recognize the type of malfunction.
Prevention
There will be no need to repair anything if you take good care of the unit. Clean the turbo brush regularly and wash the dust container. Change bags periodically. By the way, if the brush has become unusable, it can be purchased at the store. A spare part costs under a thousand rubles - it’s not a cheap pleasure.
How to hang the door of a two-chamber Samsung refrigerator
Fortunately, you don't have to change turbo brushes every day. Debris accumulates on the pile, it must be removed - this is quite enough for many years of use. If you still need a large-scale disassembly, study the video that we prepared especially for you.
Troubleshooting
In the vast majority of cases, the cause of the malfunction is the failure of the motor. This can happen with absolutely every model from any manufacturer. The main sign of its malfunction is excessive noise and the formation of a dust cloud. Also, engine failure directly affects the suction power of the device.
Weak or no suction power may also indicate a hose malfunction. Also, evidence of a violation of the hose tightness can be excessively quiet operation of the device.
A decrease in the suction speed of the product may indicate bearing failure. The main symptom of this malfunction is the periodic restoration of normal operation of the device.
Low suction speed may be due to bearing failure
The reason that the device does not turn on may be a simple broken cord. First, the cord stops winding up and coming out normally, and then it becomes impossible to fix and remove it, which eventually leads to its fracture.
The process of disassembling and repairing a vacuum cleaner
Before disassembling the device, prepare the necessary tools and consumables:
- a set of screwdrivers (usually two Phillips screwdrivers are enough for screws of different sizes and two flat ones);
- pliers or wire cutters;
- tweezers;
- 12 mm socket wrench;
- bench vice;
- round file;
- hacksaw for metal;
- a pair of wooden blocks (about 1×4 centimeters);
- lubricant
To find out the cause of the breakdown, you will need to disassemble the vacuum cleaner.
After the preparatory stage, we proceed to the actual disassembly of the device. It is necessary to disassemble in strict sequence:
- The first step is to remove the sealing grill located under the cover of the dust bin compartment. The cover is secured with a pair of screws or other threaded connections. Unscrew the screws using a screwdriver with the required cross-section, clockwise.
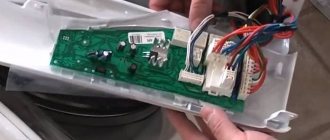
- Next, the control unit and the dust container cover are disconnected.
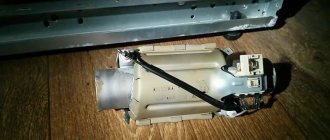
- Based on the design features and model of the vacuum cleaner, the dust collector is either simply pulled out or unscrewed. Below it is a waste collection system where the housing is connected to the motor.
- To get to the motor, you need to separate the body of the product from the base. In a number of models, this is done by unscrewing a secret screw hidden in the handle.
- The motor is protected by a special fabric gasket, which is attached to the hose inlet. This gasket must be removed and cleaned, and if necessary, replaced.
- At the next stage, the wires that supply power are removed from the engine. To do this, you must first unscrew the screw clamps.
- Regardless of the brand of the device, the first thing you should do is check the bearings, since this is responsible for the normal functioning of the motor. The primary signs of bearing pair wear - irregularities and cracks - serve as a signal to replace parts. At the same time, you need to check the integrity of the brush and motor armature. If the parts are in good condition, lubricate them with oil. You need to remove the boot with tweezers, clean it and also lubricate it for prevention.
- Now let's move directly to the motor. To do this, you first need to remove the casing using a straight screwdriver. The casing fits quite tightly to the motor, so you need to tap it a little to get the casing to come off. However, it is important to calculate the forces, otherwise the integrity of the component may be compromised.
- After removing the casing, access appears to the impeller, secured with built-in nuts. The nuts are attached with glue, so you will need a solvent.
- There are four screws under the impeller that secure the motor itself. You can simply unscrew them one by one.
- When free access to the motor appears, we proceed to checking its performance. If some violations are identified, the problems are eliminated as far as possible independently, and the failed elements are replaced.
- The device is assembled in the reverse order.
After disassembling the inside of the case, you can get to the power cord drum
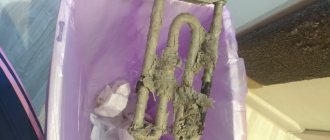
All removable components and the housing must be thoroughly cleaned and wiped with a cloth to remove dust.
Healthy! If you decide to repair a wet vacuum cleaner with your own hands, then you will have to work with the water pump. The pump is an important functional element and is responsible for supplying water to the dust collector and placing it at the inlet. Therefore, when repairing such a unit, it is necessary to pay special attention to disconnecting the pump.
Step-by-step instructions for disassembling the engine
Now let’s look at a separate, more detailed analysis of the engine itself:
- Using a screwdriver, unscrew the two bolts on the side, which are located in the upper part of the case.
- Next, you need to turn the body a little and look at the engine. If you look closely, you can see that the coil is preventing it from being pulled out. Therefore, it is necessary to carefully free the motor from the wires and disconnect the connectors. The coil should remain in place.
- After removing the motor from the housing, clean it thoroughly.
- Next, the sealing rubber is removed by unscrewing the side bolts.
- Using a screwdriver, you need to separate the two halves of the motor housing and remove the motor from the casing (this point was described above in the general provisions for disassembling the device).
- There are folds at the top of the motor that should be bent in the other direction. The two halves need to be separated and the turbine freed from the housing.
- Use a 12mm socket to unscrew the bolt. The stator should be wedged with pre-prepared wooden blocks, holding the structure.
- The turbine is removed, after which the washer is removed and the bolts are unscrewed.
- There are four screws at the bottom that can also be unscrewed.
- Then the brushes are removed and the anchor is knocked out. We insert the wrench into the hole and hit it with a hammer. After this, the motor will be easily removed and ready for testing.
Operation and Maintenance Manual
This is one of the easiest vacuum cleaners to use. Controlling it comes down to turning it on and off with the “Start” button and changing the suction power, and maintenance involves regularly cleaning the dust container (or changing the disposable bag for a new one) and washing the HEPA filter. The latter is washed under a strong stream of water (slightly warm or cold), and then dried and installed in place.
During operation, you can change the length of the cord and telescopic tube. The cord is automatically rewinded - the function is activated after pressing a special button.
You should replace the disposable dust collection bag with a new one or clean a fabric bag based on a signal from a special tank full indicator. You can pull out the bag by lifting the lid on the body, after pressing the special latch.
How to disassemble
Sometimes the owner of an LG Storm Extra vacuum cleaner needs to disassemble the device for repairs or thorough cleaning of the internal parts of the device. Disassembling the device is performed in the following order:
- Disconnect the device from the network.
- Remove all external parts - the hose, the cover under which the dust container is located.
- Find all the screws that are on the body of the vacuum cleaner, carefully unscrew them and put them aside, being careful not to mix them up so as not to subsequently damage the plastic sockets.
- Feel for all the plastic latches, press them and remove the housing. If this operation cannot be performed manually, you can use special tools made of hard rubber or flexible plastic. It is prohibited to use steel screwdrivers as this may damage the plastic of the case.
Disassembly is complete. You can begin to repair the device or clean its interior, paying special attention to the turbine blades. All procedures with vacuum cleaner parts should be performed with gloves to avoid getting your hands dirty with oil and leaving dirty marks inside the device. A deeper analysis of the vacuum cleaner will require an additional desoldering operation, and it is advisable to entrust this to an experienced technician.