A vacuum cleaner can serve faithfully for a considerable period of time, but it happens that during the next cleaning it begins to make a lot of noise, crackle, spark, get hot, smell, work jerkily, or even stops working with a nasty grinding noise. Let's figure out what to do - take the device to a service center for repairs or try to repair the vacuum cleaner motor yourself.
If you decide to disassemble your “helper” with your own hands, this article is for you. Let us warn you right away - not everything can be repaired, even if the equipment shows no signs of life.
IMPORTANT! In this article we will look at the most common, “universal” type of vacuum cleaner motor - a collector motor (with brushes) on plain bearings. There are other types of electric motors (stepper, linear, synchronous, asynchronous, brushless, brushless), but much less common - consult a specialist about them.
Despite the limitation, the article is relevant for most models of vacuum cleaners, such as: AMETEK H / Ametek, Bosch / Bosch, Bork / Bork, Cleanfix / Klinfix, Centek / Centek, Daewoo / Daewoo, Doffler VCC / Doffler, Dyson / Dyson, EIO Targa Duo / Eio Targa Duo, Electrolux Ergorapido, Twin Clean / Electrolux Ergorapido, Twin Clean; Elenberg / Elenberg, Harley Davidson / Harley-Davidson, Hoover / Hoover, Kirby / Kirby, Karcher / Karcher, LG / LV, LG or, as is customary, El-G; Makita / Makita, Miele / Miele, Moulinex / Mulinex, Philips / Philips, Rainbow / Rainbow, Redmond / Redmond, Roomba / Rumba, Rowenta / Rowenta, Samsung SC, VC / Samsung; Sanyo / Sanyo, Siemens / Siemens, Scarlett / Scarlet, Thomas Twin Aquafilter / Thomas Twin, VAX / Wax, Vitek / Vitek, Zanussi / Zanussi, Zelmer Aquawelt / Zelmer Akvavelt, Soviet and Russian - Buran, Vityaz, Whirlwind, Nord, Eagle , Orion, Rocket, Tikhon, Typhoon, Ural, Chaika, Shmel, Shtil and others, including car vacuum cleaners, washing, industrial and construction models.
Vacuum cleaner motor design
Before we begin the repair, let’s understand the basics and study the “material parts” a little, so as not to screw up and ruin everything completely.
The vacuum cleaner has a conventional AC electric motor running on 220 volts. It consists of a stator, rigidly attached to the housing, and a rotor, which rotates relative to it and converts electrical energy (current from the outlet) into mechanical energy. This energy rotates the motor shaft and causes the connected mechanism to work, sucking in air.
The rotor rotates due to electromagnetic induction, which occurs under the influence of alternating current in the windings. The working mechanism consists of an impeller, which, when rotated, creates an air flow directed into the filter system of the unit.
With a regular bag
An ordinary bag allows air to pass through, but retains and accumulates accumulated dust and dirt - that is, it is both a dust collector and a filter (perhaps even the only one in the model). This is the most common air purification technology - it can be found in both cheap models and in devices for professional cleaners. It was devices with a bag that were among the first to be produced for domestic use.
Advantages: simple, reliable, inexpensive. Disadvantages: when the bag is filled, the suction power decreases, it is inconvenient to remove dust.
With aqua filter
Such a vacuum cleaner first sucks in air containing dust and dirt, then passes it through an aquafilter - a reservoir of water. In this reservoir, particles of dirt and dust bind to the liquid and settle in the container, and clean air is released outside. The dust collector must be filled with water to a certain level and then rinsed after each cleaning. Unlike detergent brands, it does not have a special spray pump and is more affordable.
Advantages: high-quality air purification from dust, air humidification during the cleaning process, allows you to collect water from surfaces (convenient for wet cleaning). Disadvantages: too large, heavy and clumsy; Need a lot of storage space. Weight can reach approximately 10 kg. They require a lot of care and maintenance.
Cyclone system
Vacuum cleaners of such a system are called “cyclone” because when air is sucked in, they create a small vortex - a “cyclone”. The air flow throws dust particles and debris onto the walls of the cylindrical dust collector, and clean air exits through the central opening. The air then undergoes additional purification through a regular paper filter or a special replaceable HEPA filter mounted on the rear in the form of a cassette. Dust and dirt accumulate in the cyclone chamber itself. When it gets full and stops performing its functions, it is easy to pull it out and empty it into the trash can.
Advantages: inexpensive, functional, best in terms of price-quality parameters. Disadvantages: they do not remove light debris well - animal hair and fluff, hair, threads. They “beat” with small charges of static electricity that are formed during rotation. Operation depends on the stability of the air flow: when cleaning a sofa or curtains, its flow decreases sharply, debris flies out onto the filter and contaminates the cassette. Compact models are not suitable for thorough cleaning, and full-fledged models consume a lot of electricity. They are noisier than other models.
Features of the Samsung vacuum cleaner engine
The engine of Samsung vacuum cleaners, like any other, consists of a static starter and blades rotating around it. Visually, you can see the asynchronous DC collector unit used as a drive, and a fan mounted on the rotor shaft, which helps pump air out of the housing and create a vacuum, which creates the same “suction” effect.
The system is closed with several layers of sound-proofing materials, as well as a lid that prevents the penetration of air and dust particles from the outside.
Step-by-step disassembly sequence
Here we will tell you how to get to the vacuum cleaner motor and consider the disassembly process in more detail.
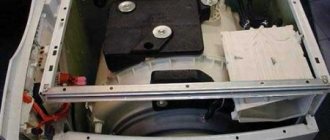
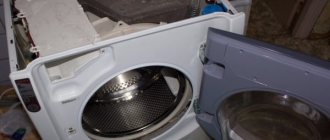
Disconnect the hose and disassemble the housing
As a rule, you need to use a long Phillips screwdriver to unscrew the four bolts holding the two halves of the case together. Sometimes you will have to remove some overhead elements, for example, a turbine. The main thing is not to damage anything and unscrew all the bolts before separating the body parts.
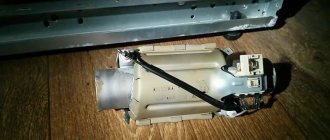
Removing the motor
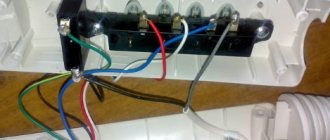
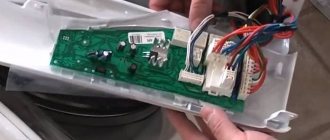
Before removing the motor, disconnect the power terminals and other electronics.
Removing the engine cover
The lid is seamed around the entire perimeter. To remove it, gently press out the seam with pliers. When exposed to light impacts, the cover should separate from the main body.
We take out the brushes by unscrewing the holding screws
As a rule, the brushes are pressed to the rotor by small springs - if you unscrew the clamps, the springs can fly out in an unknown direction.
Check the carbon brushes for wear: they should fit evenly and tightly to the motor commutator and be of sufficient thickness. The thickness must be compared with the depth of the grooves into which they are inserted on the engine, having previously measured it with a caliper.
Some motors do not have brushes at all: these are brushless motors with an asynchronous motor and a squirrel cage rotor. They are rare, but if you do not find brushes on your vacuum cleaner, do not be surprised and continue disassembling.
Unscrew the rotor mounting nut
To remove the fastener, first spray it with WD-40 or similar. Then make clamping bars in place of the brushes so that the commutator (the part of the engine between them) does not turn when unwinding. The size and shape are the same as the brushes, but slightly longer so that the bars protrude from the body.
Clamp the manifold with blocks using a vice or clamp. After this, the nut can be easily unscrewed clockwise with a wrench.
Disassembling the air pump wheel
The procedure greatly depends on the brand of the model and, as a rule, does not cause difficulties. The main task is to free the working shaft of the electric motor. Look carefully at how the working tool is mounted on the shaft, to see if it has additional fastenings in the form of screws or cotter pins. Carefully remove everything and remove. As a rule, there are friction washers on the shaft along with the wheel, which also need to be treated with WD-40.
We carefully inspect the rotor, stator and bearings for damage
If the bearings are worn out, the guide mounts often become loose due to vibration. Check - if everything is in order, move on. If a bearing fails, do not try to repair it: take it for repair or replace it with a new one. In specialized stores, sellers will 100% find an analogue, the main thing is not to throw away the part that has fallen apart.
The windings or their insulation may be damaged—scuffs or burnt insulating varnish are visible. Ideally, you would test the winding with a multimeter (more on this below).
Disassemble the engine further so that the armature can be rewound. If everything is fine with the windings and only the bearing is broken, try assembling the device and turning it on after replacing the bearing.
If there are no obvious burn marks on the winding, it may be intact and there is no need to rewind. But if there are abrasions with a metallic sheen of copper, it is better to be safe.
If the bearings are damaged: how to remove them
In a good way, a special puller is needed here, but the bearing races can be removed from the shaft using a screwdriver and a hammer. The main thing is to do everything carefully and take your time: the impacts on the bearing races should not be too hard.
If the windings are damaged: how to disassemble the armature
To disassemble the anchor, you need to rewind the motor. It is very difficult to rewind at home, so we recommend that you take the part to professionals.
Let's summarize the instructions with another example in the video:
Step-by-step instructions for disassembling a Samsung engine
In order to disassemble the vacuum cleaner engine, we need the following devices:
- Flathead and Phillips screwdrivers.
- Pliers.
- Socket wrench.
- Bench vice.
- Hacksaw for metal.
- Round file.
Armed with these tools, you can begin disassembling the internals. Let's assume that you have already removed it from the case and disconnected the wires connecting it to the board. Step-by-step instructions for further actions:
- First, let's prepare the part for unscrewing the nut: to do this, unscrew the brushes from the back and remove the casing covering the rotor from the front. If the casing fits tightly and you cannot remove it by hand, bend the edges with pliers along the circumference and gently press them out.
- To unscrew the large bolt in the middle, you need to firmly secure the device, but do it carefully to avoid damage to the winding and armature. To do this, fix two small supports in the side holes. Prepare two small blocks by turning them on one side. Insert them into the holes in the housing and press them tightly against the armature with a bench vice.
- Take a wrench or socket wrench and unscrew the nut and remove the cover from the mechanism. Now you can look at every detail.
How to hang the door of a two-chamber Samsung refrigerator
We do not recommend doing it yourself
You won't be able to:
- rewind the anchor yourself,
- restore scattered or broken bearings using “miracle lubricants”,
- repair the electronic “stuffing” of the device.
“Handicraft” treatment will not help eliminate the malfunction and extend the life of the vacuum cleaner for a long time: the motors rotate at a frequency of about 50 thousand revolutions per minute. Refrain from such alterations and bring the device to the center.
To get inspired, check out a couple of professional reviews of vacuum cleaners:
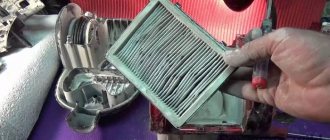
Prevention
Prevention of washing machine malfunctions includes proper use of the device and preventive filter checks. External ones are very important - the air entering the mechanism passes through them, and most of the contaminants accumulate on the filters and protective grille. When the grille and filter system become too dirty, dust and particulate matter can flow directly into the engine, becoming trapped and damaging components. Regular inspection and replacement of dirty filters will significantly extend the life of your device.
A little about electronics
Thermal fuses are installed on branded, expensive electric motors to prevent the vacuum cleaner from starting a fire. Under heavy load, for example, when a bearing is jammed, the motor begins to heat up greatly. This may cause a fire, but the thermal fuse opens the circuit, stopping rotation and overheating.
If the equipment suddenly starts to turn off during operation, this is the first bell: it’s time to figure out what’s wrong.
Finally, we’ll tell you what exactly you shouldn’t get into. The electronics in the vacuum cleaner come down mainly to powering the motor, which can be connected to the network using regular terminals via the power button. Some models have a power control (switch or dimmer on the housing), which includes an additional variable resistance adjustment resistor - this limits the current consumed by the motor. It is also possible to have an electronic filling sensor, rotation control sensors (encoders), backlit power button and other options.
Disassembling the motor step by step
To dismantle the engine, you need to have a certain tool and know the sequence of actions, as well as the nuances characteristic of the motors of some brands of vacuum cleaners.
Materials and tools for engine disassembly
To dismantle the motor, you need to have on hand a tool such as pliers, a hacksaw, a round file, a small vice, two wooden blocks, and a 12mm wrench.
Disassembly algorithm
When disassembling the motor, it is correct to adhere to the following algorithm of actions.
- Removing brushes. The process does not cause any difficulties. In some engines you have to unscrew a couple of bolts, while in others it’s even easier.
- Removing the impeller casing. Its edges have to be bent in places away from the engine housing and then removed by lightly tapping it with a hammer.
- Removing the impeller. This procedure is the most complex and dangerous, therefore the methods for its implementation are included in a separate subsection.
- Removing bearings. The manipulation is carried out using a puller.
Methods for removing the impeller
Removing the impeller from the engine is not an easy task, since the nut that needs to be unscrewed is located in a very inconvenient place . There are generally three methods used for this process.
- Instead of the removed brushes, wooden blocks of appropriate sizes are inserted so that they extend out a little. The ends resting on the rotor are shaped into a semicircle using a file. On both sides, the bars are clamped with a vice in such a way as not to damage the rotor, but at the same time ensure its immobility when unscrewing the nut.
- About 20 cm of soft insulated wire with a cross-section of up to 2.5 mm is put in a loop on the back of the armature, and then, turning the armature clockwise, it is wound onto the current collector. The end of the wire is attached to the motor housing. After this, the nut can be unscrewed.
- The third method requires the repairman to have pinpoint precision: you need to cut a slot for a screwdriver at the end of the shaft where the nut sits. This can be done using a drill or a hacksaw. Then use a screwdriver to hold the shaft from rotating with one hand, and unscrew the nut with the other. You can clearly see the process in the video.
There is a fourth method, but it does not guarantee the integrity of the winding. It consists of wedging the armature shaft using a thin screwdriver, passing it through the hole at the end of the motor. The tool is carefully inserted into the gap between the rotor and stator. The nut usually sits very tightly, and it takes a lot of effort to unscrew it.
Advice! You must always remember that the nut is unscrewed clockwise. Before starting this work, you should treat it with a penetrating liquid and wait a few minutes.
Features of removing the impeller on motors of different brands
The above methods for removing the impeller are suitable for vacuum cleaners LG, Samsung, Karcher, Tomas twin tt and others.
On a note! According to many experts, it is better not to repair Bosh products at home.
Particularly difficult is removing the impeller from the motor without a nut. This applies to some Philips and Zemler models. In place of the nut there is a pressed washer. There is no way to catch it, but there is one way to solve this problem. Two holes are made in the washer to the left and right of the axis. Threads are cut into them. Take a small metal plate and drill three holes in it with a slightly larger diameter than on the washer. On average, they are threaded. A notch is made at the end of the axle. Bolts are passed freely through the outer holes of the plate and screwed into the threaded holes on the washer. One bolt is screwed into the middle of the plate and goes into the recess of the end. It turns out to be a kind of puller. By turning the central bolt clockwise, the impeller is removed from the axle.
Some engine models do not cause major problems during dismantling. The motor of the Rocket vacuum cleaner can be easily disassembled using a long screwdriver. However, the impeller nut on it is removed counterclockwise. You need to hold the anchor with one hand, and unscrew the nut with the other. It is also easy to do this operation with a Vitek engine.
Signs of fatal engine failure
All of the above about disassembling the engine does not make sense if it is not repairable . The motor does not fail instantly. The following signs may indicate that the end is near:
- the engine whistles and hums loudly;
- There is a burning smell when working;
- the vacuum cleaner body overheats;
- The device turns off after 10-15 minutes of operation.
Such manifestations may also indicate less serious problems, but they cannot be ignored. If all the symptoms indicate that the engine has failed, you will have to replace it with a new one.
The procedure for disassembling the vacuum cleaner engine
Before starting work, you need to rid the motor of unnecessary parts - the rear brushes and the casing (housing) that covers the impeller from the front. Often the casing is installed too tightly, so pliers come into play, with which you bend the edges in different directions, then simply pry the casing off with a flat screwdriver and remove it. At this stage, you should understand that even if you remove the protection as carefully as possible, it will not be in perfect condition - traces will remain.
Disassembled vacuum cleaner motor
The body can be removed, but this can be done carefully using small blocks that should be placed in the holes of the casing so that they rest against the anchor at one end and stick out at the other. In this way, the internal parts - the rotor - are fixed, and when removed, it will not be damaged by sudden movement to the side. The outer sides should protrude by 0.5-1 cm so that they can be installed in a vice. The sides that will be installed inside need to be lightly filed with a file and then installed in the holes of the electric motor casing.
Is the rotor secured securely? It’s worth checking, if so, then take a wrench and use it to unscrew the only visible nut. In cases where the nut cannot be unscrewed, it is worth heating it, since the sealant is quite dense, but synthetic and melts at 65-75 degrees Celsius. The disassembly process is over - you can begin the repair.