Vacuum cleaner diagram
A modern vacuum cleaner consists of the following components:
- pipes and hoses for transporting collected waste to the dust collector;
- devices for collecting debris - numerous attachments: universal, as well as brushes with varying degrees of hardness and length of bristles.
- electric motor power regulator;
- compartment for network cable, automatic cord winder;
- dust collector (or aquafilter - for washing models): a plastic tank or bag that collects dust. When dust is sucked in, the incoming air swirls, and due to centrifugal force, it settles on the walls of the tank. Clean air with small particles is directed to the motor.
- a filter system through which the intake air is passed in the main and engine parts. Some of the debris and dust settles in the tank, the other moves towards the electric motor, to protect which a coarse filter is installed. At the entrance to the engine there is a HEPA (hepa) fine filter.
- motherboard located under the lid of the vacuum cleaner. It consists of the following elements: power supply - capacitors across which the voltage drops;
- zener diode, where it is stabilized;
- microcircuit for controlling the operation of the electric motor;
- smoothing capacitor;
- variable resistor;
- triac with a powerful control element;
- power button;
- two connectors: for the motor and for the power supplied to the board.
The electric motor has a capacitor for smooth operation. For uninterrupted operation, an interference suppression system is provided with chokes that smooth out high-frequency network ripples. The motor is designed in such a way that the voltage passes through the coils mounted on the stator and goes to the brushes, after which it is transmitted to the commutator.
The main problems of the Samsung 1600w vacuum cleaner
Have you noticed that the vacuum cleaner has started to work worse? If the device begins to suck in dust worse, makes louder noise and vibrates strongly, you should find the cause of the malfunction. Most models of Samsung vacuum cleaners in the mid-price category have a similar device, so similar reasons occur in most of them.
The main causes of breakdowns are:
- A drop in suction power can occur due to mechanical damage to the tube or hose, an object stuck in it, or a malfunction of the motor.
- Clogged filters. If the device has a special indicator, it will light up and you can clean the filter, but if there is no indicator, the main sign of clogged filters will be a decrease in draft and increased noise during operation of the device. In modern models, the filter can be taken out and cleaned very easily.
- The device does not turn on at all or works intermittently. The hum of a working vacuum cleaner becomes intermittent, and it begins to smell of dust or burnt wires. In order to finally make sure that the vacuum cleaner is faulty, try reconnecting it to other sockets - if it still works, then the device needs to be disassembled and the cause of the breakdown is understood.
- The cord does not retract, the plug is faulty, the wires are exposed - this problem can be solved without disassembling the case.
After a brief diagnosis, it is necessary to disassemble the device to find the cause of the breakdown and, possibly, quickly eliminate it.
Error H1 in a Samsung washing machine
Disassembly sequence
The disassembly procedure is quite simple:
- Disconnect the device from the electrical network.
- Disconnect the hose with the nozzle from the body.
IMPORTANT! Carefully inspect the pipe, hose and pipe attachment (with a curved rim): often the vacuum cleaner stops working because large debris gets there.
- Unscrew the fixing screws and carefully remove the cover from the housing.
- Pull out the dust container.
- Remove all filters.
IMPORTANT! To check the degree of contamination of the filter, it is enough to inspect it: the dark color of the membranes indicates that the filter should be thoroughly cleaned (you can use a vacuum cleaner with a special attachment) or replaced. It is recommended to periodically clean and rinse the sponge filter after using the vacuum cleaner.
- Disconnect and remove the motherboard.
- Remove the motor casing and insulating covers.
More details in the video:
Case disassembly
The upper part of the body is secured with self-tapping screws. Unscrew them with a screwdriver and screwdriver to remove the cover. If you are removing the dust container, also unscrew the screws underneath it.
Tip: Place loose screws in a small, stable container to prevent them from getting lost.
The main part of the case is held on by self-tapping screws or special latches. After removal, access to the motherboard opens. If you are sure that the board is operating normally, move it aside to avoid damage during diagnostics and repairs. To do this, disconnect its connectors and unscrew the screw in the central part.
Next to the engine there is a check valve - a small button that can be pulled out quite simply. The valve is needed to stop the engine if it becomes clogged due to strong suction force. Without a valve, the electric motor may burn out.
To access the engine itself, remove the bolted casing and rubber surrounds. There may also be protective pads made of foam rubber or felt next to the motor. They secure the position of the engine and do not allow it to touch the walls of the casing.
Engine repair and replacement
Signs that you need to check the vacuum cleaner motor:
- the device hums or hisses when connected to the network,
- the vacuum cleaner sucks up dust poorly, does not suck it in or even “spits it out”,
- There is a burning smell coming from the device.
First, let's inspect the engine visually: burnt elements or broken wires can be immediately visible. Wires break more often if they are made of aluminum, which is easily damaged by vibrations. Usually the integrity of the wires is compromised at the places where they are attached.
Then we’ll check the performance of the motor: pull it out, clamp it in a vice, install insulated terminals and apply voltage to them. If there are sparks, most likely there is a lot of dust and small debris inside the electric motor. Dust also accumulates in the impeller, from where it must be cleaned.
Tip: the collector body can be cleaned with an eraser, after first giving it the desired elongated, pointed shape. The eraser is inserted into the hole, the motor is turned by hand, and the dirt remains on the eraser. Clean the eraser with a cotton swab dipped in an alcohol solution.
If there is a lot of debris inside the case, open it by pressing it out using pliers, slightly bending the edges at the clamping points. Remove, clean and reinstall.
Work may be interfered with by:
- impeller imbalance;
- bearing failure;
- wear of the brushes on the sides of the commutator;
- displacement of the sealing ring at the entrance to the fan hole - it needs to be cleaned and put in place;
- crushed or damaged wires - they should be ringed;
- The thermal fuse on the motor housing has blown.
After diagnostics and repairs, blow out any remaining dust inside the engine. It's unlikely to work the first time. Repeat until no more dust clouds are blown out.
A separate article is devoted to engine repair:
How to repair a vacuum cleaner motor at home: step-by-step instructions + video
When installing a new motor on a Samsung vacuum cleaner, disconnect the terminals from the damaged part and connect to the new one. The new electric motor may differ slightly in modification. The main requirement is complete similarity of the holes and brushes, since the motor is inserted into the housing in only one way. It must fit perfectly, with all the grooves and depressions completely matching; it will not be possible to turn the motor around. Then tighten the rubber band or other sealing elements, screw in the removed screws and put the casing back on.
The video below shows the process of disassembling the vacuum cleaner and replacing the motor:
Repair: from simple to complex
However, the cases in the video above are quite serious and not so frequent. We will return to what happens to the engine and what can be done with it. As with the winding drum for the power cord - it sometimes gives external signs like a coil short circuit and to get to the drum, you also need to completely disassemble the vacuum cleaner. In the meantime, let's deal with what is accessible from the outside without tools - filters and a hose. Most often, repairing a vacuum cleaner comes down to them.
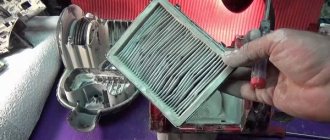
Filters
Vacuum cleaner air filter
The “thin” and HEPA filters of the vacuum cleaner are designed similarly, see fig. on right; The only difference is the filter element. The frames of both are detachable (you need to tuck them into the slot on the side). The HEPA filter is simply removed from its slot using the handle. To remove the fine filter, it is usually enough to remove the dust bag. But in some models the fine filter becomes available only with the motor, so see below.
Let's tell the reader a secret: the filter elements of auto filters are perfect for vacuum cleaner filter inserts (except for the fog one). Moreover, they are made by the same manufacturers. The fine filter is worse: it requires a motor air filter insert, which is not sold separately. But the cabin air filter insert of any SUV is suitable for the most expensive and quickly clogged HEPA filter. The cheapest ones are UAZ ones, and they are no worse than a “cool company”.
One cabin filter is enough for several HEPA, so the original packaging must be opened by carefully cutting off the edge with scissors. Then the HEPA filter frame is separated and the dirty liner is thrown away. The frame is washed and wiped dry. A piece is cut out of the cabin filter to the size of the frame, and the rest is put back into the bag and the cut is sealed with tape so that the insert does not suck up dust from the air. The cut piece is placed in a frame, glued along the contour (preferably with a glue gun), the frame is snapped into place - the new HEPA filter is ready.
Hose
Detecting the location of a vacuum cleaner hose break
If the hose sheath breaks, the vacuum cleaner behaves in the same way as if the filters, impeller or small permanent short circuit are clogged: it pulls poorly, the sound of the motor changes, and overheating is possible. Detecting a malfunction is simple: you need to lightly pull the hose at the rod holder (the pipe on which the brush is attached) or the connecting fitting (the thing that inserts the hose into the vacuum cleaner).
Most often, the hose breaks at the rod; in this case, repairs are possible with improvised means and very quickly, literally without interrupting cleaning:
Video: quick repair of a torn vacuum cleaner hose
Note: For repairs to the hose of a vacuum cleaner with cleaning functions, see below. section.
It is much less common for a vacuum cleaner hose to break in the middle. It is also possible to restore it very quickly, but you need a heat-shrinkable tube (HERE). It is not necessary to sit HERE over a flame; you can warm it up with air from a household hair dryer at full power. How to repair a vacuum cleaner hose using heat-shrinkable tubing, see next. video.
Video: repairing a vacuum cleaner hose with heat shrink
Disassembly
Now let’s take on a more complicated repair, for which the vacuum cleaner must be disassembled. This may be necessary if the measures described above have been taken, the problems have been corrected, but external signs of a problem remain. Before disassembling the vacuum cleaner you must:
- Disconnect it from the power supply.
- Disconnect the hose.
- In vacuum cleaners with a cyclone or aquafilter, remove and empty the dust container.
The internal structure of the vacuum cleaner is shown in more detail on the left in the figure:
Internal structure and procedure for operating the vacuum cleaner
The vacuum cleaner is disassembled as follows. order:
- Open the lid, pos. 1 in Fig.
- Loosen the latches or remove the screws securing the lid hinge to the body, and remove the lid if the hinge is on the front.
- If the lid tilts back, remove the HEPA filter, pos. 2.
- Remove the screws under the HEPA filter.
- Raise the carrying handle. If a screw is visible underneath, remove it.
- If the fastening screws of the upper half of the housing are visible from above (red arrow on item 2), remove them.
- If the mounting screws are not visible from above, turn the vacuum cleaner over and inspect from below. It is possible that the screws holding the halves of the housing together are hidden under the hinged technological cover, pos. 3.
- Remove the top housing cover. Now there will be access to the motor, drum with cord and, possibly, to the fine filter, pos. 4.
- In some models of vacuum cleaners, after the housing connector, 2 more screws and a latch are found. By unscrewing the screws and releasing the latch, you can remove the tray with the motor and drum, pos. 5.
- The fan motor is secured in the compartment with long screws (shown by arrows in position A).
- Do not twist the screw heads, they sit on the threads and in the motor! You need to unscrew the nuts on the studs, then the motor will come out, pos. 6.
- A possible option for mounting the motor is that instead of nuts on threaded rods, screw heads are visible behind it. This means that the impeller casing is a tight fit, see below. In this case, unscrew the screws and remove the fan motor.
- By removing the motor power connector from the socket, we get full access to the power cord reel, pos. 7.
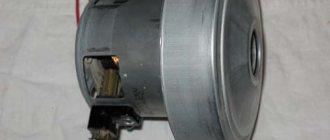
Motor: what can be done
Electric motors of vacuum cleaners, for the sake of compactness, are made as commutator motors with sequential excitation: a silent and economical 1.5-2 kW asynchronous motor will be larger than any vacuum cleaner and will pull several tens of kilos. In order to obtain an acceptable efficiency of the commutator motor (on alternating current, generally speaking, for electric machines, it is very bad), more or less decent performance of the impeller and reduce the noise of the vacuum cleaner, its motor is designed to have a high rotation speed, more than 10,000 rpm. In this case, balancing the rotor (which in a commutator motor is called an armature) together with the impeller becomes of great importance. If, for example, you go into the compressor for “no reason” and slightly dent the impeller (or break a plastic blade), you will end up with a new compressor. Or, let’s say, the vacuum cleaner rattled, but pulled. Then I stopped pulling. We take it apart and look - the bearing seats in the housing are broken. Again I fell for the same thing. Therefore, the immutable rules that must be followed if suddenly the vacuum cleaner is acting up and there is a suspicion about the mechanics are as follows:
- Suddenly, a hum, vibration, clanging, knocking, and other sharp extraneous sounds appeared in the operation of the vacuum cleaner - do not delay repairs, it will cost more.
- If the vacuum cleaner gets hot and, especially, smells of burnt insulation, turn it off immediately and see before. paragraph.
- Before getting to the motor, carefully check all the possible sources of problems described above and the power cord drum, see below.
- Make sure that the voltage in the sockets corresponds to that indicated in the passport or on the nameplate of the vacuum cleaner. Its household norm is 185-245 V, but powerful AC commutator motors do not tolerate supply voltage fluctuations within such large limits; for them the norm (unless the manufacturer indicates otherwise) is 195-235 V.
- If you don’t know the ford, don’t go into the water - take on electromechanics, only knowing exactly what and how you will do there and what it will lead to.
We will further try to provide information on how and when it is possible to repair the vacuum cleaner engine on your own.
The internal structure of the vacuum cleaner fan motor is shown in pos. 1 pic. below, and at pos. 2 and 3 – variants of its execution. Pos. 2 – fastening with short screws from the back and the impeller casing with a tight fit (see also above) is used primarily. in modern vacuum cleaners; the entire air flow washes over the motor. Pos. 3 – the casing with a seal is secured with hairpin screws; this is an old, but still quite common option. In this case, there are no problems: unscrew the screws, pry up the casing with a screwdriver (it is stuck on the seal), and the casing falls off on its own.
Construction and disassembly of the vacuum cleaner motor
If the casing is a tight fit, very, very carefully, slowly, slowly tap its protruding side until the casing slides off. It would be better to place a steel strip 3-4 mm thick: without weakening the impact, it will distribute its force over the greater length of the side. By the way, assembly is in reverse order, just tap the neck. If it is not there, then the assembly is assembled on a special stand. Then – stop! We won’t go any further on our own.
But let’s say the casing is removed and we see the impeller, pos. 5. Dented or beaten - a new compressor, nothing can be done. At such a rotation speed, if a push pin gets into the impeller, the bearing seats will definitely become loose; what this means, see above.
Brush-collector assembly of the vacuum cleaner motor
Okay, the impeller is intact. We unscrew the fixing screws of the brush holders (shown by red arrows in the figure on the right) and take out the brush holders with brushes (green arrows). For now, we put it aside and check the impeller: without brushes it should rotate freely, easily, smoothly and make several revolutions with a sharp push with your finger. No - see below, but for now let’s take care of the brush-collector assembly.
We check the stubs of the brushes, they should remain at least 1-1.5 cm in length and exactly the same. If a hole is visible in the middle of the end of the brush, and there is some kind of copper in it, that’s it, the brushes are completely worn out. Brushes are replaced only and only in complete pairs. If one is worn even a millimeter more than the other, the pair of brushes is replaced regardless of the degree of overall wear.
We clean the collector with chamois moistened with alcohol and wipe it dry with flannel. God forbid you rub with sandpaper! The lamellas of vacuum cleaner motor collectors are made of copper-plated aluminum. The copper layer is thin: I sanded it until white - a new compressor. The same applies if a ring groove is found on the collector, burnt out by a circular fire. A circular fire surrounds the collector if you run the vacuum cleaner for a long time with clogged filters.
Now let’s say that the impeller rotates a little stiffly and/or not smoothly, as if it’s clinging to something. Actually, it can be removed using a pneumatic or hydraulic puller, but first you need to unscrew the nut with the left-hand thread holding the impeller. It is stuck tightly: every time you turn on the vacuum cleaner, the inertia of the impeller tends to tighten the nut. Having no skills in working with mechanics and electromechanics, it’s better to stop here and honestly tell the craftsmen: I don’t know how to do it myself, but I’m completely afraid of breaking it. But for amateurs who are fully proficient with the tool, we provide a video on how to unscrew the nut of a vacuum cleaner impeller:
Video: unscrewing the vacuum cleaner impeller nut
If the nut gives way, you can try to remove the impeller by carefully turning it left and right on the shaft with your hands. The shaft can be fixed with a nylon cord: one end of it is tied to some hole, the cord is tightly wrapped around the shaft under the impeller, then the assistant constantly pulls the free end of the cord, and you try to tear off the impeller. But under no circumstances jam the shaft with something hard! The silumin motor housing may crack, and then again - a new compressor. Some people even manage to turn the shaft in the anchor, which is imaginable, but with great difficulty.
Okay, the impeller has slipped. For what? To check the bearings. Add 1-2 drops of kerosene or brake fluid into the gaps between the bearing races and their seats in the housing. We take a nail, rest its tip against the hole on the shaft shank and try to push the anchor (see figure below) forward. If it doesn’t stick tightly, it will work out, because... The front bearing is larger than the rear. You can lightly tap the nail head with a light hammer, but be very careful - the silumin body may crack!
Armature (rotor) of the electric motor of the vacuum cleaner
Checking the rotation of the bearings. It will be difficult to remove the unusable ones, because... They are placed on the shaft journals with a cold tension, i.e. The armature is cooled before installing the bearings. You can try to warm up the bearings with a household hairdryer and, while they are hot, push them together with the ends of scissors. There are other ways, see, for example, how to replace the motor bearings of the rather popular Samsung SC4325 next. video:
Video: replacing the bearing of a Samsung SC4325 vacuum cleaner
What not to do
“Restore” broken bearings with lithol, fiol, etc. The engine speed is not right for such a trick to work. Also, there is no need to rewind the anchor yourself, due to the same rotation speed. After rewinding, its dynamic balancing is required. Not static in the centers! If there is a specialist who can rewind with a guarantee and will charge you less for it than a new compressor, you can try it. But you don’t need to do it yourself.
Drum
The power cord reel may have mechanical and electrical faults. Mechanical - damage to the locking lever and spring inside. In both cases, the cord either does not pull out or does not tighten back, completely or partially. The lever is usually flat, L-shaped; the new one is made from a piece of metal, no special precision is needed. To get to the spring (and contacts, see below), you need to completely wind the cord and disassemble the drum; All mounting screws are on the outside. Usually the spring breaks off. To bend a new one, the end of the spring is released by heating it over a fire. When reassembling the drum, wind the spring 2-3 turns and check the course of the cord. Does not extend completely - the initial winding needs to be loosened. The whole thing is not retracted - on the contrary, it should be strengthened.
The power cord in the drum is most often connected to the vacuum cleaner assembly using sliding contacts. Symptoms of their malfunction are that the vacuum cleaner works intermittently or does not turn on at all. It may coincide with the signs of a turn short circuit: it gets hot, it doesn’t draw well, it has burnt insulation. However, it is useless to check contacts with a tester: it will not detect intermittent point non-contacts.
The drum contacts are checked with a homemade probe from any earphone and a AA battery, well known to radio amateurs. See Fig. for verification diagram:
Checking the drum contacts of the vacuum cleaner power cord
The procedure is:
- One probe (no matter which one) is placed on the contact pad of the drum (shown by red arrows).
- With another probe, click the earphone to find the corresponding pin of the power plug.
- One person listens to what is in the earphone, holding the plug to himself, and the other person pulls the cord completely through the loop and releases it.
There should be dead silence in the earphone all the time. The slightest rustle - the drum needs to be sorted out, cleaned, straightened or the contacts changed. The current through the earphone is only a few mA, but what will happen when the standard 5-10 A flows through the circuit?
Wiper blades
Malfunctions of the vacuum cleaner are also possible in the active tips, i.e. performing cleaning functions. How their main varieties are structured and operate is shown in Fig. below. In the wet mopping handpiece (left in the figure), the main source of failure is the user. The detergent pump is not designed to run dry. If you do not prime the vacuum cleaner before cleaning, its motor will fail. The pump is structurally integral to the detergent tank and cannot be repaired. As for the tubes for supplying the detergent and its sprayer, they are outside, transparent, and blockages in them are immediately visible. To clean, the supply tube is simply pulled off the fitting on the vacuum cleaner and sprayer, and simply put back on. Replacement is also easy: any plastic tube of suitable diameter.
The design of active tips of a vacuum cleaner for wet cleaning and sweeping
To see the structure of the dry (sweeping) active tip (on the right in the figure), you need to remove the side covers that sit on friction or latches on the tip hinge (in the center in the figure) or directly on the sides of the brush. The low-power, dust-proof brush motor rarely fails. Somewhat more often, the drive belt sags and slips (green arrow on the right in the figure) or the bristles of the throwing drum wear out; it should protrude beyond the lower plane of the tip by at least 8-9 mm. The throwing drum cannot be restored; it must be replaced with a new one. Quite often there is also a break in the power supply wires of the sweeping drum drive. The wires run inside the hose; how to replace them in the fairly widespread Samsung SC-6573 vacuum cleaner, see the story:
Video: repairing wires in a hose with a regulator (Samsung SC-6573)
Checking the motherboard
If you suspect that some elements on the board are damaged, first “ring” the contacts: touch the terminals on the board with a multimeter. If no resistance is detected when testing the connectors going to the engine, the problem is related to the engine. If it reacts when voltage is applied to the contact, the problem must be looked for in the board.
First of all, clean the board from dust using an air blower or a volumetric brush. As a rule, the control triac on the board fails. If you can’t replace it, you can solder the same one next to it (the model number is engraved on the triac).
An example of disassembling a vacuum cleaner whose control panel does not work is shown in the video:
The unit does not turn on at all
If you plug the unit into a power outlet and nothing happens, then repairing a Samsung vacuum cleaner (with your own hands, of course) should begin with a thorough inspection of the electrical part of the device. First, make sure that the outlet itself is working - to do this, plug in another device that is known to be working. If everything is in order, inspect the vacuum cleaner cord, look for scuffs, cracks, breaks or other damage.
Read more: Dimensions of plastic pipes for water supply table - Heating
If all of the above actions do not produce results, it means that the brushes are to blame or the motor has burned out. This part of the repair already falls into the more complex category.