Do-it-yourself boiler repair Ariston
To independently repair Ariston storage water heaters (volume 50, 80 or 100 liters) at home, you need to familiarize yourself with the main design components:
- Temperature sensor. If it breaks down, the boiler will not stop working, but it will not be possible to determine the temperature of the water and its quantity;
- Thermal insulating casing - due to it, the temperature of the water in the Ariston water heater is maintained;
- The outlet pipe for hot water to flow outside, as well as the heat-insulating element, does not require repair;
- Water supply tube;
- Metal or plastic outer shell of the Ariston water heater;
- The inner container is made of stainless steel, with a wall thickness of up to 2 mm. May require replacement if it is damaged by electrocorrosion caused by anodic current;
- Magnesium anode – resists the effects of anode current and protects the internal container from corrosion;
- Ten is a water heating element. The speed of heating water depends on its power. This element, more often than other parts of the Ariston boiler for 50, 80 liters, requires DIY repairs;
- Thermostat – performs the function of automatically starting water heating;
- Insulating seals require scheduled replacement. They perform the function of sealing the joints of the Ariston water heater structure and provide electrical protection.
The design of Ariston instantaneous electric water heaters is similar to the storage type, but it does not have a storage tank of 50, 80 liters, and the heating element has a higher power.
Problem with the electronic board in the Ariston model
If the electronic board of the water heater fails, you will need basic knowledge in the field of electrical engineering.
Since the board is put into operation in parallel with the electrical power circuit of the heating element, it can be turned off and the circuit can be connected as on conventional boilers, after which the equipment will work.
Malfunction and repair of the heating element
When the Ariston boiler is turned on, the heating element operation indicator does not light up, the water does not heat up:
- Using a tester, we determine the malfunction. Having set the scale on the measuring device to 220-250V, we measure the connection of the thermostat and the cable at the terminals; at normal voltage, we proceed to measuring the voltage of the heating element. If in this case the voltage is normal, it means that the heating element itself has broken;
- Turn off the boiler and set the tester to a resistance measuring scale. We disconnect the heating device from the thermostat, the ends of the heating element are exposed. We carry out measurements on the contacts; if the device is working properly, the tester will show a certain level of resistance (accuracy is not important here). If there are no indicators, the heating element of the water heater cannot be repaired.
A thematic video will complement the above.
Video:
Typical malfunctions of Ariston heaters
Why doesn't the equipment work? The answer to the question will be found in diagnostics or the boiler itself. Modern models are equipped with control boards that regulate the operation of all nodes in the system. When a breakdown occurs, a fault code is displayed. If there is no display, then the error is indicated by the indicators (flashing).
Deciphering the symbols will help solve problems with the operation of the heater.
Ariston boiler error codes: table
| Fault code | What does it mean | How to repair |
| E01 | There are problems with the control board. | To eliminate a system error, turn the speaker on and off for 10 minutes. If the error appears again, inspect the board. Perhaps condensation has formed on it. |
| E10 | Problems with the temperature sensor. | Check the integrity of the wiring and tightness of contacts. Test the sensor with a multimeter. In case of breakdown, replacement is carried out. |
| E11 | Message about temperature exceeding normal (more than 105 degrees). Causes:
| DIY repair:
|
| E12 | Sensors indicate that the water temperature is 12 degrees higher than expected. | See code E11. |
| E13 | Touch differential error. The difference in readings between temperature sensors is more than 50°C. | Diagnostics and installation of new sensors. |
| E14 | Error E14 reports: the water heats up very slowly. | Make sure the voltage is normal. Clean the heating element from scale. |
| E15 | The system reports that there is no water in the tank. | Check the presence of water in the water supply and the condition of the safety valve. Replace the faulty part. |
Since the boiler is simultaneously connected to electricity and water communications, problems may also affect the network or the safety valve and hoses.
Let's look at the main breakdowns of the Ariston heater:
- The tank leaked.
- The device does not turn on.
- No water heating.
Signs of a malfunction may include:
- Long heating.
- Noise during operation.
- Water with an unpleasant odor and cloudy color.
- Quick switching on and off of the boiler.
What to do and how to fix problems, read below.
Cleaning and Maintenance
Following the manufacturer's recommendations can save the boiler owner from many problems. For example, the instructions usually recommend regular maintenance of the boiler, which boils down to an external inspection and cleaning procedure.
Typically, recommended maintenance periods vary depending on the type of heating element and the nature of its operation. For “wet” heating elements, it is recommended to clean them annually, and for “dry” heating elements - at least once every two years.
If the device is used under increased loads, for example, in production or in a public place, then maintenance should be carried out every six months, regardless of the type of heating element.
During operation, scale and debris accumulate inside the boiler; to remove these contaminants, the device should be cleaned regularly
The maintenance procedure may affect warranty service. Sometimes the manufacturer indicates in the documents that the procedure should be carried out not by the owner of the device, but by repairmen certified by the manufacturer. In this case, it is better to follow the manufacturer's instructions.
Carrying out maintenance yourself is not too difficult. To do this, you need to disconnect the boiler from the power supply and water supply, and then drain the water inside. After this, the housing is opened by unscrewing the fastening bolts and the heating element is removed. The heater and the inner surface of the tank are cleaned of scale and dirt.
The protective gasket and magnesium anode are replaced. Then the device is reassembled and connected to the electrical and water supply networks. One of the common causes of damage to the boiler tank is so-called electrical corrosion. It gradually destroys the surface of the drive, which leads to leakage.
To prevent this problem, many manufacturers install a magnesium anode next to the heating element. This element does not last forever; the task of the device owner is to promptly replace it with a new element. Unfortunately, some people forget about this, which can result in their boiler being completely damaged.
The magnesium anode gradually wears out, it is recommended to replace it with a new element every year or two, depending on the heating element model
Do not forget about such an important protective element as grounding. Its absence not only creates a risk of injury when operating the device, but can also intensify or provoke electrocorrosion
Main types of faults
During operation of water heaters, several types of malfunctions can occur:
- The heating element has burned out, the water does not heat up;
- The thermostat has deteriorated;
- the magnesium anode has used up its resource;
- a large layer of scale on the heating element and the inner surface of the boiler.
All of these faults, except for replacing the thermostat, require disassembling the water heater. Considering that there is no fundamental difference in connecting Ariston storage water heaters with different capacities and modifications, the disassembly process will be the same.
The design and model range of storage water heaters is described in detail in this article:
It can be divided into several stages:
- disconnecting the electrical power cable;
- draining water from the boiler tank;
- dismantling the flange and directly opening the boiler.
Characteristics and types
The flexible hose for connecting plumbing is a hose of different lengths made of non-toxic synthetic rubber. Thanks to the elasticity and softness of the material, it easily takes the desired position and allows installation in hard-to-reach places. To protect the flexible hose, there is an upper reinforcing layer in the form of a braid, which is made from the following materials:
- Aluminum. Such models can withstand no more than +80 °C and retain functionality for 3 years. At high humidity, aluminum braiding is prone to rust.
- Of stainless steel. Thanks to this reinforcing layer, the service life of the flexible water line is at least 10 years, and the maximum temperature of the transported medium is +95 °C.
- Nylon. This braid is used for the manufacture of reinforced models that can withstand temperatures up to +110 °C and are designed for intensive use for 15 years.
The fasteners used are nut-nut and nut-fitting pairs, which are made of brass or stainless steel. Devices with different permissible temperatures differ in the color of the braid. Blue ones are used to connect to a pipeline with cold water, and red ones for hot water.
When choosing a water line, you need to pay attention to its elasticity, reliability of fasteners and purpose. It is also mandatory to have a certificate that prevents the rubber from releasing toxic components during operation.
The water heater is broken: the main causes of the malfunction
Despite the reliability and quality of Ariston heaters, they tend to break down. The weakest points of the water heater are: the heating element, a special magnesium anode, and a check valve. It is these elements that need timely prevention.
What to do if your water heater breaks down? First, you need to identify the causes of the breakdown, and only then move on to eliminating the malfunction itself.
Reasons for failure of water heating tanks:
- Corrosion (scale) has formed on the heating element;
- The filter on the pipe through which water is supplied and on the check valve is clogged;
- Power surges in the network lead to the control board failing.
When starting self-repair, be sure to check the device’s warranty card. If the warranty on the tank has not expired, do not rush to disassemble it, otherwise you will not receive free service in the future.
Checking the performance of the heating element
The functionality of the heating element can be checked in practice after assembling the boiler or using a multimeter. To do this, you need to measure its electrical resistance. The nominal resistance of the heating element is calculated using the following formula:
R=U2/N, where U is the network voltage, and N is the power of the element.
For example, with a heater power of 1.5 kW, the nominal resistance will be 32.3 Ohms. If the heating element is working properly and descaled, but the water remains cold, then the cause of the boiler malfunction could be a failure of the switch or thermostat.
You can check the performance of the heating element using a multimeter.
Typical water heater connection errors
Safety valve. The most common mistake installers make is failing to install the valve. Replacing the safety valve with a non-return valve (which allows liquid to flow only in one direction) is also incorrect - this can lead to increased pressure on the device. As a result, leaks, tank depressurization, and the need to replace gaskets. A working safety valve periodically drips and leaks (especially when the water is very hot when no one is using it). You should be wary of the fact that the valve always remains dry! There is a possibility that it clogged and failed.
Tank orientation. The second common mistake is installing a horizontal device vertically, and vice versa. Do not rush to purchase a heater until you decide exactly where and how it will hang. Which location is more convenient? If the family moves often, or cannot decide on a location, it is better to immediately purchase a universal boiler.
Electrics. It is best not to use an outlet that is located in a damp place or where it may be splashed. A prerequisite is a grounding contact. It is desirable to have a separate line with its own machine and through an RCD. Choosing the wrong machine is also a common mistake. It must be bipolar with a value of 16 A if the boiler has a power of up to 3 kW. Three-core copper cable with a cross-section of 2.5 mm2.
Fastening. You cannot hang a heavy tank (100 liters or more) on a wall or sheathing; they may not be able to support the load. The hole for the dowel should go into the wall to a sufficient depth. Small boilers up to 50 liters can be hung on a plastic dowel. If the volume of the container is larger, it is better not to risk it and use steel anchor bolts.
Water supply. Of course, installing a flexible plastic pipe is much easier. But if the boiler is planned to be located at a considerable distance from the cold riser (more than 1.5 m), then preference should be given to metal. Rubber hoses should not be used; they wear out too quickly.
Water with impurities. Hard and dirty water is the main reason for failure of heating elements. The mistake in this case would be to do nothing. If the problem occurs, it is worth installing a fine filter at the inlet
It is also important to periodically change the magnesium anode.
Even if this is not the first time you have to install a boiler, read the installation instructions and remind yourself of the basic requirements and principles of connection!
How to turn it on
The design of all boilers (storage water heaters) is the same, so it depends little on the model and brand. Considering that, according to statistics, the most popular manufacturers among Russian consumers are Thermex and Ariston, using their example, we will tell you separately how to turn on the Thermex boiler and how to turn on the Ariston water heater.
The initial installation of equipment is mainly done by specialists, but switching on must be done by the users themselves.
So, how to turn on a Thermex water heater so as not to damage it and prevent mistakes. Connecting an instantaneous water heater is not fundamentally different - the air is also vented, the hot water pipe is shut off, the settings are set and it starts up. The only difference is that the storage one takes 2.5-3 hours to heat the water, and the flow-through one dispenses it after 5-15 seconds.
- The shut-off valve on the hot water pipe is closed.
Even if a tap is installed on the pipe, shut-off valves are still used. The taps can let water through, and then the water from the boiler will go into the common riser.
- Air is released from the system by opening the hot water tap and the outlet of hot water from the boiler itself; lastly, open the cold water tap. The presence of air can be determined by a ragged stream - it will flow intermittently and a “snorting” sound will be heard.
- After the water flow has leveled off, close all the taps, including those on the device itself. Next, connect it to the network.
A separate grounded socket is always used for connection.
- Before turning on the boiler, set the temperature and check the operation.
To make sure it works, do the following:
- check the indicators;
- check the temperature;
- If the device is working properly, the temperature will rise after 15-20 minutes.
If the water heater does not turn on
The first thing you do is check the network elements - electricity, sockets, RCDs, automatic devices. Use a tester to check the voltage in the boiler to rule out a broken cable.
The most common problem is electronics. If power is supplied, but the Thermex water heater does not turn on, look at the error code on the display and check the instructions to see what it means.
- breakdown of the heating element, contamination of the heating element with lime and calcium deposits;
- thermostat failure - when the water temperature rises above 90-92 degrees, the RCD may be triggered;
- there is no water in the tank - if there is water in the system, but it does not flow into the boiler, the reason may be that the air has not been bled.
Even if there was water in the tank before turning it on, but it has not been used for a long time, you should first drain the water, and then be sure to drain the air.
Let us repeat that there is no fundamental difference in connecting storage devices, so we will schematically describe how to turn on an Ariston boiler.
- If we are talking about an apartment or house with a centralized supply of hot water, close the pipe with shut-off valves.
- Open the tap in the place where the unit is installed and drain the water, close it.
- You bleed the air from the boiler, for which you first open the inlet tap (the pipe is marked in blue), then the heated water tap (marked in red). Wait until all the air comes out and the water flows in an even stream without interruption.
- Do not close the cold water supply tap - its quantity in the boiler is regulated automatically.
- Plug it in and set the temperature on the device.
- Check the functionality - after a few minutes the temperature in the tank should begin to increase.
What errors can you encounter during operation?
Instantaneous water heaters
As for compact water heating devices, we note that their installation is very simple:
- remove the old tap;
- install the unit;
- connect to a pipe with cold water;
- turn off the hot one;
- plug into the outlet.
At this point, the installation is complete and then you just need to turn on the hot water tap and use it. With this equipment, there should be no questions about how to turn on the boiler when it is already installed. If you don’t risk installing it yourself, contact a specialist.
All listed devices belong to high power equipment (from 3 to 7 kW), they are prohibited from being connected to a common outlet. A separate outlet should only be located in a dry place, and power should be supplied directly from the distribution panel.
Typical boiler breakdowns and their causes
Before you start disassembling the device, you can check the most common causes of breakdowns:
- the device does not turn on;
- when turned on, the automatic fuse is triggered;
- the device turns on, but does not heat the water to the required temperature;
- leak.
A leak in the heating element seal area is usually easy to repair. You just need to replace the gasket, it is inexpensive.
If the water comes from a storage tank, then you will have to think about buying a new unit. The tank is practically not suitable for repair, especially at home.
Heating elements, or heating elements, are the most loaded component of the device. Constant heating and exposure to chemicals dissolved in water lead to rapid wear. Heating elements fail most often.
Signs that suggest a malfunction of the heating element are the following:
- frequent activation of the safety circuit breaker;
- the water does not heat up enough or does not heat up at all;
- the visible part of the heating element has mechanical damage, the wires are darkened or melted.
If one or more of these symptoms occur, you should check the heater resistance using a tester or ohmmeter. To do this, remove the contacts from the terminals of the heating element and measure its internal resistance. If it is zero, a short circuit has occurred; if it is infinite, a break has occurred.
Resistance measurement
In both cases, the heating elements must be replaced - they cannot be repaired.
The most common reasons for the failure of an electric heating element include:
- Resource exhausted. Usually the heating element lasts for several years.
- Elements that have been operating for some time without water or with insufficient water pressure are susceptible to breakdown.
- Constant power surges in the network, instability of power supply.
To replace the heating element, you can call a technician at home or contact a service center. However, a home craftsman who knows how to use a screwdriver, pliers and a wrench is quite capable of replacing the heating element on his own. This will save money and, above all, time.
What you need to know about Ariston boilers
The main function of Ariston water heaters is to provide houses, apartments, cottages, and cottages with hot water supply for household purposes. In order for the electric water heater to serve for a long time and with high quality, the following characteristics were observed:
- the internal tank is made of high-quality anti-corrosion material - stainless steel, the internal walls of the water heating tank are coated with a special coating to prevent plaque formation;
- High efficiency heating element with reliable insulation;
- internal dividers that do not mix cold water with heated water;
- intelligent control system;
- overheating protection using control sensors;
- high-quality thermal insulation allows you to maintain the water temperature for a long time;
- the presence of a professional antibacterial coating;
- ease of use.
It should be noted that the instructions for water heater models that differ only in the system of different volumes of the same series are almost identical. There are two types of heaters based on the principle of operation: flow-through (the heat exchanger heats the temperature instantly as soon as you open the tap) and storage (water is drawn into the tank and then heated). Storage water heaters, or boilers, have a compact tank designed for different volumes - 30, 50, 80, 100 liters. Boilers can be directly heated (they heat the water themselves using gas or electricity) and indirect (such devices are located near a heat exchanger, for example, a boiler).
Installation of the device must be carried out by a specialist, otherwise your equipment will lose the right to warranty service. After installing an electric water heater, check the following:
- Are there any water leaks: to do this, disconnect the water heater from the network and turn on the cold water filling;
- At the same time, we also turn on the hot water tap to see when the boiler is completely filled. As soon as warm water flows from the tap, the boiler is completely filled with water. Close the tap and check the boiler itself to see if there is any dripping from the connections.
- Only after you are sure that there is no leakage, insert the water heater plug into the network and select the desired heating mode.
About installing an Ariston electric water heater according to instructions
Before installing the water heater, make sure the wiring can handle the added power.
It is especially important that the outlet you are going to connect the device to is grounded and not exposed to water. Power to the water heater must come from the panel via a separate cable
When choosing a place to install an electric water heater, take into account its triple weight with water and the strength of the walls.
For fastening, hooks of at least 15 mm in size are required. It is recommended to install the water heater in close proximity to the dispenser, which will also reduce heat loss when supplying water to the point of disassembly. The distance from the ceiling is at least 10 cm, the space around the device is within a radius of at least 50 cm for technical work.
Under what conditions should the device not be installed?
prevent splashes of water
If the water pressure is low, it is necessary to set the maximum temperature mode, otherwise the device may not turn on at all.
Brand name parts only
All parts of the water heater must be in good working order when first installed. This is especially true for the safety valve. If damage is noticeable, the part should be replaced with a similar one. Do not use adapters or extension cords under any circumstances, or replace the water heater plug with another one. A separate power line to power the boiler is required. If the power cord is damaged, replace it with a similar one.
When disconnecting the electric heater, use a two-pole switch, the gap between open contacts is from 3 mm
Also note that the pipes to which the water heater connections will be connected have withstood temperatures exceeding 80 degrees Celsius and the maximum operating pressure
Precautionary measures
If you know you won't be using the appliance for a while, simply drain all the water from it. To do this, turn off the power to the device, close the cold water supply valve at the water heater, and open the hot water tap on the mixer. Open the drain valve of the tee. The magnesium anode, which will be used up over time, should be replaced with a similar one. The first start-up of the device should be carried out strictly according to the instructions.
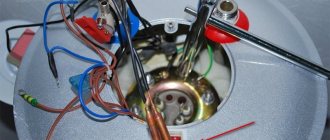
Central nut 55
If you need to disassemble a water heating tank, in which the heating element is secured at the bottom with a large hex nut, as in the photo below, you can do everything quickly.
First of all, disconnect the boiler from the power supply and water supply. Before unscrewing the flexible hoses, be sure to turn off the cold water supply. After disconnecting, you need to drain the water from the water heating tank, which can be easily done using this video instruction:
When the water is drained, you need to disassemble the bottom cover of the water heater housing, which is usually attached to 2 self-tapping screws. Under the cover you will find this large nut and the thermostat, which also needs to be removed by disconnecting the terminals that go to it. Now that you have free access to the nut, take a gas wrench No. 2 or a hub wrench 55, both can be seen in the photo:
Features of gas connections
When connecting gas stoves, water heaters and other types of equipment, flexible hoses are also used. Unlike water models, they are yellow and are not tested for environmental safety. For fixation, end steel or aluminum reinforcement is used. There are the following types of devices for connecting gas appliances:
- PVC hoses reinforced with polyester thread;
- made of synthetic rubber with stainless steel braid;
- bellows, made in the form of a corrugated stainless steel tube.
The Santekhkomplekt holding offers engineering equipment, fittings, plumbing fixtures and devices for connecting them to communications. The assortment is represented by products and materials from well-known foreign and domestic manufacturers. Discounts apply for bulk purchases, and product quality is confirmed by standard certificates. For information support and assistance, each client is assigned a personal manager. The ability to arrange delivery within Moscow and to other regions of the Russian Federation allows you to quickly receive the purchased goods without unnecessary hassle.
Drainage is a drainage and drainage measure to remove excess groundwater.
If water does not leave the site for a long time, the soil becomes gleyed, if shrubs and trees quickly disappear (get wet), you need to urgently take action and drain the site.
What to do
Ariston water heater design. (Click to enlarge)
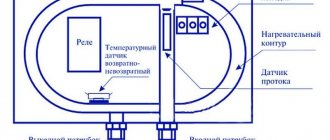
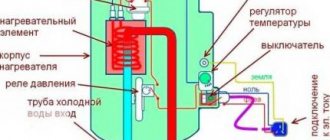
To begin self-repair, you should pay attention to the features of its design and operating principle. Typically the tank includes the following functional units:
Typically the tank includes the following functional units:
- heating element for heating water;
- thermostat for controlling and monitoring the heating temperature;
- relay that controls on/off the heating element;
- magnesium anode that protects the tank from corrosion;
- a safety valve that reduces the pressure inside the tank when water is heated;
- electronic control unit (simpler models are equipped only with warning lights).
Good to know: to heat a cube of water by one degree, 1.167 kW/h of electricity is required; if the supply water temperature is 17 degrees, then to heat it to 65 degrees you will need to spend about 56 kW/h without taking into account the heat loss of the boiler and pipes.
You can do this yourself at home, following a certain sequence:
- Disconnect the boiler from the power supply if the heating element does not heat.
- Turn off the cold water supply and drain the water heater.
- Remove the protective cover and disconnect the wires (you must first draw a connection diagram or photograph it, which will facilitate the reassembly process).
- Unscrew the flange nuts using a wrench.
- Place a container under the tank and carefully remove the flange with the heating element and the magnesium anode (its remains).
- Clean and wash the internal walls from scale and dirt.
- Install a new heating element and magnesium anode.
- Reassemble all parts in reverse order.
- Before connecting to the power supply, draw water and check the tightness of the assembly for several hours; the tank should not leak (otherwise, do not turn on the tank; you will need to install a new gasket on the flange).
You may also be interested in the article about replacing heating elements in Termex water heaters.
Read an article on how to disassemble and clean a Thermex water heater here.
And then the usual physics - when you open one tap, water will not flow from the tank until air takes its place. Therefore, a second tap is necessary to supply air to the system.
Expert advice: in order for the Ariston boiler to serve without repair for many years, it is necessary to carry out preventive cleaning once a year and limit water heating to 60 degrees, which will significantly limit the formation of scale.
Watch the video in which an experienced user explains in detail how to repair an Ariston water heater with your own hands:
Step-by-step instructions for replacing the heating element
The disassembly sequence may differ depending on the type of mounting of the heating element inside the tank. On Ariston boilers, 3 types of element fixation are used: on a nut, on a strip or on a flange with screws or studs in a circle.
Before you begin disassembly, you must complete the following steps:
- Disconnect the device from the power supply.
- Turn the shut-off valve, stopping the flow of water into the tank. Disconnect the hoses from the valves. Open the check valve. Remove water from the tank through a hose or its own drain system.
- Remove the protective cover from the boiler control system, which is located under the tank.
- Check the presence of current at the thermostat contacts. Take a photo or sketch the order of connecting the wires to the terminals, and then remove the contacts and set aside the control unit.
Only after preliminary preparation will the protective case with fastenings open. It must be dismantled to remove the heating element and anode.
With fastening nut 55
In older models of the Ariston boiler, the heating element, active electrode and thermostat are attached to a 55 mm nut.
After dismantling the control unit you need to:
- Place a wide basin under the tank, since the water may not have completely drained out of the container.
- Tighten the nut with a hub or adjustable wrench and carefully turn it counterclockwise.
- Remove the heating element. If it is difficult to remove due to a thick layer of scale, carefully knock off some of the deposits with a thin but not sharp tool.
- Inspect the surface of the heating element and the magnesium anode. In case of complete destruction, only a threaded rod remains in place of the “sacrificial” element.
- Unscrew the heater mount. Check the performance of the thread using an ohmmeter or multimeter. If the resistance is below nominal, buy a new part.
- Rinse the heating element and immerse it in an acidic solution for several hours. To prepare the product, you can use 50-60 g of dry citric acid or 100 ml of table vinegar per 2 liters of hot water.
After cleaning and replacing the necessary elements, you need to reassemble the device in the reverse order.
In older models of Ariston water heaters, the heating element is secured with a 55 mm nut.
With fastening strip
In modern designs, instead of a large nut, a clamping strip or flange is used. The tank with nut can be disassembled in an inverted position after removing the boiler; fastenings with a strip can be dismantled only from below.
The nut that secures the flange with the anode and heating element is fixed on the transverse bar. The fastening element is unscrewed using a ratchet wrench or a socket tool. After this, the bar is removed and the flange with the heating tube is removed. To speed up the process, you need to rock it a little and turn it.
With flange and all-round fastenings
In new boiler models, the heating element flange can be fixed at 4-6 points in a circle. Depending on the configuration of the device, the mounting nuts can be screwed onto bolts or studs.
As with the flange, a socket or ratchet wrench will work to remove the flange. After unscrewing the nuts, you need to carefully pull the flat part with the anode and heater attached to it.
Some models have 2 heating elements installed at once. To understand which one has failed, you will have to take out both elements and check them with a multimeter. The process of disassembling a tank with several heaters is no different from what is described above.
"Dry" heating element
The dry heating element has an additional protective flask, which protects the tube from corrosion. The fasteners on the bar or flange are located in the same way as with an open type of heater.
In most cases, the cause of failure of a dry heating element is scale deposited on the bulb.
When to change the anode
The service life of the element depends on 2 factors - operating mode and water hardness. There is no need to explain the intensity of the boiler’s operation - the higher the flow rate in the DHW system of a private home, the higher the load on the heater parts.
Water hardness is determined by the content of calcium and magnesium salts. The higher their concentration, the faster the electrochemical corrosion reaction occurs and the faster the anode metal decomposes. In soft water the process slows down greatly, in distilled water it is reduced to zero.
How often does it need to change the magnesium anode depending on the operating conditions of the hot water storage tank:
- With continuous operation + hard water – annually.
- Regular tap water, the heater operates constantly - once every 2 years, at least.
- At lower loads, it is worth cleaning the boiler once every 2 years and monitoring the condition of the element.
- An exception to the rule is a titanium rod that works in conjunction with an external power source - the so-called active cathodic protection. The system is designed for a long service life.
How to connect an Ariston water heater
First, the water heater is mounted on a wall or supporting surface and the outlet (cold water) is provided from the water pipe. It is most beneficial to install the device as close as possible to the source of water supply - this allows you to minimize heat loss.
If there is a collector in the system, a separate cold water supply pipe is transferred to the installation site of the water heater. If there is no collector, the nearest section of the water pipe is cut, and a standard tee is installed at the cut site.
The method of installing the tee depends on the material from which the pipes are made. Plastic fasteners are fastened using a special soldering iron, and metal ones are fastened with threads.
A ball valve is installed in a separate section of the water supply system, designed to shut off the cold water supply.
Wiring diagram for an Ariston electric storage water heater.
To connect the water heater to the water supply:
Pay attention to the hot and cold water pipes - it is important not to confuse them. A check valve is installed for cold water; it can be included in the standard kit. Hot water is connected using a pipe
First, a cold water pipe is installed, then a hot one. A special tape is wound onto the threads as a sealant and sealant; this is recommended by the manufacturer. A tee is installed on the cold water pipe, at the bottom of which there is a relief valve. A tap is attached to the side to completely drain the water from the tank in case of an emergency, possibly due to abnormal pressure or heating. A shut-off valve and adapter are installed at a short distance under the tee. The next step is connecting to the water supply. Connection to hot water is also made by installing a shut-off valve. When connecting different metals, adapters should be used.
Connection to the electrical network is carried out as follows:
- A separate circuit breaker (RCD) is installed in the distribution panel; it is connected to the central automatic fuse. A three-core cable is pulled from a separate RCD to the boiler, which is placed in an external cable channel (or a special groove is punched into the wall).
- It is recommended to install a 16 A fuse as a switch, since the socket and plug are subject to heat and moisture. In addition, the cost of waterproof electrical equipment is higher than the cost of a machine. The “switch” is closed in a compact cabinet with a removable panel.
- A separate RCD and the “switch” are connected by wire.
- A three-wire wire is connected to the heating element; for this, the bottom panel is removed from the water heater.
- Then the output of the machine is connected to the boiler.
- At the next stage, the ground, phase and zero lines are wired to the corresponding connectors.
Diagram for connecting an Ariston water heater to the electrical network.
Before turning on the device, you must make sure that there are no leaks and that the flange is in the correct position (strictly in the middle). Then fill the tank with cold water and open the hot water tap to release the air. After bleeding the air, the valve is closed and a test operation is performed.
More detailed advice and instructions for operation and installation can be obtained from the KVANTA+ company in Tyumen.
Under what conditions should the device not be installed?
Electrical appliances, in particular an electric water heater, must be installed in conditions that correspond to those specified in the instruction manual.
The following are stated in the instructions for Ariston boilers as unacceptable factors for installation:
- frost - this is associated with the risk of freezing water in the tank and pipes;
- sunlight - do not expose the electric heater to direct sunlight;
- power outages - the voltage in the network to which the device is connected must be stable;
- vapors, dust or gas - the water heater must not be installed in a room with a high concentration of dust and toxic or acidic gases/vapors in the air;
- dampness - it is not recommended to install the device in conditions of constant dampness and in long-term unventilated rooms (this item depends on the degree of moisture resistance of the selected water heater model).
Oval heating element in storage water heaters Ariston
Heating elements for Ariston water heaters of this type have an oval platform and are the exact opposite of those considered. If the round ones fall out on their own, you just need to unscrew them, but these ones, on the contrary, are pressed down by the entire mass of water, and have a rubber gasket on the outside. The oval mounting hole is wide enough, but a man’s hand still won’t fit through there. The Ariston storage water heater with this type of heating element can not be removed from the wall, but there is a small nuance: (See also: How to drain water from a water heater)
- If you turn the case upside down, then when unscrewing the spiral will fall inward. In doing so, it can damage the enamel coating or scratch stainless steel.
If this happens, the service life of the product will sharply decrease. Any enamel chips easily, and steel will rust in places where it is damaged. All this will lead to fairly rapid damage to the tank. Moreover, the company’s technical service will conduct an examination of the integrity of the coating, and such unusable goods cannot be exchanged. In this light, we can recommend not removing the Ariston water heater with a heating element of this type from the wall. Usually there is a lot of scale at the bottom, and if the spiral gently falls on its side on this sawdust bed, then nothing bad will happen. By the way, the heating element itself most likely will not suffer from a fall, despite its considerable weight (if there is a magnesium anode in place).
To remove the spiral, open the lid. There will be a visible cross member with a nut in the middle. This is the fastener; it attracts the heating element, which, under this pressure, sits firmly on the gasket inside the tank. To remove the coil, rotate it 90 degrees. The spiral is located in one of the foci of this ellipse (may mathematicians forgive us for such crude phrasing), that is, it is shifted to one of the edges of the stadium-shaped area. The second side easily crawls out through the edge, after which the heating element is removed for cleaning. We would not call this procedure very simple, especially if we remember the size of the hole. But you also need to avoid scratching the inner surface. That's why you shouldn't remove the tank from the wall yet. (See also: How to make grounding for a water heater with your own hands)
How to drain water from it? We talked about this, but we will repeat it. Most Ariston water heaters come with a special bypass valve, which is also a non-return valve. It indicates with an arrow exactly how to install. Be sure to connect the Ariston water heater through this device to the water supply. This will not only protect the enamel from being hit by excess pressure, but will also allow us to drain the water in case of service. A check valve is needed so as not to lose the reserve during technical work carried out by service companies. Between the valve and the Ariston water heater, insert a tee with a valve in the branch. It is through this that the water is drained. Do not forget to shut off the riser before the procedure, and in any case, disconnect from the network.
There are still no clear instructions on how to clean the tank from scale. Judging by the size and shape of the hole, this should be done by an elegant girl with a rubber glove. It will be quite funny to watch her begin to repair the Ariston water heater. All scale is poured out of the tank, after which it can be treated with weak acid solutions from the inside. Assembling the water heater is done in reverse order, and it is difficult for one person to do it. It is necessary to hold the heating element by the contacts with one hand, aligning it strictly vertically, and with the other, install the crossbar and begin to tighten the nut.
Before connecting to the network, it is necessary to check the tightness of the gasket. Toilet paper will help do this. If necessary, purchase the necessary spare parts for the Ariston water heater, most often these are: (See also: Do-it-yourself gas water heater)
- Magnesium anodes, which are consumables.
- New heating elements (from 500 to 800 rubles).
- Thermostats and spare parts for them.
The Ariston horizontal water heater is sometimes equipped with heating elements of the RNSA type. In terms of installation method, they are very similar to the ones under consideration. There is a threaded rod for mounting on the outer part of the oval platform.