Domestic water heaters - gas water heaters are used in old high-rise buildings and private houses to prepare sanitary water. Their parts and components tend to wear out just like any other equipment. Most often, the membrane of the water reducer fails, which you can change yourself.
We will tell you how to replace the membrane of a geyser. The article we have proposed describes in detail the steps to prepare for replacing the membrane and provides recommendations for its selection. Taking into account our advice, you will be able to monitor the operation of the gas heater or restore the functionality of the water heater yourself.
About the reducer and the location of the membrane
A device called a water reducer is part of almost any design of gas heat exchangers.
This part may have different configurations depending on the model of the water heating apparatus, but the principle of operation of such devices remains unchanged.
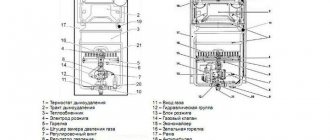
Gas water heater reducer, where the membrane is located: 1 – water inlet; 2 – rod head and stuffing box group; 3 – rod; 4 – ball valve; 5 – water outlet; 6 – nozzle; 7 – plugs for draining water from the internal areas of the device
A water reducer installed on a gas water heater serves to stablely maintain water pressure directly in the water heater heat exchanger system. Due to the uniformity of pressure, a uniform flow is ensured, which means the same uniform heating of the liquid.
A part of the gearbox that facilitates smooth pressure regulation is a rubber membrane. This gear component, made in the form of a gasket, usually based on technical rubber, has the shape of a circle. It is installed inside the gearbox housing.
Due to the long-term operation of water heating equipment, being constantly in motion, the membrane gradually wears out. Wear of technical rubber in some places leads to tears in the material. Accordingly, the function of regulating water pressure stops operating according to the specified algorithm.
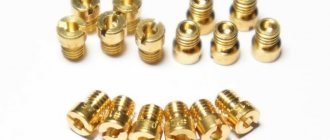
A prototype of a classic membrane based on technical rubber. The shape of the plate is round, the surface has a characteristic feature - a convex central part. Similar accessories are used on most geysers
In such cases, it becomes inevitable to replace the rubber membrane of the reducer in the gas water heater, because the water heater does not work properly.
The quality of sanitary water heating decreases sharply, and in other cases the column simply cannot be put into operation. Comfort for the user is lost.
Reducer Diaphragm Replacement Steps
If we proceed from the rules for servicing gas equipment and strictly follow these rules, performing any installation, plumbing work, as well as work related to power supply is the prerogative of gas service providers, in particular, the local gas service company.
What do you need to know before starting work?
In other words, owners of gas water heaters are prohibited from carrying out work on gas equipment themselves. And even taking into account that the water reducer is theoretically not related to the gas system, disassembling this structural part and changing the membrane with your own hands is also prohibited.
Gas water heater servicing by a specialist. According to the service rules, any service or repair work is carried out only by representatives of specialized companies
Sometimes the desire to do everything yourself, without having practical experience in performing this kind of work, can result in disastrous consequences. As evidenced by the numerous accidents associated with household gas equipment.
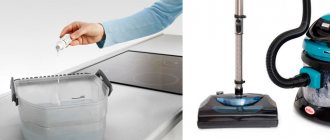
However, premature wear of the membrane and other components of the water heater under pressure can be prevented by promptly cleaning the equipment with your own hands or by a gas service representative.
A bitter example from life when, due to self-repair of a water dispenser, a gas explosion occurred. As a result, the destruction of a significant part of a multi-storey residential building. And many such cases are recorded every year.
There are often craftsmen who are ready to independently change the gearbox membrane on a gas water heater. Moreover, it is, in fact, not at all difficult to perform such an operation if you have plumbing skills.
Do this easy job as follows:
- Using documentation or by opening the column housing and examining the internal contents, determine the brand (model) of the installed gearbox.
- Based on the technical information obtained, they purchase a new membrane on the market.
- If the equipment is imported, you may have to purchase the membrane only to order.
- If there is a membrane, shut off the gas supply to the equipment and close the cold water supply tap from the central heating system.
- Drain the contents of the gas heater heat exchanger using the service drain valve, the location of which is determined according to the documentation.
After these operations, you can begin dismantling the gearbox. However, there is no need to rush here. You need to work carefully and carefully so as not to damage other nearby parts of the gas water heater.
Gearbox removal and disassembly
The water pressure reducer has inlet and outlet pipes. Actually, thanks to threaded union connections, the device is mounted inside the gas system, directly on the water flow line.
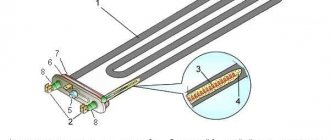
Two positions for dismantling: 1 – pipe nut on the inlet pipe of the pressure control device; 2 – pipe nut on the outgoing pipe. Drain plugs should also be used
Therefore, in order to dismantle the device, it is necessary to unscrew the two union brass nuts securing it to the pipeline. But before doing this work, it is recommended to unscrew one or both plugs on the gearbox drain outlets, which are located under the disc housing.
The nuts should be unscrewed smoothly, while simultaneously holding the device from possible rotation. The mechanism of the device has a regulator rod that is in contact with another part of the gas water heater. On some models, the rod head is secured with a screw. This point should be taken into account and, if necessary, loosen this screw.
The nuts securing the pipeline are unscrewed. All that remains is to release the fixing screw that presses the rod head. In the picture this position is marked with the number 3
Dismantling may be accompanied by residual water leakage. It is recommended to stock up on convenient, capacious containers for collection.
Brief instructions on replacing the membrane
The removed pressure regulator will need to be disassembled to get to the rubber (silicone) membrane. The disassembled part looks roughly like a plate.
The two halves of the disc housing of the pressure regulating device, inside which the membrane is located. Now the defective accessory can be easily removed and replaced with a new one
Disassembly/assembly sequence:
- Unscrew the fastening screws on the top of the plate;
- carefully use a flat-head screwdriver to bifurcate the plate;
- remove the defective membrane;
- install a new one;
- articulate the halves of the plate;
- secure the joint with screws in a circle.
The correct location of the membrane on the gear plate is determined by a special “key” recess or pin, which, in turn, is located on the radial edge in the same row as the holes for the mounting bolts.
You need to align the membrane “key” with this notch before connecting the plate halves and screwing in the screws.
The same pin on the body of one of the halves of the body, thanks to which the membrane is precisely fixed in place. The accessory itself has a hole for mounting on a pin.
The moment of screwing in the mounting screws is a traditional action. However, you should keep in mind the uniformity of tightening of the gearbox parts. Technically competent tightening is performed using the “crosswise” method. That is, first, four screws located one opposite the other are tightened sequentially, and only then all the others are tightened.
The assembled gearbox, equipped with a new membrane, is installed in place in the reverse order. Carefully insert the rod inside the tube of the control device, align the device to the level of the water pipes. The nuts are then manually screwed onto adjacent sections of the pipe.
The picture shows the uniform distribution of screw tightening torques when connecting two parts of the housing. This condition must be adhered to in order to avoid water leaks through leaks in the future.
As a rule, pipe connections require the presence of sealing gaskets and their correct installation. This point must be taken into account when installing the gearbox at the installation site. Next, all that remains is to tighten the fastening nuts, applying a little force and do not forget to tighten the drain plugs under the plate.
Membrane shapes and materials
The design of geysers is varied. Accordingly, a change in the design of the pressure reducer cannot be ruled out. Therefore, the existence of reducing membranes of various shapes also seems to be an obvious phenomenon.
If a round-shaped product, which can often be found when disassembling the valves of domestic geysers, is considered standard, imported devices are often equipped with “exotic” ones.
The so-called exotic version of the rubber membrane. As a rule, most often products of this kind are found in imported designs
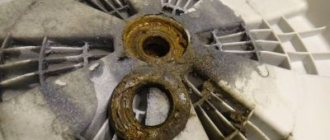
One such example is the geysers of a well-known foreign company that produces household appliances under the Electrolux brand. Many models of equipment from this brand are equipped with figured membranes in the form of a “figure eight”.
The devices of the foreign company Vaillant are somewhat less popular compared to Electrolux, but they also stand out from the entire range of household geysers due to the non-standard production of gear membranes. When disassembling their valve, there is a chance of colliding with the flag membrane.
Another “exotic”, not so expressed figuratively and quite a bit different from the classics, but still. Such accessories are also used on foreign devices
For the sake of objectivity, it should be noted: products of non-standard shape show finer regulation of flow pressure, however, in terms of long-term performance, they are often inferior to standard ones. Often the degree of durability is determined by the quality of the material.
In practice, it has been noted that silicone membranes last longer than rubber ones. However, for silicone, an important criterion is careful filtration of network water. Even a small amount of sand or rust that gets into the area where a silicone product is located will dramatically reduce the service life of the material.
Manufacturing a membrane using a relatively new material – silicone. In terms of the quality of work, an accessory in this design is characterized by more expressive parameters compared to technical rubber.
Technical rubber is less sensitive to the effects of suspended particles, but for the most part “suffers” from insufficient chemical resistance. That is, if the composition of the water has an aggressive component to some extent, under these conditions, products made from technical rubber usually do not last long.
Repair of geyser membranes
The desire to save on everything forces some users to resort to such a virtual replacement technique as repairing a defective membrane with their own hands.
It should be noted right away: this activity may be interesting for a home handyman, but, from a service point of view, it is absolutely irrational and pointless.
They try to repair geyser membranes in different ways:
- by puttingty with silicone sealant;
- using various types of adhesives;
- application of pentelast;
- installation of miniature patches;
- and even masking tape.
The activity of such a “repaired” part lasts, as a rule, no more than 1-2 days. After which the problems begin again, and often worsen.
Repairing membrane plates of geysers, especially with your own hands, ends in failure in any case. Tested in practice more than once. So, it is not recommended to change the “awl for soap”, unless there is a purely research interest in this matter.
If it is not possible to restore the functionality of the wall-mounted water heater, you will have to buy a new gas water heater. The following article, which examines this current topic in detail, will introduce you to guidelines for choosing equipment.
Membrane Failure Determination
The operation of the gas water heater may deteriorate gradually or stop instantly. The malfunction does not always lie in the wear of the rubber heart of the water block. Sometimes the reason is extraneous. Therefore, before you start with a screwdriver or a key to the insides of the unit, it is more rational to diagnose it.
Diagnosis of the reason for the automatic shutdown of the column
Column failure can occur for various reasons. Therefore, if a column malfunction is detected, you should not immediately begin dismantling and disassembling the water unit.
The column automatically turns off in the following cases:
- there is no draft in the chimney;
- the heat exchanger overheats;
- the flame above the gas burner does not ignite;
- The membrane does not work properly.
We gave other reasons why the column attenuates in the following material.
In modern household heat exchangers equipped with digital displays, the main control board displays an error code expressed in numbers on the screen. He will tell the technician what to check first.
This is not the case with older devices. The error code won't mean much to the average user. Therefore, when searching for the cause of a breakdown, you should be guided by a practice-tested method - the method of verification and exclusion.
Checking the correct connection of communications
So, first you need to make sure that there is water in the water supply network at home, the gas inlet is not blocked, the valves supplying water and gas to the water pump are open in operating mode, and the batteries are not dead.
The problem with the geyser not working may well be banal batteries - if they are dead or the contacts are oxidized, then the geyser will not turn on
That is, you need to find out whether the column has turned off for reasons independent of its performance.
- Check the water pressure in the water supply and the presence of natural draft in the chimney. To enable the membrane to operate, the water flow must be at least 2-3 liters per minute. We talked about the reasons for weak pressure here.
- Clean the contacts of the power compartment, replace the batteries.
- Imported units are sensitive to how the phase is located in the sockets. Reverse the position of the plug in the socket.
- Check fuses.
- If a filter is installed on the cold water supply pipe, check whether the filter is clogged. You should also check the mesh installed on the faucet tap. Clean if dirty.
- Check for a spark at the ignition electrodes when the hot water mixer is on. In units with a closed chamber, the clicking of the discharges can be heard from the outside. The presence of a spark means that the membrane is triggered.
Once you are convinced that the reasons for the main valve failure lie within the system, proceed to further diagnostics.
How does a membrane malfunction appear externally?
In some GC models, the rod, including the column, is located above the body, so the movement of the rod can be observed. If the rod does not move or does not extend completely, then the membrane and plate should be checked for integrity. On some models, the movement of the rod can be seen when the housing is removed.
If, after cleaning the filter mesh, the gas burner does not fire, but ignites only when the hot water tap is fully opened or several such taps connected to the hot water valve are opened at the same time, then it will be necessary to replace the old gas water heater diaphragm with a new one.
By installing a mesh filter on the inlet pipe, you will protect the elastic gasket from accelerated destruction. Silicone membranes, which can withstand tensile and bending stresses many times greater than rubber parts, are especially sensitive to mechanical abrasion
During normal operation of the membrane, the flames rise 3-5 cm and are located exactly above the edges of the burner. Otherwise, especially if cleaning the nozzle did not help (if ignition is carried out from the wick), the culprit may be a leaky diaphragm. This is also the most likely reason if you do not hear characteristic clicks from the batteries when you ignite the speaker.
A red, high flame may indicate that the gas is not suitable. If a blue flame, burning sluggishly, produces hot water at first, then rapidly cooling water, we have another symptom of a “membrane disease.”
The gearbox must also be disassembled if water leaks from the water block. This malfunction can be caused by scale, wear of the gasket on the screw bushing of the rod, failure of the membrane itself or the plastic parts of the combined membrane.
Conclusions and useful video on the topic
The video demonstrates the personal experience of one of the heater owners - that is, do-it-yourself repair of the water pressure regulator. In particular, all repairs come down to replacing the membrane. We remind viewers once again: independent repair of gas systems is unacceptable!
It’s easier to find and buy a new membrane for a geyser, replace this accessory according to the instructions described above and sleep peacefully. Moreover, replacement, in most cases, does not require significant financial costs. On average, 200-300 rubles are enough to purchase a complete accessory.
Please leave comments, post photos related to the topic of the article and ask questions in the block below. Tell us about how you selected and changed the membrane in a gas water heater. Share useful information and technological nuances that will be useful to site visitors.
The process of replacing the membrane in a gas water heater
The membrane is designed to separate the cavities in the water regulator. Despite the quality of the column and its manufacturer, the membrane wears out over time, which leads to its ruptures. This type of malfunction is very common, but anyone who has first read the instructions can cope with choosing a new membrane and replacing the old one.
According to the instructions, any repair of the geyser must be carried out by qualified personnel.
Self-repair without special skills and knowledge may result in equipment damage. Also, self-repair is very dangerous because a gas leak may occur. If any difficulties arise during self-repair, you should immediately contact the gas service.
Membrane replacement process:
- Turn off the speaker.
- Turn off cold water and gas.
- Open the hot water tap slightly to change the pressure in the pipes.
- You need to open the tap that is located closer to the column. Usually we are talking about a faucet in the bathroom.
- When disassembly occurs, water from the heat exchanger and pipes will flow out through the open tap, and the siphon effect will help with this.
- There is no need to open a kitchen faucet that is located higher than the water regulator. This can result in 3 to 5 liters spilling onto the floor.
- Remove the column casing. Finding attachment points will not be difficult. The absence of a casing will make the internal structure of the column accessible.
- Remove the water regulator. To do this, you need to remove the union nuts and fixing screws.
- Disassemble the regulator and replace the membrane.
Changing the membrane is not difficult. But it is important to ensure that all actions are performed correctly. The membrane should not be inverted; the bypass channel, which helps to unite the water unit, should not be blocked.