Heating water no longer requires any tricks, thanks to the abundance of heating equipment in the form of electric kettles, boilers, coffee machines and other devices. But there are situations when they are not at hand, and you need to boil or heat water right now. In this case, you can assemble a boiler with your own hands from available materials suitable for this.
Safety precautions.
For some, the methods outlined in the article will become nostalgic for their student years or military service. But it should be clearly understood that such homemade devices pose a potential threat both from the point of view of electric shock and from the point of view of fire and explosion hazards. Therefore, their actual use should be minimized whenever possible, and during constant operation, replaced with factory-made devices. Next, we will consider the simplest options that even a novice electrician can assemble without any skills or knowledge.
Razor blade boiler
This option has already become a classic for people who lived during the period of domestic shortages. Over the years, a lot of variations of such heating devices and decent experience in their implementation have appeared, so let’s look at this model in more detail. Blades are not the only option for boiler electrodes, but they are used most often and this is due to several important reasons:
- High quality steel - during electrolysis, an electric current flows in the water column, formed by metal electrons released from the electrodes. Due to the resistance of the liquid, not all particles move from one electrode to another, but precipitate in the form of metal, significantly changing the taste of the water. Razor blades are made of fairly high quality, so the percentage of sediment from such a boiler will be minimal.
- Optimal ratio of geometric and physical parameters - despite the fact that no one invented blades as an electrode for a boiler, they provide a relatively high rate of heating of the liquid.
- Mass distribution - can be found in almost every home, garage or workshop, which is why they are always at hand.
Materials for a blade boiler
Before manufacturing, you need to acquire the following elements:
- The blades themselves - for the quality operation of the boiler, the brand and condition of the cutting surfaces do not matter; you can even use dull blades. It is important that they are of the same design; it is better if you take them from the same package.
- A dielectric for isolating one blade in a boiler from another - you can use any items you have (plastic lids, plugs). If nothing comes to mind, it is best to use regular matches to isolate the heating elements from each other.
- Material for fixing the electrodes in the boiler - threads are most often used. You definitely shouldn’t fasten it with glue, and even more so, you shouldn’t resort to wire and other metal products - they will immediately short-circuit the blades.
- Power cord with plug - any option with stranded copper wires that can be conveniently screwed around the blade will do.
This is a minimal set; if you wish, you can complicate the design by using crocodiles to connect wires to the blades or installing a plastic block as a base.
Manufacturing procedure
To make a boiler from blades, it is advisable to have the following tools on hand: pliers, a knife or side cutters, and electrical tape. The manufacturing process is as follows:
- strip the wires on the power cord with the electrical plug, you will need about 2 - 3cm of bare wire;
Rice. 1. Strip the wires - screw each end of the wire to the blade, note, do not try to solder them - it is useless, you need to screw the wire tightly, if you can’t do it by hand, take pliers;
Rice. 2: Screw the wires to the blade - fix the blades at a distance from each other using a dielectric, in this case matches are used;
Rice. 3: Put matches between the blades - wrap the resulting boiler with threads so that it does not fall apart during use; if it holds up as it is, you can do without threads.
Rice. 4: Secure the blades with thread
The homemade water heater is ready, it should be noted that the distance between the blades determines both the parameter of the power consumed from the network and the heating rate. Therefore, you will get the fastest heating at a distance of 2 - 3 mm (per match thickness); at a distance of 2 - 3 cm, the heating time will increase proportionally.
Rice. 5: Perpendicular placement of blades on matches
But the amount of electricity consumed to boil water, say, in a half-liter jar, will be the same for both cases.
Do not forget that all homemade boilers that pass electric current through the heated liquid cannot be immersed in metal containers; they will be under potential and can give an electric shock. Only dishes made of dielectric material are suitable - glass, polymer and others.
Rice. 6: Blade boiler in action
Blade boiler
A homemade boiler or a primitive 12-volt heating device can be made from available materials.
For this we need:
- An insulated piece of two-core wire.
- Blade, which is used for a razor in the amount of 2 pieces. You can also use a paint knife blade. If you don’t have any in your apartment, even two metal spoons will do.
- A saucepan or jar for water.
- Two matches or wood chips.
- Threads.
Option 1. You need to attach a wire to the ends of the blades. The blades should not be allowed to touch each other. To do this, we install spacers made of matches or wood chips between them on both sides. Then you should wind the blades with thread. The wires should also not touch. You just need to place a homemade 12-volt boiler in a container of water, plug it into the outlet and wait until it boils.
Option 2. When using a metal container to boil water, one wire can be connected to the pan, and a blade, spoon, or other available metal object can be attached to the other end. It is important to ensure that the latter does not touch the walls of the metal container. This turns out to be a 12 volt boiler.
A self-made boiler with a power of 12 volts copes with boiling a small amount of water quite quickly.
It is important to follow safety precautions when using this heating device:
- Before you are going to use a homemade boiler, you must carefully check all the connections of the structure for strength.
- Under no circumstances should you put your hands in the water while heating the liquid (you may get an electric shock).
- Do not leave the heating device turned on unattended.
- Don't risk boiling salt water. Otherwise, you will cause an explosion, causing most of the water to splash out of the container.
- Do not use this design for more than a month. And also think about the quality of the water you are going to drink. Due to the ingress of metals into it, the water becomes of poor quality.
From the heating element of the kettle
You can also assemble a boiler from an unnecessary electric kettle, provided that the heating element is in working order. In this case, you don’t need to come up with anything extra - you will need the heating element itself and a cord with a plug. First, check the integrity of both parts of the electrical device using a multimeter.
Rice. 7: Check with a multimeter
Ring the cord and heating element, if they are in good working order, then they can be safely used to make a boiler.
To connect the terminals of the heating element, it is more convenient to use terminal clamps, but if you don’t have these on hand, you can use a regular soldering iron.
To make a boiler, follow these steps:
- disassemble the kettle and remove the heating element from it, do the same procedure with the stand and remove the cord from it; if the cable is long enough, you can simply cut it at the base.
- using a knife or wire cutters, remove the insulation from the edges of the wire;
- secure the terminal clamps to the contacts of the heating element using a screwdriver;
- on the other side, connect the stripped wires of the cord to the terminals;
Rice. 8: connect the wires to the heating element - Use a multimeter to check the boiler circuit and the resistance between the terminals of the plug and the housing.
Rice.
9: ready-made boiler from heating element The boiler is ready, it can be used both for heating technical water and for boiling drinking water. In terms of its operating parameters, it is no different from a classic kettle or boiler, so it can also be used in metal containers. Due to the fact that the heating device uses a factory heating element, you get a fairly powerful boiler.
From nails
For such a boiler you will need 6 nails 8cm long, a wooden strip about 2cm thick that can be installed on the edge of a container made of non-conductive material, a ready-made power cord or a pair of wires with a plug. To work, you need pliers and a drill with a drill bit of the same diameter as the nails.
The principle of creating a boiler is as follows:
- drill holes in the board at a distance of 5 mm from each other;
- insert the nails into the holes, leaving a free distance of 2 - 3 cm above the board so that it is convenient to wind the wire;
Rice. 10: Insert nails into holes - strip the edges of the cable by 5 - 10 cm with a knife or wire cutters, you should be left with bare metal without varnish or other insulation;
- screw the exposed wires to the nails right under the heads - 3 nails for each wire, note that the reliability of the electrical connections depends on the tightness of the fit, so they need to be tightened as tightly as possible;
- Drive the nails in as far as possible using pliers, but make sure that the mechanical impact does not weaken the electrical contact point.
The boiler is ready, pour water into a glass jar or plastic bowl, place a bar on top so that the sharp edges of the nails are immersed in the water. Plug in the boiler and wait until it boils. Never try to check the heating temperature of the water with your finger or hand, as you will receive an electric shock if the boiler is turned on.
Assembling a homemade boiler from blades
We attach the stripped wires to both blades. Using solder is pointless, so we perform strong twisting. It is desirable that the exposed part of the wire is as short as possible. Remember about electrolysis.
Next, you need to fix the canvases at a short distance from each other. From 2–3 mm to 1–2 cm. The boiling speed depends on this, and as an inverse relationship, the power consumption. The farther the blades are from each other, the more economical the device. Accordingly, the longer the water boils.
From spoons
For such a boiler you will need two metal spoons, a two or three-wire cable, a power plug, a glass jar and two clothespins. The process of making a boiler consists of the following stages:
- remove the insulation from the cable and wires to obtain 2–3 cm of bare wires on each side;
Rice. 11: Strip the insulation from the wires - attach a plug to one end of the cable, and attach spoons to the terminal of the other end;
- place the spoons in a glass jar on opposite sides and secure with clothespins, the spoons should not touch;
Rice. 12: Attach the spoons with clothespins - secure the cable on the outside of the can with tape.
Rice. 13: Secure the cable with tape
The boiler is ready - just pour water into the jar and plug in the plug. Please note that it is unsafe to move the jar with the device turned on, so first unplug the boiler.
Rice. 14: finished kettle made from spoons
12 Volt boiler
A popular device for many car owners, which allows you to heat water far from civilization using power from a car battery. The most difficult thing is the selection of the heating element, which is calculated by the formula: P = U2/R
where P is the power of the boiler;
U – supply voltage rating;
R – circuit resistance.
For example, with a circuit resistance of 1 Ohm, the power of a boiler powered by a 12V source will be 144W. Accordingly, the heating time of the glass will be about 10 – 15 minutes.
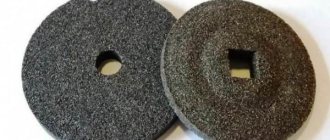
The heating element can be ceramic resistors or a nichrome thread wound on a textolite. Connect them to the two terminals of the battery and the boiler is ready. The main condition is that the heating container must be made of dielectric material.
Rice. 15: 12V heating element
Homemade 12 volt boiler
Despite the fact that there are various options for electric kettles and boilers for use in cars, making a 12-volt boiler with your own hands is not so easy. It is impossible to create a heating element on your own, unless you use PEV ceramic resistors.
In addition, with a boiler power of 300 W, a current of 25 amperes will be required. Too much for a battery. However, the resistor resistance for such a boiler can be calculated using the formula:
where P is the required power in Watts, and R is the resistance in Ohms. For example, if a power of 300 W is required, then a 0.5 Ohm resistor is needed. If you cannot find one, then you can connect two 1 Ohm resistors in parallel. Let us recall that with a parallel connection the resistance is divided by the amount, and with a series connection it is multiplied.
The main problem is that it will not be possible to obtain high-quality drinking water, since the water will come into contact with the electrical product.