How to Use Blender for Beginners
Next we'll look at how to use Blender for beginners. This instruction will not teach you how to model, but you will understand the basics of working with the program. But first we need to look at the interface of the main window.
Main program window
The main window can be divided into several conditional areas that you will use. Here they are:
- Main menu of the program;
- View switching menu;
- Left navigation bar;
- Toolbar on the right;
- Main work area;
- Time line below.
All of these areas have been highlighted in the screenshot. By default, the work area displays a 3D figure - a cube. Next we will look at the main actions that can be done with it.
Navigation Basics
The program is very easy to operate, here are the basic navigation techniques:
- To change the viewing angle, hold down the middle mouse button and move it;
- To move up and down or back and forth, hold down the Shift button and the middle mouse button, then move it;
- To change the scale, use the scroll wheel;
- To select an object, right-click on it, or right-click outside the object to deselect;
- To select multiple objects, hold down the Shift button while selecting;
- Press A to select all objects and again to deselect, the selected objects will be highlighted in yellow.
Operating modes
The 3D modeling program Blender can work in several modes:
- mode - allows you to select objects, move them, rotate them, and move them as you need;
- Edit mode - allows you to change the vertices of an object, its lines and planes, you can change the mesh in this mode.
- Sculpt mode – 3D mesh editing mode;
- Drawing mode (Vertex Paint mode) - allows you to change the colors of shapes;
- Texture Paint mode - allows you to paint textures;
- Weight Paint mode – allows you to change the thickness of surfaces;
- Grid mode (Particle mode) - convenient for working with particle systems.
Tab or menu to switch between these modes
In this article we will use only the first two modes, they are the main ones.
Changing objects
Blender 3D modeling starts with changing objects. Notice the arrows that appear next to an object when you select it. These are directional arrows, and they point to the edges of the coordinate system. The red arrow represents the X axis, the green arrow represents the Y axis, and the blue arrow represents the Z axis. These arrows allow you to move objects more precisely.
You can move an object in several ways:
- Just drag it with the right mouse button;
- Press G and drag the object to the desired location;
- Click on one of the arrows and move the object along it.
Rotating objects is also very easy. All you have to do is select the object and press the R button. If you want to rotate the object around a specific axis, press R and then one of the X, Y, Z keys. These correspond to the coordinate axes.
To scale, use the S button. Again, to scale along one of the axes, press X, Y or Z.
Creating Objects
Working in Blender doesn't involve creating multiple objects in the main area. First, notice where the 3D cursor is. This is where the object will be inserted. By default it is located at the origin, but you can move it anywhere by simply left-clicking.
Then open the Add at the bottom of the screen and select the type of objects you want, such as shapes (Mesh), and then the shape itself. After adding it, it will appear near the cursor. This way you can add any object.
Editing objects
In editing mode, you can change the sizes and characteristics of objects. You can select individual parts of objects: vertices, lines, and planes. What you need to select can be indicated on the panel:
Further work is similar to dragging objects. Select the desired part with the right button and drag it where you need it. Also in edit mode you can select multiple vertices and merge them together. To do this, select the desired vertices using “Shift” , then press “W” and select the “Merge” menu item.
You can also extrude parts of an object in Edit mode. To do this, select a face, vertex, or plane, then press "E" and drag it to the desired location.
You can often cut an object to drag it to another location or expand it. To do this, press Ctrl+R and select the desired part simply by moving the mouse, then this part will be marked and you can do whatever you need with it.
Modifiers
Modifiers allow you to change the characteristics of your figure according to certain algorithms. To use modifiers, return to object mode, then select the key icon in the right panel:
Next, click “Add Modifier” and select the desired modifier. You can experiment with them. Most often you will have to use "subdivision surface". It allows you to smooth out the corners of the surface. All modifier parameters will be located in the right panel. Using the “View” you can adjust the rounding force:
Saving the result
To save the result of your work, open the “File” and select the “Save” :
Then you need to select a save location and click "Save blender file" . The work will be saved in Blender format and you can continue editing it. But if you need a regular image, select “Export” “File” , then select the format of the desired image:
Our instructions on how to use Blender 3d for dummies are coming to an end.
Large powerful drill blender
We make a simple and very powerful homemade blender from a drill. We decided to make squash caviar. The question arose: how to chop zucchini?
Blender
too small and weak for such tasks, and the meat grinder is not able to grind into a homogeneous paste.
Small lumps remain, and the caviar turns out to be grainy. Therefore, I decided to make a large and powerful blender from a drill, which every homemade person has. The design turned out to be so simple that it does not require any drawings and is literally done “on the knee”.
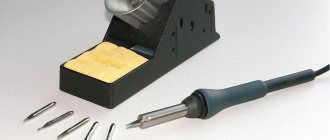
Materials and tools
- Drill. (every DIYer has one);
- PVC pipe 50 mm (plumbing store);
- PVC pipe plug 50 mm. (ibid.)
- Metal chrome tube with a diameter of 16 mm (furniture fittings store);
- Plastic dowels 14 and 8 mm. (building materials store);
- Self-tapping screws 16 mm with a wide head (ibid.);
- Screws M8 and M6. (ibid.);
- Blades for mounting knife (household goods);
- 50 mm clamp (ibid.);
- Empty tin can (trash can)
Making a blender
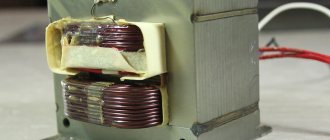
The blender consists of 3 nodes. 1 – drive, 2 – housing, 3 – blade shaft. Since the drive is an ordinary drill, we will consider the remaining 2 nodes.
Making a knife shaft
Since the knife shaft is the most labor-intensive, we’ll start with it. The most optimal solution is to cut an M6 internal thread at one end of a rod with a diameter of 9 mm to a depth of 20 mm. Unfortunately, not everyone has access to a lathe (it can be done without a lathe, but it’s troublesome), so there is a second, very technologically advanced option.
At the end of a steel tube with a diameter of 10 mm. hammer in a plastic dowel with a diameter of 8 mm. And screw an M6 screw with knives into it. But I have never seen steel tubes with a diameter of 10 mm on sale anywhere. Therefore, those for whom the first and second options are unacceptable choose the third.
This is using a 16 mm tube, which can be purchased at any furniture hardware store. You should buy the one with the thickest walls. Because they are different... A 14 mm dowel is driven into one end of this tube. and the next dowel is hammered into this dowel 8 mm and into the dowel 8 mm. The M6 screw is screwed in.
Since it is impossible to clamp a 16 mm tube directly into the chuck of an ordinary drill, we also hammer a 14 mm dowel into which an M8 screw is screwed into the opposite end. Leave 30 mm of protruding screw for clamping in the drill chuck, cut off the rest.
Only in this option it is necessary to take into account that the optimal length of the knife shaft (without knives and the part that is clamped in the chuck) is 100 mm, and the length of the dowel 14 mm is 80 mm. it makes sense to shorten the dowels to 50 mm. We've sorted out the tube, now – fastening the knives.
On an M6 screw with a wide flat head, we put 4 blades for the mounting knife, broken off to the required length, through washers (I used 2 washers between each knives). We arrange the knives crosswise and tighten them with a nut. We screw this screw with knives into the 8 mm dowel. It screws in quite tightly, but holds securely. So, the knife shaft is ready.
Case manufacturing
The body is made from a PVC pipe with a diameter of 50 mm, a plug for this pipe, and a tin can. And another clamp. From the socket of the pipe we cut off the thickening for the rubber cuff, since it will not be needed. Next, take a suitable shallow empty tin can and drill a 1–2 mm hole in the center of the bottom. greater than the diameter of the knife shaft.
We drill the same hole in the center of the plug. Along the perimeter of the can we drill several holes with a diameter of 10 - 12 mm to allow the ground mass to exit (It is much more convenient to drill holes in a can using feather drills for wood). We combine the tin can with the plug and secure it with self-tapping screws.
We place a pipe on the plug and also secure it with self-tapping screws. To ensure that the pipe fits tightly onto the plug, several turns of electrical tape should be wound around the plug.
We measure the length of the knife shaft fixed in the chuck and adjust the body to this size. In the upper part we make 2 slots 30 mm deep.
Since the internal diameter of the pipe is slightly larger than the diameter of the drill neck, we need a gasket, which we will make from the remainder of the same pipe. We cut a ring 20 mm high and cut out a 15 mm section from this ring. We glue the ring on the inside of the extension so that it does not get lost. We glue it to one point so that it can be compressed.
Next, we attach the extension to the neck of the drill (or simply measure it with a ruler, which is somewhat more accurate:), mark the location of the key hole on it, and drill it with a 20 mm drill.
The body is ready. By the way, I forgot to write. If you don’t have a suitable empty tin can at home, you can replace it with any suitable lid, or use a plug for a 100 mm pipe.
Which will look much more “branded” :)
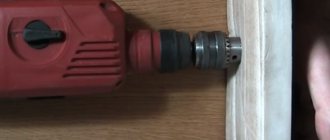
We put the body on the drill, without securing it completely yet, insert the knife shaft into the previously spread cams, turn the body until the hole for the key on the body coincides with the socket on the chuck, tighten the shaft with a key, and finally secure the body with a clamp. All.
As they say, the design does not require adjustment and starts working immediately when turned on. It also grinds potatoes into a homogeneous mass for hash browns, which previously had to be manually grated on a fine grater, because the meat grinder leaves lumps, apples for applesauce, crushes nuts for cookies, and much more. PS
Since I had a steel tube with a diameter of 10 mm, which I cut from another leaky heated towel rail before throwing it away, I used the second option when making the blade shaft.
Go back to the main page
Source: https://www.freeseller.ru/6600-bolshoy-moschnyy-blender-iz-dreli.html
conclusions
In this article we looked at how to use Blender 3d to model various shapes and objects. Of course, you have not become a professional, but now you know what the Blender modeling program is capable of and how to use it.
Related posts:
- Installing Gimp on Ubuntu
July 9, 2015
- How to use Gimp 2
January 2, 2017
- How to use Inkscape
March 21, 2017
- How to use Krita
April 2, 2017
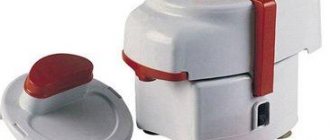
Using a Stand Blender
This device is a holistic type design. A special feature is that the bowl, where the products are beaten, and the engine are directly connected (for more details about the internal parts, see the article on the structure of a stationary blender). Therefore, the requirements for the instructions for use are as follows:
- Before chopping, you should cut the food into small cubes and only then load it into the bowl.
- After turning on the device, you must remember that the lid of the bowl where the grinding takes place is blocked and it can only be opened at the end of the processing process.
- Do not place hot foods into the appliance bowl. This leads to the fact that it turns yellow very quickly and loses its transparency. After this, it will be difficult to observe the cooking process.
- It is strictly forbidden to load the blender bowl to the very top, while also trying to compact the contents. Also, you should not place small quantities of products in it, the volume of which does not even reach the minimum mark indicated on the container. This can lead to failure of the power unit.
- It is recommended to use a bowl that will allow the grinding process to be carried out efficiently. For example, for two or three people, a one-liter container will be enough.