A construction stapler is a multifunctional mechanism. It is used when it is necessary to connect identical or different not particularly hard materials to each other, for example, plastic, wood, film, insulation, plywood. This tool is called differently: tacker, staple gun, staple gun, nailer, staple gun. The individual elements are fastened to each other using staples, pins or small nails. To know how to properly work with a construction stapler, you need to understand its design, the types of fasteners suitable for it, and the method of setting up and replacing staples.
Design and principle of operation of a construction stapler
The furniture stapler is widely used by builders and furniture makers, as well as representatives of other fields of activity. Based on the type of energy used to fire a shot during operation, the following types of takers are distinguished:
- mechanical;
- electrical;
- pneumatic.
The first two types are intended for domestic use, while the last type of tool is considered professional and is used mainly when performing large-scale work. The operating principle of mechanical and electric staple guns is based on pushing out fasteners by the force of a cocked (compressed) spring. After pressing the trigger, it unclenches, which causes the striker to move. He strikes the staple (nail or pin), driving it into the surface of the material.
Mechanical stapler design
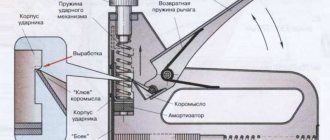
Manual (mechanical) staplers differ from their analogues in their simpler design. They consist of the following components and parts:
- cocking handle;
- a safety bracket that protects against accidental shots when transporting the tool;
- impact springs;
- shock absorber;
- drummer;
- striker;
- impact force regulator, providing the ability to work with material of varying degrees of hardness (different densities);
- housings;
- charging spring;
- store for fasteners;
- rammer (with spring and lock);
- tip that allows you to accurately drive fasteners.
The diagram of the staple gun device is shown in the photograph below.
The impact mechanism is the main unit of the stapler, cocked by the force of the worker’s muscles. It can be equipped with two types of springs:
- twisted;
- spring (plate).
Manufacturers indicate in the operating instructions for products the type of spring installed.
The twisted spring mechanism shown in the photo above is equipped with cheap models. They can be easily distinguished by the adjusting screw located on the tool body on the opposite side of the staple outlet hole. But it is also possible that the wing will be missing, then you will need to refer to the instructions to determine the type of spring installed.
Leaf springs are more powerful, but more expensive than their coiled counterparts. At the same time, the impact of a tool equipped with them during operation is less. They also have a long service life and are easier to cock. The leaf spring mechanism is installed on models intended for professional use.
To make it easier to work with the tool, the handle is covered with rubber pads, and the magazine is made with a transparent insert (which makes it easy to control the presence of staples or nails).
Design features of electric and pneumatic staplers
The device of a network-type electric stapler is shown in the photo below.
The numbers in the photograph correspond to the following structural elements:
- trigger;
- fuse;
- handle with special coating;
- power cord;
- on/off switch;
- shock force regulator;
- pusher mechanism;
- shop.
Inside the tool there are electric drive and impact mechanisms. In this case, the electric motor is designed to charge the spring.
Battery models do not have a power cord: batteries are installed instead.
The design of a pneumatic furniture stapler is more complex than its mechanical counterparts. Pneumatic tools consist of the following structural elements:
- housings;
- a cylinder with a piston located inside it;
- starting systems (trigger mechanism);
- magazine for fasteners with a pusher;
- impact mechanism;
- an inlet fitting designed to connect a high-pressure hose to the tool;
- regulator of penetration depth of fasteners (impact force);
- air distribution unit.
Pneumatic type scrapers are powered by the energy of compressed air supplied by a compressor or from a cylinder. After pressing the trigger, the gas passes through the air distribution unit. Next, the compressed air enters the cylinder, causing the piston to move. The latter transfers energy to the striker striking the fastener. After impact, the staple or nail is driven into the surface of the material.
Types of furniture staplers
The correct choice of a furniture stapler is based on determining the frequency and duration of use, the type of surfaces to be connected. Considering these factors, you can purchase one of three types of staplers in the store:
- Manual or mechanical tacker
, which works thanks to the physical effort of the master. The tool has a simple design and the lowest price. - An electric furniture stapler gun
is similar to the mechanical version, but the spring is driven by an electric current. - Pneumatic tools
are used by professionals when carrying out repairs or making furniture. Its design differs significantly from analogues, which increases productivity and price.
Manual furniture stapler
The simplest and most often used in everyday life is a manual stapler for furniture. Its power is enough to independently reupholster sofas, chairs and armchairs in the house, carry out minor repairs or manufacture interior items. The main part of the impact mechanism in a manual staple gun is the impact spring, which can be:
- Twisted
. It is installed in the most budget models and is considered less productive than its analogues. You can determine the presence of a coil spring by the presence of an adjusting screw on the device body. - Spring
. This type of furniture stapler has greater performance and durability. The recoil in it is significantly less than that of the previous model. - Lamellar
. This mechanism is used in professional devices due to its high performance and price.
Read also: Class 1 portable power tools
Classification of staples used
To use a staple gun, you need staples. They are divided into separate types according to the following criteria:
- according to the material from which they are made;
- by degree of hardness;
- by the presence of coverage;
- by size;
- according to form.
According to the material of manufacture
Staples for staplers according to material are:
- aluminum, used when working with non-solid materials;
- copper (expensive), also intended for soft parts;
- steel, suitable for both non-hard and soft materials, but will rust over time;
- made of stainless steel (stainless steel) is a reliable option in a wide variety of conditions, but has a high price.
Furniture staples can also be galvanized to prevent them from rusting.
By hardness
Based on hardness, fasteners are divided into the following types:
- simple;
- very hard;
- hardened.
The ends of the fastener can also be sharpened differently, making it easier to drive in under certain conditions.
By shape
Based on the shape of the staples, the following types are distinguished:
- U-shaped;
- U-shaped;
- T-shaped (pins).
Most often in practice, fasteners in the form of the letter U are used, and U-shaped ones are used mainly when laying cable lines. Pins are almost invisible fasteners. They are used when fasteners must be as invisible as possible.
Furniture stapler design and repair recommendations
Sometimes it happens that the stapler refuses to work. Namely, the staples do not fly out of the charger. Before starting repairs, disassemble the device in the following sequence:
- Remove the adjuster screw.
- Remove the spring.
- Remove the protective cover.
- Remove the pins and lock washers.
To successfully repair a furniture stapler, you will need:
- Hammer.
- Vise.
- Flat blade screwdriver.
- Pliers.
- File.
Drummer
Carefully inspect the striker and assess its condition. The most common reason for incorrect operation of the device is wear of the thrust pad on the firing pin body. With the help of a thrust pad, the impact mechanism and the trigger lever work together.
Important! The drummer is the executive part. A spring presses on the hammer. The spring force can be adjusted using a special screw.
Carbine
The charging carbine is located at right angles to the impact device. The striker contains brackets that are acted upon by a spring. When not in use, the brackets are covered by a plate attached to the device body.
Trigger system
The trigger system includes the following components:
How to use a furniture stapler? To drive the staple, you need to press the lever. The hammer lifts the rocker. After the staple enters the striker mechanism, the spring is released. The striker strikes the bracket with force, and it enters the base.
The rocker arm and the striker work synchronously. Otherwise, there is a “blank shot”. The furniture stapler needs to be adjusted. The trigger worked, but the firing pin did not engage the staple. When the thrust pad of the striker protrusion is severely worn, this is exactly what happens.
It won't take much time to complete the repair:
- Clamp the firing pin in a vise.
- Sharpen the protrusion with a file, giving it its original shape. This will significantly extend the life of the stapler.
Important! You just need to perform this simple manipulation after the device has started working “idle”. At the same time, the drummer plate becomes shorter and needs to be sharpened.
Standard staple sizes
Almost all tacker manufacturers also produce their own brackets for them. But at the same time, there is a mandatory standardization of product sizes - this allows you to insert staples into a staple gun from different companies when replacing them.
The dimensions of fasteners mean the following parameters:
- staple thickness (denoted by the English letter a);
- the length (width) of its back (b);
- leg height (depth).
Based on these dimensional parameters, the following types of brackets are most popular in practice.
- 53 is the most common standard size with a=0.7 mm, b=11.4 mm and a leg height of 4÷14 mm.
- 140, having the following dimensions: back width equal to 10.6 mm, thickness 1.2 mm and depth from 4 to 14 mm.
- 36 - This marking indicates that U-shaped fasteners can be used for the staple gun.
- 300 are nails that are only suitable for a staple gun.
It should be taken into account that different companies designate the same types of fasteners differently. To compare fasteners from different manufacturers, use the table below. Determining the size of the staples will not be difficult at all.
There are no universal types of fasteners suitable for any type of work.
It is recommended to use high-quality consumables, which are recommended by the manufacturer of the model of staple gun being used.
How to fill a staple gun with staples
A mechanical stapler allows you to nail plastic panels, clapboard clamps, fabric to furniture, wooden or plastic surfaces.
There are three types of staplers: mechanical, electric and pneumatic.
Mechanical staplers are affordable, compact, lightweight, and easy to maneuver. Below we will only talk about them.
How to choose a stapler?
In short, it is not advisable to buy the cheapest options, as well as plastic models. Metal tools are more powerful and reliable.
Choose professional models that have an adjusting screw (thumb) at the top. It helps regulate the force with which the tool will pierce the material.
Many people forget
Before work, adjust the adjusting screw according to the material of the surface you are going to work with.
If it is hard plywood, strong penetration of the material will be required, therefore, it is worth setting a high force. If it is a loose surface, the force must be reduced so as not to break through the fabric, or for example the PVC panel that you are shooting.
During operation, it is recommended to press the lever with one hand and press the adjusting screw with the thumb of the other hand. Then the recoil will be minimal and the load will be distributed evenly in the stapler. You will be able to nail the brackets much better.
How to insert staples into the receiver
The design of all mechanical hammers is almost the same. There is a handle-lever, due to which pressing occurs, and at the bottom of the stapler there is a metal plate that opens the receiver. This is where we have to load the staples.
Before you buy brackets at a hardware store, you need to find out what size will fit your device. As a rule, the size and type of suitable staples are indicated on its body.
For example, the body of our stapler indicates a width of 12 mm and a depth of 6-14 mm. This means that you will only be able to charge staples in this range.
Smaller or larger brackets will not fit into the receiver. The size of the staples in millimeters is also indicated on their packaging.
To insert projectiles into the stapler, you need to open the metal plate on the back surface.
To do this, you need to take it with your thumb and forefinger on both sides, then pull it towards you and slightly down. Thus, we press the metal tab on the back surface of the plate, and pull out a metal spring, similar to the one found in a regular office stapler.
If there are any staples left in your stapler, they will fall out once the spring is pulled out. If they are not there, then it’s time to install new ones for further work.
The staples are inserted into the receiver (the hole is in the “P” position). Next, insert the spring back, closing the metal tab. That's all, the tool is loaded and ready to go!
How many shells will fit?
Now a little about how many shells fit into a stapler. Staples are sold in small rows. The row can be divided into several parts yourself by slightly breaking it with your hands.
The tool is filled with 1-1.5 rows. 2 rows rarely fit in the bin, so if there is a lot of work to be done, it is better to prepare half rows before starting work.
What to do if a bracket gets stuck
It is worth noting another very important point that will help you in your work. It happens that the staples become bent and get stuck in the exit hole. They cannot be hammered into the surface and cannot be pulled out by hand.
In this case, we will need to pull out the feed magazine completely.
This option exists for almost all professional staplers.
First you will have to repeat the opening of the metal plate and pull out the spring.
Next, in the middle of the lower part of the stapler you need to find an iron part, slightly protruding from both sides. Grasp it tightly with your thumb and forefinger on both sides and pull down forcefully.
This will remove the entire feed magazine that was in the tool.
You will see a jammed staple that can now be easily pulled out by hand.
Putting the stapler back together is not difficult: the entire pulled out block returns to its place with a press. You should hear a click when you do this. Afterwards, do not forget to replace the spring.
Not just parentheses
Some staplers can work not only with staples, but also with studs of various shapes. The designations of what the stapler works with are indicated on its body or in the instructions.
I tuck the nails into the stapler in the same way as with staples, but you need to be careful after pulling out the spring. A row of nails must be loaded along one of the outer edges of the letter “P”, and not inside this very letter!
If you want it to produce two nails side by side when working with a stapler, load the second row along the second outer edge. Next, the spring is inserted and the stapler is closed.
Source: https://narodnyeokna.ru/kak-zapravit-stepler.html
How to insert staples into a stapler
Changing staples in a mechanical tack is easy. To charge a new fastener, proceed as follows:
- the tool is blocked from accidental activation using a fuse;
- on the back side of the staple gun, open the magazine cover, behind which there is a groove for fasteners;
- a rod equipped with a pusher spring is removed from the inside;
- the strip of staples is turned with its points against the handle, and then inserted into the groove;
- install the rod with the spring inside the tool in its original place, where they clamp the fasteners;
- close the magazine lid;
- remove the fuse;
- make several shots in test mode to check the functionality of the tool.
When loading the stapler, nails are handled in the same way.
The photo below shows how to place staples in a mechanical stapler.
Blocking the staple gun from accidental firing is a mandatory procedure to ensure the safety of the work.
To fill pneumatic or electric staplers with staples, proceed according to a scheme similar to a mechanical tool:
- block the device;
- turn the instrument over;
- by pressing a special button, take out the tray for the fasteners;
- correctly insert staples or pins (nails) into the tray;
- insert the “clip” until a click appears;
- unlock the tool and check its operation.
When you press the stapler button, the fastener tray may slide out or its cover will open - this depends on the stapler model used.
Some modifications of mechanical staple guns have a different principle for replacing fasteners: they are made with a chute that extends when you press a button. Staples are placed in the elongated tray and inserted back into the magazine until it clicks. The entire process, showing in detail how to thread the staples in the case considered, is demonstrated in the video:
Working with a mechanical stapler
To learn how to carry out repair work using a construction stapler, you need to know about the basic rules of this process.
Charging the device
Before you start, for example, upholstering a sofa, it’s worth learning how to charge a stapler. This is done step by step according to the following algorithm:
- Installing the device on the fuse.
- A folding flap at the rear of the stapler reveals a compartment for staples.
- Pulling the rod with the spring out of the compartment.
- Installing staples with the upper bent part towards the handle of the stapler.
- Releasing the rod to clamp them.
- Slam the sash until it clicks and start working.
Some models have a different mechanism and therefore many people think about how to refill them. There is nothing complicated here either, just remove the special chute that appears when you press the button. The staples are installed into it with their sharp ends down. Afterwards the filled element is inserted back.
The process of charging a mechanical stapler with staples
We attach the staples to the base
After clarifying the charging instructions, it will not be amiss to find out how to use the stapler during direct work.
This is done like this:
- Prepare materials for fixation and the instrument itself.
- Mark the line along which the staples will be attached. This makes it easier to install fasteners exactly in the place where you plan.
- The stapler is applied to the desired place quite firmly.
- Without lifting the device from the surface, press the lever.
- After this, if everything is done correctly, a characteristic sound will be heard, and the bracket will be securely attached to the base.
Staple fixation process
The sequence of adjusting the stapler
Setting up a staple gun is needed in the following cases:
- after purchasing the tool before starting work;
- if the stapler stops completely driving in the fasteners;
- when starting to work with a material of a different density than the previous one.
If the stapler stops driving in the fasteners completely, this is due to gradual wear of the spring of the impact mechanism or its loosening. For some time, the adjustment will help, but after that you will need to purchase a new stapler.
Video review of staplers
You can also watch a short video on the review of furniture staplers, as well as the principle of filling, setting and working with them:
Good luck to all home craftsmen, if you have any questions - write!
When doing independent restoration work, a stapler is often used to repair furniture. Using such a tool is simple, but it is important to follow safety precautions and operating rules.
Basic rules for working with a construction stapler
A construction stapler is an indispensable thing when it is necessary to connect several materials together. However, you need to know how to use it correctly.
First of all, it is necessary to fix the elements to be fastened and firmly place the tool in the place where you want to drive the staple. Then, without moving the stapler away from the surface of the material, you must press the button or trigger lever. If everything is done correctly, a characteristic click will be heard, indicating that the bracket has fixed the materials together.
In addition, you must not forget to comply with all safety regulations. A construction stapler is a potentially dangerous tool, so the following conditions must be observed when using it.
- It is prohibited to point the stapler towards people, animals or press them against your own body. Sometimes the staple may release spontaneously.
- It is not recommended to use the tool if you are feeling unwell or under the influence of alcohol.
- It is necessary to prepare the workplace in advance. It must be clean and sufficiently lit. All foreign objects that may interfere with the work should be removed. Also, do not forget about the use of personal protective equipment. It is necessary to have safety glasses and gloves.
- If the stapler is electric, then before plugging it into the network, you must make sure that the device is turned off and that there is a fuse on the handle.
- Do not use an electric stapler with a damaged cable. In addition, they should not be used in a damp room or outdoors during rain.
When working, protect your eyes with goggles
Furniture stapler design and repair recommendations
Sometimes it happens that the stapler refuses to work. Namely, the staples do not fly out of the charger. Before starting repairs, disassemble the device in the following sequence:
- Remove the adjuster screw.
- Remove the spring.
- Remove the protective cover.
- Remove the pins and lock washers.
To successfully repair a furniture stapler, you will need:
- Hammer.
- Vise.
- Flat blade screwdriver.
- Pliers.
- File.
Drummer
Carefully inspect the striker and assess its condition. The most common reason for incorrect operation of the device is wear of the thrust pad on the firing pin body. With the help of a thrust pad, the impact mechanism and the trigger lever work together.
Important! The drummer is the executive part. A spring presses on the hammer. The spring force can be adjusted using a special screw.
Carbine
The charging carbine is located at right angles to the impact device. The striker contains brackets that are acted upon by a spring. When not in use, the brackets are covered by a plate attached to the device body.
Trigger system
The trigger system includes the following components:
How to use a furniture stapler? To drive the staple, you need to press the lever. The hammer lifts the rocker. After the staple enters the striker mechanism, the spring is released. The striker strikes the bracket with force, and it enters the base.
The rocker arm and the striker work synchronously. Otherwise, there is a “blank shot”. The furniture stapler needs to be adjusted. The trigger worked, but the firing pin did not engage the staple. When the thrust pad of the striker protrusion is severely worn, this is exactly what happens.
It won't take much time to complete the repair:
- Clamp the firing pin in a vise.
- Sharpen the protrusion with a file, giving it its original shape. This will significantly extend the life of the stapler.
Important! You just need to perform this simple manipulation after the device has started working “idle”. At the same time, the drummer plate becomes shorter and needs to be sharpened.
Useful tips when using a staple gun
In order for the work to be done correctly, and then not have to be done again, you need to know certain nuances that will help in using the tool. For example, in some cases, the staple does not fit into the material due to its high density, or is driven in in the wrong place. To avoid such problems, you need to follow the basic tips for using a construction stapler.
Setting the impact force
It was said above that if the stapler model is mechanical, then it has a screw regulator with which you can change the intensity of the shot. It must be adjusted manually, adjusting the impact force for each specific type of material depending on the density. For example, if you need to drive a staple into a pine tree, you should select the minimum impact force, otherwise a mark will be left on the surface. If it is necessary to fasten fiberboard, chipboard, oak or laminate, you will have to choose the maximum impact force. In this case, the staple will be able to go all the way into the surface.
Get to work prepared
Do not immediately hammer staples into the surface of the material in different places. First you need to adjust the impact force for the given material. It is best to test the settings on scraps or leftovers from the workpiece. The staple should fit well into the material the first time. If this works, then you can start working. Otherwise, it is better to make additional adjustments to achieve the required impact force.
The material must be fastened carefully
For ease of use, it is recommended to pre-mark the places where the staples will be driven in. Also, if your mechanical stapler has a special lock, you should use it. This way you can maintain the required distance between the staples without applying markings. To prevent the material from sliding to the side when driving in fasteners, you need to firmly fix it. The shot should be fired with careful aim. If the stapler has a thin tip, then for a more accurate hit you need to use it.
Make sure the fasteners are present
Almost all models have a special window through which you can see how many staples are left in the store. During operation, you should constantly check their presence and insert new ones if necessary. In the store, the staples should be positioned with their sharp ends facing upward. If installed incorrectly, they may become stuck in the tool.
How to use a stapler
Refueling
In order to load the stapler with staples (i.e. load the staple gun), you must first move away the spring intended for pressing them. The staples themselves are placed in a special groove, in which, in fact, they need to be placed. After this, the spring is put in place. The tool is completely ready for use.
Video: how to thread a stapler with staples
Now you know how to insert staples into a stapler, we can proceed directly to work.
Shot
In order to fix the necessary element, you should firmly attach the device to the place where you plan to hammer the bracket. After this, without lifting the device from the surface, you must press the trigger button (lever). If these manipulations are successful, you will hear a characteristic sound and see a staple inserted into the material.
Tips and tricks
In order to protect yourself when working with a construction stapler, you should follow some rules:
- If you use a mechanical model of the device, it is necessary to adjust the screw regulator. This operation should be performed on a piece of rough material by rotating the screw from minimum to maximum. If the staple goes in all the way from the first shot, you can start working on the “finishing” part. Otherwise, re-adjustment is required;
- In order to drive the staples at the same distance, you should first mark the necessary places with a pencil or ballpoint pen;
- Hold the material with your free hand so that when firing it does not move from the pre-designated place;
- Keep track of the number of staples in the “store” so as not to be left without a single fastening element at the most inopportune moment;
- After finishing work, secure the handle with the safety catch to prevent spontaneous or accidental firing.
In addition to all the above tips, you may also need help repairing this construction tool, since the stapler, like any other equipment, tends to break.
Repair
The most common cause of stapler failure is a breakdown of the impact mechanism . However, in order to get to it, you must first disassemble the tool. This can be done by performing a number of simple operations:
- Remove the adjusting screw;
- Remove the spring;
- Remove the protection cover;
- Remove the pins;
- Remove the lock washers.
If the list of actions does not make it clear to you how to disassemble the stapler, then you can see this in the video below.
After performing all the above manipulations, you will be able to see the drummer, which, for the most part, fails due to the exhaustion of its resource.
In order to repair this element, you should remove it, place it in a vice and, using an ordinary file, give the striker its original shape.
That's it, the repair is completed, and the instrument is again in full combat readiness.
Tips on why the stapler does not work and how to fix it:
- If your tool does not finish (does not finish) the staples, then try tightening the spring, it may have weakened;
- If a construction stapler bends the staples, try adjusting the spring tension bolt (relax or tighten, experiment). Another probable cause of malfunction is a mismatch between the type of staples and the structure of the material - for chipboard and plywood it is recommended to buy staples made of hardened steel;
- If the staples do not come out of the stapler, but bend and get stuck inside, perhaps the striker (tongue) that pushes them has become rounded and needs to be sharpened;
- If the mechanism itself works, but the staple does not fire, it is possible that the staple does not grip, or the firing pin has worn out. Try filing the firing pin and turning the damper with the other side.
Watch the video to see how to repair a staple gun with your own hands.
Video: do-it-yourself stapler repair
How to disassemble a furniture stapler, what to do if it jams. What could be the reason, what to do if the construction stapler does not fire staples:
The real-time video shows step by step how to disassemble the stapler, what could be the cause of the breakdown and how to fix it yourself, as well as how to assemble the stapler.
Classification of pistol staples
Staplers are useless without staples. And the “cartridges” differ in many ways. Manufacturers themselves make all kinds of projectiles for staplers.
Read also: What kind of oil to pour into a walk-behind tractor in winter
- Aluminum fasteners. Suitable for working with soft surfaces.
- Steel staples. Suitable for both hard and more plastic materials. Over time, they become covered with rust.
- Stainless steel and galvanized fasteners are more expensive. They are as versatile as steel ones. They don't rust.
- Simple - suitable for working with malleable materials.
- Solid - used to interact with dense materials such as plastic and wood.
- Hardened - for the most stubborn surfaces.
An important point will be sharpening the ends of the staples. Spicy? They will get clogged much easier.
- Flat ones are the most popular types of staples; there is a very large selection of them.
- Semicircular - more often used to secure cables.
- Pins (look like the letter "T") are used to hide the fasteners. The most inconspicuous ones.
Each stapler has its own type of staples. The marking is indicated on the pistol box or on the body. It is important to use only staples that match the markings, otherwise the device will work by shooting several fasteners or not work at all.
What to do if the gun does not release staples:
- Check the number of fasteners inside the device. If there is nothing, fill it up.
- Are there staples, but they don’t fire? This means you need to open the “latch” on the back of the gun and remove the staples. Then check if they are the right size. If not, then you need to replace it with suitable ones.
- If the projectile is visible and it is stuck in the exit hole, then carefully pry it by the protruding ends and remove it.