The history of sewing machines began at the end of the 18th century. It was then, during the Industrial Revolution, that in some places manual labor was replaced by machine labor - women began to sew less by hand.
An important milestone in the history of sewing machines was the year 1851. Then the design of the machines was changed, this was done by such inventors as Singer, Gibbs and Wilson.
Changes in the design of machines are still taking place, but this does not protect sewing machines from breakdowns.
Absolutely any part of the device can break, so every owner will sometimes have to resort to repairing the sewing machine pedal with their own hands.
How to fix a sewing machine pedal at home?
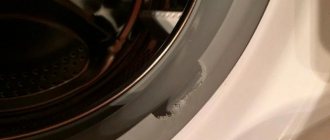
A pedal breakdown is often not immediately noticed; people think that everything stopped working because the engine burned out. But when the engine breaks down, the air begins to smell of burnt wiring, and when the pedal breaks, there is no smell at all.
The causes of pedal failure can be:
- Oxidation of contacts of connecting plugs;
- Broken wire inside the cord.
The first reason is quite easy to deal with; you need to take sandpaper and clean the contacts with it. The second reason is more difficult to fix than the first. This is due to the fact that you need to find a specific place where the wire broke.
Read here - DIY bee trap: drawings, review of the best projects, sizes, diagrams, choice of materials and baits (90 photos)
If you don’t want to look for the break point, you can replace all the wiring. But for this you will need the help of a specialist - an electrician.
But even specialized help will not always save the situation. Therefore, the best solution to the problem is to buy a new pedal.
It is better not to repair electrical appliances yourself; electricity should be handled by specialists. Therefore, to the question: how to fix the pedal yourself, you can give a simple answer - no way.
There are also breakdowns in the car that are not related to electricity.
Other problems with the sewing machine
Many problems in machine operation are associated with the use of low-quality materials and tools.
These include: Thread breakage. Both the top and bottom threads can break. If the top thread breaks, the quality of the thread or the size of the needle is to blame. If the bottom thread breaks, then burrs or other irregularities on the bobbin and incorrectly wound thread are to blame.
The fabric does not advance. In this case, you need to pay attention to how the teeth move.
The fabric is cut. This problem is related to the presser foot and the condition of the needle.
There are many brands of sewing machines available these days. Some brands have appeared quite recently, but some have existed for quite a long time. Brands that appeared a long time ago include “Chaika” and “Podolsk”.
Self-Configuration Guidelines
You can set up the device yourself if you follow a certain plan:
- First of all, you need to adjust the springs that lift the threads. They must be twisted in such a way that the wound loop does not unwind, but is held by the bobbin cap.
- It is important to achieve the correct thread tension. For this purpose, the machine has a special mechanism located on the side of the body and in the interlinear screw of the shuttle. To tighten the bobbin thread, you need to tighten the locator screw.
- After setting the thread, you need to check the work on a piece of material. If hanging loops form, the top thread needs to be loosened.
Checking the thread setting
- Next you need to set the presser foot pressure. This is done by adjusting the springs with a special bolt. In most modern models it is located in an accessible place so that it can always be easily adjusted during operation. It is important that the spring is not too overtightened, but not too loose. If the presser foot presses the fabric too tightly against the body surface, it will increase the pressure and may cause the fabric to rip. If the foot, on the contrary, does not clamp the material sufficiently, the seam will turn out sloppy. The presser foot needs to be adjusted every time a new type of material is used. The thicker the fabric, the greater the presser foot pressure.
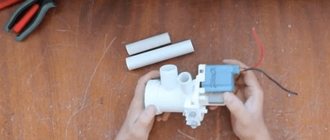
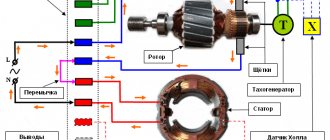
- Check the operation of the electric drive. Often malfunctions in the functioning of sewing machines occur due to the fact that the speed is incorrectly set. They are set by a special regulator located in the pedal. If the sewing speed is broken, you need to disassemble the pedals, clean them and put them back. If this procedure does not help, you need to replace the contacts in the pedal.
- Check the condition of the needle holder. The needle should be firmly installed all the way, the large groove should be turned to the left.
You might be interested in: Features of lubrication of sewing machines from different manufacturers
Before work, you must also set the stitch length. This is the exact value that is set for each type of fabric in accordance with the instructions. The average value is from 1 to 2 mm; if the material is thick, then the parameter can reach 3 mm.
Checking the sewing machine before use
Sewing machine "Seagull"
The history of “Chaika” began in Soviet times. They were very popular back then and sewing machines of this brand were very difficult to find. The demand for such sewing machines was explained by the fact that they are very functional and reliable.
DIY sewing machine: primitive models and tips on how to build a machine (100 photos and videos)How to make a crossbow with your own hands: step-by-step description of making small arms (video + 95 photos)
Do-it-yourself grain crusher: types, principles of operation and tips on how and what to make an effective crusher from (85 photos)
The body of the “Seagull” is made of aluminum, and the parts are made of steel. But the quality of the material will not save the owner of the machine from needing to repair the Chaika sewing machine with his own hands.
Most often, a car of this brand has problems with the stitching and the electric pedal. The board in the electric pedal is made of radio components, and the microcircuit is also made of the same. Therefore, the pedal in this sewing machine cannot be repaired. But you can fix stitching problems with your own hands.
If the stitching starts to loop, there is most likely a problem with the needle. To do this, you need to lubricate the needle, needle plate and shuttle mechanism cover. Also, to avoid problems with the needle, you need to use special needles for machines of this brand.
All these instructions can also be put into practice when repairing a Podolsk sewing machine with your own hands. This is explained by the fact that the designs of the machines are very similar.
Troubleshooting and troubleshooting yourself
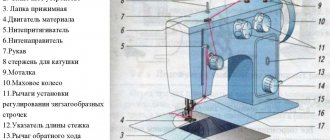
The user of the machine can identify and fix a certain number of problems on his own if he understands the principle of operation of the machine.
Attaching the needle bar and tensioner
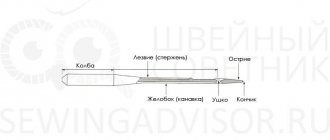
The most important element in the operation of a sewing machine is the needle. Before you start setting up, you need to check its functioning. During operation, a large load is placed on the needle. She makes a huge number of punctures in the fabric. This results in dulling and bending over time. It is very dangerous for the needle to hit the metal body. This will cause the tip to break immediately. Craftsmen with little experience may not immediately notice the defect. And working with such a needle creates large tears in the fabric.
A thread that is threaded through a broken eyelet will constantly snag, which can lead to deformation of the fabric. Loops may appear in the stitching. Because the needle is bent, the thread may continually break. This makes it difficult to stitch difficult areas where the top thread needs to be kept as tight as possible.
Checking the condition of the needle holder
For your information! In this case, adjustment and repair of the sewing machine is not required. You can fix the problem if you replace the needle yourself. Experts recommend changing this element as often as possible to make the machine work better.
When changing the needle, you must adhere to the following rules:
- The sewing needle should be selected only in exact accordance with the type of equipment. You cannot insert a needle for an industrial device into a household machine. In such a situation, the gap between the nose of the shuttle and the needle blade will be compromised. This will cause skipped stitches. In the worst case, the shuttle may break.
- It is important to position the element correctly in the needle holder. The blade should be on the side of the shuttle nose.
- Before replacing, even a new needle needs to be checked. There should be no distortions on it. This may not be noticed immediately. It is recommended to place the needle on the glass. The location of the curvature will immediately become noticeable.
- The needle should be selected according to the fabric being used. For jeans, stretch or faux leather, you need to choose special needles that allow easier passage through the fabric.
You might be interested in this: The procedure for sewing panties for different types of dolls
The needle must match not only the fabric and machine model, but also the thread number.
It is important to pay attention ! New sewing machines have a certain feature: they have a guide stop that prevents the point from moving to the side.
Needle installation
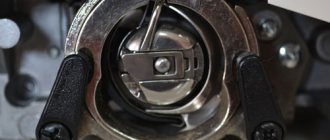
Setting the interaction between the hook tip and the needle
The quality of the row and stitch depends on the proper settings of the shuttle assembly and the sewing machine needle. The correct values must be set between them. If they are broken, thread breaks, looping, and omissions may occur. To perform the setup correctly, you need to understand the principle of loop formation.
As soon as the needle rises 2 mm, a loop is formed from the upper thread. At this time, the nose of the shuttle should pass close to the hollow of the needle. It is important that this distance is no more than 0.15 mm. And the distance from the eye of the needle and the nose should be 0.5 mm. These parameters apply to working with fabrics of medium thickness.
For your information! It is important to pay attention to the correct installation of the rack. It should be positioned vertically. It is the rail that moves the fabric relative to the needle. As soon as the material is pierced with a needle, the edges of the teeth of the rack should be at the level of the sewing machine work table.
Adjusting the rack of a sewing machine
Industrial sewing machines
One type of sewing machine is the industrial sewing machine. It is used in the sewing industry and differs from a regular sewing machine in its size and the fact that a table and a lamp are sold complete with it.
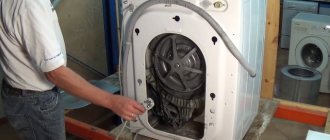
An industrial machine, just like a regular one, must be looked after so that it does not break down. Some breakdowns should be left to specialists, but there are also those where you can repair an industrial sewing machine yourself.
Do-it-yourself ski mount: installation and tips on how to install various types of mounts correctly (115 photos and videos)- How to make a castle with your own hands: building decorative medieval castles and fortresses (110 photos)
How to make skis with your own hands: choice of materials and technology for making skis at home (105 photos and videos)
Where to get it repaired: average prices in workshops
When choosing a workshop where sewing machines are repaired, it is better to focus on service centers that service the purchased model. In such centers, most often all components are in stock, the client does not have to order them and wait a long time for the work to be completed.
The cost of repair depends on the model and complexity of the breakdown. On average, for a machine of the Veritas, Singer and Janome brands you will have to pay from 800 rubles to 1,500 rubles for a simple breakdown. Repair services for Brother and Jaguar models start at 1,200 rubles.
You might be interested in Patterns, cutting and sewing skirts with your own hands
If we are talking about an industrial sewing machine, its repair can cost 2,000 or more. Repairing older sewing machines can be difficult due to the lack of spare parts. This may increase the waiting time.
Choosing a repair service
Do-it-yourself repair of an industrial sewing machine
You can fix the needle problem yourself in an industrial machine. We need to make sure that it meets the nose of the shuttle.
To do this, lift the needle plate and foot, and then clean everything with a special brush. Next you need to reduce the tightening force of the screws.
You can also adjust the compensation spring yourself. To do this, you need to loosen the tensioner mounting screw or remove it completely.
Thus, we can conclude that many breakdowns in any sewing machine can be repaired independently.
To repair it yourself, you can use both the instructions that come with each device and a video with sewing machine repairs. Love what you do!
DIY cockroach trap: options, effective ideas! Operating principle of cockroach traps, types - glue, ultrasonic, electric, electrostatic, poisonousHow to make a furnace for mining: drawings, operating principles and construction of simple and effective furnaces (video + photo)
DIY waste oil burner: types and step-by-step description of how and what to build a burner from (100 photos)
Poor fabric advancement
Frequent breaks and difficulty moving the fabric may be due to mismatch between the movement of the needle and the movable rack assembly. Since each model of sewing machine may have different settings for the rack assembly, for example, if we take the repair of Brother sewing machines, it is not possible to give universal instructions. But if you understand how this unit works, you can configure it on any model of the unit.
- The needle moves simultaneously with the staff to the final lower position.
The most important point in tuning is when the tip of the needle meets the notches of the staff. The latter should be in a slightly lowered state relative to the needle plate, but not completely (peeking out a little). At this time, the position of the needle should be such that its tip does not reach the teeth 1.5-2 mm. This position of the two parts relative to each other is the main parameter when setting up straight-stitch machines. In this case, your unit will no longer tear the thread, and will no longer move or collect the fabric poorly. This is possible as long as the other settings are correct. - The moment when the needle rises. Once the bottom position is reached, the needle begins to rise and the staff begins to move forward in preparation for the next cycle that advances the fabric.
At this time, a stitch is formed (the top thread is removed from the needle using a shuttle), and there should be no obstacles to the advancement of the thread. Often this occurs simultaneously with the advancement of the fabric, as a result of which excessive tension is created and the thread breaks. Often, moving the fabric causes the needle to break. - The thread is pulled into the stitch. If the staff moves upward towards the plate, the thread taker pulls out the top thread with a sharp movement. This movement of the thread guide must occur when the stitch formation has already finished, so the excess thread is pulled out.
The quality of the stitch is affected not only by the tension of the thread, but also by the correct operation of the compensation spring, the ideal condition of the shuttle (without roughness and burrs), the tension force of the thread from below and other parameters. If the rack is incorrectly adjusted, the thread will get tangled at the bottom, break, and be difficult to pull out. - Promotion of fabric. At the last stage, the rack begins to move the fabric along the plate. The length of the stitch, set by a special regulator, depends on the distance the staff moves. You should pay attention to the height of the teeth above the plate. Their reach should be no larger than their size.
For thin fabrics, it is recommended to lower them halfway, while simultaneously reducing the pressing force of the presser foot. The ideal option is to replace the rack with another one, with smaller teeth (not all sewing machines have this option). Straight stitch units can sometimes have 3 types of slats, and, accordingly, needle plates. The rack is changed simultaneously with the plate with the corresponding number.
Photos of DIY sewing machine repairs
Help the site, repost 
1+