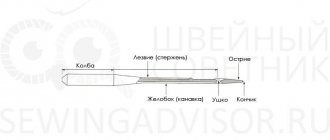
Basic operating rules
Setting up a sewing machine will go without any problems if you familiarize yourself with the basic rules for operating the device and follow them. The exact requirements are described in the instructions for each model. But there are basic recommendations that will help you understand different machines:
- the machine is rotated only in the direction towards itself;
- You cannot “sew” on a machine if there is no fabric under the presser foot;
You need to know the device of the machine
- you cannot pull the fabric while the sewing process is taking place;
- it is necessary to lubricate the mechanisms in a timely manner with the means recommended for use in the instructions;
- It is important to refuel the machine in strict sequence.
Important! Not all machines require lubrication.
The sewing machine needs to be cleaned
Typical sewing machine problems
With proper use and proper maintenance in accordance with the requirements of the instructions, sewing machines can be operated for a long time without breakdowns. Malfunctions that reduce the quality of sewing or lead to complete failure of the unit occur in the following cases:
- use of low quality consumables from unverified manufacturers
- frequent power surges in the electrical network, leading to failure of electronic boards and motors
- violation of the rules for using programs and modes of household appliances
- natural wear of parts during long-term use
The following common problems occur with mechanical components and electronic modules of sewing machines:
| Malfunctions | Description of faults |
| The electric motor does not turn on | The power supply has failed. Repaired by replacing individual radio components (chips) or replacing the entire board |
| The result is poor quality stitching | The cause of the defect is uneven winding of the thread on the bobbin, as well as incorrect tension. The bobbin case needs to be replaced |
| The upper or lower thread constantly breaks | A break at the top occurs when the spring installed in the bobbin case lock is weakened, when the thread is incorrectly threaded or the needle number does not match. The lower thread breaks due to strong tension in the bobbin case. Requires qualified adjustment and adjustment of the tension mechanism |
| The tissue moves with difficulty | The mechanism that moves the tissue requires maintenance. The presser foot is skewed. Wear of rack teeth |
| Frequent needle breakage | The problem can occur for several reasons:
|
| There are missing stitches in the stitching | The gap between the needle and the shuttle requires adjustment. A thread is used whose thickness does not correspond to the standard. The reason may be improper needle placement |
| There is increased noise when the machine is running | Breakdown occurs when the unit has been in use for a long time. The noise comes from the electric motor shaft and other mechanisms. Requires qualified service and lubrication of rotating (rubbing) parts |
| Selected programs are not included | The control unit needs to be checked or replaced |
| Stitch length changes | The force with which the presser foot presses against the fabric is not adjusted |
| The result is a dirty line | Dirt has formed in the hook or under the needle plate and gets onto the stitching during work. |
Causes of breakdowns
Adjustment of sewing machines should occur only after the cause of the breakdown has been determined. Experts identify several main problems:
- The threads break along the seam after sewing. This is due to a dull needle;
- stitches are skipped due to a mismatch between the needle type and thread;
- the fabric is damaged due to incorrect selection of material and needle number;
- the top line is missing due to the incorrect position of the bulb;
- the needle breaks if it is bent or installed incorrectly.
Important! Craftsmen often notice broken needles in Artista machines.
Main causes of failure
Technologies for cleaning machine parts
In order to troubleshoot problems in the operation of the product, you should adhere to the technology of cleaning mechanical elements.
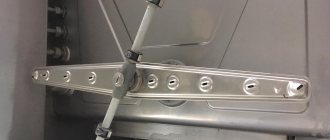
- The process of adjusting the sewing machine hook begins with removing the needle plate using a small-section screwdriver.
- Using a hard brush, remove any remaining fluff, glue, or dried oil from the shuttle teeth.
- The machine is turned over on its side, then the shuttle is disassembled.
- The stroke parts, heel, nose and ribs, are subject to careful inspection. If the nose does not have a certain sharpness, it should not be sharpened, because a pointed element will easily rip the fabric. The way out of this situation is to replace the part. The heel should have a rounded shape and a clean surface.
- The ribs of the working element are rubbed with a soft cloth with GOI paste applied to it.
- The swing shuttle pusher is equipped with a leaf spring. The function of the spring is to soften the pressing force and make it smoother. At the same time, the spring causes the sewing thread to break. The thread should pass smoothly, without “clicks,” between the spring and the heel, without wrapping around each of the parts. If the heel and petals of the product are pinched or located at a large distance from each other, you should take the car to a workshop.
- The position of the hook nose is adjusted while bringing the device into a horizontal position to keep the parts within the nest. The mechanical or electrical product switches to a mode suitable for straight stitching, with the needle lowered to the lower working position. When the needle is raised by the handle of the machine by 1.8 mm, the nose approaches the end of the latter by 1.5-1.8 mm.
What parameters can be adjusted
Adjusting a household sewing machine does not take much time. There are few parameters that can be adjusted.
- stitch length;
- reverse;
- presser foot pressure;
- thread tension;
- height of teeth.
Important! The wobbling shuttle of Bernina machines often bends needles and tears threads.
Sewing machine controls
Setting the sewing stitch
Setting up sewing machines is carried out using tools and buttons, screws and knobs located on the device panel. To adjust the stitch, the second adjustment method is sufficient. For the correct stitching, adjust:
- Presser foot pressure. The adjustment is carried out with a bolt that presses the foot. It is located on the arm of the sewing machine. For thick fabrics, the pressure is increased, for thin fabrics, the pressure is weakened.
- Comb height. The position of the teeth is determined visually. When sewing thick material, they protrude more than when working with thin fabric.
- Upper thread tension. Its adjustment is carried out using the adjustment wheel, which is located on the top panel of the device.
- The degree of tension of the lower thread. Adjustable with a screw on the bobbin case spring. The uniformity of tension is checked by pulling the lower thread in the position when the machine is threaded. The thread should stretch freely, without jerking, but with little tension.
Setting up a stitch doesn't take much time and is something every necker should be able to do.
What you need to set up the sewing unit
Setting up a sewing machine often does not require special tools. At home, use a syringe to inject lubricant. And also a screwdriver for tightening the bolts. Parameter adjustment occurs without tools. They may be needed if a breakdown occurs. But in this case, the machine is taken to a specialist who will repair the device.
New models of machines from such lines as Brother are sold complete with all the equipment necessary for setup.
You might be interested in this All about the pattern of big-legged dolls and its sewing
What you need to set up
Sewing machine brands serviced
Service masters provide sewing machine repairs at home, which provides many advantages for the client. By eliminating the need to transport the device to a stationary workshop, the client is able to save not only money, but also time. Qualified specialists and modern equipment provide the opportunity to restore the functionality of household appliances of different brands. Problems and malfunctions in the operation of both foreign and domestic models are quickly and efficiently eliminated.
Constant monitoring of the latest innovations and technical solutions used for the production of units, as well as the study of operating algorithms, allows us to restore the functionality of the newest models and those already out of production. Thanks to the availability of the necessary tools and components, the entire range of operations is performed in a minimum amount of time. It is beneficial to use the services of the Service Center for the following reasons:
- access to repairs and maintenance by trained employees with practical experience;
- performing the entire complex of operations, so it is possible to quickly eliminate malfunctions of any degree of complexity;
- daily availability of the service - applications from clients are accepted even on weekends;
- organizing an immediate visit of a specialist after acceptance of the application;
- compliance with safety rules when restoring the unit’s functionality.
Sewing machine repair cost at home
In order to create acceptable conditions for cooperation, the Service Company practices an individual approach to clients. This method allows us to take into account the requirements of each of them as fully as possible, offer optimal options for restoring the functionality of units and provide a flexible pricing policy.
Each emergency situation is considered individually. The preliminary cost of the work is agreed upon before the repair and is finally clarified after all operations have been completed, taking into account the installed components. Professional sewing machine restoration services are provided at a price that will satisfy customers.
Original spare parts
The service life of sewing machines depends on competent and complete routine maintenance, as well as the consumables and spare parts used. The Service Center cooperates directly with manufacturers and reliable suppliers of quality parts that are used to restore the functionality of expensive household appliances. The installed spare parts are reliable and safe to use.
The units are covered by a warranty period of trouble-free operation. The use of original components makes it possible to extend the service life of sewing machines and overlockers. Experienced specialists accurately determine the range of parts that have optimal technical characteristics for replacing defective products. Spare parts of the entire range are always available for high-quality and prompt repairs.
Warranty period up to 2 years!
Before repairing household appliances, specialists perform competent diagnostics using precise measuring instruments. The causes that led to breakdowns of sewing machine components are also identified and eliminated to prevent recurrence during subsequent operation. To replace defective parts, craftsmen disassemble the unit and install new components. The qualifications of our employees allow us to perform all operations at a professional level and in compliance with technological sequence. The quality of the work performed and installed spare parts is confirmed by the warranty period for trouble-free operation of household appliances.
We employ only professionals
Our technicians regularly undergo professional training to study the structure and operating principle of the latest models of units. They perfectly know all the features of complex equipment used in domestic conditions and in the industrial field, as well as all the progressive technical solutions that expand the functionality of modern devices. Specialists regularly confirm their qualifications in performing diagnostic, repair and service operations. The acquired knowledge and accumulated practical experience are components of the high quality of the service provided. There is always a way out of any non-standard situation.
Call a sewing machine repairman
To receive qualified services, just submit an application by calling 8 (495) 213-11-90
or on the website. After contacting the manager, you need to briefly describe the symptoms of the malfunction. Employees quickly contact clients to clarify the address and main points of the upcoming repair. A preliminary description of the breakdown allows the technician to prepare and take with him the necessary equipment and spare parts to carry out all the work in one visit.
If the quality of sewing deteriorates, malfunctions occur, or a complete failure of the sewing unit, use the professional services of the Service Center. With minimal investment, technicians will quickly restore the functionality of household appliances and their full functionality. We ensure that all requests are completed within a short time frame and a high-quality result is guaranteed.
Instructions for winding thread on a bobbin
Setting up machines at home does not require much effort. Any owner of a sewing machine can handle winding thread onto a bobbin.
How to proceed:
- Place the coil on the vertical pin.
- Pass the thread through the thread guide.
- Pull the thread between the tension discs clockwise.
- Insert the tip into the hole on the bobbin. Place it on the spindle of the winding unit.
- Press the bobbin and move it to the right.
- While holding the thread, press the pedal.
- Make a few turns and trim the end of the thread.
- Continue winding at speed.
- Move the bobbin to the left.
Important! When full, the bobbin stops rotating.
Winding thread
Classification of sewing machines by type of control
All sewing machines are divided into three main classes:
- Mechanical;
- Electromechanical;
- Electronic.
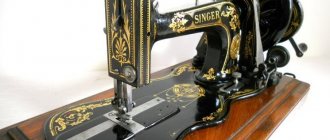
We all remember our grandmother’s old “Singer” with a simple hand or foot drive that set the sewing mechanism in motion. Later, the Soviet “Chaika” and “Podolsk” appeared with an electric drive and backlight bulbs. These and similar machines belong to the mechanical class. They are simple and quite reliable, can sew almost any fabric, and are easy to maintain and repair.
On the other hand, mechanical sewing machines are usually equipped with the most primitive swing-type shuttle, which limits the speed of work and increases the noise level. The disadvantages include poor functionality, a small number of stitches produced and exclusively manual settings.
The electromechanical sewing machine has evolved significantly from its predecessor. It is equipped with an electronic unit that controls all functions and settings. The most inexpensive models of electromechanical sewing machines are still equipped with oscillating hooks. The new generation equipment is equipped with two modern types of shuttles: horizontal, which provides high speed and soft movement, and vertical, an almost perfect mechanism that produces perfect stitches.
The productivity of electromechanical machines with modern shuttles is incomparably higher, the noise level is quite comfortable, and the range of possibilities and variety of stitches is incomparably wider. The electronic control unit has a certain set of programs, and also allows you to independently select and save settings for certain operations in memory.
As for the disadvantages of such machines, there are very few of them. Firstly, they are much more expensive than mechanical ones. Secondly, they require a more attentive attitude in terms of maintenance, and in the event of a breakdown, repairs in the workshop will also be expensive.
An electronic sewing machine has even more functionality, and each of them is controlled by a built-in microprocessor. Working on such a machine is as comfortable as possible: you just need to select any of the programs stored in memory and press the appropriate button. Depending on the model, there may be several dozen built-in programs. The tailor does not need to manually adjust the length or width of the stitch, or look for the desired type of stitch in the settings - the machine will do all this for him. The processor controls the stroke of the needle, regulates the speed of work regardless of pressing the pedal, controls the thread tension, etc. Electronic sewing machines are equipped with the most modern shuttles, so their stitch quality is impeccable.
As for the disadvantages of such equipment, first of all, buyers may be put off by the very high prices for cars of this class. Electronic “filling” is very sensitive to failures and voltage drops in the electrical network. Most models are not designed to work with very dense and thick materials. And, of course, the cost of repairs can amount to a very impressive amount.
Eliminating knocking
The service technician always knows how to get rid of knocking. Seamstresses often encounter this problem when working on the Podolsk unit. To do this, pull the flywheel in the axial direction from the machine. In most cases, cunning helps. Sometimes you have to disassemble the device. It is necessary to unscrew the limiter in the form of a screw under the drive. Remove the flywheel. As well as the bobbin and sleeve. The master puts on a washer, which he can make himself. This trick helps get rid of knocking for a long time.
Machine repair
Rules for setting up modern machines
Repair and adjustment of modern sewing machines is different. At home, adjustments are a little different. Included with the new electric model, the buyer receives adjustment wheels for manual adjustment, for example, like with Janome.
A spring is used to press the thread when winding. Then the upper thread is threaded through the eyes, tension regulator, thread puller, staples, and needle. Presser foot pressure is adjusted by a spring.
To prevent adjustment from causing damage, use the instructions for the individual model. Use the tools that came with the machine. Do not use other available means. In case of problems, contact the specialist.
What does a modern sewing machine consist of?
Setting the stitch length and type
The manufacturer has provided different types of stitches for all materials. For knitwear or thick fabrics, lines are selected separately. The purpose of tailoring also influences. Therefore, the length and width are set on the machine.
Important! The thinner the fabric, the shorter the stitch should be.
Sets the width of zigzag and other types of stitches. The types of needles are selected based on these parameters. Each line has a purpose.
In the instructions for the machines, manufacturers indicate the compliance of stitches, material, threads and needles. Therefore, it is not difficult to choose them.
Adjusting the stitch length
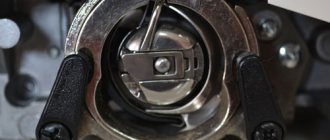
Setting the interaction between the needle and the sewing machine hook
The shuttle must interact correctly with the sewing machine needle. The parameter is especially important if a zigzag is performed. The position of the looper nose is set a few millimeters above the eye of the needle.
The nose of the shuttle normally fits closely with the needle. In this case, no gaps are formed. The ratio is adjusted by loosening the screw with a wrench and holding the flywheel with your hand. The needle should drop to its lowest point and meet the hook at a 1.8mm lift.
The sewing unit should be taken to a specialist if interaction cannot be established.
You might be interested in this: How to sew a beautiful bow tie for a suit
Setting shuttle operating parameters
Attaching the needle bar and tensioner
Often the machine stops working due to the top thread breaking and looping. Gaps occur and lines are uneven. It all depends on how the tension regulator is mounted. The tensioner wobbles or falls out. The needle bar moves upward along with the needle.
To correct the situation, you should loosen the screw and adjust the position. The blades and groove of the needle must be in proper contact. If problems arise, check the interaction of the needle and the shuttle.
Refueling the machine
Adjusting the upper thread tension
Adjusting the tension helps to cope with the problem of uneven and unsightly lines. Most often it is excessive. To reduce the tension of the upper thread, turn the adjuster in the direction of decreasing numerical marks. In this case, they do not rotate the entire division at once. Check the lines periodically. The bottom thread should not show through on the top side. If the adjustment fails, try to correct the lower thread.
Adjusting thread tension
Adjusting the bobbin thread tension
Check the tension of the lower thread using a removable hook. If you hang it by the end of the thread that comes from the bobbin, and at the same time does not unwind it, loosening is required. If there is a strong unwinding of the bobbin, the tension, on the contrary, is weak.
Use a screwdriver to turn the adjusting screw clockwise to increase it. To decrease - counterclockwise. Then a check is carried out. Scroll until the shuttle goes down a few cm. For proper adjustment, test lines are periodically laid.
Threading the bobbin thread
Adjusting the height of the gear bar
The toothed bar affects the movement of the material relative to the machine and the needle. When the needle pierces the fabric, the top of the strip should be level with the work surface. If the height is set incorrectly, sewing may occur in one place or the fabric will tear. Often the lines turn out uneven. The quality of tailoring is falling.
To adjust, you need to lift the presser foot lever and move the bar to its normal position. It is indicated in the instructions. The flywheel is turned towards itself.
Rail height adjustment
Height of teeth for tissue advancement
Often the teeth are not raised enough above the insert. The height is adjustable. To do this, tilt the car. Then loosen the screw and set the height. Normally, only the teeth rise above the plate in the middle part. In this case, the front part is higher than the back by 0.5 mm. In difficult cases, it is necessary to install gaskets between the platform and the teeth.
Adjusting the tine height
Threading the bobbin thread into the bobbin case
To thread the bobbin thread into the bobbin case, just follow a few steps. How to refuel:
- Insert the bobbin into the cap.
- Thread the thread into the slot under the spring.
- Insert the cap into the shuttle.
- Switch the machine to working speed.
- Bring the thread up.
Modern machines have a vertical or horizontal shuttle. It is easier to work with it in a vertical position. But seamstresses say that it is recommended to purchase a model with a horizontal device. It's more reliable.
Threading the bobbin thread
Mechanism lubrication
Lubrication of sewing machine parts is necessary to extend its service life. Due to friction, the mechanisms wear out quickly. Frequent sewing requires monthly lubrication. If a seamstress rarely sits down at the machine, 3 times every six months is enough.
You may be interested in Choosing sewing threads for a sewing machine: prices
The oldest method of lubrication is using vegetable oil. But it quickly evaporates and also oxidizes. Motor oil is chosen with a low viscosity.
Important! You cannot use solid oil or lithol.
For modern models, manufacturers recommend purchasing special store-bought formulations. For precise dosage, use a regular syringe.
Mechanism lubrication
Setting the presser foot pressure on the fabric
The uniformity of stitches and the quality of sewing of products depends on the force with which the foot presses on the fabric. To adjust this indicator on old machines, a screw located on the rod was used. Modern devices have a regulator that is located on top of the body. It is used according to the instructions.
Important! Computerized models do not require such adjustments.
Pressure adjustment. Setting up and adjusting the Podolsk sewing machine
Setting up the Podolsk machines yourself does not take much time. These units are distinguished by their ability to work with dense fabrics. To ensure high quality products, it is important to properly prepare the device.
The setup begins with threading. Then the needle is installed. Then thread the upper thread from right to left. The flywheel is rotated towards you, the handle - away from you. When the machine is idle, the foot is raised.
Machine "Podolsk"
The rack moves to the lowest position along with the needle
The needle always moves to its lowest position at the same time as the feed dog. And the most important parameter by which this interaction is regulated is the moment the needle tip “meets” the teeth of the rack. The teeth of the rack should already be slightly lowered in the needle plate, but “peek out” a little, and the tip of the needle at this moment should be slightly above the teeth, by 1.5 - 2 mm. Actually, this is the main parameter for adjusting the rack of any lockstitch machine. If you install it correctly, your machine will stop skipping, picking up fabric and tearing thread. But, provided that other settings are made accurately.
Seagull sewing machine: setup and adjustment
“Singer”, “Chaika”, “Veritas” or other machines are configured according to similar principles. The adjustment of modern machines is different; some operations occur automatically.
The “Seagull” begins to be set up by installing the needle and thread. Then adjust the tension. Place the coil at the top. Thread the thread throughout the mechanism.
Important! There are no special features in preparing for sewing.
Machine "Seagull"
Setting up mini cars
Even a small machine can be configured in the same way. These are mostly modern models. It is recommended to prepare them for work strictly according to the instructions. Experts recommend not purchasing such devices. They are often brought in for repairs. However, finding parts or fixing them is difficult. Most often, the units cannot be repaired. They use fragile parts.
Mini car