Preparing for work
First, turn off the water supply and disconnect the machine from the power supply and sewerage. Carefully roll up all the hoses so that the remaining water does not spill out and secure them to the back wall. Unscrew the drain filter cap and drain the water from the tank into a container. Then, together with an assistant, move the washing machine to a convenient place where it can be disassembled without interference.
Disassembling the case
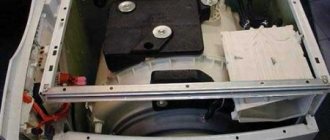
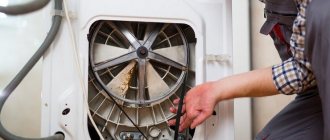
The degree of disassembly of the Ariston machine depends on the nature of its breakdown. Often, complete disassembly is not required and only partial disassembly can be done - to inspect the main components. Disassembling the washing machine begins with removing the service hatch located on its rear wall. This allows immediate access to the electric motor with the drive belt, temperature sensor, heating element and drum pulley. If further disassembly is required, then remove the top cover, which is secured with two screws on the back wall of the washing machine. Underneath you will find a large counterweight, tank springs, control panel and noise filter. The counterweight prevents us from reaching the drum tank and some sensors located below. Therefore, if necessary, it will have to be removed using a special key.
To remove the front control panel, you need to remove the powder tray and unscrew the screws under it, as well as the two screws on the left and right located under the top cover. Now, if you pull the control panel up, it will come off easily.
Next, turn the machine over to its left side and look at what’s underneath. If your washing machine model has a bottom, then remove it. But usually there isn't. From below we can access the drain pipe, motor, pump, filter and shock absorbers.
Location of parts at the bottom of the washing machine
This completes the partial disassembly of the washing machine body, and now we can remove some components and parts from it.
What you need to disassemble a washing machine
So, after all the work done, the tank is supported only by hanging hooks. To remove the drum from the Ariston washing machine, lift it up, removing it from the hooks. Another difficulty. If you need to remove the drum from the tank, you will need to cut it, because the drum and tank of the Hotpoint-Ariston washing machine are not formally disassembled - that’s what the manufacturer of these units intended. Nevertheless, it is possible to disassemble them and then assemble them with appropriate dexterity.
If the washing machine is made in Russia, then the tank is glued together approximately in the middle; if it is made in Italy, then cutting the tank is much easier. Everything is explained by the fact that in Italian samples the tanks are glued closer to the cuff (ring seal) of the door, and sawing them is quite simple. This is exactly what is installed in Hotpoint Ariston Aqualtis washing machines.
Procedure.
- Take a hacksaw with a metal blade.
- Install the tank on its edge. Start cutting from the side that suits you.
- After cutting the tank along the contour, remove the top half.
- Flip the bottom over. Lightly tap the stem with a hammer to dislodge the drum. The tank is disassembled.
The stages of disassembling the machine are clearly demonstrated below.
You will need:
- Several screwdrivers (phillips and slotted are required).
- Screwdriver.
- Several hexagons.
- Pliers.
- Hammer.
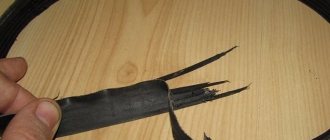
Some types of compounds simply “stick” over time.
In order for you to be able to unscrew such an old screw, you will need a special liquid, which is available to almost all motorists - WD-4O.
In addition, it never hurts to have a small basin to drain the remaining water from the hose and a few rags with which you can wipe the internal parts, wipe your hands and quickly collect the water that spills outside the basin.
Tip: if you do not disassemble washing machines every day, the best option would be to photograph each stage of disassembly. This will be a reliable guide in the final assembly so that you do not mix up anything and successfully launch your refurbished home assistant.
Devices from any manufacturer such as Ariston, Indesit or other machines have a similar structure and disassembly principle. There may be only slight differences in details, which we will discuss later.
The basic schemes are predetermined mainly by the type of laundry loading.
First, you should turn off the power to your device, remove the drain hose from it and turn off the water supply to it.
If you know the diagram of the internal structure of all the elements of your washing machine, then you can roughly guess in which part of the machine the breakdown occurred and, without wasting time disassembling the entire washing machine, start doing this from the place of the supposed breakdown.
This way you will save your time and effort.
For example:
- A decrease in the quality of washing, an increased noise level during spinning and poorly wrung clothes indicate a problem in the pump, or it is simply a clogged hose. To eliminate this type of breakdown, disassemble the machine from below, or simply remove the front panel.
- If you notice that the water does not heat up, then this is most likely a breakdown of the heating element. You can find out the location of this part by reading the instructions. As a rule, you need to remove the back panel, but in some models of washing devices this part may be located on the front.
- If the drain takes longer than usual, then the problem is in the pressure switch or pump. Based on the structural structure of the washing machine, the part can be located either behind the side panel or in the upper part.
- If there is a problem with the drum or bearings, then you will have to completely disassemble the machine.
- Top hatch.
It is held in position by several screws (you can use a Phillips screwdriver to remove them) at the top of the back panel. When you have unscrewed them, you should press on the cover from the front side, and then lift it up.
- Tray for detergents.
To remove this element, you need to feel a special plastic button, which, as a rule, is located in the center of the tray, and after you press it, pull the element towards you and the dispenser for gels and powders will come out.
- Removing the control panel of the washing machine.
This part is secured with a pair of screws. One of them is located under the powder tray, and the second is located in the opposite part of the panel. Do not forget that you should handle it with extreme caution, and it will be better if you place it on the top of the machine or put it on a hook.
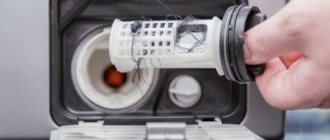
- Removing the service panel.
It is needed for servicing and removing small items that accidentally got into the tank during washing, so it couldn’t be easier to remove - press two latches on the sides and the third one, which is located in the middle.
We invite you to familiarize yourself with Making a shower tray with your own hands, manufacturing tips
First you need to remove the rubber clamp located on the loading hatch. It is held in place by a small spring that needs to be tucked in.
Next, you need to tighten the cuff in a circle (pliers and screwdrivers will help you). If the cover is in the way, you can remove it by unscrewing just a few bolts, but if it doesn’t bother you at all, you can leave it alone.
Next, find all the latches that hold the front panel in place.
In addition to them, there are also hooks on the panel and in order to remove them, the part should be lifted a little.
The power connector is removed from the hatch locking devices, and the panel is now completely at your disposal.
- Back panel.
Everything is much simpler here, because to remove this wall you only need to unscrew the fixing bolts around the entire perimeter (of which there can be quite a lot).
The unit should be disconnected from the drain, electricity and water supply.
- Control Panel. Using a screwdriver, carefully pry up the top control panel from all sides. Pull it up, then towards the back wall, and then tilt it at an angle convenient for you so that you can easily work with the wires.
Be sure to take photographs of the wire locations in the “BEFORE” disassembled state. Then everything is twisted and dismantled. The printed circuit board contains all the elements that can be unscrewed to further detach the mounting module. - Side walls. To remove the side panels, tighten all the screws, the bottom edge leans towards you, and pull it down.
- Front wall. You can remove its fastenings only after dismantling the side panels.
How to disassemble a Samsung washing machine
In Samsung washing machines, the tray for loading detergents is attached to two self-tapping screws.
The heating element in Samsung machines is located under the front cover of the washing machine, below the loading tank.
How to disassemble an Ariston washing machine
The biggest problem that can befall washing machines manufactured by Ariston is the failure of oil seals and bearings. The manufacturer tried his best to make these parts impossible to repair, although if you have golden hands, then this is not an obstacle.
The tanks of Ariston machines are solid, so to replace the seals you will have to completely flare the tank, or, simply put, cut it.
How to disassemble an Atlant washing machine
It is very convenient to get the drum in the Atlant machine through the top hatch, not forgetting to remove the counterweight and dismantle the top control panel in advance. The drum in this model is disassembled into two halves, which are bolted together in working order. This model is very practical in terms of tank repair.
How to disassemble an Electrolux washing machine
The front wall in the Electrolux can be removed, and it will also provide access to all the main components.
“To replace (repair) bearings and seals, you do not need to dismantle the entire tank, since these parts are located on removable supports.”
How to disassemble an LG washing machine
To remove the front wall of the washing machine in LG, you will need to unscrew the hatch cover and then remove the cuff. It is held in place by a clamp that will become a screw in one place.
This screw can be found if you lift the edge of the clamp with a screwdriver and inspect everything, moving in a circle.
To make it easier to remove the drum, first remove the top weighting from it.
How to disassemble an Indesit washing machine
The back panel of the Indesit washing machine is a small oval wall, which is attached with six bolts. The top cover is inserted into the grooves, and to remove it you will need to unscrew two bolts, and then lift the part towards yourself, without lifting it.
The heating element is located under the tank, and access to it is freely accessible through the back of the device.
We suggest you familiarize yourself with Strong vibration of the washing machine during the spin cycle
The weighting weight in machines from this company is located below and above the tank.
How to disassemble a Bosch washing machine
As standard, the Bosch washing machine comes with a special wrench, which is located in the bottom panel. Behind it you will find a drain pump, which will be located a little to the left.
Complete disassembly
If up to this point we made do with one Phillips screwdriver, then for further disassembly we will need a whole arsenal of tools:
- hammer;
- knob with attachments;
- pliers;
- flat screwdriver;
- wrench for fastening counterweights;
- colored markers.
Through the service hatch, remove the drive belt from the drum pulley, unscrew the electric motor bolts with a wrench and pull it out of its seat.
When disassembling the machine, do not forget to mark with a marker all the wires that you disconnect from sensors and other electrical elements so as not to mix them up during assembly.
We do not completely unscrew the central nut of the heating element (heating element) and press its pin inwards until it stops with a hammer or other suitable tool. Then we remove the heating element from the tank using a flat screwdriver.
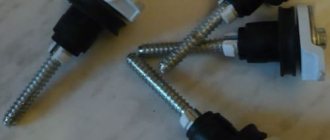
We unscrew all the screws at the bottom front next to the garbage filter and remove the pump assembly with filter from its seat. Next, using pliers, carefully remove the clamps from the drain hose fitting, and then disconnect the hose from the pump and filter.
If the “original” drain hose clamps are damaged, they can be easily replaced with any others.
You can also remove the interference filter from the top of the washing machine by first disconnecting all the wires from it. And this completes the partial disassembly. Only those components and parts remain that are best not to be removed if they are in good condition.
In Ariston cars, the tank with the drum is cast and cannot be disassembled, although in practice this is possible, and the disassembled tank can then even be soldered back together. So if you still need to remove it, you should start with the upper counterweight, the fastenings of which can only be unscrewed using a special key. Read about how to disassemble the drum here.
Next, you need to unscrew the racks supporting the tank, and with someone else, take it out through the top of the washing machine, pulling it off the springs. At this point, complete disassembly of the machine is completed and you can begin to repair it or replace faulty parts.
Step-by-step instruction
Having completed the preparatory work, we proceed to disassemble the Hotpoint-Ariston washing machine.
Without dismantling the top, there is no way to remove the other walls of the unit. Therefore, unscrew the fastening screws from the back, move the cover back and remove it from its place.
On top there is a large block that equalizes the position of the washing machine (counterweight, balancer), which blocks access to the tank, drum and certain sensors, however, it is quite possible to get to the noise filter and control panel. Remove its bolts and move the balancer to the side.
From the rear wall, use a Phillips screwdriver to unscrew several screws holding the back wall. By removing the back panel, many components and parts become available to us: a drum pulley, a drive belt, a motor, a thermoelectric heater (TEH) and a temperature sensor.
Now we dismantle the front panel. We unscrew the 2 screws located under the top cover of the machine body in the front right and front left corners. We unscrew the screws located under the tray of the washing unit, and after that we take hold of the control panel and drag it upward - the panel will come off freely.
Moving elements
A pulley with a belt is fixed to the back of the tank. Carefully remove the belt from the motor pulley first, and then from the large pulley.
You can now disconnect the thermoelectric heater wiring. If you need to remove the tank, in this case the heating element does not need to be removed. But if you want to diagnose a thermoelectric heater, then:
- disconnect its electrical wiring;
- unscrew the central nut;
- push the bolt inward;
- use a straight screwdriver to pry up the base of the heating element and remove it from the tank.
We switch to the electric motor. Remove its wiring chips from the connectors. Unscrew the mounting bolts and remove the engine from the housing. It doesn't have to be removed either. However, the tank will be much easier to reach if there is no electric motor hanging down below.
Time to remove the sump pump.
Keep in mind that if you feel uncomfortable removing the pump through the service window at the back, this can also be done through the bottom:
- unscrew the screws holding the bottom cover, if it is present in your modification;
- Unscrew the screws that are located in the drain filter area on the front panel;
- push the filter, it should pop out along with the pump;
- Use pliers to loosen the iron clamp on the drain pipe;
- disconnect the pipe from the pump;
- Unscrew the bolts connecting the filter to the pump.
Now the pump is in your hands. We proceed to further disassembly of the Hotpoint-Ariston washing unit.
Upper parts
From above it is necessary to remove the pipe that goes from the pressure sensor to the tank. Unclench the clamps of the filler (inlet) valve pipes. Remove the pipes from the seats of the washing powder tray. Remove the pipe connecting the dispenser to the drum. Set the tray aside.
As mentioned above, by disassembling the bottom of the Hotpoint-Ariston washing machine, you can disconnect the drain pipe, pump and shock absorbers:
- lay the unit on its side;
- if there is a bottom, then dismantle it;
- Using pliers, loosen the clamp of the hose and pipe;
- pull them out of place, there may still be water inside;
- unscrew the pump bolts, disconnect the wires and remove the part;
- remove the shock absorber fastenings to the bottom and body of the tank.