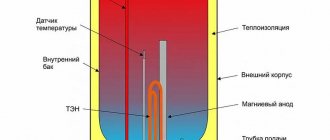
Operating principle and main elements of an infrared heater
To make an infrared heater from scrap materials, it is necessary to study the operating principle. How can you do something you know nothing about?
All heated bodies radiate heat, just like the Sun does. The rays emanating from a heat source are electromagnetic waves that heat bodies encountered in their path: pieces of furniture and people. In this case, the air does not heat up: the air receives only part of the heat during heat transfer from already heated bodies. Infrared heaters operate on the principle of thermal radiation, which includes two main elements:
- Radiation source . In industrial heaters, these are thin metal filaments that heat up when an electric current passes through them, or lamps (incandescent, halogen, quartz and others);
- Reflector . This is a highly reflective body, the function of which is to reflect infrared rays to disperse heat throughout the apartment or form separate heated zones.
Advice! To check the effect achieved by the reflector, take some food foil and hold it near your hand for a while. You will feel the heat, which is reflected and directed towards you.
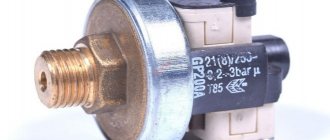
Another important part in industrial infrared fireplaces is the controller, which regulates the degree of heating of the emitter. It may not be present in homemade designs. But its installation gives the advantage of being able to set the desired temperature range. The controller automatically causes the device to heat up if the temperature drops below normal, and cool down if the temperature exceeds it.
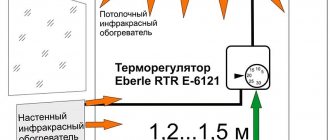
If you study the infrared ceiling heater, the operating principle will be the same as that of the floor/wall design. The only difference is in the installation method of the IR fireplace. But it depends on him which zones in the room will be more comfortable.
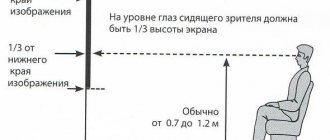
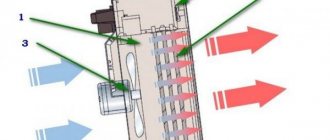
The figure shows the advantage of infrared heaters: heat reaches physical bodies and is absorbed by them, remaining there. Therefore, it may be warmer on the floor than under the ceiling. And when heating a house using the convection method, the floor is always cold: the coating itself does not receive heat. Heat is carried by air, which, when heated, rushes upward, and a new portion of cold air falls down.
Infrared heaters for home
Today it is fashionable to create heating branches independent of central heating networks. The owners go three ways:
- Traditional water heating with boiler, pump and radiators.
- Air heating combined with a ventilation branch.
- A set of infrared heaters controlled by thermostats.
Experts consider heating with infrared heaters relatively safe. Quartz lamps are considered the only type of devices that do not heat up, giving off heat due to radiation.
There were rumors about the creation of a new generation of heaters. A transparent semiconductor is deposited on glass; when an electric current passes, the element begins to emit radiation in the infrared range. The technology is similar to liquid crystal monitors, where the tracks driven by scanning signals are transparent. This is a true breakthrough, the creators are already dreaming of possible applications.
Having purchased similar glass, we will replace stained glass windows, cabinet glass, and partitions. Imagine a house where warm rays come from everywhere. Infrared heaters do not require space for placement, are easy to install and dismantle, and do not spoil the interior appearance. The only difficulty is in creating rotating contacts - since the doors are constantly opening and closing.
This is difficult, we will try to make an infrared heater for an aquarium based on the products described. You will need glass, glue for it and invented elements for a pair of walls. The advantage is the ability to warm fish in complete darkness, and equip the device with a thermostat to maintain the climate in automatic mode.
So, we glue together an aquarium from pieces of glass, equip one or two walls with heating elements with electrodes facing outward, and, if necessary, cover them with waterproof varnish. All that remains is to connect the wires, set the thermostat, and start the fish. In addition, infrared radiation is beneficial for living organisms. The fish and owners will be satisfied.
Cheap and cheerful
Typically, devices that are heated by electricity are used as an emitter - incandescent filaments or lamps. But the simplest version of the emitter is a heating radiator. This is the same physical body as the Sun. And it can also emit heat. Stand by the radiator and feel the emanating heat - this is radiation. It just spreads in all directions. Why heat the walls if you can direct the rays towards the living space?
Take the foil, smooth it well to improve the reflective effect and stick it on the wall behind the radiators and radiators. As a result, the heat that the walls could receive will be directed in the opposite direction - towards you. This method helps to get up to 20% more heat without any tricks. The only drawback is the ugliness of the reflective screen: it spoils the interior.
Attention! Instead of foil, you can use heat insulators with a reflective screen. A striking example is the material penofol, one or both sides of which are foil-coated.
Main elements and principle of operation
To create an infrared heater at home, you must first study the principle of its operation.
As is known, electromagnetic waves emanate from thermal sources, directly heating all the bodies surrounding them, in this case, in an apartment - pieces of furniture and people. In this case, the air in the room does not heat up, and all the heat comes only from already heated objects. Infrared heaters, which include several basic elements, also work according to this principle:
- source of heat radiation. In infrared industrial heaters, the sources are thin metal filaments, which are heated by an electric current passing through them, or various lamps, for example, halogen or incandescent,
- a reflector with increased reflectivity, the main function of which is to dissipate heat or create independent heated zones by reflecting infrared rays,
- The controller is also one of the main parts of industrial infrared heaters. It regulates the heating degree of the emitter. It may not be present in homemade heaters, but its installation is recommended for setting a suitable temperature range and for automatically heating the device when the temperature drops below normal limits, as well as for cooling at elevated temperatures.
Tip: to check the reflex effect, it is recommended to use food foil, which must be held over your hand for a while. Heat should emanate from the foil, which is reflected and directed towards your hand.
The operating principle of ceiling infrared heaters is the same as that of other devices of this type. The only difference is the installation method, which determines the most comfortable heated zones.
Source: electricdoma.ru
This diagram shows the main advantage of infrared coolants: the heat that warms physical bodies and is absorbed by them remains inside. Therefore, the floors in the room are warmer than the ceiling. When providing heat using the convective method, the floors always remain cold, since the material itself is not heated. Heated air rises, displacing cold air down.
The old Soviet reflector is in use!
A homemade infrared heater can be made from an old Soviet-made reflector. In addition to this, you will need:
- Nichrome thread;
- Steel rod;
- Fireproof dielectric (ceramic plate is suitable).
To make an IR fireplace from these things, follow the instructions:
- Remove dirt from the reflector;
- Check the plug, cord and terminals to turn on the coil (they must be intact);
- Measure the length of the spiral that is wound around the reflex cone;
- Cut a steel rod the same length as the spiral;
- Wind a nichrome thread onto the rod so that there are 5 turns for every centimeter;
- Carefully remove the rod from the nichrome winding;
- Place the spiral on a plate (another dielectric) so that the turns do not touch each other;
- Connect the ends of the nichrome spiral to the mains;
- Now the heated spiral will easily fit into the grooves of the cone from the reflector;
- Connect the ends of the spiral to the contacts.
The nichrome filament glows better than the spiral that was in the device before our manipulations. As a result, we get a powerful emitter, the energy of which is reflected from the walls of the reflector and hits opposing bodies, which begin to absorb heat.
Heater glass + aluminum foil
You will need:
- Foil;
- Two glasses of the same size;
- Paraffin candle;
- Sealant;
- A wire with a plug at the end;
- Cotton napkin;
- Boxed;
- Cotton swabs;
- Any device for holding a candle.
Step-by-step instruction:
- Clean the glass with a napkin from paint, dust, grease;
- Light a candle. Place it in a glass, candlestick, or simply drip paraffin onto a flat surface and quickly place the candle on the puddle;
- Smoke the glass on one side by passing it over the fire at the same speed. The soot will lie evenly if the glass is cooled before the procedure. The dark layer will eventually become a conductive element;
- Run cotton swabs around the perimeter of the glass pieces so that you get a frame of clean glass 0.5 centimeters thick;
- Measure the width of the smoked rectangles on the glass with a ruler;
- Cut two rectangles of the same width from foil - these will be electrode strips;
- Take one glass and place it with the smoked side up;
- Apply boxing agent to it and place rectangles of foil on the edges so that they extend beyond the glass;
- Place the second glass on top with the smoked side down and press well so that the structure sticks well;
- Along the perimeter of the “layer cake”, spread sealant at the joints of the glass;
- Check the power of the structure. If it is not higher than 100 W per square meter of room, then the heater can be connected to the network using a wire and plug;
- To connect to the network, use a wooden block with metal plates reinforced at both ends. Solder a plug to one contact. If you install the glass on a block so that the foil coming out from the sides fits tightly to the metal contacts, you get a full-fledged heater.
Attention! To calculate the power of a structure, use a multimeter to measure the resistance of the conductive layer. Since the current strength in the circuit depends on the load, it is better to calculate the power using a more stable parameter - this is the voltage, which in the network is equal to 220 Volts. To do this you will need the formula: N=U*U/R .
N – required power. U – voltage (220V). R – measured resistance. Example: when measuring, we got 24 Ohms. Substitute into the formula: N=220*220/24. We get 2021 Watts. This is enough to heat a room with an area of 19-20 square meters.
If your power is more than 100 watts per square meter, then it needs to be reduced by increasing the resistance (we cannot change the network voltage). If the power is very low, then it needs to be increased.
What to do if the power is not suitable?
Now let’s talk about how to make an infrared heater with your own hands of the required power. To do this, you need to know the area of the room you want to heat. For example - 15 meters. Now you need to calculate the maximum permissible power at the rate of 100 watts per meter. Since we have 15 of them, the power will be 15 * 100 = 1500 Watts (it is necessary to count in them, despite the fact that in the passports of electrical appliances it is indicated in kW).
If the voltage is constant (220 Volts), then you can calculate the required resistance. To do this, we derive the resistance from the formula given above: R=U*U/N. Substituting the calculated power and voltage into the formula, we get: R= 220*220/1500=32 Ohms (approximately).
In the example above we had 24 ohms. This means that the resistance needs to be increased. To do this, you need to reduce the width of the smoked strip on the glass. This comes from the formula R=l*p/S . Where l is the length of the conductive layer (a constant value, because we will not cut glass), p is the resistivity (constant), S is the cross-sectional area of the conductive layer, which depends on its width. The wider the layer, the lower the resistance, the narrower it is, the greater it is.
Conclusion! To achieve the required resistance, you need to select it experimentally, making the soot strip narrower or wider, depending on whether you need to increase or decrease the resistance. In this case, each time you will have to disassemble the glass structure.
DIY infrared heater
Greetings, Samodelkins!
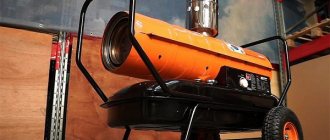
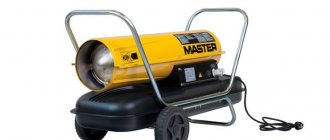
In order not to freeze in the workshop or garage, let's try to assemble a heater with our own hands.
And the heater is not simple, but one that is almost free, with a minimum investment. Today, the most affordable and effective source of heat is a regular incandescent lamp.
The light bulb converts all the energy consumed into light and heat. This is what the emission spectrum of an incandescent lamp looks like.
The figure shows the part of the spectrum that the human eye can see.
As you can see, the main radiation power lies in another spectrum - infrared.
If we consider a light bulb as a light source, then its efficiency is extremely low and is no more than 2-3%. But if you look at a light bulb as a heat source, then the efficiency will be as much as 97%, because we perceive infrared radiation as heat.
If you increase the voltage supplied to the light bulb, you can achieve a light output efficiency of up to 15%, but the light bulb will not last more than a couple of hours. And if you reduce the voltage by half, the light output will drop by 5 times, and almost all the energy consumed will be spent on radiation of the infrared spectrum. At the same time, the service life of the light bulb will increase from 1000 hours to almost 1,000,000 hours, that is, the light bulb will become almost eternal when compared with human life.
You can see how the light output dropped significantly with this connection. Let's measure how much such a bunch of light bulbs consumes. Current is approximately 290 mA.
This means the consumption of two light bulbs is approximately 70 W. Due to the increase in resistance, consumption decreased, but the ratio of the amount of heat per 1 W of power consumption increased.
For comparison, let's measure the current flowing in one light bulb. It is equal to 420 mA. That is, the consumption is an honest 100 W.
For the homemade heater, the author bought 150-watt light bulbs, which, by the way, after the epic law banning the production of light bulbs with a power of over 100 W, are now produced under the guise of heat emitters. Tricky, isn't it?
When such lamps are connected in series, the radiated heat is immediately felt. And at the same time you can calmly look at them without squinting from the bright light. The current in this circuit is 410 mA. This means that the consumption of such a bunch of light bulbs is about 100 W, which is almost entirely used for heating.
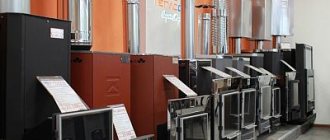
Let's see what power infrared heaters come in and what area they are designed for. It is very easy to compare different models on the Internet.
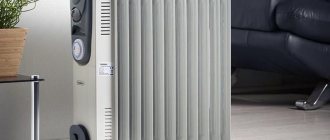
As you can see, most heaters spend 100 W of electricity to heat one square meter. Purely for comparison, let’s take a look at what’s going on with oil radiators. The ratio is the same, the same 100 W per 1 m2 of area.
To make the heater more or less durable, we will make a frame from an aluminum corner. The author has a couple of unnecessary scraps.
The light bulbs inside the frame must be positioned so that the distance between the axes of the light bulbs is equal to the distance from the axis of the outermost light bulb to the edge of the frame. It sounds kind of tricky, but in the picture, I think everything is clear.
The distance between the rows of light bulbs should be such that the light bulbs can be replaced after 100 years if they fail. That is, it is necessary to leave a gap between the flasks of about a centimeter. The author temporarily connects the frame parts with bolts. Of course, you need to use a square, otherwise it will turn out to be hell. Now inside the frame you need to fix two strips on which the reflector, that is, the reflector, will be attached.
After the author secured the aluminum strips with rivets, the frame became rigid. The corners are maintained and the bolts in the frame can be replaced with rivets. In addition to the bolts of one corner, we leave the opportunity to unscrew it, in case you can’t screw in the light bulbs.
To make the reflector, you will need aluminum from aluminum cans, because it is easy to process and has the desired bend.
After trying it on for a long time, the author came to the conclusion that it was better to make a bend approximately in the middle, so that there was a margin of a centimeter. And one more bend, with the help of which the two segments will cling to each other.
Rivets will help connect the two pieces together. But canned aluminum is very thin and breaks easily, so we’ll put a washer on both sides of the rivet. This design will be much more reliable.
Now you need to fasten the missing pieces in the same way. We put the reflector in the frame.
We fasten the reflector with rivets. First the central ones, without pressing them to the end, and then the extreme ones. This is done because the sheets fidget and constantly want to fold a little. And if you clamp the central rivets, the sheets may remain in the wrong position.
You will need strips of aluminum 9 cm long. The places where the cartridge is attached to the strips must be very accurately marked. Because if it’s crooked, you won’t be able to run the wire. The stripe is right next to each other in width.
We attach the strips to the frame using a square. We secure the cartridges using nuts with a nylon ring. They do not spin up due to vibration and do not need to be controlled. Do not tighten the nut too hard, as it will expand when heated and may crack.
And now the two keys are together.
This thing really heats up. Right away when you turn it on, you feel the warmth of the sun. It's like sitting in front of a fireplace. At the same time, the light from the bulbs is not bright and does not hit the eyes. Even through a T-shirt, the heat immediately breaks through. A huge advantage of such a heater is that it immediately heats not only the area where it is directed. If you hang these 500-watt heaters in the four corners of the garage, you won’t have to worry about freezing in winter. Yes, it will be a little expensive, 10 rubles per hour, but you can turn them on only when necessary, and do not heat the room in advance. And you don't have to wait for it to warm up.
From two meters you can clearly feel the heat from the heater, which means everything is working.
Thank you for attention. See you again!
Video:
Source
Become the author of the site, publish your own articles, descriptions of homemade products and pay for the text. Read more here.
Heater based on laminated plastic
To assemble a homemade infrared fireplace you will need:
- Laminated paper plastic - 2 pieces with an area of 1 square meter;
- Boxed;
- Graphite (you can buy powder or get it from old batteries, from a pencil - but you will have to crush it);
- Copper plates;
- Wood;
- Plug with cord.
If everything is there, start assembling:
- Mix graphite powder with bauxide to form a thick mass with high resistance;
- Place the plastic sheet with the rough surface facing the table;
- Apply bauxide mixed with graphite onto the plastic using zigzag strokes;
- Prepare the second sheet of plastic in the same way;
- Glue both plastic sheets together, pressing them tightly together;
- On opposite sides of the plates, attach copper plates that will act as terminals;
- Build a wooden frame into which you will need to insert the resulting structure;
- Allow the future heater to dry;
- Measure the conductor resistance and calculate the power.
Attention! Here, the calculation of power and resistance is carried out using the same method as in the previous case. Only the resistance will depend not on the width of the conductive layer, but on the graphite content in the box. The more powder, the higher the resistance, and vice versa.
You will have to disassemble and reassemble the structure several times before you experimentally achieve the required power. Only then can you connect the device to the plug and connect it to the network for operation.
Mini heater made from a shoe polish can
Prepare materials:
- Flat shoe polish box;
- Two conductors;
- Can;
- Graphite powder;
- Sand;
- Plug.
Step-by-step instruction:
- Wash the box;
- Mix sand with graphite powder, taking them in equal quantities;
- Pour the mixture into the box, filling it halfway;
- Cut a circle out of tin;
- Attach a wire to it;
- Place the circle on top of the graphite-sand mixture;
- Add enough sand and graphite until the jar is full;
- Close the jar with a lid to create pressure inside;
- Connect the second wire to the body of the can and connect it to the network using a plug (you can use a car battery).
To regulate the degree of heating, screw the lid of the jar looser or tighter to change the pressure inside. The tighter the jar is twisted, the stronger the heating, and vice versa. But do not allow it to overheat, at which point the jar begins to emit yellow or orange light rays. In this case, the contents inside the can are sintered, causing the efficiency of the heater to decrease significantly. To improve performance after sintering, you need to shake the jar vigorously - then the graphite-sand mixture will again become loose and suitable for work.
How it works - operating principle and main elements
The power supply must be securely soldered - no twists!
Absolutely any physical substance has the property of emitting thermal energy.
It is this postulate that is taken as the basis for heating a room with infrared rays. At a given frequency, electromagnetic oscillations at certain temperatures heat up the emitter, as a result of which it releases thermal energy into the space surrounding it.
But in order for the scheme to work in full mode, a number of conditions must be met.
One of them is the ability to connect directly to a 220 V network.
Firstly, there must be an emitter, which can be either a specifically designed incandescent lamp or a special multilayer panel, which is made of an alloy characterized by a special composition.
Between each layer of the panel a thin thread made of metal is laid. The thread, creating resistance to the electric current, heats up to the desired temperature and transfers heat to the panel. It is these heat rays in their infrared range that heat the room.
Such a panel emitter as a heat source can be fixed to the surface of walls and ceilings, while the spectrum of the emitted infrared flux is located in the range of 5-15 microns, which is considered comfortable for humans, while such heaters consume almost half as much electricity as heating devices , having a different operating principle.
The reflector is one of the main components of an IR heating device. Thanks to it, heat is reflected in a given direction and, acquiring a certain specific shape, thereby determining the most active radiation zone.
If desired, you can create a small area in the room that will have the most comfortable and preset parameters, but for this purpose it is necessary to select the right reflector, since not every material used is characterized by a high degree of reflection; most often it simply absorbs the generated heat.
Watch a video about what infrared heaters are:
If necessary, check how high the reflective properties of a particular material are, then you can use a small piece of ordinary food foil. The mirror surface should be brought to the surface of the skin and the thermal effect will not be long in coming.
Thermal resistance - it helps maintain the temperature created by the emitter under certain operating parameters.
The controller is used to check whether the specified parameters correspond to the real ones. If the data does not match, the device automatically adjusts the temperature to the required values.
Important: Useful heat is generated as a result of the conversion of electrical energy into heat in the form of infrared rays. At the same time, surrounding objects heat up, which then release all the accumulated heat to the surrounding space. The efficiency of such devices is high, and heat loss is minimal.