General recommendations
block connection diagram
It is worth keeping in mind that the electrical connection diagrams for the air conditioner for low-power household and more powerful semi-industrial (commercial) models differ. The former have single-phase, and the latter both single-phase and three-phase connections.
There are two ways to power a split system: directly through an outlet and by connecting a wire to the electrical panel. The first option is suitable for household appliances and in the case of already completed renovations in the room. The second method is acceptable for powerful units, as well as for devices of various capacities at the initial stage of rough repair work. Household models are often put into operation using the first method, so this article will discuss this in more detail.
As a rule, powering a split system takes place in several stages, which should be strictly followed if the user plans to do this independently. So, how to connect an air conditioner with your own hands without relevant experience? It's difficult, but quite doable.
Sequence of work
First of all, the owner of a split system must remember the sequence of work. They are carried out according to the following scheme:
- preparation of materials and tools;
- study of air conditioner connection diagrams;
- laying interconnect cables - connecting them to the terminals of the indoor and outdoor units of the air conditioner;
- connecting the device to the network;
- checking the operating parameters of both modules.
Depending on the indoor unit, the cable may run from either the outdoor unit or the indoor unit to the power source.
Air conditioning kit and installation equipment
Read also: Air conditioning for an apartment: how not to make a mistake and choose the best option for your home | 2019
Installation of the external air conditioner unit
Installing a device with your own labor is a job in which there are many little details; if you miss them, it leads to wear and tear of the equipment. But if you decide to install it without the help of professionals, we advise you to follow the instructions below.
The electric air conditioner kit includes the following components:
- Outdoor unit
Outdoor unit
- Indoor unit
Indoor unit
- Metal frame. Used for installation
Metal frame
- Nuts, self-tapping screws with dowels (for fastening the frame)
Nuts, self-tapping screws with dowels (for fastening the frame)
- Drainage tubes. Used to remove moisture
Drainage tubes
- Remote control for the device
Remote control for the device
- Instructions
When installing the mechanism yourself, an addition to the standard package is required. They consist of the following components:
- electrical cables. Most often, four-core cables with a length of about 30 cm are used.
- brackets for mounting an outdoor model
- Copper tubes with plugs. The length of the tube corresponds to the length of the route
- thermal insulation. Its length is equal to the length of the route * 2
- reinforced tape
Copper fittings for air conditioning
If the device is already a verse, you should choose a location for installation. We take into account the following factors:
- device requirements
- maximum length and width of side parts
- installation of the outer part. Not all buildings can be equipped with an outdoor unit. If there is nowhere to attach it, then they usually put it on the balcony
Tools and equipment for work
Installation equipment:
- Hammer with drill (length 45 mm)
- Vacuum pump
- Collector
Set of tubular products, for fastening
set :
- 2 copper pipes; diameter of one is 6.35mm, the other is 9.52mm
- Insulation
- Drainage hose
- Wiring
- Mounting bracket
Connection and connection of air conditioner interconnect cables
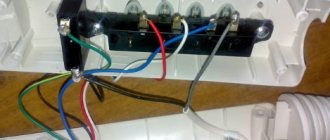
terminal block with wires
If you decide to connect the air conditioner to the electrical network through a socket, you need to make sure that it can withstand the upcoming load. If the required parameters do not comply, the installer should not connect the device to it and must explain to the customer the essence of the problem, as well as offer a way out - laying a separate line to the panel.
Here are the basic requirements for the outlet:
- The socket must have a ground connection or a differential relay;
- It must correspond to the required values specified in the instructions for the split system. The best ratio is high network power and low cooling device power;
- The air conditioner is not placed in line with other powerful appliances;
- It is forbidden to power the device from an outlet if aluminum wiring is used. To connect the air conditioner through it, you need to take a copper wire with the appropriate cross-sectional area;
- It is important to make sure that the socket itself is connected through a circuit breaker that has a distance between contacts of at least 3 mm when open;
- Work must be performed by an experienced installer in accordance with required national and local standards.
If all of the above requirements are met, begin preparatory work on connecting the air conditioner to the outlet with your own hands. First, check that you have the necessary tools, and then strip the cable cores with a knife or an insulation stripper. Now we move on to laying interconnect cables and connecting the external unit of the air conditioner, and then the internal one.
Modern reinforced euro sockets are usually suitable for high-power devices.
The connection is carried out according to the diagrams on the blocks, which indicate the terminal blocks corresponding to the interblock cables. Unconnected cable cores must be insulated so that they do not come into contact with live parts of the air conditioner.
Marking of terminals for on/off models of split systems:
- 1 – compressor power supply;
- 2(N) – common neutral;
- 3 – four-way valve;
- 4 – fan of the external unit;
- (Earth).
Terminal markings for inverter models of split systems:
- 1 – food;
- 2(N) – neutral;
- 3 – control;
- (Earth).
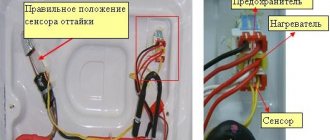
In some Chinese economy-class air conditioners, a separate wire is laid between the units to connect a temperature sensor.
The wires are connected to the terminals. The terminal box is located under the block panel. In accordance with the numbering, the wires of the internal module are connected to the contacts of the external module.
Stages
Brief instructions for connecting an air conditioner with your own hands for the indoor unit are as follows:
- Remove the decorative panel from the block.
- Remove the protective cover from the connectors and the cord clamp.
- Lay the interconnect cable through the mounting hole in the rear of the device.
- Prepare the cable for connection by first stripping it and removing the insulation.
- The stripped ends are inserted into the terminals and tightened tightly with screws. The tightening force should be approximately 1.2 Nm. Typically, terminal blocks use screw terminals to connect wires.
- The clamps secure the interconnect wire well.
- Reinstall the terminal cover.
The same brief instructions are suitable for connecting the external unit of the air conditioner according to the electrical diagram yourself. Instead of a decorative panel, remove the protective cover from the outdoor unit and connect it with wires to the indoor module through terminals.
At the very end, they check whether the work done corresponds to the connection diagrams. Only then can you turn on the device.
Selection of wire for connection
five-core copper wire
It is worth remembering what wire is needed to connect the air conditioner, or rather, what cross-section is required. Its parameters are indicated in the instructions for each split system model individually. The cross section depends on the power of the device. As a rule, household air conditioners (sizes 7, 9, 12, 13) require a wire diameter of 1.5 to 2.5 mm². You can focus on the current strength: less than 18 A - 1.5 mm², more than 18 A - 2.5 mm².
Also, the wire required to connect the air conditioner to the electrical network is selected taking into account the distance of the panel. The distance between the device unit and the electrical panel over 10 meters requires a cross-section of 2.5 mm².
To ensure reliable operation of the air conditioner, only copper wires are used. For a single-phase connection, three-wire wires are used (phase-neutral-ground), and for a three-phase connection, five-wire wires are used.
interconnect cable attached to the outdoor unit
The wire should not be laid near gas and heating pipes. The minimum distance between them is at least 1 meter. If necessary, use additional insulation. As a rule, the cable is laid along with the route in a corrugation and hidden in a box or groove in the wall.
The cables are attached to the wall with clamps, which are secured with dowels or screws. When laying communications in boxes, glue or screws are used to secure them. If hidden wiring is performed, then the wires are hidden in a corrugation and fixed to the wall using special clamps.
How to choose an installation location
Determining the location is a fundamental stage of installing a split system, which is regulated by manufacturers.
Regarding location, you should know the following requirements:
- The indoor unit should be located at a distance of 20 cm from the ceiling;
- The indoor unit should be placed at a distance of 30 cm from another wall;
- The distance between the outdoor and indoor units must be at least 1.5 m.
It should be noted that the maximum distance between the split system units is not limited. Installers try not to exceed 6 meters, because if additional freon charging is required, additional costs will only aggravate the situation. The ideal distance is 3 meters.
Installing the Mounting Plate
The outdoor unit is often placed on open balconies or near a window. In multi-storey buildings, they are guided by the following principle: up to the 5th floor, the outdoor unit of the split system is installed above the window and at a certain distance from it; if the air conditioner is installed on the 9th floor, for example, then the outdoor unit is mounted at the window level or below it.
In private houses, the choice of location depends on the strength of the walls and suitable conditions. Installation is carried out on a load-bearing wall using brackets or hung on the base of the house itself.
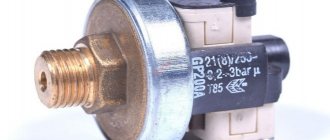
Circuit breaker
If you plan to power the split system from the panel, then you will need protection devices, one of which is a circuit breaker. It is selected relative to the rated power of the device indicated in the technical data sheet or on the external unit. It is advisable to always leave a small reserve. For example, start-stop air conditioners have a very high starting current, exceeding 20 A. And although the operating time at such values is short, it is still worth taking this into account.
You can select the required current values of the machine using the formula: divide the air conditioner power (kW) by the network voltage (220 V) and increase the obtained data by 20-30%.
When connecting the air conditioner to the power supply, it is important to remember that the circuit breaker must have a distance between the contacts in the open state of at least 3 mm for each phase wire. The phase order is strictly observed: the order of connecting the phases must correspond to the order on the terminal block.
A type C circuit breaker is suitable for air conditioners. It completely ensures the safety of the motor load and has high tripping characteristics in case of emergency.
You need to make sure whether the electrical panel allows you to install additional equipment in it.
It is worth remembering that for both the air conditioner and other household electrical appliances, the most reliable connection is via a separate line. With this option, it is not necessary to install a residual current device and a differential relay.
Connecting the LG ART COOL GALLERY air conditioner according to electrical diagrams
The photo below shows an electrical diagram for connecting an LG ART COOL GALLERY inverter type air conditioner. The first diagram is for connecting the indoor unit, the second is for connecting the outdoor unit. The third photo is the terminal block of the external unit. The fourth photo is a completely ready-to-function indoor unit. The model 9 split system shown in the photographs is installed in the apartment, connected to an outlet and works perfectly. The installers used a copper power cable with a cross-section of 1.5 mm².
In order to cope with all the stages yourself, you can watch the video of installing and connecting the air conditioner with your own hands below:
Air conditioner installation rules
After purchasing the air conditioner and unpacking it, you can begin installing the system. Of course, provided that all the necessary tools are available.
The outdoor unit is installed first. After completing its installation, you can begin installing the system indoors.
If work is carried out in an apartment on the second floor or higher, special safety regulations must be observed.
Choosing a location for installing the air conditioner