Gas hose selection
Before choosing a built-in oven, you need to ensure that certain requirements are met, compliance with which will allow you to avoid dangerous situations:
- There should be no flammable or combustible materials near the oven (kitchen curtains, towels, rags, oil).
- Furniture in the near zone of the oven must withstand an increase in ambient air temperature of 50 C.
- It is not recommended to place the oven and hob next to the refrigerator or freezer.
- The oven should be located away from water sources in the kitchen.
- The electric oven must be located close to a grounded power outlet installed at a height of more than 10 cm from the floor.
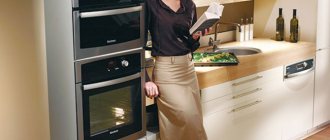
When determining where in the kitchen and at what height to install the oven, you need to consider the following placement options:
Traditional placement of the oven, while the location of the hob above the oven is not mandatory. This option is most often used in small kitchens where there are few work surfaces, and there is no alternative for small ones.
Column cabinets
Typically, this placement is used in a spacious kitchen, where there is enough space to install additional tall cabinets.
Important!
When deciding at what height to install the oven, you need to consider the following. The high placement of the oven provides a number of advantages: it is easier to clean and maintain, it is safe for small children, it is easier to remove dishes and monitor the cooking process.
Read more: Rules for refilling household gas cylinders
To the skeleton
In a spacious kitchen with a hob placed in the middle, it would be logical to install the oven directly into the frame. This option is most suitable for families without small children and who rarely cook.
In a high cabinet
A very convenient place to integrate the oven into the cabinet located on the edge of the unit. At the same time, it is not possible to use the surface of the cabinet as a working area, but you can install a microwave oven, various household appliances and kitchen accessories on it.
It should be noted that such placement is quite often used in everyday life for medium-sized kitchens, where there is no shortage of work surfaces, but there is also no shortage. In this case, it can be considered optimal.
Installation of cabinets on different surfaces
There are two main types of gas hoses on sale:
|
Gas hoses are sold in various lengths; before purchasing, decide what length you need.
| Rice. 1. Various types of gas hoses |
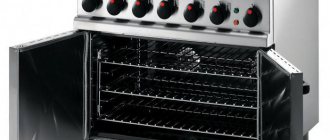
Rubber gas hoses are the simplest and cheapest, which is probably why they are the most common. But rubber hoses are poorly protected from mechanical stress; the recommended service life is 5 years.
| Rice. 2. Rubber gas hose |
https://www.youtube.com/watch?v=8pS69oVPeW8
Polymer gas hoses in steel braid were previously widespread, but in many cities and countries they are prohibited for use. They are visually distinguished from water hoses by yellow braided stripes.
Bellows gas hose is safer and more durable than rubber gas hoses, with references to lifespans of up to 25 years. Bellows hoses are produced from stainless steel, at the ends of the hose there are threaded fittings with paronite gaskets. The hose bends easily, withstands pressure up to 6 atmospheres and temperatures from -50 to 200 degrees C. I chose this option.
Bellows gas hose with protective coating is a bellows hose model that is protected by a layer of polymer coating.
Read more: Recommendations for the selection and installation of fire protection RCDs
The choice of location for installing a do-it-yourself electric oven should be approached with the utmost responsibility. At the same time, in addition to observing the basic rules of electrical and fire safety, it is necessary to ensure normal conditions for the operation of the oven and make sure that it does not interfere with the functioning of other household appliances located in the kitchen.
A far from complete list of recommendations is as follows:
- there should be no curtains, towels, paper products or other flammable items in the immediate vicinity of the oven;
- furniture elements in contact with the cabinet must withstand a temperature of 50 ° C without damage;
- placing the oven close to a refrigerator or freezer is unacceptable;
- It is advisable to install the oven as far as possible from water sources;
- to ensure natural air circulation, it is necessary to provide gaps of at least 90 mm from the bottom, 40-50 mm for the side and rear walls of the oven;
- On the side of the installation site, at a height of at least 10 cm from the floor, there must be an electrical outlet with grounding that can be easily reached.
Size ratio when connecting an oven
Important!
The socket must be designed for a current of at least 40 A. If this is not the case, replace it. Before you build a new oven with your own hands, you should decide on its installation location. The most convenient locations for ovens:
- In the cabinet under the table top. In this case, the hob does not have to be nearby at all. This placement is optimal for small kitchens with limited work surface area;
- Column cabinets. This option is good for spacious rooms. The niche intended for the oven can be located at eye level, which makes it easier to monitor the cooking process and removes hot surfaces from children;
- To the skeleton Many housewives find it convenient and natural to install an oven in the supporting structure of a hob, located in the center of the kitchen area;
- In a high cabinet. In a medium-sized kitchen, it is quite possible to mount the oven in the outermost cabinet of the kitchen unit.
Examples of oven locations
As preparatory work after choosing the location for future installation of the stove, the following should be provided:
- availability of reliable ventilation;
- grounding inspection;
- checking the electrical network for the possibility of connecting a new large energy consumer.
Advice! The socket for a powerful oven should be connected through a separate machine. If you lack your own qualifications, contact a professional electrician.
Origins of the problem
Often in the kitchen of an apartment or private house there is only one electrical outlet at the equipment connection point. This is how the living space was designed, especially for old houses.
At the same time, we are faced with the task of ensuring the connection of two independent loads simultaneously, each of which has its own electrical input.
This situation becomes critical when the electrical equipment:
- has high power, which does not allow solving the problem through a multi-socket extension cord or tee;
- due to its purpose, it was not initially designed for frequent connections and disconnections.
An additional complicating factor is that the electrical appliances located at a given load point, in our case the oven and hob, must function simultaneously, and the problem cannot be solved by alternatively connecting one of the devices to another point.
Connection rules
If the gas model of the stove in the kitchen is replaced simultaneously with the renovation of the room, then it may be necessary to move it to another place. It is important to follow the following rules for installing the stove:
- The maximum permissible distance from the device to the gas supply pipe is 4 meters, ideally no more than 2.
- The room must have high-quality exhaust ventilation.
- Modern units contain electric ignition and oven lighting functions, so you need to provide a grounded socket nearby. If you select a model with an electric oven, you will have to draw a separate power line from the distribution board (with the installation of an additional 16 A RCD) using a 3 × 5 cable.
To connect the stove to the gas pipeline, a flexible hose is used (it differs from the water pipe by yellow marks on the braid), the maximum length of which is 5 m, and the internal diameter is more than 10 mm.
There are several types of such hoses:
- Rubber-fabric. Soft and flexible, non-conductive, but not rigid enough.
- Rubber with metal braid, the most common variety previously.
- Standards for installing a modern gas stove in an apartment recommend using a bellows hose when connecting, which is a stretchable metal sleeve in a protective sheath.
Many people do the installation themselves to save money. But in order to carry out the installation process you need to know several important rules:
- The distance from the pipe to the hob should not be more than 4 meters. Therefore, you cannot use a flexible hose longer than 4 meters.
- Due to the fact that modern gas stoves use lighting in the oven, and in some models an electric grill, you will need an outlet with a grounding circuit to connect the power. Remember that a separate copper cable with a cross-section of 3 x 1.5 mm² must be stretched from the socket to the distribution board in the house. That is, it is three-core, having a cross-section of each core of one and a half squares. A 16A RCD is installed in the wiring panel.
Manufacturers offer three types of gas hoses:
- Rubber-fabric. In mechanical strength it is inferior to other types, but in flexibility and softness it is superior to others. There are no metal inserts in this hose, so the product is not a current conductor, which is an important factor for electrically dependent gas stoves.
- Rubber with steel braid. This is a reliable and durable gas hose.
- Bellows. This product belongs to the category of metal hoses. It has increased rigidity and strength. A very reliable but expensive product. Two varieties are available for sale: a bare hose and one covered with yellow dielectric insulation. It is better to give preference to the second one.
Bellows connection for gas
In addition, it should be noted that steel-braided rubber and bellows hoses are conductors of electricity. Therefore, a dielectric insert must be installed between the hob and the hose, which will create a barrier to the current. A gas hose is often confused with a water hose because they have the same design.
After the installation location and method have been selected, it is necessary to provide:
- Protection against voltage surges in the general electrical network;
- Grounding;
- Ventilation – the oven needs to be built in at a distance of 50 mm from the back wall of the niche, 9-10 cm from the bottom, and the gaps on the sides should be approximately 5 cm.
Connection via socket
In practice, the following main versions of sockets are used, which are shown schematically in the figure below:
- assembly of two single sockets with a separate cable for each of them;
- assembly of two single sockets with a common cable;
- monoblock socket with two seats for plugs.
Options for the end section of wiring for connecting the hob and cabinet, from top to bottom:
- with individual cable and circuit breaker for each socket;
- with the installation of a monoblock double socket and a common circuit breaker;
- using a daisy chain connection of two sockets and a common circuit breaker.
Taking into account the high power of electricity consumed, monoblock sockets with three or more seats are not used in this connection method.
The type of socket used is significantly limited if the panel and/or oven cable is reinforced with a plug. You cannot change it for another one, since in this case, at a minimum, the factory warranty will expire.
POPULAR WITH READERS: Floor sockets - purpose, types, installation rules
When connecting, it is advisable to use socket modules with different form factors, which are also available in a double monoblock version.
Dual power socket with different form factors and the option of lateral cable supply to it in a brick wall groove
Dielectric coupling
Don't forget to buy a dialectical insert or coupling.
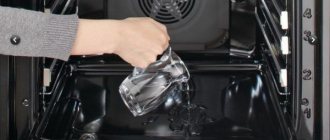
Firstly, as it turned out, without it it was impossible to connect the bellows gas hose to the tap of the gas supply network. By the way, if you look at the picture of the rubber hose above, the rubber gas hose came with a coupling.
Secondly, safety, leakage currents can spread through gas pipelines. This can be caused by various technical reasons, but it can lead to the accumulation of potential, which leads to heating of the hose braid and melting of its rubber core. Over time, the hose begins to leak gas, and there is a risk of explosion.
The dielectric insert, thanks to the material from which it is made, does not allow stray currents to pass through.
| Rice. 3-4. Dielectric insert - necessity and safety |
Preparing for work
Before you thoroughly understand how to install a new gas stove, you need to dismantle the old equipment and evaluate the future scope of work. Also, “estimate” the list of required tools and materials, which looks something like this:
- gas, adjustable and wrench (22 x 24) wrenches;
- ball valve 1/2ʹ (if replacement is necessary);
- FUM tape;
- concentrated soap solution;
- suitable hose;
- screwdriver.
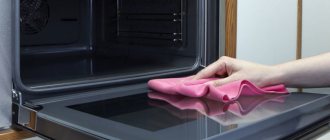
The walls of the cutout must be treated with sanitary silicone, that is, using a piece of fiberboard or a spatula, rub the silicone into the sections of the tabletop, this way you will protect the tabletop from moisture.
https://www.youtube.com/watch?v=
If you have thermofoil, then additionally stick foil on the ends of the cutout, this will additionally protect the cutout from temperature influences.
| Rice. 7. Treatment of the ends of the cutout under the hob with sanitary silicone |
| Rice. 8. Additional protection of the cutout ends with thermofoil |
First of all, you need to determine the type of oven and hob. These elements can be dependent on each other and autonomous. If the first option is chosen, two elements are placed in one niche. In the autonomous version, the hob can be installed in the center of the unit, and the oven in any convenient place where the gas supply hose can be reached.
Connecting the gas oven cabinet and starting it up begins with installing the equipment in the niche of the unit. To do this, the back panel of the niche must be removed and the oven placed on two bars that are pre-attached to the surface of the furniture set. This will ensure ventilation of the oven and niche to avoid fire.
The next stage is connection to the gas supply system. This installation stage involves connecting the oven cabinet and gas pipe using a hose. It is also necessary to connect the hob to the gas pipeline. In this case, you can use a welded pipe connection. Before starting work, do not forget to turn off the gas supply to your house or apartment.
After the gas oven and hob are connected to the fuel supply, it is necessary to configure all functions of the equipment, check the functionality of the burners and the gas control system. The valve responsible for the gas supply is subject to checking and adjustment.
Detailed instructions for connecting a gas hob and oven are presented in the video.
When connecting the oven to the power supply, remember that the wire should never come into contact with the gas pipe. The maximum heating temperature of the conductor should not be higher than 700C. Do not use extension cords or double or triple sockets. All additional wires and connections may cause a fire. Before you start cleaning the oven cabinet, it should be disconnected from the electricity supply.
Installing an oven hob
- The installation of a gas hob is carried out by professionals with extensive experience who are able to solve any problems as quickly as possible. In most cases, the entire job takes about an hour.
- The visit of a specialist to obtain the necessary measurements is carried out free of charge, to any point in Moscow and at a time convenient for the client.
- We work with stoves and ovens of different brands.
- The price for installing a hob in Moscow will pleasantly surprise you. Only favorable prices without overpayments.
Always ready to help with choosing a good hob and oven.
Hob insert
We have a bellows hose and a dielectric coupling, now we move on to installing the gas hob.
Before cutting a hole in the countertop for the hob, refer to the instructions for your hob model. We have attached the following diagrams with recommendations. The hole size according to the diagram is 56*48 cm.
| Rice. 5. Scheme of inserting the hob |
The manufacturer recommends maintaining the following distances to the wall, to the pencil case and to the hood. As for the hood, it would be more correct to study the recommendations for your hood model.
| Rice. 6. Recommendations for placing the hob and hood |
Important!If your gas hob is located on the oven, then when marking the cutout, take this point into account so that the hob does not end up to the side and you cannot secure it properly, or even the countertop, in case of an error, will have to buy a new one. |
Information!For reference, the width of the oven casing is 600 mm, if you remove the thickness of the two side walls by 18 mm, then the internal width of the casing is 564 mm, and the width of the cutout according to the instructions is 560 mm, that is, everything must be done exactly. |
Dismantling the old device
Dismantling a gas stove and then installing a new one is not particularly difficult, but it also requires strict adherence to safety precautions.
- The first step is to turn off the gas supply valve on the lower side (you must make sure that this step is fulfilled, i.e. try to light the burner).
- Then the lock nut is unscrewed and the coupling is pushed down towards the device.
- The kitchen appliance is moved a sufficient distance away from the wall.
- If repair work is planned, and the new slab will not be installed immediately, for safety reasons a plug is placed in the valve at the lower end.
Typical connection instructions
Ideally, it is better to invite a specialist to install gas and gas-electric stoves, but if you are still determined to make the connection yourself, then the installation instructions will help with this. By following it in detail and carefully observing the mandatory points, it is quite possible to cope with this task yourself.
The standard sequence of actions is as follows:
- Free the “object” from packaging materials and all components (baking tray, tray, dividers, etc.), leaving only the protective film, which must be removed after completing all repair work.
- Install the stove in the intended place, maintaining the distance from the wall specified in the attached documentation.
- Using a level and adjustable feet, the working surface is leveled horizontally.
- A flexible hose is connected to the gas pipeline. To do this, the threaded connection is wrapped with a sealant (FUM tape) and tightened with the appropriate wrench.
- Then the gas hose is connected to the device in the same way, using a seal and tightening the locknut with two open-end wrenches. It often happens that the thread at the outlet of the plate has a pitch of 3/8′, then an adapter is installed that comes with the device.
- The last step is to check both connections for leaks, which is carried out using a soap solution. In this case, thick foam is generously applied to the joints (with a brush or hand) and the gas supply valve is opened on the lower side. If bubbles appear at the joint, the tap is turned off and the defective connection is redone. If the surface remains level, then there is no gas leak, which means the new stove is installed correctly.
- At the end, the functionality of the burners and oven is checked.
The video will help you understand more clearly how to properly install a gas stove yourself.
How to connect a gas oven
- Prepare the gas oven for installation: carefully remove it from the packaging and check for mechanical damage.
- Remove the old gas oven, if available.
- Connect to the electrical network and connect the gas hose.
- Install the oven into place.
- Check the entire connected system including all connections for gas leaks. (There is a special device for this.)
- After connecting the gas oven, you should check the device for functionality.
You do not have to purchase gas hoses yourself to connect the built-in stove and oven; we will always have the necessary materials for you, including flexible bellows-type hoses for gas.
| From January 1, 2009, when connecting (installing) gas appliances or replacing gas hoses, the installation of dielectric inserts must be provided! |
Attaching the hob
Before installing the hob, it must be connected to the bellows hose; I remind you that the gas hose must be connected by a specialist.
On the edge of the inside of the hob, stick the self-adhesive sealant that comes with the hob; the sealant is similar to the sealant for installing a sink.
| Rice. 9. Connection of the gas hose to the gas surface |
Additionally, we applied sanitary silicone to the edge of the hob to ensure reliable sealing; after installation, we remove excess silicone with a rag.
| Rice. 10-11. Hob sealant |
To secure the hob, there are special brackets that come with the hob. With a hook, the bracket clings to narrow grooves in the inside of the hob body; through the groove in the bracket itself, we use self-tapping screws to attach the brackets to the side walls of the oven body.
| Rice. 12. Brackets for fixing the hob |
| Rice. 13. Fastening the hob using staples to the sides of the chipboard oven body |
| Rice. 14. Hob and electric oven installed |
If you paid attention, you saw that my hob is in reverse. That is, the handles for gas supply and electric ignition should be on the right, but for me, on the contrary, on the left. As a result, the gas hose approaches the hob not from the right behind, but from the left in front.
We had to do this because we had a sink next to the cooking area and splashes could get on the control knobs; I couldn’t really move to the left, there’s a boiler there.
As further operation showed, there were no problems with this arrangement. But, if your hob is located at a sufficient distance from the sink, then carry out the installation as usual.
| Rice. 15. Location of the gas hose if the hob is not in the normal position |
Connecting the oven and hob
The rules for installing a gas oven and gas hob are not particularly complicated.
Tools and materials for work
You will need:
- set of adjustable wrenches;
- manual milling machine (jigsaw, saw);
- tape measure, marker;
- gas hose and steel (copper) tube;
- gas winding;
- connecting elements;
- sealant.
Before installation, determine the location of the devices. If they do not depend on each other, then they can be placed in different parts of the kitchen furniture, the main thing is that the hose is long enough. If the oven is connected to a panel, then they should be installed in the same section of furniture.
Important! Gas household appliances are connected to the main pipeline only in the section located after the tap that shuts off the gas supply.
Before work, turn off the gas for safety.
Step one
First, place the equipment in the niche of the furniture. To install the oven, you need to remove the back wall of the furniture and place the device on wooden steps (blocks). This is necessary to ensure high-quality ventilation (otherwise overheating and subsequent fire may occur).
Step two
Connecting household appliances to the electrical network. This is needed for grilling, ignition, lighting, fan and more. Use the instructions for the device.
Important! Sockets in the kitchen must be grounded. Remember to first turn off the power supply and use only insulated tools.
Step three
We join the main gas pipeline. First, turn off the gas supply to the apartment (house). You will need to connect to the central gas supply via a non-flexible steel or copper pipe if the cabinet is located very close, or via a flexible bellows hose if the appliance is to be located further away.
Important! We remind you that the hob and oven must have two gas supply lines with separate taps.
After the tap, a dielectric gasket is installed to break the electrical network. The length of the gas hose should be no more than 2 meters; it should not be kinked. Make sure that there are no moving objects within the radius of the gas hose that could subsequently pinch it.
Step four
Let's understand the hob:
- It has two outlets for the gas hose, use the diagram to make it clear which one is made for a gas cylinder and which one is not.
- Use a saw to make a hole in the countertop for the panel. Use a special template.
- Use a level to check that the surface is level.
- Apply sealant along the joints.
Step five
The last step is to check the functionality of the gas oven and hob after connection:
- Turn on the gas supply to the apartment and electricity.
- Remove protective films and plugs.
- Check the operation of the burners and oven one at a time.
- Don't forget to check the gas control function. Almost all ovens and many models of hobs have it.
- If necessary, adjust the gas supply valve.
Important! When you are ready to carry out a “general cleaning” of gas household appliances, do not forget to turn off the gas and electricity supply to them.
We told you how to connect a gas hob and a gas oven to gas. If you are sure you can handle it, try doing it yourself. Although gas is not something to joke about, turning to gas workers will be safer and more reliable.
Share on social media networks:
Is it a violation to install the stove yourself?
Despite the fact that replacing one appliance with another (equivalent in number of burners) is not in itself a violation, it is strongly recommended that you call a gas service representative before using it to check the correct installation, make the necessary changes to documents and register the appliance.
Also, despite its apparent simplicity, the initial installation of gas stove modifications in new buildings with your own hands is strictly prohibited and is carried out by certified specialists, so the question of whether you are allowed to do this yourself does not arise.
Installation and connection of the electrical cabinet
The built-in oven may well be gas. However, such a connection to the network can only be carried out by gas service specialists - all these nuances are carefully controlled by them.
Advice! Before connecting the oven, the gas supply to the apartment is shut off. Therefore, it is more profitable to install the hob right away.
The connection process consists of connecting the oven to a pipe that supplies gas to the kitchen using special gas hoses, and the gas source must be located at a distance of up to 1.2 m from the oven.
Before the final switching on of the equipment, the gas must be checked for inclusion - as soon as a characteristic smell appears, the gas supply is shut off again until the problem is resolved. Upon completion of the work, the equipment is connected to the electrical network (ignition and lighting operate from electricity).
The traditional way to install an oven is to make a special cabinet, although you can find many options for installing ovens in pencil cases together with other built-in appliances.
The oven cabinet is made 720 mm high, excluding the height of the adjustable plastic legs, and 600 mm wide, the body depth is 560 mm, which exceeds the depth of the standard body 522 mm.
Attention!When designing a cabinet for a built-in oven, be sure to study the installation diagram from the instructions for your oven. |
In our instructions, the size of the opening for installing the oven is 595*595 mm - this is the standard, but there are ovens of other sizes, so be careful. By the way, in the diagram you can also see that the depth of the oven housing should be at least 560 mm.
| Rice. 16. Electric oven installation diagram |
| Rice. 17-18. Oven cabinet body |
A metabox of the smallest height is installed in the lower part of the oven housing; read in detail about metaboxes on the page about metabox guides.
Attention!When designing the drawer, be sure to leave at least 595mm of height space for the oven. The oven body is made without a back wall, so that excess heat has somewhere to go. |
| Rice. 19. Oven body, rear top tie panel located vertically |
| Rice. 20. Drawer at the bottom of the oven cabinet |
We attach thermal insulation strips to the ends of the side walls of the oven housing; they are purchased separately; read more about such strips in the article about the secrets of a reliable kitchen.
Thermal insulation strips will protect the facades on adjacent buildings, this is especially important if the facades are film. Otherwise, the film may peel off and you will need to buy new facades.
| Rice. 21. Installation of thermal insulation strips |
All that remains is to connect the stove to an outlet and install it in the housing. The electric oven body is attached with self-tapping screws to the ends of the oven body through standard holes.
By the way, the ovens are sold without a Euro plug; you need to buy it separately. Read how to connect a Euro plug on specialized websites or trust an electrician to do it if you are afraid.
As for preparing the wiring for an electric oven, this is also not the topic of a furniture site. In our case, the house is new and everything has already been taken into account; all that remained was to connect the plug to the outlet, or rather to the extension cord.
| Rice. 22. Electric oven before installation in the cabinet |
| Rice. 23. Scheme of attaching the oven to the cabinet body |
| Rice. 24. Installing an electric oven |
It is easier to install an electric oven yourself than a gas oven. Before installing the oven, the following conditions must be met:
- required distance from the nearest surfaces: between the side walls of adjacent bedside tables and the kitchen wall - about 5 cm, distance from the floor 5 - 9 cm.
- It is advisable to set the oven itself strictly according to the level; inaccurate installation can lead to disruption of its operation.
- Next, the oven is screwed to the side walls of the installation cabinet or to additional wooden planks fixed to the walls of adjacent kitchen cabinets.
The main difficulty when installing an electric oven is the question of how to connect it to the electrical network. Most ovens are designed for very high power consumption, so not every wiring can handle the load. When deciding how to properly connect an electrical cabinet, you have to install an additional line to connect to the power panel and install a separate circuit breaker.
An electric oven is much easier to install than a gas oven, you just need to follow the basic rules
Manufactured oven models provide two ways to connect to the electrical network: through a plug with a socket or directly through a socket.
In the first case, the plug and socket are selected according to the maximum current: for a stove with a power of up to 3.5 kW. they must be rated for a current of 15 A, with a power of up to 5 kW. this value increases to 32 A. A three-pin socket and plug with grounding are used (usually a yellow-green wire), contacts with a white and blue wire are connected to the network.
When connecting via a screw terminal block, color coding is also observed.
Preliminary remarks
When connecting the oven and hob, a number of requirements must be met regarding wiring and circuit breaker:
These include:
- the wire is known to be in good condition;
- withstands prolonged maximum load;
- contains the required number of working conductors, neutral and grounding;
- complies with all safety standards.
When choosing a machine, it makes sense to be guided by the values of 25 A with a total load power of up to 5 kW and 32 A with a higher power (see table below).
Table. Limit parameters of 220-volt single-phase wiring for cables with a core cross-section of 4 mm2.
POPULAR WITH READERS: How to connect a 380V electric motor to 220V
| Exposed wiring or box | Closed wiring (in a groove) | |||
| Core material | Copper | Aluminum | Copper | Aluminum |
| Current, A | 41 | 32 | 27 | 21 |
| Power. kW | 9 | 7 | 5,9 | 4,6 |