It is impossible to imagine a kitchen without some household appliances. One of them is the oven. It is thanks to him that we can prepare delicious and healthy dishes. The built-in oven can be powered by electricity or gas. If your house is connected to a main gas pipeline, then the choice in favor of a gas oven is obvious. With the help of our instructions with photos and videos, anyone can connect the oven on their own.
What you need to know about installing an oven
Installing a built-in oven, although a responsible matter, is not as complicated as it might seem at first glance. Typically, the installation of built-in household appliances is carried out during the assembly of furniture. If you bought an oven of this design after the furniture was installed, this may lead to some problems. For example, a niche for this household appliance may have a different size than the oven.
The niche for placing the gas oven should be located close to the gas pipe
Modern ovens can be dependent (installed together with the hob) and independent (installed separately with the hob). The second option is more preferable, since the oven can be installed at a convenient height for working with it. And the absence of a hob in such a household appliance makes its installation easier.
Installing a gas oven is not much different from installing an electric oven. Such a household appliance is connected to the main gas pipeline using a flexible hose. In this case, the connection must be completely sealed.
Attention! The gas oven is installed no further than 1.2 meters from the connection point with the main gas pipeline.
Another point to consider is the space for ventilation. Each manufacturer indicates the parameters of such an indentation in the documentation. They must be adhered to.
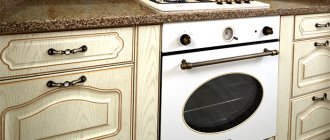
The dimensions of the cabinet must exceed the dimensions of the oven
When installing an oven in a niche, it is important that there is no wiring or water supply running behind it on the wall, and that there is no socket on the wall.
Possible problems
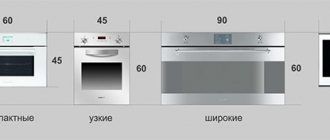
The main problem with installation is the height of the oven. At the same time, the strict dimensions of the niches should seem to correspond to the technical parameters, but in reality, ovens with handles may not fit into niches with a height of 598 mm. If the oven has a front control panel, a niche of at least 600 mm is required for it.
The design of the oven should not be changed if:
- the device is under warranty service;
- you don't understand anything about electrical engineering.
If during the warranty period you decide to return an unsuitable device, they will accept it from you. However, the following cases will be considered an exception by the warranty service personnel.
- Traces of attempted opening. These could be removed seals, cut bolts, or other signs.
- The components or mechanical parts of the device have been damaged by rodents that you may have at home.
- The manufacturer's recommendations were not followed when transporting the device.
- Unsuitable voltage parameters caused damage to the electrical part of the device. Critical possible limits are usually indicated by the manufacturer in the instructions.
READ MORE: How to make paving slabs with your own hands at home - step-by-step instructions
Door hinges of devices, power regulators, elements responsible for heating, ignition, thermostat, sealing rubber bands, rods, retaining springs - all these are elements that often become a problem for owners home appliances. If a cracked power regulator does not interfere with the operation of the appliance, but only causes discomfort, then a broken heating element will make it difficult to use the oven.
You can continue to comfortably use your oven only after the repair is completed. It is permissible to carry out minor repairs yourself. After all, original spare parts for common branded devices are by no means in short supply. For complex repairs, it is better to call a specialist at home or take your equipment to the nearest workshop.
Gas hose installation
- Check the contents and make sure there are no mechanical damages. After receiving a gas oven from the store, it is important to check it for mechanical defects that may have appeared during transportation and check the package contents.
- Connection to the gas pipeline. Then we connect the gas hose to the central gas pipeline. Before installing the gas hose, a dielectric insert must be installed in the faucet, which does not transmit electricity and does not allow it to pass to the hose and the gas appliance.
Gas pipeline connection point
- If the built-in oven is connected instead of a conventional gas stove, then turn off the old household appliance. To do this, turn off the shut-off valve and screw the tee onto the outer pipe. It is necessary to supply energy not only to the oven, but also to the hob. Both hoses must have their own taps in order to cut off the gas supply to each of these two kitchen appliances. This is necessary for comfortable work with them in the future.
- The flexible hose is connected to the household appliance by simply screwing the nut onto the thread. But to ensure tightness, it is necessary to use a special gasket at the point of such connection. It must first be lubricated with grease.
Attention! When tightening the nut, it is important not to overdo it. Otherwise, you can break the thread!
Can it be placed next to a gas pipe?
The main gas supply system is characterized by increased danger. All rearrangements and redevelopments in houses with gas are regulated by relevant standards. If the rules are violated, gas company inspectors have the right to issue fines. For example, it is prohibited to hide a gas pipe behind walls, niches and partitions.
The gas pipe cannot be located under the sink or behind the dishwasher; the same rule applies to installing an oven. There must be at least 0.3 meters of free space to the side parts of the equipment. The ventilation duct, window/door openings and chimney should not come into contact with this element of the gas system. The electric wire with the gas pipeline can be at a distance of at least 0.1 meters.
The installation of gas shut-off valves must be carried out in accordance with strict requirements. For example, the place must be easily accessible; the permissible height is 0.8 meters from the floor. There should be a distance of 0.2 meters from the gas appliance. This is if the device is installed at the bottom, and the permissible values for the top installation are 1.5 meters from the surface.
READ MORE: Installing a shower drain in the floor under the tiles
Welding is allowed to connect devices. Threaded connections are possible at the installation point of the shut-off valves, as well as at the junction of the pipe and the device.
Electrical connection
Many modern gas ovens have an electric ignition system. For the system to work, you need to connect the kitchen appliance to the electrical network. It is important that the cable through which electricity will flow is not subject to heating.
Electrical connection
After the oven has been connected to the central gas pipeline, you need to check the connection location. In general, this should be done by gas service specialists. But if you connect to the main gas pipeline yourself, then it is important after such a connection to make sure that the gas is “poisoned”.
Attention! The reliability of the connection between the hose and the gas main pipe and the oven outlet must be checked after connection. This can be done using bubble liquid. It must be applied to the joint. The appearance of bubbles after filling the pipe with gas indicates an unreliable connection.
Installing the oven in place and checking its functionality
After the oven is connected to the gas line, it must be securely fixed in the furniture niche. To do this, use the fasteners that come with the household appliance. Self-tapping screws can be used for this purpose.
Some oven models are equipped with mounting strips. They are attached inside the sides of the box and make it easier to install this kitchen appliance.
Before cooking in your new oven for the first time, wash it thoroughly.
After connecting the oven to the gas pipeline and installing this household appliance in place, you need to check its functionality. We turn it on according to the instructions and check the indexing and heating. If everything works fine, then increase the oven power. Leave this household appliance for a few minutes. If there is a burning smell, don’t worry. This is the factory lubricant burning out.
Connecting the cable to the oven
If you connect the oven to the mains, it is very important to comply with all the requirements specified in the device data sheet. Regarding connecting an electric oven, it should be said that it is important to take into account the state of the network, and also make sure that there are no voltage surges. Because otherwise, you risk saying goodbye to your device.
To 220 V network
Are you wondering which machine to put on your oven? Remember that it is important to maintain the power ratio and the safety of the devices. Connection to a 220 V network should only be made with a three-pin plug, as well as with grounding. It is also worth remembering that when connecting the oven to the network, there must be three jumpers.
To 380 V network
If there is no plug, but you want to connect kitchen appliances to a 380 V network, you do not need to connect it yourself. There are many qualified specialists in Moscow who can help you connect the plug to the oven.