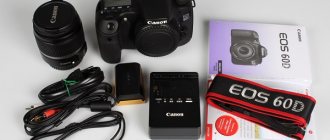
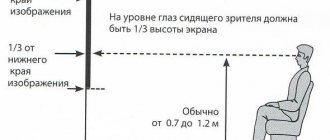
When buying your first DSLR camera, you have a great opportunity, first of all, to take high-quality photos in low light . This could be filming at home, in a cafe at a holiday, at your children's graduation party, or at an event in a large hall.
indoor photos still turn out dull, blurry and not clear. How to avoid this? How to set up your camera to take great photos? This is exactly what we will talk about in this article.
Indoor photography can be divided into two categories : with flash (external) and without flash. Each category has its own advantages and disadvantages . Let's take a closer look:
Photo indoors without flash
This is the first thing an amateur photographer encounters when purchasing a DSLR camera. After all, there is no external flash yet, and the built-in one only spoils the frame, giving it the look “as if from a point-and-shoot camera.”
Therefore, to get great photos you will need to do the following:
— Set the shooting mode to Manual . In this mode, you can adjust the shutter speed and aperture yourself.
— Open the aperture . Those. if you have a Nikon AF-S DX Nikkor 18-105 mm F 3.5-5.6 G ED VR lens, try to always keep the f/ value minimal (f/3.5).
— Go to ISO and set AUTO-ISO: 1600 . This means that the camera itself will set the ISO value (photo sensitivity) in the range from 100 to 1600.
— All that remains is to set the shutter speed correctly. If you photograph sedentary people (who are sitting, standing, posing, etc.), feel free to set the shutter speed to 1/40s - 1/60s . But if your task, for example, is to photograph children in motion, then the shutter speed should be at least 1/125 or shorter.
That's basically all. These are the basic settings you need for low light photography. Remember, if your pictures turn out dark , then you can raise the AUTO-ISO to 2000 or higher, and also set a longer shutter speed, say 1/20s - 1/10s . (but in this case, you need to hold the camera steady so as not to get blurry shots due to hand shake).
The main thing is practice ! Remember, if you are shooting during the day, try to place your subject next to open large windows and sources of natural light. In this case, the results will be much better if the windows are covered with curtains. In the dark, try to turn on all kinds of lamps/chandeliers/lights, etc. to ensure a large amount of light falls on the camera sensor.
How else can you improve the quality of your photos?
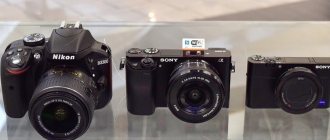
You must understand that even if you buy a camera for $1000 , which comes with a standard (kit) lens, you will not always get perfect pictures. The reason for this is the lens , because This is the most important part in the camera. Basically , the quality of your photos depends only on the lens. Therefore, pay attention to high-aperture optics . For beginners, I strongly recommend purchasing a 35mm f/1.8 or 50mm f/1.8 prime lens , because... they have a huge aperture ratio, which will help you when shooting in dimly lit rooms, and their price of $200-300 will be affordable for everyone, and they also have focal lengths acceptable for shooting.
But keep in mind that using a prime lens you will not have the opportunity to “zoom”, i.e. zoom in/out. If for some reason you are not satisfied with such lenses, pay attention to fast zooms . They are much more convenient than fixes, because... They save you from having to walk back and forth to zoom in/out on your subject, but they have two drawbacks:
1. This is the price . Such lenses are much more expensive (at least 5 times) than regular 35/55mm primes.
2. Aperture . All existing zoom lenses currently have an aperture of f/2.8.
Lesson 6. Photographing indoors
In today's modern world, man has long become a part of society. We live in large, densely populated cities and spend a significant part of our time indoors. From our apartment or house we go straight to our offices, from there to a cafe or canteen for lunch, and then home again in the evening. On weekends we go to shopping centers, restaurants, night clubs. We appear on the street extremely rarely. It turns out that we spend the lion's share of our lives indoors.
So what do we photograph indoors?
We often photograph indoors. These could be portraits of our loved ones, or group shots of friends, or shooting sports competitions in gyms or matinees in kindergartens and schools. All these photographs can be combined into one category - indoor photography.
Compared to an open space, a room is a place where light penetrates in limited quantities. Therefore, when photographing, a lack of light may occur. Perhaps for some it will be a discovery that the word “photography” is translated from Greek as “painting with light.” A photographer literally uses light as the raw material to create a good photograph. Light is necessary for a photographer as paint is for a painter, as clay and granite are for a sculptor. That is why light is necessary for a photographer like no other.
Let's look at specific situations that occur most often:
When using the flash in a portrait, red-eye may occur, so set the flash to red-eye reduction mode, which is usually indicated by an eye symbol.
But remember, if the person being photographed is not looking at the camera, then this function will not work. Red eyes only disappear if the person being photographed looks directly into the camera lens.
Let's say you only have a built-in flash in your arsenal, and you want to take good photos. Even in such a situation, you can get some pretty cool effects using your wits and an ordinary cosmetic mirror.
When photographing a person, place the mirror in front of the flash, tilting it slightly forward or to the side. You need to try to be closer to the surface into which the mirror reflects the light of your flash. If you angle the mirror to the left, the light will bounce off the mirror to the left toward the wall and reflect back off the wall. Exactly the opposite, this happens if you point the mirror to the right. If you point the mirror up, the light will be reflected down from the ceiling. You can't go down like that!
If you do not have a built-in flash, then it is advisable to turn on all the lights in the room, or move the lighting fixtures closer to the subject. Or you can ask the person to move closer to the lighting fixtures so that their face is illuminated brighter.
Pay attention to how the shadows fall - are they beautiful, is his face visible, is the person’s appearance distorted (does he look like a monster).
Leonardo Da Vinci also recommended directing the light slightly from above when portraiture.
During daylight hours, you can also use the light coming from the window. It is bright enough and therefore we can safely use it. In this case, try to bring the person closer to the window, but not with his back, but with his face. This will allow light to reach his exterior. Here you have the opportunity to turn a person not only directly to the window, but also sideways, which allows you to diversify the lighting effects.
Sometimes it is important for us to show not just the person in the photo, but also the place where he is, for example, a wedding hall or a room decorated for a holiday. Here the problem arises of how to make both the person and the room look good.
If you intend to use flash in this situation, you're in for a tough time! Choose the darkest corner of the room, where there are no light sources at all. Ask your model to move to this very place. And take a position yourself so that you can see both the model and the necessary room behind her in the frame. In this case, you will see the following picture on the display: Against the background of a fairly well-lit room, a dark figure of a person can be seen, but don’t worry, the flash will do its job and illuminate your model as expected. You'll get a great shot of a well-lit model against a well-lit background.
In this case, use backlight if Portrait mode will not activate the flash.
If you do not want to use the flash, you need to do something differently. Choose a location for the model that will provide even illumination of the model's face and surroundings.
You can use the “Portrait”, “Beautiful Photo”, “Face Retouching” modes for this situation.
If you want to make the photo lighter, use the “Text” mode, and if yellow shades bother you, then use the “Dawn” mode. It automatically neutralizes yellow tones.
When photographing a group of people, you need to follow some guidelines:
Take several shots, as in a group of people someone may blink and appear in the photo with their eyes closed. To avoid this, protect yourself with additional personnel.
If you're shooting without flash, position people so everyone is well lit. Try to avoid lighting differences, don't let more light shine on someone than on others.
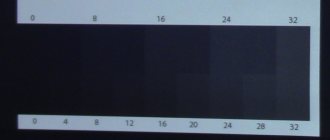
When photographing a group of people, do not use a zoom value of 18 or less. Try to bring this value closer to “35” if the room allows it. Usually it is necessary to move a little further to capture the entire group. But you can always ask people to sit more compactly. If it is not possible to move further away and there is nowhere to seat people more compactly, ask people to lean a little towards the middle so that their heads do not end up in the corners of your photo. Remember that a value of about “18” or less will noticeably distort the shape of a person’s head if it is in the corner of the frame.
Fig 6. Portrait shot at lens value “18”.
Fig 7. Portrait shot at lens value “35”.
In addition, people standing on the edge of the frame will appear fuller than they really are. In this situation, your ingenuity can save you again. Place the skinniest people on the edges of your group.
If we use a flash, then we need to turn on the flash mode to remove red-eye. It is imperative to attract the attention of all participants to the camera lens.
If possible, arrange people in a group photo according to the color of their clothing so that those dressed in black do not stand next to each other, otherwise they will merge into one dark spot in the photo. If among them there are people in light clothes, put them between people in black. Try to group people by height: taller in the middle, shorter at the edges, and vice versa.
If we are shooting indoor action, we may need a flash. Especially if there are no bright lighting fixtures in the room and direct sunlight does not penetrate, then a flash will definitely be needed. With cameras that do not have a built-in flash, you can shoot movement in a room only if direct sunlight penetrates into it, or very bright devices, such as stage lighting, are installed in these rooms.
To fully capture movement, you can set the “CHILDREN” mode with the flash on for slow objects, the “Sports” mode with the flash on for faster objects, or “Freeze Frame” in both cases.
Congratulations, you have completed the “Photographing Indoors” lesson. Now you can view the "Examples" section, where our teachers share their tips and start completing assignments, after which your work will be reviewed by a personal instructor. The best student works will be included in the Photo Gallery and will be available to all users. We recommend paying attention to the execution of these pictures for a better understanding of the task.
The simplest option for a good photograph is when a person stands near a window, while he is turned relative to the camera towards the window. The shadows fall on his face and it makes for a good shot. This technique is used quite often; the light from the window is the favorite light of photographers!
The lamp is a universal light! Photographers love to work with artificial light (lamps, lamps, professional studio lighting), as they allow them to control the situation. Therefore, do not be afraid to move the person relative to the lamp and vice versa, move the lamp relative to the person. Pay attention to the shadows, sometimes they are beautiful, sometimes not so much, the rest is a matter of taste.
These simple recommendations will help you take good pictures and make it easier to complete the lesson tasks.
Photo indoors with flash
No matter how much you love shooting without flash , even with professional high-aperture optics, there is not always enough lighting to take a good shot. For example, in this photo, taken indoors , you can’t do without a flash, although it was shot with a professional fast zoom lens Nikkor 24-70 f/2.8 , costing more than $1800:
I would like to immediately note that by flash we mean not a built-in flash, but an external flash . Only with it you can achieve excellent results by evenly illuminating the subject. When shooting with an external flash, you should set the following settings:
— Shooting mode: Aperture priority ( A - in Nikon models, Av - in Canon models on the mode dial). This mode allows us to adjust only the aperture, and the camera sets the shutter speed itself.
— If you are not yet well versed in ISO settings, you should set AUTO-ISO: 800 , or even less, because When shooting with flash, you don't need high ISO values.
— Set the flash pulse power . This is done on the flash itself using the more/less buttons, i.e. If you get dark images, set the pulse power to plus (+); if you get very overexposed images, set them to minus (-).
We've sorted out the settings, now we need to understand the technique of shooting with an external flash . Its main advantage is the rotating head , which allows you to direct the light pulse in different directions.
Always try to point the flash head not directly at the subject, but to the side , so that the light reflects off the nearest wall and falls evenly on the subject. Surely you have noticed that professional photographers always have the flash head turned up/towards the side? This is done in order to reflect light from the ceiling/walls and evenly illuminate the person being photographed.
When you simply have nowhere to reflect the light , i.e. There are no walls next to the subject, and the ceilings are too high, take out the reflector (white paper, found in almost all modern flashes). The light will be reflected from it and also fall evenly on the person.
Pointing the flash head directly “ at the forehead ” is only worthwhile in cases where you are far from the subject being photographed (more than 3-4 meters).
CONCLUSION
Analyzing this article, we can come to the conclusion that the ideal option for indoor photography would be to have both high-aperture optics and a good external flash . After all, high-aperture optics allow you to take excellent shots with complete immersion in the atmosphere of the image, i.e. “as is”, the photographs come out alive and real. And the use of an external flash will always come in handy in those moments when the illumination of the room is extremely low and no optics can cope with its task.
And if you combine these two methods (shooting with high-aperture optics + external flash), you can get such wonderful shots:
Do you have any questions about indoor photography or interior photography? You can ask them in the comments to this article, consultations are free and free of charge for everyone! © Phototricks.ru