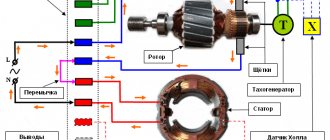
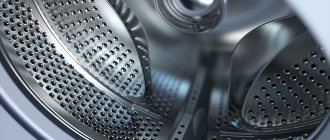
Today, bearings are used in almost all mechanical devices, including automatic washing machines (hereinafter also referred to as SM, ASM). The main task of the bearing is to minimize friction between the surfaces of the shaft and sleeve moving relative to each other during rotation. According to their design, modern bearings are divided into several varieties. In modern SM drums rotate on ball bearings, as well as on their roller “counterparts”. We will tell you about replacing the bearing in an Ariston washing machine in our article.
Modern plain and rolling bearings
Causes and symptoms of bearing wear in washing machines
Ball bearings are designed for a long service life, on average up to 10 years. In order for the devices to work for a long time, their parts are well adjusted and generously lubricated with special substances. To prevent water from entering the mechanisms, the bearings are hermetically sealed with seals made of special types of rubber or caoutchouc.
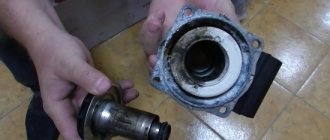
Bearing and seal covering it in a washing machine
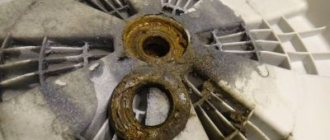
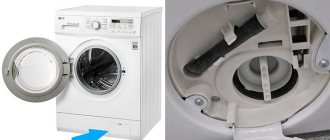
During washing and spinning, the drum rotates inside the tank on ball bearings mounted on the shaft. Replacing bearings in an Ariston washing machine, as well as other well-known brands, is inevitable after water gets into mechanical parts. This occurs due to damage to the seals, which lose their elasticity over time. The reason is exposure to an external aggressive environment: water and detergents. Water accelerates wear of parts by washing away lubricant.
Washing machine bearing corroded due to water getting inside
Accelerated wear is caused not only by damage to the seals, but also by improper operation of washing machines. If you often load a large amount of laundry into the AFM and spin it at maximum drum speed, high loads lead to the following symptoms:
- strong vibrations and hum while spinning clothes;
- play of the drum when it rocks, which can be felt with your hands;
- slow rotation or jamming of the drum during washing and spinning.
If signs of a defect are evident, replacing the bearings yourself requires preliminary preparation.
Preparing to replace the bearing
To get started, you need to have a set of tools for disassembling the unit:
- pliers and platypuses;
- a set of slotted and Phillips screwdrivers;
- adjustable wrench and set of open-end wrenches;
- metal rod;
- removable device for bearings (preferably, but not required);
- sealant and WD-40 fluid;
- hammer.
A set of tools for replacing bearings in a washing machine
It should be noted that bearings are quite easy to change in models of the Margarita 2000 series - such as AVSL 109 and others, with metal and plastic tanks that can be disassembled. But there are other models of machines with a non-removable tank made of plastic. In these cases, you will have to purchase and replace the entire expensive unit.
Some craftsmen manage to cut a non-separable plastic tank, change the bearings and oil seal, and then glue it together with sealant and fasten it with self-tapping screws. But the consequences of such repairs are unpredictable - the tank can leak at any time, as it experiences heavy loads during spinning.
Before you change the bearings on your Hotpoint Ariston washing machine, you need to purchase the same new ones. The markings can be found in online stores that sell spare parts for ACM. New seals for ball bearings also need to be purchased. In the place where the repairs will be carried out, you need to free up a free space of at least 3-4 m2. A free perimeter around the machine is necessary for access to all its components.
Changing the bearing
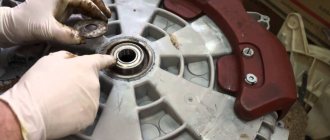
Now we have to disassemble the plastic tank of the Ariston washing machine. We start by removing the pulley - this is one of the difficult moments, since the pulley is screwed onto a screw with locking paste. To unscrew it you will have to be patient. You can unscrew it using a hammer and chisel, gently tapping the screw, or you can use a durable T40 size bit and a holder.
The bit is screwed into the axis of the screw, and then, grasping the bit with the holder, you need to rotate the screw counterclockwise. Using a marker, you can mark the correct position of the pulley so that you can put it back on without any problems. Remove the pulley by pulling it towards you with a rocking motion from side to side. Once you remove it, you will see the outer bearing and the end of the shaft that needs to be knocked out of the tank and drum. This is done like this: a wooden block is placed on the shaft, which is struck with a hammer.
Important! If the shaft does not come out and a lot of force is required, then it is best to screw an unnecessary bolt into it and apply blows to the bolt.
Next, you need to divide the tank into two parts. In some models of Ariston washing machines, they are fastened together with bolts, which can be unscrewed to disassemble the tank. The part of the tank on the cuff side can be removed from the drum quite easily . The second part will need to be carefully knocked off the drum so as not to damage the plastic. Having released the drum from the tank, inspect the wear of the shaft sleeve, to do this, wipe it with a cloth and put on a new bearing; if there is even a small play, the shaft together with the cross will also need to be replaced.
If the tank is not disassembled, but is solid, then it will have to be sawed along the seam; see how to do this in this video recording.
And finally, we take on the bearings. First, the outer bearing is knocked out. This is done using a metal rod and a hammer. We rest the rod against the bearing rim and apply a small blow with a hammer, then change the position of the rod and strike again. So we knock the bearing in a circle. After the bearing is removed, turn the tank over and knock out the second bearing from the inside in the same way. Together with it we take out the oil seal.
Note! It is most convenient to use a special bearing puller rather than a hammer. A universal puller can be useful not only for repairing a washing machine.
Having pulled out the bearings, we clean them from dirt and wipe the holes where they were inserted with WD-40 liquid to get rid of rust, and then lubricate them with a special lubricant or Litol-24 lubricant.
Now we install the bearings, starting with the inner one. Gently drive it in using a rod and a hammer, moving the rod crosswise along the outer rim of the bearing. We place a seal on the bearing and coat it with waterproof grease. The outer bearing is driven in in the same way. Next, we assemble the tank, performing the steps in reverse order, using our own photos or videos.
Important! When assembling the two halves of the tank, it is necessary to clean the joint, lay a rubber gasket and apply silicone sealant. Then just connect the parts together with bolts.
We also assemble the machine step by step, proceeding in reverse order. Take your time, be careful and careful.
In conclusion, we emphasize once again that replacing bearings in any washing machine is considered a rather difficult job. For a better understanding of this work, you can watch the video below. But if, after watching the video, you are even more convinced that you cannot replace this part in the washing machine with your own hands, then feel free to take it to the service center.
Disassembling the washing machine to remove the cross
Below is the procedure for replacing parts in the Ariston Margherita 2000 AVL 109 washing machine with a stainless steel tank. A special feature of this model is that the tank does not have to be removed from the housing. It is enough to remove and remove the crosspiece, which contains two bearings and an oil seal. It is located at the rear of the tank. The work is performed in the following sequence.
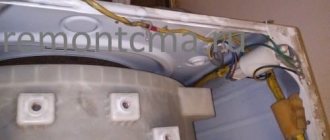
First, the top and then the back panel of the case is removed. To do this, you need to unscrew 2 screws on the top cover, and then 6 more on the back.
Ariston washing machine back cover with drain pipe
Once the back cover is removed, the belt that drives the drum is exposed. It must be carefully removed. After this, you can remove the pulley on which the belt was placed. It is held on the shaft with a bolt. The pulley must be fixed, and then the bolt must be tapped with a hammer through some copper die. This is done because the bolt was screwed together with the sealant, so it will be very difficult to unscrew.
Drive belt and drum pulley
The upper counterweight is removed by unscrewing two bolts.
Top tank counterweight and two mounting bolts
Access to the cross appears. To remove it, you need to unscrew all the mounting bolts - 8 pieces, 4 at the top and bottom. In order to get to the bottom screws, the machine will have to be placed on its side.
Unscrewing the upper mounting bolts of the crosspiece
After the cross is released, it must be pulled off the drum shaft and removed from the tank. If you have a bearing puller, use it. If it is not there, you will have to remove the plastic plugs from the CM body located in the places where the bolts were located for transportation.
Plugs in the locations of transportation bolts
It is necessary to carefully pick up the ends of the cross with a long flat screwdriver through the holes in the case and pull it towards you.
Screwdriver in the socket for transport bolts
Another option is to screw a bolt of the required size into the shaft hole and lightly hit it several times with a hammer, trying to push it down.
One of the ways to pull the cross off the shaft
The crosspiece is removed from the body. Now you can begin replacing the bearings and seal.
Crosspiece with bearings removed from the machine body
How to replace a bearing on an Ariston washing machine
Contents:
The bearing assembly is one of the main parts of an automatic washing machine, since it connects the pulley and the drum shaft. Using a pulley and a drive belt, torque from the engine is transmitted to the drum of the washing machine.
The bearing is installed on the axis of the washing machine drum and acts as a connecting link between its shaft and pulley
Typically the assembly includes two bearings.
One of them is located on the outside of the drum and carries the main load, the second has a smaller load and is located inside the drum.
An important part of the assembly is the oil seal - a sealing rubber collar that protects the bearings from contact with water.
The bearing replacement kit includes a rubber seal that is installed at the same time as the metal parts.
In this article we will tell you how to replace the bearing in an Ariston washing machine, for example, in the Avsl 109 or Margherita 2000 models. The same recommendations apply to household appliances manufactured under the Hotpoint brand. First, let's figure out why the part fails and how to determine its malfunction.
Why do you need to change the bearing?
The average service life of a unit is from 6 to 10 years. After this time, the oil seal begins to lose elasticity, water from the tank gets onto the metal parts, washes away the lubricant, and the bearing becomes deformed.
Bearings can “knock” before their allotted time if, for example, you constantly overload the washing machine tank during washing. Factory defects in parts cannot be ruled out.
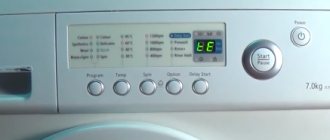
If you notice that there is a knocking and grinding sound when spinning the washing machine drum, this means that the bearings need to be changed urgently. Do not delay replacing parts - deformation of the oil seal and bearing can lead to breakage of the washing machine shaft and other expensive parts.
Preparing for replacement
So, you are convinced that your washing machine needs to replace the bearing, and you are determined to do the work yourself without involving a technician. Where to begin?
First of all, you need to prepare a new set of bearings, including an oil seal. It is best to purchase original spare parts from the manufacturer, even if they cost more than their analogues. Replacing a bearing with your own hands is a labor-intensive process, so, you see, it is better to supply a high-quality part and not return to this issue again.
For repairs you will also need:
- flat and Phillips screwdrivers;
- chisel or impact screwdriver;
- hammer;
- pliers;
- wire cutters;
- puller (optional);
- socket wrenches;
- WD-40 product;
- glue;
- sealant.
The photo shows the tools and equipment necessary to replace the bearing.
Before disassembling the body of the washing machine, you need to make enough space both for work and for storing parts. Disconnect the unit from the power supply, disconnect the water supply and drainage hoses, move the equipment away from the wall so that it can be accessed from all sides.
Bearing replacement: procedure
To replace the bearing, you need to get to the washing machine drum on which it is installed. The car is disassembled, gradually removing all the parts from it.
Emptying the washing machine tank
The body of the unit begins to be disassembled from the cover by unscrewing two bolts located on the top on the far side. To do this you will need a Phillips screwdriver. Once the bolts are removed, the cover must be pushed forward towards the scoreboard and then removed.
To remove the dashboard , open the detergent compartment and remove it by pressing the latch in the center. In the resulting niche you can see several bolts and several more on the opposite side of the panel. The bolts are unscrewed, all the plastic latches are opened, after which the wires are disconnected and the panel is removed to the side.
To get to the washing machine tank, first remove the lid and dashboard
Next, remove the back panel - unscrew the bolts around the entire perimeter and remove the cover to the side. By carefully rotating the pulley wheel, remove the belt that connects the motor shaft to the pulley mounted on the tank.
The next step is to remove the back panel and the belt connecting the motor shaft to the pulley
Then they move on to releasing the top of the tank . Disconnect the pipe that leads from the powder compartment to the tank, remove the contacts of the valve that lets water into the washing machine. Remove the valve and pipe to the side.
Next, unscrew the bolts that secure the counterweight and remove it. Disconnect the hose connecting the pressure switch to the tank.
To free the washing machine tank, you need to remove all the parts located in the upper part of the body
The next step is to dismantle the front panel .
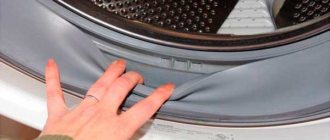
First, remove the rubber cuff from the hatch of the washing machine, carefully prying it off with a screwdriver. Then unscrew the bolts located next to the lock mechanism and disconnect its wiring.
The hatch door is removed by first unscrewing the screws that hold its hinges.
To remove the hatch cover, you need to unscrew the bolts that hold its hinge
All that remains is to unscrew the bolts located around the perimeter of the front panel and remove it.
Next we move to the back of the installation . Disconnect the wiring of the heating element and the washing machine motor. The heating element is left in its place, but the motor is dismantled, having first removed all the bolts that hold it in place. Then remove the counterweight installed below.
To get to the washing machine tank, you will have to remove the engine.
Finally, the shock absorbers on which the tank is attached are disconnected and removed from special hanging hooks.
The shock absorbers are disconnected from the tank last.
Now the tank can be removed from the body, unscrew the bolts and remove its front part.
In the photo you see the open tank of the washing machine, in which the drum is located
A shaft (metal axis) is inserted into the rear wall of the drum, passing through the bearing, the wall of the tank and connecting to the pulley. To get to the bearing, the pulley must be disconnected.
Usually the bolt securing the pulley is not just tightened, but also additionally set with glue. Before unscrewing, spray it with WD-40. If this doesn't help, you can use a hammer and chisel.
Unscrewing the bolt that secures the pulley can be very difficult
After removing the pulley, unscrew the bolts attaching the drum to the tank, unfasten the latches and remove the tank wall. Now you can proceed directly to replacing the bearings in the drum.
How to open a non-separable tank
Most Ariston washing machine models are available with a non-separable tank. Making a one-piece tank is easier for the manufacturer (no screws and fasteners), but this is not the only reason for producing non-separable parts. If a drum, bearing or other elements located inside a solid tank fail, the manufacturer recommends replacing it entirely.
However, there is a way to replace the bearings in this situation. This allows you to minimize repair costs.
If you take out the tank and find that it cannot be disassembled (there are no bolts connecting the two halves), you will have to spend time opening it. Let's look at how to disassemble a solid tank, step by step with photo illustration.
First of all, using a drill, holes are made around the perimeter of the weld at a distance of approximately 5 cm from each other. The next, most important step is to carefully saw the tank along the seam using a hacksaw for metal.
Bearing replacement
To remove old bearings, you will need a removal device. If this is not available, you can use a metal rod and a hammer. If you have never performed such an operation before, it is better to resort to the services of a specialist.
The Ariston SM model AVL 109 has bearings 6205 and 6204, as well as an oil seal with a skirt 65 x 30 x 52 x 10 mm. This marking is deciphered as follows:
- 65 – skirt diameter, expressed in mm;
- 30 – internal diameter;
- 52 – outer diameter;
- 10 – thickness, also in mm.
Two bearings and an oil seal installed in the Ariston AVL 109 crosspiece
If you decide to replace the bearings yourself, you need to perform the following sequence of actions.
Use a metal rod and a hammer to knock out the old bearings. The crosspiece must be placed on stops so that there is free space under the bearings. The operation must be performed with utmost care.
Removing used bearings from the spider
To install a new bearing, you need to take a hammer and very carefully seat it in the seat, tapping the edges of the outer race of the bearing and slowly moving in a circle. Then, when it is almost completely seated, you should place the old bearing on top, using it as a guide, and, tapping with a hammer, completely seat the new part in the seat.
New bearing, partially seated in the seat
Before putting the cross back, you need to clean the drum shaft with “zero” sandpaper and a rag, as well as the front surface of the tank - in the place where the oil seal will come into contact with the tank. It is also necessary to lubricate the surface of the oil seal. To do this, you can use a lubricant with molybdenum.
Shaft and place of contact of the oil seal with the tank
The crosspiece must be carefully installed on the shaft. To do this, use a hammer, gently tapping it along the edges of the cross.
Assembly is carried out in reverse order.
As you can see, with certain skills you can repair your washing machine yourself. When working with other models, deviations from the above-described sequence of work are possible, but we have described the main stages.