Almost all housewives sooner or later notice that their washing machine is leaking. This is very unpleasant news, because repairs can require quite a lot of money. If you wish, of course, you can try to fix the damage yourself, but it is important to do everything correctly and not overdo it, because you can easily damage something else. We’ll talk about this in a short instruction, so that you don’t suffer because of your own mistakes, and at the right time turn to an experienced specialist for the services.
Possible causes of water leakage
A washing machine is a rather complex household appliance that combines many components. The water flow path is quite large, which is why there are plenty of places where unpleasant leaks can occur. Let's look at the most common problems that many users of this technology have to face:
- The reason why water flows from the washing machine is a broken drain pipe.
- Also, one of the reasons why a leak may occur from under the washing machine is a worn out oil seal.
- Defective rubber seal.
- Damaged or incorrectly installed water tray.
- Broken water supply hose, damaged thread.
- Faucet malfunction.
- Damage to the receiving tray with valves.
- Defective drain corrugated hose.
- Drum overfilling, etc.
The washing machine directly interacts with water, so there can be many reasons for its leak, as well as places where this defect manifests itself. The first step is to carry out a careful inspection to identify a specific location or approximate area of failure.
Main types of breakdowns and their repair
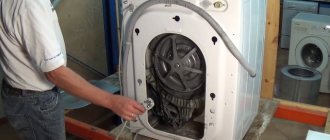
A visual inspection of the case will not help much. First of all, they study the hoses connected to the unit, and then its internal mechanisms. To do the latter, you need to move the washing machine to make access easier, tilt it, or completely remove the back or side wall. Access paths to the mechanical contents of the machine depend on the design of the model.
It often happens that a leak is associated with incorrectly connected or damaged hoses of the filling/drain system. They detach quite easily.
It is worth considering a very common case when the drain hose is not initially connected to the drainage system. If the unit is in an inconvenient place or far from the unit, it is not securely attached to the side of the sink, bathtub or even toilet. This happens when the owners do the installation themselves, rather than turning to specialists.
With such a connection, leakage becomes almost a regular problem due to a simple human factor - forgetfulness. When taking a bath or using other plumbing amenities, the hose is removed and then not reattached. As a result, the next wash will turn into a flood.
If there is a drain hose that is not connected to the sewer, you need to pay attention to its position. Such exploitation is a violation, but not so critical that anyone would care much about it.
When checking, properly connected drain or inlet hoses must be carefully inspected and probed. The corrugation is easily deformed and can crack at the bend. This is the most common cause of leakage.
It is not difficult to fix this problem. The tubes are easy to replace by purchasing an exact copy. It is better to purchase original ones, which will last longer, rather than fragile fakes. The problem with the drain hose is manifested by the presence of a constant leak during the drainage of water during washing or in the spin mode.
Drain filter
If the washing machine is leaking directly from below, in the area of the drain filter, most likely it is simply not screwed on properly. This happens if it was cleaned or excess water was removed, and then not turned enough.
It is necessary to remove the filter and then close it tightly until the end. This should be done without applying force, otherwise there is a risk of breaking the thread, and you will definitely need to call a specialist to fix it.
There is also a possibility that the filter is clogged due to the fact that regular preventive cleaning is not carried out. In this case, you need to take it out, remove all the debris, wash it and put it back.
Powder compartment
When the machine starts working, at the beginning of the wash cycle or rinse mode, water flows into the detergent hopper. If the ditch is clogged, the soap solution will flow outward and not toward the laundry, thereby creating a small puddle on the floor.
You need to maintain the dispenser and clean it periodically to avoid clogging. In case of obstruction of liquid drainage areas, the cuvette is completely removed and thoroughly cleaned. In addition to washing powder, there is a residue left on it from hard water, and sometimes mold.
Pipes
A failed intake valve pipe can also cause a leak. To get it, you will have to dismantle the upper part of the case and replace the broken part. If the problem is with the water intake pipe, it may not need to be completely replaced.
It is enough to disconnect it, treat the break with sealant and re-glue it with rubber-based glue. You can run a test wash after all applied substances have completely dried.
The pipes can fail because manufacturers of inexpensive models of household appliances usually skimp on such parts. As a rule, they begin to leak after 1-2 years of intensive use of the unit.
Rubber cuff
The reason that the washing machine is leaking from below may be a leaky cuff of the laundry loading hatch. When the crack or puncture is at the front, water flows through the door. If the inner part is worn out, then it comes from under the bottom.
This element is damaged mainly due to improper use of the washing machine:
- the seal is often pinched;
- small hard objects get into the clothes drum.
You cannot do without completely replacing the part. You need to dismantle the door and take out the rubber seal. The damaged area can be sealed with a patch if it is small. But even in this case, the repaired part will not last long. It is better to immediately buy and install a new one.
Troubleshooting
You have long noticed that your washing machine is leaking, but you still haven’t gotten around to diagnosing and fixing the problem. We will help you eliminate the defect with this short instruction. In fact, almost any action to repair this household appliance can be done with your own hands, but everything should be done as carefully and carefully as possible.
Proper troubleshooting is a fundamental point that will allow you to find the right direction and fix the problem. To do this you need to proceed as follows:
- Carefully inspect the car from all sides. Pay attention to whether water is flowing down the front of the cabinet from under the tray or door, because you will not have to move the machine to fix problems with these parts of the machine.
- When you are sure that water is leaking only from the front or from under the equipment, you need to take specific actions.
- After eliminating the defect, check the machine for leaks again.
Inspect the washing machine from all sides
As a rule, identifying the place where the washing machine is leaking is not difficult. It runs quite quickly. Of course, with a high probability, the equipment will still have to be moved aside in order to inspect the rear part, and even more so to remove the back cover.
Leaking from under the pull-out tray
If you have not fully installed the powder and rinse aid receiving tray, then a leak is quite likely. In this case, the water simply hits the wall of the device and splashes beyond its boundaries. It is also worth paying attention to the integrity of the bunker. If you ever dropped it, a crack may have formed. Damage can be eliminated by sizing or replacement. You can temporarily seal the gap with reinforced plumbing tape.
Also notice how the water flows into the tray. To do this, just pull it out a little when it is drawn into the drum. The streams should be smooth and unidirectional. If the water is too hard, plaque or salt deposits can form in the holes in the diffuser, causing water to be directed to the wrong place. If the washing machine is leaking for this reason, then you can fix the problem using a needle or wire of a suitable size. Be careful not to puncture the top wall of the canal.
Clean the channels under the tray
Damage to the aquifer
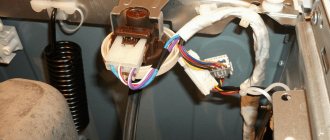
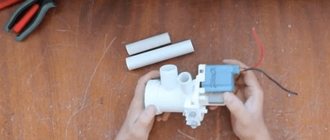
Water enters the washing machine through 2 valves, which are turned on for two modes: the main filling of the drum when washing clothes and rinsing, that is, using an air conditioner or freshener. To inspect these elements, it is necessary to remove the top cover. Top-loading machines will have a different design. They are accessed from the side.
To do this, you need to remove the front and side panels. Please note that they are secured with 3-4 screws using a Phillips screwdriver. The lower ones are clearly covered in rust, so it is better to pre-treat them with WD or a similar product before unscrewing them.
After opening, carefully inspect the connections between the hoses and the valves. Because of them, the washing machine may well leak. Often, leakage occurs due to clamping clamps. Tighten or replace them. If your washing machine has been in service for more than 10 years, you may need to replace cracked hoses.
Water supply valve
Leak at the inlet
The receiving hose, through which water penetrates into the receiving tray through the valves, is screwed to a special adapter. It has a coarse filter installed. It is this that saves the holes in the raincoat from quickly becoming dirty. If you have already reached this place, clean the mesh with a needle and a powerful stream of water.
Receiving hose
Pay attention to whether the hose is damaged. This could well have happened from long-term use, and most often due to the same poor-quality water. This is an infrequent but significant problem when your washing machine leaks. Less often, when moving the car, you could accidentally jerk it. The thread on the nut may also be damaged, so it should only be tightened by hand, and do not forget about the sealing gasket.
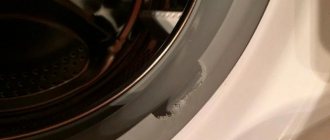
Leaking at the front under the door
The most common problem when a washing machine leaks is leakage from under the rubber seal. This is a large cuff that forms a passage portal for loading laundry into the drum. It encircles the entire hole in the outer casing and drum. Due to its shape, it creates a casing for water penetration into the front part, bending inside the rotating drum. When closing the door, it should press against itself to ensure a tight seal.
During a certain service life, which can be calculated in five years, the body is deformed, and the rubber itself becomes more rigid. To eliminate the leak, all that remains is to replace it. The most unpleasant thing is the fact that the price of the cuff is very high. As for replacement, the procedure is quite easy. It is quite doable with your own hands. It consists of performing the following actions:
- Open the door.
- Using a flat, 10mm wide, non-sharp object with smooth edges and missing corners, pry up the raised edge of the cuff from the front.
- Underneath you will see a tight spring that holds the elastic to the edge of the outer case.
- The same picture is on the reverse side of the cuff on the drum. Carefully remove the spring and rubber band.
- Installation is performed in the reverse order, that is, first put the tight spring on the drum, then on the body.
Replacing the cuff
In addition, one of the causes of a leak may be damage to the cuff by a sharp object. That is why, before you load the laundry into the machine, carefully check for any dangerous objects: pins, wire cutters, tweezers, tweezers, pens. All this will cause not only damage to the cuff, but also puncture of the drum.
Damage to the drain pipe
If the washing machine is leaking from below, then the cause most likely should be sought in the drainage system. To do this, you need to turn it on its side, because this will make it easier to get to the pipe, pump and other components. The first thing to inspect is the black rubber pipe with corrugation, which is wider on one side than on the other. Inside it there is a plastic ball, which is a kind of check valve.
During operation of the washing machine, if the balancing is poor, the drum vibrates strongly. This may well lead to rupture of the rubber in the area of the folds. It may also crack due to age. This is a completely natural process, because the average service life of rubber hoses is 6-10 years. That is why it is recommended to carry out preventive maintenance in advance in order to promptly identify the defect and replace the pipe. Moreover, its cost is low.
Drain pipe
It is quite easy to change. To perform this procedure, you will need pliers. All hoses in washing machines are mounted on fittings, cylindrical bends with protrusions and are compressed using spring clamps. To remove it, you need to squeeze the two tails extending from it, thereby relaxing them. Please note that these clamps are made from simple hardened spring metal, which is susceptible to corrosion.
Instead, a car clamp for a screw works quite well. Just buy it in stainless steel. Such ties are commercially available. As a last resort, you can secure the pipe with a nylon tie. It is better to use white ones, since black materials are very fragile.
water pump
Also, the cause of a leak in the washing machine may lie in the pump, or more precisely, in the connections on it. The same spring clamps are used there. Replace them if the car is 6 years old because it will have to be done soon anyway. Also pay attention to the condition of the pump housing. You don’t know where and from what plastic it was made, so it may well crack unexpectedly for you. Then the repair will cost you a new pump.
Check the pump and its connections
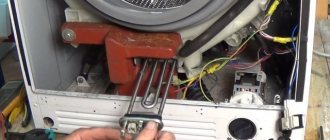
Oil seal wear
Also, one of the reasons why a leak occurred in the washing machine could be a worn out oil seal. This breakdown is the most difficult, because to fix it you will have to do a lot of work, and it may turn out that it is not advisable to do this at all. In machines of the budget price category, the manufacturer eliminates this possibility even at the production stages of the equipment. They install casings glued together from two halves. This procedure is performed on a heat press, which was done precisely in order to reduce cost and, accordingly, maintainability.
In machines of the middle and high price categories, it is possible to disassemble the drum, because the halves of the “nut” are fastened together using metal brackets made of spring steel. They can be easily removed with a screwdriver, the main thing is to have time to catch them, because they like to bounce right into the eye. Between the halves in a special groove there is a cylindrical sealing ring, depending on the model. It can also be one of the causes of a leak, so you shouldn’t rule it out. Fortunately, it’s possible to do this.
As for the oil seal, its replacement seems possible only in dismountable casings. And this is done as follows:
- First you need to get to the drum and remove it from the housing. To do this, remove the top and side covers.
- From below, you need to unscrew the screws holding the 2 shock absorbers with a 10mm head. They are also called dampers. The drum will remain hanging on two or four springs.
- To remove it, it is recommended to lay the washing machine on its side, disconnecting the hose to the level sensor, the filling hose and the drain pipe.
- The springs on the side of the body are easily detached using the same screwdriver. Insert it into the ring and pull it onto the body with a slight twist.
- That's it, the drum is in your pocket, or rather, in your hands. This is where the fun begins: you need to remove the pulley. This is that wheel that looks like a ship's steering wheel. You can easily pull the belt off it because its surface is absolutely smooth. First, a screw is unscrewed, usually with a T6-T5 sprocket or a powerful slotted screwdriver.
- After removing the screw, you need to tighten the pulley somehow. It’s better to do this with a puller, but since you obviously won’t have one, take a copper or oak adapter that matches the size of the shaft and, holding the pulley securely with another pair of hands, carefully knock it out of its seat. You should hit it lightly, but sharply, so as not to break the aluminum “steering wheel”. Everyone knows how this alloy breaks.
- If everything works out, and the casing is disassembled, the pulley is removed, you can begin to remove the bearing with the seal.
- Again, using a wooden block or a copper adapter, carefully knock out the shaft, placing something under part of the casing so that the height is sufficient for free removal of the shaft and the drum at its second end.
- If the oil seal is not on the shaft, you will have to knock it out along with the bearing. Moreover, they are installed in pairs: two bearings inside, an oil seal on the drum side.
- Using the same gentle movements as when knocking it out, first install the oil seal, and then the bearings into place. Reassemble the casing and reinstall it in reverse order.
Remember, trouble doesn’t come alone when a car leaks. If this happened due to the oil seal, and there is huge play in the bearing, then you should check the condition of the dampers, which are called shock absorbers, and springs. Often they lose their proper properties, which is why the drum begins to sway and bounce violently. This leads to bearing failure.
The washing machine is leaking from the door
- Clogged washing machine dispenser hopper.
- The tank is not sealed (a crack or breakdown has appeared).
- One of the hoses (drain or inlet) was damaged.
- The pump is leaking.
- Wear of the tank seal.
- The door rubber seal is leaking.
- One of the pipes has lost its seal.
Before starting repair work, you need to turn off the power to the equipment by unplugging the plug from the socket.
Then you need to figure out which of the many elements of the washing machine is leaking. To do this, the washing machine must be carefully inspected. To find out the cause of the breakdown, it is extremely important to find out at what stage of the operating cycle the washing machine began to leak from below. This will greatly facilitate the task of troubleshooting and will allow you to detect 1 out of 3 probable leak locations. Leak locations such as:
- Hoses.
- Door cuffs.
- Dispenser hopper.
If the machine starts to leak, there are many reasons for this. Today, home appliance stores are filled with a large number of models of washing machines. Each of them is characterized by different malfunctions and weak points, which can lead over time to breakdown, leading to water leakage.
The first step is to determine which part of the machine the water is leaking from:
- Water appeared from below the washing machine, from under the legs. The reason may be the drain filter, perhaps it is simply not fully tightened.
- Water leaks out from under the machine when filling with water. You should inspect the fastenings to the body of the machine and the body of the inlet hose; perhaps the reason is that it is damaged and it has begun to leak water.
- Water leaks out of the dispenser when washing or rinsing. The reason is powder accumulated on the walls of the tray, which impedes the natural flow of water into the tank. The leak may be due to strong water flow. If the inlet valve allows a strong flow that washes powder out of the dispenser, then water may spill out.
- When the machine is turned off, you can hear the sound of water and you can see that there is a leak; the problem lies in the fill valve.
- Water flows from the hatch. There may be malfunctions of the hatch cuff.
- Water flows out from below during spinning. In this case, the drain pipes and hoses are most likely damaged.
Once a leak has been discovered, it is important to determine the location of the defect. There are many reasons for water leaking at the bottom of the machine. It doesn’t matter whether it’s an old model or a new one.
The main cause of the malfunction is considered to be hard water with impurities. This is often observed in low-cost models that use inexpensive materials and components.
There are other possible problems that can arise:
- non-compliance with the rules for operating the machine;
- use of poor quality chemicals;
- invisible manufacturing defect;
- accidental mechanical damage during operation.
When faced with a malfunction, the first thing to do is take the following actions:
- unplug the machine from the outlet without touching the puddle;
- turn off the water supply to the washing machine;
- get things out of the machine.
Next, you need to analyze possible leakage options. There are several of them:
- damage to hoses. It is worth carefully assessing its condition and, in case of damage, it is better to replace it with a new one;
- problems with pipes. You can encounter such a situation just a year after purchasing the machine, the reason lies in the manufacturer’s desire to save money;
- problems with the tank. If you wash belts with buckles, shoes and other similar items while using the machine, you should not be surprised that the tank leaks;
- problems with the seal. In this case, a leak occurs at the bottom of the machine during spinning;
- damage to the pump drain valve. Perhaps it is simply not screwed in completely. You can find out about this by removing the bottom panel of the machine.
If over the course of several washes it is discovered that water is flowing and this happens during the spin cycle, then there may be several reasons for this:
- the drain filter is clogged;
- the drain hose is damaged;
- seals not corrected;
- the drain pump is broken;
- bearings have failed;
- the tightness of the connection of the pipes is broken.
To figure out where the fault occurred, you must first turn off the power to the washing machine. Next, you need to check the condition of the water drain filter and whether it is clogged. Perhaps it is simply not completely closed, which is why water is leaking. You can find the filter at the bottom of the machine body, under the front bar.
Next, you should inspect the drain hose and the place where it is connected to the drain pump. For most well-known manufacturers, this place can be found through the bottom of the washing machine. It is enough to turn the machine on its side and make sure how tightly the hose is screwed to the pump.
If everything is normal here, it is necessary to inspect the seals and bearings. If the seals are worn, you can see water leaks in the rear of the drum. To verify this, you need to remove the back cover of the case. If the reason is in the bearings, then a grinding noise is heard when the drum rotates.
If the above reasons for water leakage are excluded, the last option remains - the drain pump is broken.
If water begins to leak immediately during the dialing stage, you need to check the inlet hose. It probably simply “moved away” at the attachment points. It happens that the inlet hose is damaged and a leak appears for this very reason. In this situation, you will need to replace the hose with a new one.
When water flows out from under the machine during filling, the pipe is most likely damaged or its fastening has become loose in the section from the inlet valve to the dispenser, or from the dispenser to the tank. To accurately determine the location of the damage, you should remove the upper part of the device and replace the damaged part. If it is minor, it is not necessary to change the element; the hole can be sealed using a good quality sealant.
After the pipe is removed, it is processed and installed back using a special rubber-based glue. It's best to make sure everything is done correctly after the glue has completely dried.
The main cause of machine leakage is the door seal. Wear and tear leads to holes or abrasions, which causes water to leak inside the machine, which can then seep out from underneath the machine itself or leak from the door. It is worth noting that ruptures may not always be in the lower part; they also appear in the upper part and cause water leakage during spinning or rinsing.
If water is found on the front of the machine, the rubber seal should be inspected, but before doing so, it is necessary to ensure that there is no possibility of water leaking from the powder tray. A slight leak of water from the dispenser can flow down to the door in a thin path and create the appearance of water leaking from the door.
We invite you to read why the washing machine is electrocuted
Wear of the rubber seal is a common cause of water leaking from the door. When the door is closed, the glass presses on the seal, forming a tight seal. Wear may be caused by chips and cuts. Perhaps it has simply worn out, that is, it has become hard and wavy, in which case it will need to be replaced.
Sometimes a leak can occur when an object gets between the glass and the seal, disturbing the seal. It is important to clean the door seal and glass from the inside where they come into contact while the machine is running. Such objects can be hairs, undissolved detergent, pieces of clothing, and scale.
In this case, the dispenser may be malfunctioning. It is a retractable structure into which you need to pour washing powder. The functionality of the dispenser may be impaired for several reasons:
- clogged with powder, which for some reason did not dissolve;
- in case of contact with a foreign object.
You can detect the problem by removing the powder container, after which you can examine it for leaks. It is not difficult to fix the problem; all you need to do is rinse and clean the dispenser well.
However, this will not be easy to do with all machines. It happens that if this part of the machine is clogged, water flows not from above, but from below, then it will not be easy to rinse the powder container. You can often find this in car models. It will be necessary to disassemble the front face of the device to perform cleaning work.
Once the troubleshooting work is completed, you can wash as usual.
Obviously, there are many reasons why water flows while the machine is running. In any case, if a leak is detected, measures must be taken as quickly as possible to avoid complete breakdown of the machine. In order to minimize the risk of water leakage, it is necessary to operate the washing machine correctly. In many cases, the service life of the equipment depends on this.
Since the washing machine is a fairly simple unit from a technical point of view, the reasons for the appearance of leaks come down to two main factors:
- Incorrect installation of the device (for example, the machine may stand at an angle or pressed tightly against the wall of the room);
- Poor quality of component materials or their irregular maintenance.
To prevent leaks for the first reason, just read the instructions; in the second case, complete replacement of the failed element usually helps. So, if the washing machine is leaking from below, you must first check:
- An inlet hose, which in most cases is made of rubber. Budget devices are usually equipped with a standard hose; devices in the middle segment and above are equipped with a two-layer sealed hose;
- Operation of pipes. In this and the above described case, the machine leaks only when the tank, powder container is refilled and additional water is supplied from outside.
- The dispenser is full (a retractable container for washing powder, fragrances, antistatic agents and other liquids). During normal operation, it should not be even a third full. Water may overflow from it due to strong pressure (regulated by a tap) or a high degree of clogging of the filter grid further (clean with a toothpick, etc.);
- The degree of sealing of the door by the sealing collar. Again, this mostly applies to budget models, since low-quality rubber can crack when dried over time due to constant exposure to high temperatures and become unusable.
To understand the processes described below and the location of the main structural elements, you should look at Figure 1.
Figure 1 – Main structural elements of the washing machine
Is it worth doing the repairs yourself?
As you can see, you can repair a washing machine that has started to leak on your own, but there are some nuances. Moreover, there are cases when you will have to think about buying new equipment. For example, this is exactly the case when a leak occurred in the oil seal, and, as luck would have it, water got onto the pulley, spraying it throughout the entire internal space.
If this is cheap, budget-class equipment, then the power unit is probably located only 20-30 cm from the pulley and is protected by a leaky plastic cover. Therefore, along with a leak, you will also get a burnt out block.