Replacing the cartridge in the printer can be easily done by the owner himself at home. The list of steps is the same regardless of the device model, be it HP, Canon, Epson, Samsung, Brother, Kyocera, OKI or Xerox. This “moment” does not have an important impact. Only for laser and inkjet devices, consumables need to be changed differently. In this material we will tell you in detail how to remove and insert a new ink tank or toner correctly so as not to harm your equipment.
- 6.1 Video
- 8.1 Printing a test page
When to change?
The first signs of an imminent need to replace the cartridge with a new one may be problems with the quality of printed sheets:
- White vertical, less often horizontal, stripes on paper. They can appear in different places on the leaf. For laser printers, this problem can be solved by gently shaking the consumable, but this will not help for long. In inkjet, this method does not work at all.
- Letters are not completely printed, entire words disappear, and the edges of the sheet are invisible.
- Fuzzy gray text tone.
- One of the color shades has disappeared or their rendering is distorted and does not match the original.
- The message “Replace Toner” appears on the monitor or printer display. This is, if the cartridge is equipped with special chips (chipped) to count the number of printouts, the message begins to appear when there is still 10-20% of the dye left, and therefore you will have time to buy a replacement for it. Products in the more expensive segment are equipped with this function. Budget models do not have built-in tracking tools - their cartridges are not chipped. Although recently, in order to combat the use of non-original consumables, some manufacturers have begun chipping all equipment, regardless of the sales price range.
Possible problems and ways to solve them
If, after replacing ink, the printer displays errors or says “replace toner,” you need to make sure that:
- the correct original cartridge model was used;
- the container is installed all the way - you can remove it again and return it to its place;
- all additional films are removed before installation;
- If several cartridges were inserted, you need to make sure that each one is in its place, since their location cannot be changed.
Advice! To restore the printer's functionality, you can calibrate and clean the printheads. And if you couldn’t find out on your own what happened to the device, it’s better to seek help from specialists.
So, replacing consumables awaits everyone who uses the printer. And in order for the device to continue to work properly, you need to know how to change cartridges correctly, use proven consumables and act according to the instructions. But each manufacturer of printing office equipment and consumables for it uses its own proprietary features for replacing components, which should be taken into account so as not to damage the device.
The correct choice of a new “consumable”
The cartridge that comes with or “starter” in the printer. Initially filled at 30–50%. And also not all models allow it to be recharged.
- To purchase something, first of all, you need to know how the future purchase looks visually. Laser and inkjet printer cartridges are fundamentally different. For the first option, this is a black plastic product 25-40 cm long and 7-20 cm wide.
For the second - small rectangular boxes, where the size of the longest side does not exceed more than 7-10 cm. - On the body of any cartridge you can find its number and brand. It can be indicated on labels or embossed on the plastic itself. When selecting a new substitute, you should clearly focus on these values. Before going to the store, be sure to mark it in your notebook or take a photo on your phone. You can also select a cartridge based on the make and model of the printer itself.
- Often the cost of original dyes can reach a third or even half the price of the printer itself (typical for inkjet technology). For laser lasers, branded consumables are also not within the “people's budget”. One way out of the situation would be to purchase substitutes produced by third-party companies. The quality of such goods may differ from the original and even more so from each other, depending on the price. Before purchasing, you should ask for reviews about the chosen option.
- The main characteristic of any cartridge is its resource. In other words, the ability to print a certain number of sheets per refill. This figure is indicated in its description, but with the expectation that the page will be filled with paint by 5%. In reality, this is not always the case. It may be more or less, but the average figures are 5%.
For devices that use ink, with the stated 120-140 sheets, you can actually make 90-100 black prints. For color shades, the numbers are even smaller - while the 50–60 indicated in the description, in reality it is 30–40. For a laser monochrome device, the average cartridge resource is about 1000–1500 pages.
What else do you need to know?
- Non-original cartridges may have a resource either less than the original or more. This characteristic must be found out and clarified directly from the seller in the store. Some products are of very high quality, last a long time and are not inferior in quality to “original” consumables.
- Increasingly, printers are equipped with chip cartridges, which automatically count printed sheets and ink or ink consumption. When purchasing a replacement part, you should make sure that it has a chip on it to ensure compatibility with your equipment.
- The use of substitutes during the warranty period may result in loss of warranty. Therefore, until the warranty period has expired, it is better to use the equipment manufacturer’s products.
Check after installation
How to insert a cartridge into the printer so that the device functions correctly? To do this, you need to check its performance. When the lid is closed, the equipment is detected automatically. A message will appear on your computer screen asking you to print a test page. You need to confirm this action.
If this function is not available, enable printing yourself. Do not forget to insert blank paper, otherwise an error message will appear. Before printing, you usually check the settings in the printer, after which a test page is printed.
If the picture matches, the procedure is completed correctly. If streaks or problems are found, a deep cleaning should be performed. The printheads may need to be aligned. These procedures are carried out in the printer control panel. Each device has a menu, so see the instructions for details. Does it usually indicate how to insert the cartridge into the printer? It is necessary to adhere to the manufacturer's instructions to prevent equipment breakdown.
Some recommendations for replacement
Each model of printing device may have its own characteristics, including installation of new cartridges. First of all, look at what they write about this in the printer operating instructions. You can find it in the equipment box or on the manufacturer’s website. Improper removal and installation of consumables can easily damage the entire device. There are also some general rules.
- It is not recommended to use the printer without a cartridge inside. Although in many models this will not be possible at all. More often than not, such situations happen by accident. This point is especially important when working with inkjet technology. Prepare for replacement in advance. Follow the rule - “remove the cartridge and immediately install a new one.”
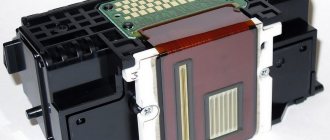
- Handle consumables outside the printer with care. You should not touch the following elements with your hands: microcircuit boards, print head, nozzles, nozzles, chips, photo roller. Such actions easily damage the spare part.
- After installing it back, you should only remove the ink tanks for the next replacement. This will prevent the contacts from drying out, which will extend the life of the equipment as a whole.
- Perform the entire replacement process wearing rubber gloves. This will prevent you from getting dirty and avoiding possible injury during installation.
Replacing old with new
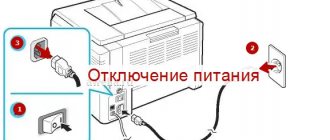
When there is a need to change the cartridge in the printer, you should act according to a certain algorithm. In various models, to change consumables you need to either turn on the power, or vice versa - turn off the device and unplug the cord from the outlet. This should be clarified in the manual.
- First you need to carefully open the cover of the cartridge compartment, which is usually located on the front side of the device or on the top.
- If your device has additional latches (for example, some Kyocera and Epson models), you need to open them. The latches most often differ in color from the main mechanism of the device.
- Then you should smoothly pull the cassette towards you and remove it. It is better to set it aside on a surface covered with paper. In some models, you also need to lightly press the consumable to remove it. But under no circumstances should you touch the image transfer drum when removing cassettes (this is important for laser devices).
- Then you need to carefully remove the new cartridge from the packaging. It should not be left exposed to air for a long time to prevent the ink from drying out (this is important for inkjet machines).
- Then you need to take a new consumable and remove the protective film, if any. In this case, do not touch the electrical contacts located on the cassette.
- If it is a laser printer toner container, you need to shake it slightly so that the powder inside is evenly distributed.
- Next, you need to insert a new cartridge into the free space. If everything is correct, the process is usually accompanied by a soft click.
- Then you should check the latch, if there is one, and close the lid.
- Finally, you need to turn on the power (if it was turned off) and make sure that the device does not display any errors. You can also print a test page right away.
Advice! If toner suddenly gets on your clothes, you need to remove it with a dry cloth, and then wash the stained area with cold water, as the hot liquid will help fix the dye.
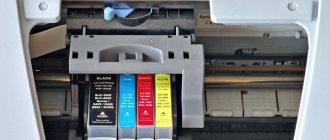
How to replace an inkjet cartridge
Gaining access to the cartridge
The ink cans in an inkjet printer are located in a special compartment inside the device. This thing is called a “carriage”. To remove the cartridges, you first need to force it into the right place for this. Below are universal instructions for action.
- Plug in the equipment and start it with the button on the case.
- Remove all paper from the tray and close it.
- Open the back cover. Now you should wait a while until the carriage is in the right place for replacement.
- Leave the lid open.
If this option of getting paints does not end successfully, then you should clarify the list of replacement steps in the instructions for your model.
Also, as an option, but not recommended, you can unplug the power cord during testing (passes when turned on), when the carriage is not locked in the resting place. Use the method only if others do not help.
Removing old
Since the inkwell is located directly inside near other parts of the device, there is a high risk of damaging them or being covered with paint. Try to work carefully, and if ink gets on, wipe it off with a clean white cloth. To extract correctly, do this:
- Lightly press the surface of the cartridge with your finger until you hear a click.
- Pull slowly towards you to remove.
Different manufacturers and even printer models may have different types of fastenings, and therefore the removal and installation of the cartridge may differ. But the course of action and the logic of their implementation remain unchanged. And also, it is not always necessary to turn on the device during replacement or to press buttons on the case. The manufacturer often provides detailed information in the instructions for the equipment.
How to remove a cartridge from a printer All methods with detailed descriptions.
How to determine that a cartridge needs to be replaced?
The cartridge is usually pulled out when refilling is necessary. Insert it after completing this procedure. There are signs when you need to do:
- The print becomes faded and its former saturation is lost.
- Not the entire sheet is printed, some letters may be lost, and the effect of “unprinted corners” is observed.
- The display will show o.
- Light streak effect.
There are 2 types of cartridges - chipped and non-chip. The former are considered expensive to maintain and also technologically advanced. For example, this device notifies the owner about the need to replace the ink unit. Non-chip devices are usually used with budget equipment. Then you need to independently calculate the resource of the device.
Cartridges must be refilled regularly and not allowed to dry out. These devices are very easy to insert. It is enough to try it once, then no difficulties will arise in the future.
It is simply impossible to imagine at least one office in which a printer would not be installed. This information output device has been serving humanity for decades, greatly facilitating the work process. It is difficult to imagine a person who could completely replace this useful equipment. All this is very cool, but, unfortunately, not every office worker knows how to install a cartridge in a printer. In addition, sometimes it is necessary to carry out a similar operation on a home device. Is it easy to deal with this on your own? Of course, because it is enough to know only a few simple instructions.
How to install a new one
Don't mix up black and colored dyes. Such an error can damage the entire printer.
- Remove the product from the box.
- Unpack it and remove the protective films from its surface.
- Do not insert the ink tank perpendicularly, but slightly tilt the edge down.
- A click will indicate correct installation. Check whether the cartridge is firmly and securely in the holder.
Video
Replacing and refilling a laser cartridge
As in the case of an inkjet printer, the cartridge for a laser printer is also easy to remove: open the front (top or back) cover, press a special latch and take out the cartridge itself. Depending on the model, the cartridge may be removed in different ways, but it is always easy to do. In a good way, you need to throw out the used cartridge and insert a new one, but it’s best to simply refill it.
How to install in laser
As you can safely and accurately assume, you need to insert a cartridge into a laser printer. Most likely, you don’t have such skills and need help. Therefore, follow these instructions:
- Remove all jewelry from your hands. These can be rings or bracelets. Such actions will avoid injury and foreign objects falling into the device. Wear rubber gloves.
- Unplug the printer power cord from the electrical outlet.
- Now open the lid to get inside the device. It can be located in front vertically or horizontally. It should be folded back using a special recess or lever in one of the corners. Most likely it will be the top right one.
- Now you see the printer cartridge. In some models it can be fixed with clamps. Check if you have them. Gently pull the consumable towards you by the handle (located in the center and closest to you). The move should be smooth, you should not pull or pull out with passion. Such actions can only do harm.
- If everything was completed without any problems, then place the cartridge on the table or on the floor, but before that, cover the surface with paper or newspapers so that excess dyes do not stain anything.
As you can see, there is nothing complicated in the process. The main thing is to correctly and clearly follow each step of the instructions.
Inserting it back is also not difficult:
- The equipment must be de-energized.
- Check that the toner cartridge is clean. If we are talking about a refilled consumable. The new ones are characterized by the presence of protection on the chip - a plastic attachment, a sheet of paper on the photodrum, and a tape in the toner tube that needs to be pulled out.
- Shake the hopper slightly to evenly distribute the toner inside.
- Place the product at the beginning of the tract and slowly begin to immerse it inside.
- Do not use force, and if it refuses to return to its place, pull it back and try again.
- Now close the lid.
- Plug the cable into a power outlet.
- Start the printer and try printing.
For many printer models, after changing consumables, you also need to reset the ink counters or drum life. Different devices carry out the procedure differently. There is no universal recipe for such cases. Some may continue to work without problems even with a constant notification to change the toner when it has already been done.
Important!
- When the printer refuses to print after refilling, it is better to contact technical service specialists.
- Do not disassemble the cartridge yourself - this cannot be done at home.
Reinstalling the cartridge
Installing the cartridge should be done in reverse order.
- Do not connect the device to the network until the cartridge is installed.
- Make sure the new cartridge is clean.
- Carefully insert it into the empty compartment without forcing it in. If the box itself is stuck and won’t go through, you shouldn’t try to push it in, it’s better to pull it out completely and try again.
- Snap all fasteners and check the fastenings.
- Close the lid.
- Plug the device into a power outlet.
- After connecting the device to the network, you should wait until the printer recognizes the new consumable and the “replace toner” message does not disappear from the display.
Problems may arise with the latter if non-original consumables are used. In such cases, it is recommended to reset the settings of the device itself and enter combinations (each model has its own), but even this may not help. However, this inscription itself most often does not in any way affect the operation of the device itself, which continues to print properly even with the inscription “replace toner”.
If the printer refuses to print even with a refilled cartridge installed, then it would be best to contact a service center.
Do not try to fix a complex technical problem yourself; this may cause serious damage and you may be injured by being scratched by sharp edges.
Replacing toner is quick and there is nothing complicated about it, but emergency situations can always arise. Experts recommend not changing consumables yourself; in most cases, visiting a specialist saves a lot of time and, ultimately, money. In some cases, it is more convenient to pay for a service than to decide what to do with a bunch of documents queued for printing in a printer that is paralyzed due to the inept actions of an employee.
Functionality check
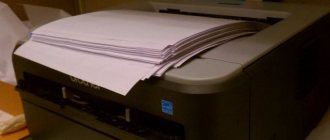
Print a test page
After replacing the cartridge, immediately before printing important documents or color photographs, you should check the quality of its operation. Printing a test page of the device will help with this. Such a sheet can show possible defects, problems or malfunctions in the display of color tones. You can also find out from it information about the exact model of your device for ordering the same paints, and the driver version for reinstallation if necessary.
To print a test sheet, the printer must be connected to a computer or laptop running the Windows operating system. Unfortunately, not all models allow you to perform this procedure using buttons on the case.
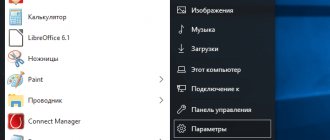
- Through “Start” you need to go to the “Toolbar”, and then open the “Devices and Printers” section. Its name may be different if you are using a non-Windows operating system.
- Now find your model from the list you see. Perhaps he will be the only one there.
- Call the context menu by clicking on it first with the left key once, and then with the right one.
- From the list, select “Properties”.
- On the General tab at the bottom, find the Test Print button and click on it. At this moment, the printer should be turned on and there should be paper in the tray.
- Wait for the sheet to come out (this may take a little longer than usual) and visually evaluate the print quality on it.
When assessing quality, pay attention to the following points:
- The format and visual presentation of information on the “probe” may differ for different models.
- Different display options will be printed on it: text, graphics, gray gradient, color scheme.
- All lines should be clear, nothing should be blurry or uneven; in the spectrum, make sure that all shades are present and the quality of their drawing.
Printing a test sheet from different manufacturers, be it HP, Canon, Epson, Samsung or any other, is no different using a PC. But some models allow you to perform such actions through the menu on their case.
Printing a test page without a computer Instructions for models from different companies.
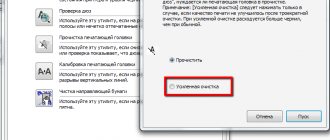
If your color inkjet print quality is not satisfactory, there are a number of procedures you can perform on the Maintenance tab to correct the problem. Namely: cleaning, checking nozzles, aligning the head.
If the software method does not give a positive result in restoring print quality, then it is worth washing the head or cartridge. Laser consumables require physical intervention. This could be: replacing the photocell, rubber shaft, cleaning or dispensing blade.
Step-by-step instructions on how to insert a cartridge into the device
There are two situations: change or refill the print cassettes. One way or another, you will need to remove them from the printer and then put them in place. Let's consider this for several types of printing equipment.
What is needed to refill the cartridge
In order to refill an empty cartridge, you need to prepare:
- cotton swabs;
- latex gloves;
- cloth napkin;
- refill kit: syringe, ink.
We proceed in the following steps.
- Open the hinged cover and carefully remove the empty cartridge according to the printer instructions.
- Find the filling hole and insert the syringe needle into it, which will respond with a light touch to the sponge located inside.
- Slowly fill the cartridge with ink at intervals that allow the sponge to become saturated.
- When the paint appears in the drainage hole, the syringe can be removed.
The holes are wiped with a cloth. The cartridge is placed on a flat surface (table) to settle for about 5 minutes.
How to install a filled container
You need to carefully take the full tank and place it where it was previously located. Install until it clicks. The next step is to enable the “cleaning cycle” to obtain good print quality. The equipment can then be considered ready for use. This way you can refill the cartridge yourself, saving time and money on a trip to the workshop.