The devices responsible for ensuring that everything works smoothly are control elements represented by electronic units and sensors. One of the most important parts of any washing unit is the pressure switch.
If the water level sensor is faulty, the control module of the washing machine processes the signal incorrectly or does not receive it at all from this device. In such a situation, the water level in the tank is not controlled, and therefore underfilling or overflowing occurs. All signs of a malfunction of this sensor will be described below.
What is a pressure switch
When wondering what a water level sensor is, you need to understand that any process related to the supply of water to the washing unit must be strictly regulated by a given program. According to the principle of operation, the pressure switches of washing machines Lg, Samsung, Electrolux, Candy, Ariston or any other brands do not differ, but there may be differences in design, appearance and characteristics. This device looks like a small plastic piece, usually round in shape, with electrical wiring connected to it and a tube from the washing tub tank.
The pressure switch in a washing machine is a device that controls the water level in the tank, without which the operation of any unit is simply impossible. The element is small in size, and its replacement does not require major capital investments, but the importance of this part is enormous.
Operating principle of the pressure switch
The essence of the operation of the sensor in question is to supply electrical signals to the processor of the machine. When there is no water in the tank, or the liquid in the tank reaches a certain level, the controller receives a corresponding signal initiated by the pressure switch.
When water is added to the tank, the air pressure inside the sensor increases, and when the control level is reached, it is triggered. Having received the signal, the controller shuts off the water supply to the tank. When water is drained from the tank, the pressure situation in the pressure switch changes towards a decrease. If there is no liquid in the tank, a return signal is triggered.
Operating principle of the sensor
The operating principle of the water level switch of a washing machine is based on the effect of pressure on a special membrane (diaphragm). When water is drawn into the tank of the washing unit, water fills the compression chamber and pressure corresponding to the level of the collected water is injected into the sensor housing through a special tube.
The compression chamber is usually built into the drain pipe. The pipe itself is connected to the tank and the volute from the drain pump using special clamps. There are cameras soldered directly into the tank itself. It happens that these cameras become clogged with slurry and dirt over time!
When pressure is applied to the membrane, the contacts close and open, as a result of which a signal about incoming water is sent to the control module. There are several types of pressure switch: pneumatic (mechanical) or with an oscillating circuit (electronic), in this case the mechanical principle will be described. They are also divided into single-chamber and double-chamber.
Double-chamber pressure sensors are specially developed for washing machines with small and large loads. When the load is low, one membrane is activated and water is supplied in a minimum amount. When the drum is heavily loaded, the second membrane is activated, the contacts close and the control processor gives a command to supply the maximum amount of water.
As a rule, the membrane installed inside the sensor is made of rubber or elastic polymer and is designed for repeated on and off cycles. The operating principle of the pressure switch combines the sequential influence of air pressure on the mechanical part, above which the electrical contacts are located, and a direct electrical impulse on the control processor of the washing unit.
Signs indicating a malfunction of the device
In order to accurately diagnose the malfunction of this sensor, you should understand the main symptoms that indicate that it has failed.
How to check the pressure switch, and what signs of part failure exist:
- The automatic equipment of a washing machine or dishwasher does not adequately perform actions that depend on the presence of liquid in the system. For example, when the tank is empty, the heating element turns on or the drum drive motor runs in washing mode;
- The pump does not work, which leads to an overflow of water, or vice versa - practically without filling the tank, it gives a command to perform work operations;
- In a washing machine or dishwasher, when the “rinse” mode begins, liquid accumulates and drains randomly;
- During washing, the spin does not start or the dishwashing modes do not work.
Among the main reasons for the failure of the water level sensor in a washing machine are:
- Mechanical wear of the flexible relay membrane, as a result of which it loses its original properties and cannot move the rod;
- Moisture gets on the contacts of the wires, which leads to their oxidation and, as a result, loss of current in the circuit;
- Puncture of the tube or its disconnection from the main element of the relay, which leads to loss of pressure in the system;
- The tube becomes clogged with debris, which also prevents the membrane from functioning adequately.
Signs of a malfunctioning pressure switch
As with any element of a washing unit, malfunctions can occur in the water level sensor, leading to malfunctions of the entire washing unit. This is expressed in the following signs:
- the washing process begins in the absence of water;
- water is supplied to the tank in too much or too little quantity;
- after the wash is completed, water is not removed from the tank;
- the laundry spinning program is not processed;
- There is a periodic pumping out of dirty water and supply of clean water in the rinsing mode, which is not typical for normal operation;
- malfunctions of the washing machine in all washing programs.
In addition, due to the lack of water in the tank and the heating element being turned on, smoke and a burning smell may appear. Typically, such inclusion ends with the replacement of the heating element. A faulty sensor can also lead to failure of the electric motor due to constant overload on it, since more water is often drawn into the tank than the required level.
How to understand that the pressure switch is broken?
Before attempting to repair and adjust the level sensor, you should ensure that it is faulty. This is not difficult if you take a closer look at the behavior of the washing machine. For example, you should be alert to an uncharacteristic hum when drawing water, a cycle that does not start, or an incessant drain.
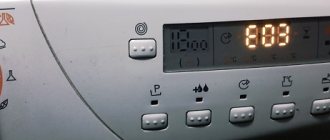
The display will tell you directly about problems with the pressure switch. If the “F05” combination lights up on the machine, then with a 70% probability it is the level sensor that refuses to work. The risk increases to 85% when the user notices that there is either too little or too much water in the drum.
It is strongly not recommended to neglect a broken pressure switch. Operating a machine with a faulty sensor can greatly aggravate the problem. If there is not enough water in the tank, the heating element will burn out, and if it overflows, the pump, which cannot cope with the volume, will suffer. It’s even worse if the triac on the control board fails, since the cost of repairs will increase by 2-3 times.
Where is the pressure switch located?
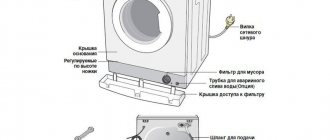
In washing machines from most manufacturers, the sensor is installed on a bracket in the upper part of the body on the side wall, however, in each specific case, you can find out where this device is located only by removing the top cover or side trim of the unit. Very rarely, on vertical types of machines, the pressure switch is located at the bottom of the unit.
A distinctive feature that makes it easy to find the sensor is a small-diameter tube connected to it, usually made of rubber or polyvinyl chloride.
Appearance and principle of operation
The device that checks the water level in the washing machine is made in the form of a small plastic round. Several wires and a tube are directly connected to it. All this is connected to a high-pressure reservoir.
When liquid is drawn into the tank, pressure corresponding to the water level is pumped through the tube. After this, a special relay closes and the contact opens. This is how the main control processor receives a signal that there is enough water.
[custom_ads_shortcode1]
Replacing the pressure switch
If checking the water level switch shows that it is faulty, then replacing it in most cases does not cause any particular difficulties. Therefore, you can change this device yourself, without resorting to the help of specialists. Repairing the device itself is not only impractical, but also useless, since the case is non-separable, any attempt to get to the internal parts will lead to a violation of its integrity. Some types of water pressure sensors must be opened, but this is a rather lengthy process and requires some competence in this area.
Replacing the pressure switch in a washing machine begins with disconnecting the vacuum tube and electrical contacts. By loosening or unscrewing the mounting bolts, remove the sensor. Reinstallation of the device is carried out in the reverse order of dismantling. Although the vast majority of sensors are similar in appearance, it must be taken into account that this element is configured for a specific model and brand of washing unit.
When carrying out all types of work, safety measures must be strictly observed. Before starting work, it is imperative to disconnect the plug of the washing unit from the power outlet.
Why do you need a pressure switch?
As in a washing machine, so in a dishwasher, the pressure switch performs one function - it controls the amount of water entering the tank of the appliance system. In other words, thanks to this mechanism, or more precisely, the electrical signal coming from it, the automation takes water to the required level, depending on the given program.
Thus, the failure of the water level sensor (the second name for the pressure switch) makes it impossible to further operate the washing machine and dishwasher, since they will not be able to control the intake and drainage of water for washing clothes or washing dishes.
How to check the pressure switch yourself
The water level sensor in the washing machine tank can be checked for functionality at home. To do this, it must be dismantled. Carefully inspect the pressure switch housing and vacuum tube for mechanical damage (cracks, chips, abrasions). Carefully check the tube and inlet fitting for blockages, and if there are any, clean them with a plastic stick or soft wire.
The pressure switch can be checked for functionality by blowing air into its housing using a small hose identical in diameter to the standard one. To do this, attach the hose to the inlet fitting and blow lightly into it several times. In connection with the pressure force, characteristic clicks should be heard inside the housing. The number of clicks depends on how many water levels a particular model of washing unit provides. Their absence indicates a malfunction.
The second way to check the water level sensor is to measure it with a multimeter. This method allows you to be almost one hundred percent sure that the pressure switch is faulty. By connecting the device to the pressure switch, you need to measure the resistance. If the resistance does not change when air is blown into the device body, you can safely send the faulty element for scrap.
In order to avoid undesirable consequences for the entire washing unit as a whole, it is necessary to carefully monitor its operation, and if the slightest malfunction is detected, take the necessary measures. By replacing a relatively inexpensive pressure switch in advance, you can extend the life of the entire washing machine for a long time.
Checking the pressure switch
If you have the slightest doubt about the correct operation of the pressure switch, you must immediately replace it with a new one. But before that, you need to gain confidence that the problem is with the sensor. Checking the pressure switch of a washing machine is quite simple:
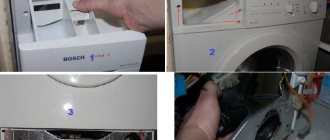
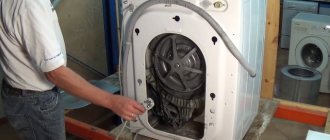
- The top panel must be removed. You can remove it by unscrewing the special bolts and sliding it in the opposite direction from you. On most models, the sensor is located at the top of the side wall.
- Experts recommend simply unscrewing the pressure switch. It is usually secured with several screws, which are quite easy to unscrew.
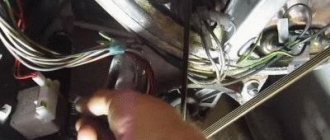
- After this, disconnect the tube and contacts from the sensor. The hose is secured with special clamps; they will either have to be carefully disassembled or cut off and then replaced with new ones.
Carefully examine the dismantled pressure switch: there should be no damage or formations on the housing. Check the tube and the condition of the insulating material of the wiring no less carefully. If necessary, clear blockages and repair minor damage. Clean the sensor contacts.
Now let's check the device itself. Typically, a ten-centimeter hose is used for this, identical in diameter to the one already removed earlier. Having connected the tube to the inlet fitting of the pressure switch, blow strongly into it. At this moment, clicks should be heard from the sensor. Their number depends on the blowing force.
If the sensor does not make any sounds, it is most likely faulty and needs to be replaced.
To finally make sure that the pressure switch is not working, measure its resistance with a multimeter. If during injection the resistance remains at the same level, feel free to throw away the sensor and buy a new one.
To check the pressure switch, it is better to use a multimeter
Setting the washing machine pressure switch
Along with the serviceability of all elements of the sensor, its precise adjustment is also of utmost importance. It must operate clearly at certain pressure levels, sending the necessary signals to the central control processor. The amount of water supplied to the tank depends on this, which is different at each stage of washing.
Accurate calibration of pressure switches is carried out at the manufacturer's factory using special ohmmeter devices, and under normal conditions no additional adjustment is required. Washing machine repair technicians not only do not recommend, but also categorically deny the possibility of adjusting the pressure sensor at home.
On the adjusting bolt of almost any pressure switch there is a seal, the integrity of which must not be violated. Even if you simply insert a screwdriver and turn the bolt half a turn, and then turn it the same half a turn in the opposite direction, the fine adjustment will be lost. In this case, no one can guarantee the normal operation of the washing unit.
Experiments with adjusting the water level sensor, as a rule, lead to failure of the heating element or the entire unit as a whole. If the cause of malfunctions in the washing machine is indeed the pressure switch, it is replaced entirely, and it is best if this operation is carried out by a service center technician, followed by high-quality diagnostics.
Sensor setup
For the correct reaction, the pressure switch of the washing machine must be precisely adjusted to the required pressure. This will help him give a signal in time and start the washing process. Typically, the manufacturer himself is responsible for setting up the sensor, and most often the owner of the car does not come into contact with this process.
Pressostat diagram
However, there are experimenters who deliberately tamper with the standard settings of the water level sensor in the washing machine. This is quite simple to do: just change the position of the special adjustment screw located directly on the body. By unscrewing it to a certain level, you can increase or decrease the standard pressure level.
Important! Manufacturers categorically do not recommend changing the standard settings of the pressure switch. This can result in loads that were not taken into account when the structure was designed.
Pressostat breakdowns and repair tips
Before considering how you can independently fix a pressure switch installed on a gas boiler, we will deal with typical malfunctions affecting this structural element.
Identifying Major Faults
As the practice of operating household gas boilers shows, defects in the differential relay are usually indicated by:
- absence of a characteristic “click” when starting the exhaust system fan;
- inability to put gas equipment into operation;
- output of an error signal through an indicator or on the display;
Any of the noted errors may be associated with defects in the pressure switch elements , as well as with such a fairly ordinary moment as the appearance of an oxide film on the contacts of the pressure switch microswitch.
In order to be able to perform high-quality cleaning of the contact petals of the microswitch, this element of the system must be dismantled. However, oxidation of the contact inside cannot be ruled out, which requires a complete replacement of the part.
Also, a fairly common reason for the failure of gas equipment is physical wear of the differential relay membrane . This part of the device is traditionally made on the basis of silicone rubber.
With long-term use, rubber partially loses its elastic properties (dries out). As a result, incorrect operation of the mode microswitch is noted.
Among other things, physical wear of the flue gas exhaust fan can cause an emergency operation of the pressure switch. Similar conditions cannot be excluded due to clogging of the condensate collection system , damage to system pipelines , etc.
We also recommend that you read the instructions for checking the functionality of the draft sensor and three-way valve in a gas boiler.
How to repair a pressure switch on a gas boiler?
If the reasons for the malfunction of the pressure switch of a domestic gas boiler are specifically identified, then most often the optimal way out is to completely replace it.
This approach is explained by the fact that most differential relays of gas boilers have a “cast” design. Accordingly, repairing this type of device will simply be more expensive than buying a new one.
It is easy to buy a new pressure switch for a gas household boiler of one model or another in the appropriate stores. The commercial market offers devices for almost any model
However, if you have the desire, skills and opportunities, trying is not torture. You will first have to dismantle the device by turning off the power supply to the gas boiler and turning off the linear gas supply valve.
Then you can begin to remove the pressure switch, for which you will:
- open the boiler body;
- remove the air intake cover;
- disconnect the silicone tube from the fan fitting;
- unscrew the fasteners and remove the pressure switch;
- disconnect a pair of faston contacts from the device;
- disconnect the silicone tube from the device fitting.
The first step is to check all the silicone tubes included with the system for contamination. If there is contamination inside the tubes, it is necessary to rinse and blow out the internal area.
It is also recommended to wash and blow out the internal area of the differential relay using special technical fluids that are neutral to silicone.
It is easy to check the functionality of the microswitch of the differential relay of a gas boiler. To do this, in the resistance measurement mode, the contact groups are “ringed” for conductivity
Then the microswitch, namely the contact group of this element, is subject to verification. The conductivity of the contacts is checked using a measuring device - a tester. If there is a conductivity failure on any of the contact groups, the microswitch should be repaired or replaced with a new one.
When checking the pressure switch microswitch of a gas boiler, it may be necessary to simulate a vacuum pressure. To do this, just connect, oh, a small piece of silicone tube to the pressure switch pipe of the gas boiler. The second (“positive” pipe) is simply closed, and air is sucked through the connected tube through the mouth with little effort.
In the process of performing such manipulations, connect a measuring tester to the contact groups of the microswitch and look for the presence or absence of current passing through the contacts.
This testing technique, of course, is exclusively of a “domestic” nature. Professionally, these same actions are performed using service equipment.
In addition to a breakdown of the pressure switch, the user of a gas boiler may encounter a number of other breakdowns. We provided an overview of popular faults and recommendations for their repair in the following article.