Let's reveal the secret of how to quickly and correctly clean a laptop keyboard from dust and dirt at home. We will tell you about the most effective means of how and with what you can clean the keyboard of a laptop and computer from spilled liquid (if it has been spilled with juice, beer, water, wine or tea, etc.), dust, debris and dirt.
Who among us doesn’t like to eat next to the computer while passing the time watching our favorite TV series or news feed? However, this behavior almost always leads to one result - that the keyboard becomes clogged and will have to be cleaned. Although it is worth saying that even if you have never eaten next to your laptop in your life, it will still need timely cleaning. It is not at all necessary to go to a workshop for such a trifle; you just need to know how to clean a laptop keyboard at home.
External cleaning
External cleaning is the easiest option for cleaning a laptop keyboard. It is quite enough if your keyboard works normally and the reasons for cleaning are rather preventive. This is done quite simply.
- First you need to disconnect the keyboard from the computer. If we are talking about a laptop, you need to turn it off and then remove the battery. Only after this can you start cleaning.
- You should start by wiping the keys. This is done with a regular cloth (it can be dry, or it can be barely damp). First, wipe the top of the keys, and then pay attention to their end part. There's quite a bit of dirt that accumulates there, so be diligent but careful or you risk breaking the keyboard.
- After this, you need to clean the space between the keys from dust. It is recommended to do this with a special brush for cleaning the keyboard, but a regular soft paint brush or toothbrush will do just fine. Also, don't forget about the space under the keys, that's where most of the dirt is. When cleaning, it would be useful, if possible, to place the keyboard perpendicular to the surface on which you are cleaning, then all the crumbs and dust will fall down and not get clogged under the adjacent keys.
The steps described above should be sufficient for preventative cleaning. But, of course, due to the nuances of the keyboard design, you will not be able to clean it completely. Most likely, most of the dirt will remain where you can't reach with a brush. Fortunately, there is another option for cleaning your keyboard without disassembling it.
Vacuuming
The next option for cleaning a laptop keyboard at home is to use a vacuum cleaner to clean the keyboard. Such vacuum cleaners are also quite often sold in stores. In fact, this method is not much different from the option with a can of compressed air, except that the dirt will not fly around and certainly will not get deeper into the system.
If you cannot find a special vacuum cleaner, then you can use a mini vacuum cleaner to clean the car interior or even a regular low-power household vacuum cleaner. But be sure to switch it to the lowest power setting, otherwise you risk ripping the keys out of the keyboard or otherwise damaging it.
Removing the keyboard
If the laptop model does not allow you to simply lift the plate with the button mechanics, you should understand: removing the keyboard will be very difficult. To do this, you will have to disassemble and dismantle almost all parts of the device. If you are confident in your abilities, you can watch a video on the Internet and get down to business.
Advice! To replace or deep clean the keyboard, it is recommended to take the laptop to a service center. The cost of cleaning after a spill or installing a new keyboard is high, but there is a guarantee that the specialists will do everything correctly and there will be no problems after their work.
Cleaning with alcohol
Cleaning the keyboard with isopropyl alcohol is a fairly effective procedure for getting rid of dirt, drips, stains and other contaminants of a similar nature (which a vacuum cleaner or brush cannot handle). However, it, in turn, is practically useless against dust and crumbs, and therefore it is recommended to combine cleaning with alcohol with one of the previous methods.
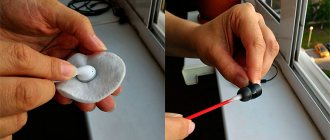
Cleaning your keyboard with alcohol is quite easy. Most often, cotton swabs are used for this purpose. You just need to blot them a little in alcohol, and then wipe the surface of the keys and the space between them. For convenience, you can pour a little alcohol into the cap of a plastic bottle.
The only caveat is that it is not recommended to use ethyl alcohol for cleaning. It won't harm your keyboard, but it can easily remove all the paint and stickers from the keys. Use isopropyl alcohol.
How to clean your keyboard at home
The housing, keys and mechanism can be cleaned in each keyboard. However, a lot depends on how much you take it apart.
Deep disassembly (after pouring) requires much more time and precision, but it's worth it if you don't want to buy a new one (it's much easier with a computer).
The number of cosmetics used to clean computer equipment is almost as large as the number of keyboard models available on the market.
The most expensive cleaning products often cost as much as a new keyboard, so it's not worth it to buy them.
When cleaning, the most useful tools are compressed air, a stiff-bristled brush, detergent and antibacterial wipes. Additionally, you should prepare two screwdrivers and a bowl of dishwashing liquid.
Keeping it clean will not only perform better, but you will also be healthier - some buttons harbor bacteria and viruses that can be dangerous to you.
If you do not plan to disassemble, then use compressed air and a brush with stiff bristles, which effectively removes debris accumulated under the keys.
If you are going to dismantle it, you will need a screwdriver, and in order not to scratch the plastic buttons, line it with a tape slot.
Then press the tip of a screwdriver between the keys and lightly pry the key until it pops out of the guides. I use a screwdriver and use my finger as leverage.
In this way we sequentially dismantle all the keys.
Only now can you see how much dirt has accumulated under the keys. Not only are the buttons difficult to press, but they are also an ideal breeding ground for bacteria.
The best way to remove dust from your keyboard is with compressed air. You can also use a vacuum cleaner.
Use a damp cloth to thoroughly clean your keyboard and remove any remaining dirt.
In hard-to-reach spaces, use a cotton swab.
Now we move on to the most tedious part of the job - cleaning the buttons. If they are very dirty, prepare a bowl of warm water with a little dishwashing liquid and soak them for at least 30 minutes.
We suggest you read How to store dried plums at home
After washing, wipe with a cloth and leave until completely dry. On older keyboards, exposure to sunlight over long periods of time can cause the key casing to discolor.
Unfortunately, you cannot wash yellowed buttons with any detergent. After drying, using the photo, proceed to installation.
Start with the big keys. In their case, you must place the hooks correctly in the bracket. They are used to support buttons.
At the next stage, when inserting the button, fix the direction and press firmly.
After installing everything, turn on the laptop. The unit is clean and ready for use.
When looking for alternative cleaning methods, you should look into chemical cleaners such as CyberClean.
This is a thick gel that works well as a bacterial cleanser. The effect of the gel may not be as good as removing the buttons, but CyberClean can be used for less dirty keyboards.
CyberClean is also suitable for cleaning a mobile phone, printer panels or remote control.
After purchase, it is stored in airtight packaging. Let's see how to use it and what the results are.
First, remove all coarse dirt and then take it out of the package. The substance is soft, but not sticky, so you can handle it with confidence.
Place the gel on the keyboard and press it over the entire surface, including those between the keys.
Using your fingers carefully, try to clean the top and sides of the keys.
On the surface of the gel you can see various impurities that have adhered to the cleaning substance.
If cleaning does not give satisfactory results, try to repeat the procedure until it succeeds. After cleaning, remove dirt from the gel and place it in a bag.
The standard keyboard is simpler in design. Low profile, thanks to the smaller key travel, it is much more comfortable for many people.
Such a keyboard must be cleaned slightly differently than described above for a standard one.
Removing all the buttons is difficult and risky - you can easily damage the delicate fastening mechanism.
At the beginning of dismantling, carefully remove the last right row of keys using a thin tool. Here I want to share one observation.
I have a small child. Just recently, I advised him to take up flies. A fly sat on the keyboard. He hit it with a fly swatter. The keys jumped out like cockroaches.
Due to the low travel of the keys, even the smallest crumb can cause a malfunction. This is why it is very important to carefully remove all debris from under the keys.
You can use compressed air for this. While moving the compressed gas drain tube over the keys, place the dirt towards the removed keys and then remove it.
After that, put everything back in place and wipe the entire keyboard with a damp cloth. Unlike a standard keyboard, you can easily clean the sidewalls of the buttons. Fellowes bactericidal fabric gives good results.
In the case of low-profile keyboards, you should take extra care. Their suspension mechanism is extremely delicate and can be easily damaged.
For the scissor screwdriver, prepare two flat screwdrivers and slightly lift the top of the button.
We do this until it is unlocked.
Then we take the button with our fingers and carefully lift it up, unfastening the lower mounting.
For large keys, you also need to bend the metal bracket.
It's good if the mechanism doesn't come loose. Unfortunately, very often two more elements are removed.
Scissoring requires precision and patience. Looking at the other buttons, set them back. After this operation, the mechanism should act as a hinge.
Place the wider end into the hooks and press firmly against the upper clamping mechanism to engage.
There is one more key step left - place the button on the mount and tighten it.
That's all. You can also clean the cable and contacts, but I won’t describe this process, but I’ll make a video in the near future so that you don’t accidentally perform miracles.
The train is a thin thing, like the East, it is not to be trifled with. To see it, you need to remove not the keys, but the entire keyboard.
Contacts can be cleaned with alcohol, but not diluted or isopropyl, but traditional alcohol - this will be correct.
If the keyboard is flooded, and cleaning does not solve the problem (does not work completely), then the service center can supply you with a new one.
You can do it yourself - the main thing is to find an identical one, otherwise you will not be able to cut it or deepen the installation site.
NOTE: until you get it into working condition, you can use the screen - it’s not very convenient, but tolerable. Good luck.
Any device that runs on electricity attracts dust, this is the nature of electromagnetism, and if the device is also equipped with a forced ventilation system, then dust and dirt will collect inside like bees in a hive. A laptop is just such a device.
Care and prevention in relation to a laptop comes down to timely and correct disposal of dust and stains. This is necessary not only to maintain a neat appearance, but also, most importantly, for the normal operation of the device and extending its service life.
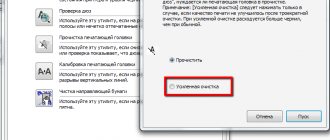
First, figure out what kind of cleaning you need - superficial or deep:
- Superficial cleaning involves cleaning the keys and the space between them.
- Deep cleaning will help remove dust from the contacts so that it does not settle on the internal devices of the laptop.
We suggest you familiarize yourself with How to clean an office chair
The keyboard needs to be cleaned regularly, at least once a month. You can buy a cleaning kit in specialized stores. It includes a brush, cloth and cleaning fluid. This kit will help you clean your keyboard more thoroughly. If special liquids for wiping buttons are not on hand, use improvised means to clean the laptop keyboard.
We offer some of them:
- Diluted isopropyl alcohol.
This is the optimal cleaning product that will help get rid of stubborn stains. Soak a soft cloth with alcohol and carefully wipe all the keys. Treat the keyboard carefully, do not overdo it with liquid so that it does not drip between the keys and onto the contacts. Important! Acetone and other aggressive substances cannot be used, as they can not only erase the paint of the keyboard, but, worst of all, melt the laptop body. Ethyl alcohol and vodka can also ruin the paint on buttons. - Soapy water. Soak a swab or cotton swab in soapy water and carefully remove dirt from the buttons. After the procedure, be sure to wipe the keyboard with a dry cloth, since moisture is contraindicated for the device.
- Use only special liquids, as well as lint-free wipes, which are sold in any computer stores. Users recommend high-quality computer equipment cleaning products from Defender.
- Use special soft brushes to remove dust and dirt between the keys, and it is better to clean the buttons themselves using napkins.
Dirt and debris also collect under the keys and interfere with the normal operation of the laptop. The easiest way to get rid of debris is to turn the device over and shake out the contents.
For the same purpose you can use:
- a brush with long, hard bristles;
- hair dryer - lift the laptop and tilt it, blow cold air on the keyboard;
- household vacuum cleaner using a narrow nozzle;
- portable can of compressed air - this aerosol is sold in computer stores.
Removing the buttons
To deep clean your keyboard, you may need to remove the keys from the keyboard and then clean everything inside. This should be done if, after carrying out all the procedures described above, some of the keys still do not work, stick, or a crunching sound is heard when you press them. The process of removing the keys is quite simple and straightforward.
- To begin with, it is recommended to take a photo of the keyboard so that when you start putting it back together, you will not have any difficulties.
- After this, you can begin to remove the keys. To do this, you need to pick up the key with some sharp and thin object (a knife or plastic card will do) from one of the corners, and then carefully start moving it to another corner, then to the third and fourth, until you hear a characteristic click and the key comes off . In this case, you need to be as careful as possible and under no circumstances put pressure on the keys.
- It should also be noted that the key will not always be completely disconnected after this. On many keyboard models (for example, island keyboards from Acer, Asus or HP), the keys may be raised, but will remain connected to the keyboard with special jumpers. You can carefully detach them too, or continue cleaning if you feel that the space that has opened is enough.
Once you have disconnected all the keys, you can start cleaning. Be prepared to be surprised by the amount of dirt under the keys. In general, you don’t have to disassemble the entire keyboard, but only disconnect the stuck keys and the keys next to them. But it would still be better to remove all the dirt. It definitely won’t be superfluous.
Modern keyboard cleaning at home
Dust and dirt under the keys of a laptop keyboard usually accumulate over many months or even a year or two, so by simply wiping the device with a cleaning cloth, the user is unlikely to be able to remove all accumulated dirt.
To do this, you will have to remove all the buttons before cleaning, but before doing this, do not forget to photograph their location so as not to experience further difficulties with their reinstallation.
The cleaning method described above is effective only when accidental drops of spilled liquid, crumbs and dust come into contact with the input device. Cleaning a laptop keyboard after sweet tea has been spilled on it requires several other measures, which most users can also do on their own at home.
To completely remove traces of tea or coffee, the laptop's input device will have to be completely removed. But on most laptops, this device is attached to the front panel using ordinary plastic latches, so there is no need to completely disassemble the mobile computer or do any complex disassembly.
In some cases (this mainly applies to fairly old and less common models), the keyboard can be attached to the back cover of the device with screws. Usually there are no more than two. After unscrewing the fasteners, the device to be dismantled can simply be picked up with a knife or screwdriver, after which it can be easily detached from the body.
You should also use a screwdriver to lift the edges of the input device when unsnapping the fasteners. It is not recommended to do this with your hands, since the plastic of the device is quite thin - if force is applied carelessly to it, the material may crack.
Disconnecting the cable
The input device of the mobile computer is connected to the system board via a special cable. It is easy to damage, so do not yank the removed panel under any circumstances after the fasteners have been detached. The cable is secured using a special lock with latches, the type of which may vary in different laptop models.
When removing a cable, in order to open the latch that holds it, in some cases it is necessary to perform such actions as lifting the fastener or clamping the tabs. Some types of clamps use spring latches to hold the cable.
On a desktop PC, dirt getting inside the keyboard can cause only that device to malfunction without causing harm to the computer. In a laptop, the keyboard is built into the case, which means that everything that penetrates under the buttons can get inside to the electronic “stuffing”. In this case, the owner may face serious troubles - from poor ventilation, which leads to overheating and spontaneous shutdown of the PC, to failure of the electronics (motherboard, processor, etc.).
The choice of method for cleaning the laptop keyboard depends on the type and degree of contamination.
- Dirt, greasy stains from your hands and dust on the outer surface of the keys do not interfere with the operation of the device, but they greatly spoil the appearance and are simply unhygienic. Cleaning requires a cloth and cleaning fluid.
- Debris and dirt getting inside the keyboard can lead to individual buttons sticking or not working (not pressing through). In this case, more serious work is required to remove dirt from the device.
- If tea, coffee or other liquid is spilled on the device, emergency measures must be taken to save the device and laptop.
It is used in the first case to remove dirt directly from the keys and in the space between them. It is advisable to clean your PC keyboard once a month. The buttons should be cleaned with a soft, lint-free cloth. The use of cotton wool for these purposes is not advisable. The space between the buttons is cleaned with a soft brush, or, in extreme cases, with cotton swabs, but you should carefully ensure that no lint remains between the keys.
It is advisable to use special cleaning compounds, such as gel, as a cleaning liquid. But you can do it with home remedies. Diluted isopropyl alcohol is suitable; it cleans plastic well, but not everyone has this substance. There is a universal remedy that everyone has. The keys can be washed perfectly and safely with ordinary soapy water.
Before cleaning the keyboard, be sure to turn off the computer and remove the battery!
The prepared napkin must be slightly moistened with the cleaning liquid so that its drops cannot get inside the keyboard and gently wipe (not wash) all the keys with it. Moisten a brush or cotton swab with soapy water, be sure to blot it with a napkin, and then clean the space between the buttons. At the end, you need to thoroughly wipe the device with a dry cloth and do not turn on the computer for 20-30 minutes.
Regular removal of dirt from the keys significantly extends the service life of the device. In addition, the need for deep cleaning will be much less likely.
If debris and dirt get under the keys, it is impossible to operate the laptop normally. In this case, you cannot do without thorough cleaning. First you should try to remove dirt without disassembling the keyboard:
- Use a long-bristled brush to clean the spaces between the keys, turning the laptop over from time to time and shaking it lightly.
- Place the laptop at an angle and blow off the keyboard with a hairdryer (cold air)
- Do the same using a portable can of compressed air.
- Use a special miniature USB vacuum cleaner.
If after these manipulations the buttons continue to stick or cannot be pressed, then you will have to disassemble and wash the keyboard. It's better to remove it from the laptop. Before attempting to remove the keyboard, you need to find out how it is secured to the laptop. In different models it is secured differently in the body.
Most often, the keyboard is secured using latches. Use a thin screwdriver to press out the latches, starting from the upper left corner. Having freed the top and sides, the keyboard is carefully pulled out of the case. This must be done very carefully so as not to damage the cable connecting it to the motherboard. Having carefully disconnected the cable, you can begin disassembly.
We suggest you read How to clean gold-plated forks
After disassembling the buttons, you can wash them with soapy water, and clean the base and contacts with a soft brush. If the contacts and rubber bands are heavily soiled, wipe them with a cloth moistened with a cleaning solution or soapy water, and then wipe them dry. Under no circumstances should they be washed.
After finishing cleaning, it is advisable to allow all parts to dry thoroughly, after which you can assemble the keyboard and install it in place.
If after the procedure some keys do not work, then there is no point in disassembling and washing the keyboard again, since, most likely, it is not a matter of dirt, but a malfunction, and it will have to be replaced.
Every laptop owner can perform preventative surface cleaning himself. You can also do complete disassembly and cleaning yourself, but it is better to entrust this work to specialists.
No matter how carefully you work with electronics, there is no escape from manifestations of human nature: someone sins by eating near a laptop, someone likes to drink aromatic coffee and eat crispy crumbly cookies. Therefore, if you do not observe computer hygiene, after a short time the question will inevitably arise: how to clean a laptop keyboard at home?
If you want to be sure that there is no dirt left in the keyboard, then do a deep cleaning. You need:
- disassemble the keyboard;
- remove the keys using a screwdriver;
- Clean rubber bands and contacts using cleaning agent and soft cloths.
If you still decide to thoroughly clean your laptop at home, use the following algorithm:
- Take a photo of the keyboard so that when you're done, you can return everything to its original place.
- Use a screwdriver to remove the keys. The fastening of the keyboard buttons, although simple, is very weak. Therefore, proceed carefully so as not to damage the cable.
- Once the keys are disconnected, use a brush or a special vacuum cleaner for cleaning laptops to remove dust (a vacuum cleaner for cleaning upholstered furniture will also work).
- Return all keys to their places.
- If after cleaning a couple of keys do not work, and you are sure that you did everything correctly, then replace the keyboard. Most likely, it's not the dust.
One of the easiest and most cost-effective methods for quickly cleaning keys is using a vacuum cleaner. A small car vacuum cleaner with a special nozzle (tapered towards the end) is better suited for this. If you do not have such equipment, then a regular vacuum cleaner will do.
To clean your laptop keyboard as effectively as possible, you need to thoroughly vacuum each key, especially the space bar. We also recommend carefully processing the gaps between the keys, stopping at each for about 3-5 seconds.
Today in specialized stores you can find various products that make cleaning your laptop keyboard much easier. We recommend that you pay attention to a can of compressed air: it is designed for cleaning hard-to-reach areas of various equipment. Method of application: you need to spray air at an angle, this will remove dust and other dirt from inside the keyboard.
What to do if liquid is spilled on the keyboard
Let's say it so happens that the laptop keyboard is flooded with juice, beer, water, wine or tea. What to do in such a situation? First of all, don't panic. The first step, of course, is to remove the container and get rid of the spilled liquid. This can be done with a napkin, rag, toilet paper or sponge (just blot, do not rub).
Then you need to disconnect the laptop from the power supply and remove the battery (if you can’t get the battery, at least just turn off the device). You need to do everything quickly and clearly, because if you hesitate, you risk losing not only your keyboard, but also your entire laptop.
After this, you can more thoroughly and slowly clean the flooded laptop keyboard. You need to act carefully and ensure that as little liquid as possible flows under the keys. After this, you can dry the laptop with a hairdryer (do not forget about cold air). Dried liquid residues can be removed with alcohol.
If you think that liquid has leaked inside the keyboard, proceed to fix it immediately. First of all, remove the keys where the liquid came into contact. If the liquid has not yet dried, carefully wipe it away. Be sure to dry everything thoroughly with a hairdryer. You also need to treat all sides of the keys under which liquid has got in, otherwise they will begin to jam and make a characteristic cracking noise when pressed.
When the main consequences of the incident have been eliminated, you need to check the key contacts. As a result of contact with liquid, they may oxidize. If this is the case, then you cannot do it on your own and will have to turn to a specialist.