In most cases, mounting the projector to the ceiling is done according to the following scheme:
- Remove all structural elements from the packaging.
- Place the mounting panel on the ceiling and, through the holes in it, mark the places into which the dowels will be screwed.
- The plate is removed, holes of the required depth are made with a puncher in pre-marked places and dowels are installed in them.
- Place the panel back and use a screwdriver to attach it to the screws.
- Screw the plate tightly to the ceiling with a screwdriver.
- Connect the rod to the mounting plate.
- Attach the installation panel to the rod and install the projector.
- Connect wires and a socket to the equipment.
It is recommended that you plan to install the projector on the ceiling during the renovation phase. In this case, it will be possible to hide all the cables under a suspended or suspended ceiling, and organize grooves in the concrete ceiling for laying wires.
Key selection criteria
The most important stage of installation is the choice of fasteners. Typically, such installations are made of metal, although both plastic and metal products are available on sale. A typical ceiling projector mount consists of the following elements:
- Panel. This is a plate that is mounted to the ceiling. The stand is attached through it.
- Cylinder rod with telescopic capabilities. Adjusts the height of equipment from the ceiling plane. Thanks to it, the projection of the image onto the projector screen can change its location.
- Platform. The equipment is located on it. There are both universal platforms and mounts tailored for a specific brand. Some models allow you to change the angle of the platform.
When purchasing a universal ceiling mount, be sure to check how much your equipment weighs. The stand must correspond to this parameter.
It is also necessary to pay attention to the height of the bracket, it can be fixed or variable
The next parameter to be guided by when choosing is the correspondence of the holes to the gaps on the platform. Even if the misalignment is 3-4mm, it may not be possible to install the projector on a ceiling.
We pay attention to such a parameter as the length of the rod when the platform is raised. In rooms with very low ceilings, it may be difficult or impossible for the projector to project images onto the screen.
In this regard, experienced craftsmen have one proven method. To calculate the exact length, measure the height of the room and subtract the distance from the floor to the screen from the resulting value. The error should not be more than 10 centimeters.
When installing a projector bracket on the ceiling, it is necessary to take into account such an important indicator as the surface of the ceiling covering. The standard projector mount is designed for a horizontal plane. If the top arch has a slope, an additional adapter must be purchased before installing the projector. By the way, it allows you to mount the ceiling projector not only on an inclined vault, but also on a beam.
Selecting a screen by surface material
Manufacturers of projection screens offer designs with different surface finishes to ensure the highest quality video images. The choice of screen based on the surface material parameter depends on its purpose and the room in which the structure is planned to be located.
The main parameters of the surface material are the following:
- The gain indicator is a value that indicates the light reflection of the canvas. The higher the ratio, the brighter the video clip will be, allowing viewers to see it from a far distance.
- Contrast is an indicator of the accuracy of displaying light and dark fragments of video material.
- Viewing angle is a value that characterizes the part of the space where it will be most comfortable for viewers to look at the screen.
A universal option for home movie viewing would be a screen with a white matte surface. Thanks to the wide viewing angle and accurate color reproduction, the screen will convey the quality characteristics of the video and make viewing comfortable. This screen is labeled Matte White.
To achieve the brightest image on the screen, you need to choose a bead-coated canvas, which is labeled by manufacturers as Glass Beaded. It has a mirror reflective surface. And the bead coating is a spraying in the form of glass chips, which helps to reflect the light flux. This allows the screen to be mounted close to the audience or even on a table in front of the audience. This screen is used in rooms with fairly bright external lighting.
To enhance the contrast of the image on the canvas, you need to install a screen with a gray surface, which manufacturers call HiDef Gray or High Contrast. This projection screen clearly conveys rich black shades, without darkening the light gamut of the image.
You can learn more about the intricacies of choosing a projection screen here:
Installing Fasteners
The work of attaching brackets for a projector to the ceiling, regardless of its model, is carried out in the standard way:
- holes are made using a hammer drill;
- dowels are inserted into them;
- Screws are screwed in through the holes in the mounting panel.
There is nothing complicated about how to mount a projector on the ceiling, but this is provided that the ceiling in the house or apartment is concrete or wooden, and the owners are comfortable with the presence of visible wires. Contemplating them under the ceiling surface is not entirely aesthetically pleasing.
To prevent wires and sockets from spoiling the appearance of the ceiling and the style of the interior of the room, it is advisable to plan the installation of the projector on the eve of the renovation, when it is possible to place communications behind a suspended or suspended ceiling structure or lay a channel for cables in the concrete ceiling.
If the decision to purchase a projector was made after the renovation was completed, you need to think carefully about how to install it.
Mounting to concrete ceiling
If the decision to install the emitter was made after the renovation was completed, then for installation of the equipment it is recommended to purchase a cable duct that will help disguise the electrical wires and not spoil the appearance of the room. Otherwise, the features of mounting the bracket are no different from the procedure described above.
Mounting to plasterboard ceiling
A plasterboard ceiling allows you to disguise electrical wiring, including the wires that power the projector. However, before carrying out such manipulations, it is recommended to make sure that the electrics hidden by the suspended ceiling will be reliably protected from moisture.
You can install fasteners for a compact projector using butterfly dowels, which open when screws are screwed into them. This design will be able to hold equipment whose weight does not exceed 5 kg. If the equipment weighs more than 5 kg, then the installation of the ceiling mount for it must be done in a metal profile holding the drywall. To detect it, just use a magnet.
In addition, to install a bracket on such a ceiling, you can make a hole in the drywall and secure the structure to a concrete base. This installation option will require subsequent masking of the projector mount outlet. A polyurethane socket is suitable for this purpose.
Armstrong ceiling mount
The Armstrong ceiling is a cellular frame, in sections of which decorative slabs are placed. To install ceiling fasteners, it is enough to remove one or more ceiling elements and install them to the main ceiling according to the classical scheme. It is recommended to place the communications necessary for the operation of the projector in a special corrugated hose.
You will need to make a hole in one of the plates to bring the bracket rod out. After completing all the manipulations, you need to return the ceiling elements to their place and connect the projection installation. If you need to remove wires from under the ceiling, you can also use a cable duct to disguise them.
Attaching to a suspended ceiling
If you plan to install a stretch ceiling in a room, then it is recommended to combine the installation of a video projector on the ceiling with cosmetic repairs. In this case, before installing the tension fabric, you will need to secure the bracket. If the mounting rod is not long enough, then between the main ceiling and the mounting plate you need to install a mortgage that adds height to the bracket.
Often the decision to install a ceiling mount for a projector is made after tensioning the canvas. In this case, you need to figure out how to attach the projector to a suspended ceiling. To solve this problem, you will need to contact specialists who will partially or completely dismantle the top and, after installing the bracket, return it to its place. As a last resort, you can use thermal rings to make a hole in the canvas and install the mount on a concrete base. But due to the fact that for ease of installation the hole will have to be made significantly larger than the diameter of the bracket pipe, you will then have to think through various options for masking the hole in the ceiling.
Wall mount
To place the projection unit on a wall, you must purchase the appropriate type of mount. After purchasing and determining its location, you need to screw the bracket to the wall at the designated location. For fixation, you need to use dowels or anchor bolts (depending on the dimensions of the equipment). To complete the installation of the projector, you need to secure the equipment to the bracket.
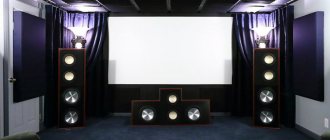
Installing the projector on the ceiling
Attaching projection equipment to the ceiling has its own characteristics. This is harder to do than with a TV or speakers. The image on the screen should be transmitted as clearly as possible. Only with proper installation will watching a movie bring pleasure and delight you with a bright picture.
Determining the height and installation location
Where to hang the projector is determined by the shape of the room, the size of the screen and the characteristics of the equipment itself. Also take into account obstacles in the path of the rays - chandeliers, air conditioners and other devices. They check whether pets or people can damage the equipment (this is likely if there is a high podium in the house).
Before installation, calculate the projection distance between the screen and the lens. To do this, you need to find the projection ratio in the instructions for the device. The value is represented by a numeric range or a single digit. To obtain the desired value, multiply the screen width by the projection ratio, expressed in inches or centimeters. So, for a screen with a diagonal of 100 cm with a projection ratio of 2:1 to 3:1, the distance should be 200-300 cm.
Using the same formula, they will find out what size screen is needed if the equipment must stand at a certain point. Then the distance to the planned location is divided by the projection ratio and the required width is obtained. For example, 10 m/2:1=5 m.
When choosing a location for the projector, you need to consider:
- seating arrangement - they are not placed at the bottom if the equipment is heavy, especially when the home theater is used to show cartoons to children;
- places of sockets - the cable length should be enough to connect to the power supply;
- image quality - the picture will be different depending on the distance even if the calculations are correct, so you need to try several positions.
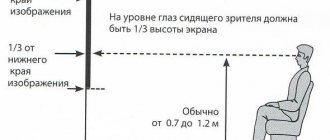
Next, find the amount of vertical displacement of the projector (in percent) at which the image is displayed correctly. This parameter is also indicated in the instructions. With a positive value, the image is located above, with a minus value, below the lens. Positive numbers are more important because the equipment is mounted upside down.
At the next stage, the optimal height is calculated using the formula: the screen height is multiplied by the vertical displacement indicator. For example, if the screen height is 124 cm, and the vertical offset is +/-96.3%, or 0.963, the result is: 124 * 0.963 = 119.4 cm. This means that the equipment must be installed accordingly up to 119 cm above or 119 cm below the middle demo panel.
Another important value to figure out before mounting your projector to the ceiling is the horizontal lens offset. The lenses should be aimed at the center of the screen. The position is calculated using the previous formula, but takes the horizontal offset (%) multiplied by the screen width.
Complex calculations are more often used when installing demonstration equipment in large rooms. At home, it is often enough to calculate the height of the bar (X), which is determined as follows:
X=A-B-C , where:
- A is the height of the walls;
- B is the distance from the floor to the bottom edge of the demonstration screen;
- C is the vertical length of the canvas.
For example: 2.5-1-1= 0.5 m.
Most brackets make it possible to move equipment vertically. This allows you to find the most suitable point. If the rod has a fixed length, then the bracket is mounted at the height recommended by the manufacturer.
Mounting the bracket and securing the projector
When all the calculations have been made, select a mount that matches the brand of the projector and connect the cables. Then proceed to installation:
- Screw the projector to the legs or lower platform of the bracket in accordance with the manufacturer's recommendations. Check the reliability of the fastening.
- Open the screen on which the broadcast will be carried out.
- Adjust the height of the suspension.
- Check the picture quality by first attaching the projector to the ceiling. The boundaries of the frame when zooming in the middle position should coincide with the edges of the screen, as well as the center of the image and the demonstration canvas.
- From the middle of the screen, draw a perpendicular line along the ceiling, marking the place under which the center of the lens should be placed.
- Holes are drilled in the concrete ceiling and plastic dowels are inserted. In wooden houses, beam ceilings are used for this.
- Center the device so that the corners do not outweigh.
- Screws are tightened securely.
- Adjust the position of the projector along the X, Y, Z axes.
Wires can be hidden in the ceiling. To do this, a groove is cut into the ceiling. After laying the cables, the surface is leveled with putty. An easier way to hide wiring is to use a plastic cable duct.
Final projector settings
After installation is complete, turn on the projector and adjust focus, lens shift and other parameters: brightness, contrast, color. If you cannot install the equipment perpendicular to the screen or if it is above or below the acceptable zone, you will not get a rectangular frame. Then use digital keystone correction - this function is provided by the projector software. But if the deviations are significant, the picture quality will deteriorate.
Sometimes it turns out that the distance to the screen is not enough or it is too large. This may be dictated by the configuration of the room. Then a long-focus or short-focus lens will correct the situation. The accessory is sold separately from the multimedia system.
Incorrect installation of the projector will affect the image quality. If it is located too close, the picture will be small; if it is too far, it will go beyond the boundaries of the screen canvas.
Projector ceiling mount: selection criteria
Ceiling kits for mounting projectors on ceilings include the following plastic or metal parts that form a single composition:
- The mounting panel is made as a plate. The stand is attached to it to the ceiling surface.
- The rod is a structural element that determines the distance from the ceiling to the projector and allows you to change this value if necessary.
- The mounting platform is a stand where the projector itself is installed.
- A special mounting unit that allows you to fix the projector at the desired height.
- A mechanism for rotating the projector, with which you can broadcast the image in the desired angle.
Universal bracket - ceiling fastener design
When choosing ceiling fasteners, you must be guided by the following criteria:
- Projector weight. The fastener must be able to withstand the weight of the image translator.
- Location of mounting sockets. It is necessary that they match each other on the projector and mount. Even a minimal discrepancy between the holes will not allow you to properly install the projector under the ceiling.
- Rod length. Despite the possibility of adjustment, such elements may be limited in terms of minimum and maximum length. Therefore, the height of the room must be measured in advance, as well as a decision on how far from the ceiling the projector will be placed. An incorrectly sized boom will result in the projector only projecting the image to the top of the screen.
Distance diagram in the room
Important! The optimal placement of the projection installation is its correspondence to the upper edge of the screen surface. The length of the rod is calculated as follows: the height of the screen and the distance from it to the floor are subtracted from the total height of the room. An error of 10-15 cm is allowed.
- Design features of the ceiling. Standard projector mounts are designed for placement on flat horizontal ceilings. However, if you want to mount the fastener on an uneven surface, you will have to use an adapter. It will help not only fix the structure on a sloping ceiling, but also on ceiling beams or rails.
People knowledgeable in this matter advise buying parts and assembling fasteners for specific premises. Thanks to modern technologies, stores present a wide range of brackets not only in materials used for the manufacture of parts, but also in color shades.
Important point! Mounts for projectors on ceilings are mounted with the simultaneous installation of the screen in order to eliminate possible discrepancies during further use of the products.
Ceiling mounting design requirements
The conditions for installing a projector on the ceiling are somewhat different from the mounting diagrams for any other equipment. A TV, monitor screen or speaker can be fixed on any suitable-sized bracket without meeting additional requirements for geometry, body tilt or height of suspension above the floor.
For a projector on a ceiling bracket, special calibration tables have been developed and used, although at home they usually follow the simple recommendations given in the diagram when setting up the device.
Projection technology produces images on the screen with high image magnification, so the bracket or ceiling holder for the projector must provide:
- Height adjustment of the housing;
- Installation and fixation of the tilt angle of the optical axis of the projector;
- Possibility of adjustable rotation of the housing in a horizontal plane or with a slight negative angle.
Advice! If the ceiling bracket needs to be periodically reconfigured to different positions or angles of inclination, then it is best to choose a model made of light alloys; plastic stands and holders are usually used in classrooms and presentations.
Why is a ceiling bracket better than a wall bracket?
Most users agree that the main advantage of installing projection equipment on a bracket on the ceiling is that the ceiling projector, being in the center of the room, does not interfere with movement around the house.
In addition, mounting the projector to the ceiling ensures maximum quality of the projected image. The optical axis crosses the screen at a very small angle, resulting in almost no image distortion. If you use a wall bracket instead of a ceiling one, the angle of projection of the image from the side wall onto the screen located in the center of the room will increase from 3-4o to 20-25o, the picture will be slightly blurred along the horizon.
In addition to the convenience associated with placing the device on a special bracket for the projector on the ceiling, the use of a vertical suspension on a metal stand significantly increases the accuracy of displaying the image on the screen. Any wall mount or cantilever mounted bracket must be adjusted periodically due to sagging and deflection. The heavier the video projector, the more often you need to make adjustments to the settings.
A ceiling suspension for a projector is free from such problems; the load from the weight of the device practically coincides with the axis of the vertical stand, so even after several years of using the video projector, no adjustments or adjustments will be needed.
Varieties of ceiling brackets and racks schemes
As optics and element base develop, projectors become lighter and more compact, the need for heavy mounts and brackets becomes minimal and disappears.
For non-professional home projectors, four types of suspensions are used:
- Universal projector ceiling bracket with telescopic stand;
- Stationary “crabs” with a universal ceiling mount for the projector;
- Elevator fastenings-platforms;
- Suspended swinging platforms.
For your information! All stationary brackets are equipped with sliding strips with holes for screws. This method guarantees reliable fixation of the projector even at a large angle of inclination of the housing.
In educational institutions, conference rooms, offices and pavilions, quick-release ceiling mounts are often used.
Essentially, these are two brackets fixed to the ceiling, slightly larger than the dimensions of the case. This system allows you to install the projector inside the mount in a matter of seconds and, if necessary, just as quickly remove it at the end of the video demonstration.
A simple bracket option for a video projector
Many electronics manufacturers equip their projectors with budget-level telescopic brackets. In most cases, the ceiling mount is only suitable for a given model of projector.
And the positioning accuracy of such products remains low, so owners prefer to install video projectors with a standard bracket on a minimum rod length.
A ceiling stand for a projector is usually made in the form of a square or round telescopic pipe connected to a thrust bearing and a “crab” using ordinary self-tapping screws. In the upper part there is an adjustment unit, with the help of which the rack is aligned vertically.
Ceiling brackets with retractable suspension are convenient in large rooms with a ceiling height of 3-3.5 m.
Classic bracket model with a “crab”
Today this is one of the most popular and sought-after ceiling mount options for a projector. Structurally, the holder consists of three elements:
- Mounting heel, with the help of which the entire structure is fixed to the ceiling surface using dowels or anchors;
- A rotary joint connecting the heel and the crab. Thanks to the built-in ball joint, the projector body can tilt and simultaneously rotate around the axis of the bracket;
- The unit for gripping the body of the device, also known as the “crab”.
For most models of ceiling brackets, the hinge and heel have a similar structure; the difference can only be in the shape and size of the plate, while the “crab” design can be very different.
This can be an X-shaped fixed grip or several movable bars mounted on a disk holder.
For full-size projectors, ceiling mounts with extendable parallel clamps are used.
Some modifications of the brackets can be installed on a ceiling guide rail, which allows you to change the location of the projection equipment on the ceiling.
Elevator brackets
The most expensive and difficult to install. This type of suspension is designed for use in conjunction with suspended ceilings. As a rule, the dimensions of the elevator and support platform do not exceed the dimensions of one section or cassette of the suspended ceiling. It is not difficult to install such a device, but only a specialist can configure the process of opening and closing the holder.
The device is convenient in that the device is stored in a ceiling niche, which significantly reduces the risk of equipment damage and imbalance of the video projector settings. This type of device for a projector and the process of removing it from a ceiling niche looks quite impressive in appearance, so craftsmen often make homemade ceiling brackets for a projector with their own hands using a simplified design.
Suspension systems
The weight and dimensions of some projectors, especially older ones, with powerful optics and a power supply, may exceed the design limits for rack mounts, so for older designs, brackets with support platforms and a suspension in the form of a loop are used.
Typically, such video projectors are designed in a desktop version, so the housing is not equipped with mounting threaded bushings. In order not to violate operating conditions, projection devices are not suspended, but installed on suspended platforms mounted on suspensions on the ceiling slab.
Basic nuances of installing the bracket
Before installing the fastening to the ceiling surface, it is necessary to determine the sequence of work. In order for the projector to operate fully, it will require signal sources (audio and video), as well as electrical current and its manufacturer (outlet).
Setting up the projector
Standard projector mounts already come with wiring hidden inside the boom. However, the need to install the socket on the ceiling surface does not disappear, since in most brackets the cable length is from 0.8 to 1.5 m.
Cables for sound reproduction are purchased separately, taking into account the required length. If it is possible to hide the wires under the ceiling, do not neglect this. If there is no additional space to hide the cables under the base of the ceiling surface, you can mount them in plastic gutters, which will make the appearance of the structure more neat.
Screen installation
Form factors
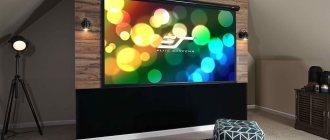
How can you identify a projection screen? What it is? This is a flat, light surface onto which an image is projected. First of all, I would like to draw your attention to the word “smooth”. This characteristic is perhaps the most important; it determines whether the image will be distorted due to the fact that the surface is not smooth enough. Yes, the polymer fabric of any screen, even a very high-quality and expensive one, warps over time and ceases to be smooth. By the way, a good sign here is the weight - it is directly affected by the thickness of the canvas; with greater thickness it is less susceptible to warping. The cardinal solution is models with constant tension. Their design provides for fixation on four sides - top, bottom, right and left. This dictates the need for a rigid frame structure, which, as a rule, is non-dismountable, i.e. It is mounted permanently, and you can only remove it from view by blocking it with something, curtains or sliding panels. There are options with tension adjustment. As a rule, such specimens are quite large, from 3 meters in width. Smaller screens, as well as those that you would like to remove as needed, provide tension on the canvas under the influence of its own weight. Therefore, the rule here is also true: the heavier, the better. Most provide tension only vertically, but there are models that stretch the canvas horizontally as well. In addition, wall screens are motorized. As the name implies, they have a motor in their design - an electric motor, controlled by a wired or wireless remote control - which allows you to extend or retract the canvas. Finally, it is necessary to mention floor-mounted models. This group includes mobile structures of the “tripod” type - on a tripod, as well as those that can be mounted in a niche on the floor or in furniture.
Characteristics of projection screen surfaces
Sometimes, out of a desire to save money, the customer just wants to use a flat white wall instead of special equipment. One of the main reasons why you shouldn’t do this is the gain of the projection surface. The fact is that it rarely reflects light like a mirror, where the angle of incidence of the beam is equal to the angle of reflection, because designed to reflect the light of the projector towards the viewer. But still, the canvas is a non-intelligent device and cannot itself determine where the light source is and where the viewer is sitting. Therefore, selection in each specific case is the task of a specialist. In addition to canvases for direct projection, there are polymer materials for reverse projection. The terms “forward” and “reverse” here characterize the position of the projector relative to the screen and the viewer. When both the viewer and the video projector are on the same side of the screen, the projection is called forward, but when the screen is between the viewer and the projector, the projection is called reverse. So, rear projection requires a special canvas. Another task, which is not so rare, is to hide the acoustics from the eyes of the audience. In this case, the sound reinforcement system is located behind the screen, and an acoustically transparent material is used as a canvas. By the way, about a flat white wall. There are developments of special paint on the market. After application to the wall, the surface becomes similar in properties to traditional projection surfaces.
Instructions for mounting the projector to the ceiling
Most bracket models are equipped with one ceiling plate. This option is quite convenient if the projector is mounted on a concrete floor slab.
In order to secure the bracket, it is enough to punch four holes in the ceiling slab with a hammer drill and fix the projector using dowels.
For ceilings finished with plasterboard or tension fabric, it is recommended to use structures with an additional fastening frame, as in the photo.
But you can also use the rack version. To install the ceiling holder on a suspended or plasterboard ceiling, you must perform the following operations:
- Mark a place on the rough ceiling plane, determine the point of passage of the vertical axis of the bracket;
- Using a 150x200 cm plywood board and two galvanized ceiling hangers, an embedded element is assembled, which will be hidden behind a suspended or plasterboard ceiling;
- Holes are drilled in the plywood according to the markings in the ceiling plate, after which the bracket stand can be securely fastened with screws or self-tapping screws.
If the design uses a frame instead of one telescopic stand, then the fastening is done through two half-clamps, cut into the plywood at a distance of 150 mm from each other. This makes the system self-leveling.
For the rack-mount version, adjustment along the vertical axis is carried out using a plumb bob and washers.
All that remains is to secure the bracket rails to the projector body and hang the device from the rotating unit.
Where to install the projector on the ceiling
In presentation rooms and lecture halls, it is advisable to install the projection installation at a short distance from the screen, in the first third of the ceiling space. The reduced distance makes it possible to reduce the thermal load on the device, and in addition, in case of problems, there is always the opportunity to approach and correct the direction of the image.
At home, the projector is placed on a ceiling bracket on the wall opposite the screen. On the one hand, this allows residents to avoid collisions with the mount, and on the other hand, it significantly reduces the amount of dust settling on sensitive optics.
Almost all models of modern projection installations have a built-in function for correcting the horizontal direction angle to the screen. This allows you to mount the equipment on the bracket, not necessarily along the axial screen. The projector can be moved left and right by 1.5-2 m. Although, as users note, the color rendition of the image deteriorates somewhat.
Ceiling projector distance from ceiling
The main advantage of the universal mounting system is the smooth adjustment of the height of the suspension. The adjustment range is from 30 cm to 1.2 m. The distance cannot be reduced less than the recommended one, as the cooling conditions of the device worsen.
Most users prefer not to use too long gimbal stands. On the one hand, this impairs the view for spectators, on the other, it sharply reduces the rigidity of the ceiling mount.
If the projector is installed in an apartment of a panel multi-storey building, then it is best to choose a ceiling bracket model without a stand, otherwise the neighbors walking above will lead to “shaking” of the image.
Advice! If you cannot do without a rod, then it is better to choose box-shaped or frame ceiling holders.
Distance of ceiling hanger for projector from wall
It is possible to obtain high image quality only if the requirements of the manufacturer are met. The optimal distance from the lens to the screen depends on the characteristics of the optical system:
- For long-focus technology, the optimal distance is 3.7-4 m;
- Standard models are installed at a distance of 2.0-2.5 m;
- Short throw projectors are placed at a distance of 1.5-1.8 m.
The screen sizes change accordingly; the recommended diagonals are shown in the diagram below.
For your information! The further away from the screen, the easier it is to install the projector, but as the distance increases, the brightness of the image decreases sharply, and stronger shading of the room is required.
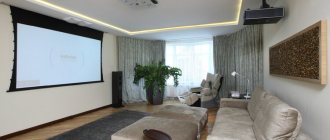
Where is the best place to place the screen?
To begin with, you must choose the best location for your screen. It all depends on the layout of the room in which your home theater will be located. The most important rule is the following: choose a wall that does not receive direct rays of light, otherwise the image will end up blurry and you will not get pleasure from viewing it. If, however, there are no other options and the wall on which direct light falls will be intended for watching movies, you will have to buy a projector screen that will reflect diffused lighting. Also, if you are painting a screen on the wall yourself, use a special paint that reflects diffused light. You can buy it at hardware stores. Another option is thick curtains for windows that block out the sun's rays.
I decided to help my friend improve her personal life, but she greatly regretted it
Take off your toys: 200 Christmas tree recycling stations will be opened in the Moscow region
Menshov and Alentova are both complex people. How they get along together for over 50 years
Features of mounting the projector bracket on different types of ceilings
Fastening such equipment usually does not cause difficulties if you carefully study the instructions. It is also necessary to select the right parts to create a strong and reliable structure. Installation involves several methods, depending on the type of ceiling:
Suspended plasterboard ceiling
In this case, the weight of the stand and projector included is of decisive importance. When this value does not exceed 5 kg, there is no reason for concern at all. A plasterboard ceiling can easily support the load of a platform with fasteners.
Projector mounted on plasterboard ceiling
Heavier structures must be mounted on a frame mounted during the construction of a plasterboard ceiling. Its metal base can easily support massive brackets.
Advice! In order not to dismantle the coating and find metal profile elements, a regular magnet will come in handy.
Another option is to make a hole in the drywall and attach the device to the rough ceiling surface. This method has an undeniable advantage - the ability to hide all the wires under the suspended ceiling, if this has not been done before. The hole can then be hidden under a decorative rosette made of polyurethane.
The best fastening for the device to a metal profile is a butterfly dowel.
Suspended ceiling installation
For Armstrong-type ceiling systems, it is best to immediately find a holder for the projector, designed for installation with fixation on elements of the metal ceiling profile.
In this case, installation comes down to a few simple operations:
- At a selected point on the ceiling, one or two facing slabs are removed;
- Wiring for connecting the projector is installed in the ceiling space;
- A hole for the stand is drilled in the decorative panel using a ring drill;
- A jumper is installed on the profile of the suspension system, a heel, a stand and a “crab” are attached to it;
- The remaining suspended ceiling panels are returned to their place.
Sometimes it is not possible to find a suitable bracket model designed for installation on suspended systems. In this case, it is enough to cut out a decorative panel from plywood, lay it on the profile and attach the heel of the device to it.
It is more difficult to install a ceiling holder for a projector on a suspended ceiling. In this case, an additional wooden insert must be mounted on the concrete floor slab, to which the heel will be attached through the tension membrane.
Features of fastening to suspended and suspended ceilings
The method of mounting the holder depends on the finish of the floors. For suspended and frame structures, the process is slightly different.
Plasterboard ceiling
The total weight of the projector and bracket is taken into account when working with this type of finish. So, with a weight of up to 5 kg, equipment is hung on gypsum boards. For this purpose, you can use butterfly dowels, which open after screwing in the screw and hold the device.
For greater weight (up to 10 kg), the holder is attached to a metal frame, to which drywall is hemmed. The location of the profile is determined with a magnet.
If heavy equipment is used, a hole is drilled in the drywall and the holder is secured to the base ceiling. Then the slot can be hidden with decorative polyurethane overlays.
Armstrong cassette ceiling
This finish is the most convenient because it allows you to easily dismantle one slab. Install the bracket like this:
- Remove the cassette.
- Wiring is laid between the base and finished ceilings.
- A hole is drilled in the panel for the stand and cable.
- A holder with a rod is attached to the rough ceiling.
- A drilled cassette ceiling tile is placed on the stand and the wires are passed through the hole.
- Return the removed elements to their place. Then the “crab” is screwed on and the projector is attached.
Stretch ceiling
This is one of the most problematic options, so it is better to contact the company that installed the ceiling. A beginner will most likely ruin the film coating and the canvas will have to be changed.
There are two ways to install the projector on a suspended ceiling:
- On the embedded part . At the point where the bracket is attached to the floor slab, a wooden beam or plastic platform is mounted flush with the suspended ceiling. After stretching the canvas, the holder for the projector is screwed to the embedded part located in the interceiling space.
- On a concrete floor with outlet to the outside . If the length of the bracket rod allows, the rack is attached to the sub-ceiling. Then a hole is cut out in the tension fabric, after gluing a tread ring so that the hole does not come apart. This method is more complicated, since you need to accurately calculate the location of the cutout, otherwise folds will form after stretching. In addition, the integrity of the canvas is compromised.
Due to the high risks and large amount of work required, it is best to install the projector in the ceiling. If such a need arose after the repair, then the tension fabric is partially dismantled.
Read more: How to remove a suspended ceiling
It is also important to consider that most popular projection equipment models become very hot during operation. From high temperatures, the PVC film, which is used as a canvas for a stretch ceiling, can be deformed, therefore, the further away the projector is located, the better.
Projector Ceiling Mount Manufacturers
The highest quality hangers for projection equipment are produced in Germany, they are expensive, very reliable and durable. On average, the price is 15% higher than that of the nearest European manufacturers.
Good reviews about ceiling holders, models of the same type with “Sunne” are 15-20% cheaper, and the quality and reliability of the holder are almost the same.
The original model of the ceiling bracket can be easily distinguished from a cheap fake by the quality of the paint. Most holders are painted with powder paints and special antistatic enamels. Products made in Southeast Asia are almost always painted with alkyd enamel.
Projector mounting requirements
When choosing a specific fastening model, you need to take into account the requirements for such devices. Criteria for selecting a projector ceiling mount:
- The strength of the device must correspond to the weight of the equipment. It is recommended to give preference to fasteners with a large margin of safety. For example, for a projector weighing 10 kg, the optimal mount would be a device with a maximum load of 12 kg.
- Location of mounting sockets. When choosing a bracket, make sure that the holes on the installation platform and the projector match. Even minor discrepancies may make installation impossible.
- Rod length. For correct operation of the equipment, you need to correctly calculate the installation height of the projector. Although some brackets can adjust the length of the mount, there are limitations.
For the device to function properly, it must be at the same height as the top edge of the screen or interactive whiteboard. To calculate the optimal length of the rod, subtract the distance from the top edge of the screen to the floor from the height of the room. The difference will determine the height of the equipment. Deviations of 10-15 cm are allowed.
To mount a short-throw projector, it is recommended to use a wall-mounted holder.
DIY ceiling bracket for a projector
A simple budget version of the holder can be made with your own hands. Its design will not have systems for adjusting the angles and height of the suspension, but the ceiling suspension will be durable, reliable, and most importantly - cheap.
To build the bracket you will need:
- Aluminum pipe;
- Galvanized corner;
- Mounting perforated plate to fit the projector;
- Fasteners, bolts and screws.
The diagram of the ceiling holder is shown in the photo.
For hanging from the ceiling, two corners are bolted to the top of the stand.
The pipe is connected to the plate in a similar way. If the lower pair of corners is secured to wing nuts, it will be possible to adjust the angle of inclination of the device. The presence of perforations on the plate ensures reliable and efficient removal of warm air from the video projector, so the operating time of the device is almost unlimited.
The most difficult part of the assembly is to accurately align the axis of the stand with the center of mass of the projector. You have to select the attachment point experimentally. The optimal height of the stand is 60-70 cm. Since there are no recommendations for installation, the length of the ceiling rod for a homemade bracket also has to be selected empirically.
The network wire and cable from the computer are laid inside the pipe and led through a corrugated hose to the corner of the room. In general, the ceiling system cost a little more than 500 rubles.
Fastening technique
After the first step towards creating a home theater has been taken, the projector has been purchased and delivered to its destination, you have to think about how to install the projector, what kind of projector mounts you should definitely purchase.
It is good when a technical product is purchased before repair work is carried out. There are also no problems with how to hang a projector on the ceiling if, during repairs, long before purchasing the technical equipment, the owners nevertheless foresaw the likelihood of purchasing a projector, so they took care of creating a mini-zone focused on mounting the projector to the ceiling.
If you are one of those who, just a few years ago, did not dream of purchasing such a device, and are now in a dilemma, not understanding how to properly install a projector, then it will be useful for you to familiarize yourself with the recommendations of those who have already traveled this path.
Preparatory work
Initially, you should visit a retail establishment to select a suitable ceiling mount for the projector. The store may offer you several types of brackets, differing from each other in several respects.
First of all, you should decide what material you would like the ceiling bracket to be made of. Most often, users purchase metal or plastic structures, although it is also possible to purchase wooden models.
The bracket, with which it is possible to mount the projector, consists of three components:
- installation site;
- rods;
- platforms.
It is important to pay special attention to the modification of the platform, which can be tailored to a specific projector model, or can be universal. If you purchase a bracket with a universal platform, then you can install not only a projector of any weight and configuration, but also even mount a TV.
No matter how much the salesperson in the store convinces you that a particular bracket model is ideal for installing a projector on the ceiling with your own hands, do not give in to such persuasion, but personally examine the surface and make sure that the mounting points on the projector body and the bracket pad exactly match.
Since the wall or ceiling mount for a projector should be fixed once, and not be involved in such manipulations constantly, it is important to pay attention to the modification of the rod. It’s great if it can be easily adjusted. Unfortunately, not all models have such characteristics, so it is advisable to decide in advance at what height the technical device should be fixed so that the image is subsequently reflected on the screen in a high-quality manner, without being accompanied by distortions.
Experienced users emphasize that a mount for a projector on a wall or on a ceiling can be purchased as a complete set, but if you wish, you can buy each component separately, thereby selecting what, in your opinion, is most suitable for your projector.
Don’t be particularly alarmed by the fact that the ceiling in the room is not accompanied by a horizontal surface. By purchasing a special adapter, the projector can even be mounted on a beamed or dome-shaped ceiling.