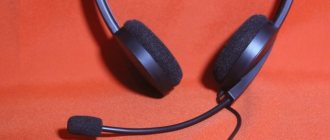
Checking the headset via Windows
Depending on the version of the Windows operating system, headset diagnostics will occur differently.
Windows XP
For Windows XP, you need to perform the following algorithm of actions.
- Open Start.
- "Control Panel".
- "Sounds and audio devices."
- "Speech".
- Run the test in the “Speech recording” section.
- Click “Next” after the “Audio Device Check Wizard” appears.
- Say a few words when the microphone test window opens. If the device is working, the playback indicator under the word “Recording” will fluctuate up and down.
- Click "Next".
- Speak some text when the speaker test window appears. If everything works correctly, the user will see how the indicators react in the “Record” and “Playback” tabs.
- Click “Next”, then “Finish” to complete the verification.
Windows 7
On Windows 7, checking the functionality of the headset looks different.
- Open Start.
- "Control Panel".
- "Equipment and Sound".
- "Managing audio devices."
- "Record".
- Next to the microphone image there is a scale - a playback indicator. If it fluctuates up and down, this indicates that the device is working. You need to click on the microphone and select “Properties”.
- Open the “Listen” tab and check the box next to “Listen from this device” to hear yourself speak, then click “Apply” to confirm the action.
- Go to “Levels” and select the desired microphone level. When pronouncing words, the user must hear his own voice.
- Return to “Listen” and cancel your changes. Record the actions by clicking “Apply”.
- Check completed.
To find out if the microphone on your headphones works through a computer running Windows 8 or 10, you need to follow the same steps as Windows 7.
Advice! To open the “Recording” tab, right-click in the tray (lower right corner) on the speaker icon and select “Recording Devices”.
Method 3: via Skype
Some time ago we published an article about setting up a microphone in Skype. So, approximately the same method can be used to check the operation of the microphone as a whole - even if you don’t need it specifically for Skype.
Skype has two verification methods - a faster one and a longer one. To quickly check the microphone, you just need to select any contact from the list of added ones and click on the “Call Quality Data” button. A window with microphone settings will open, where you should select your microphone from the list and click “Test”. The program will record a few seconds and then play back the recording.
Another way to check your microphone via Skype is to call a special audio testing service. Select the “Echo / Sound Test Service” contact, which is automatically added when registering an account, and click “Call”.
After a short message, a recording of 10 seconds will begin, after which the result will be played back automatically. It is worth noting that this method requires Internet access.
Other verification methods
There are other methods for checking the functionality of a headset with a microphone if the above algorithms using Windows OS did not give the necessary results or for some reason are not suitable.
Checking the headset using audio recording
You can check headphones with a microphone through “Sound Recording” or “Voice Recording” (the name differs depending on the version of Windows). To start the program, you need to open “Start”, then “Programs” - “Accessories” - “Sound Recorder”. In Windows 10: “Start” - “All applications” - “Voice recording”. You can also find this application through “Search in Windows”, which is located in the Start menu or on the taskbar in different versions of the OS .
To test your microphone or headphones, turn on the recording, speak the text and save. Next, you need to play the file and listen through headphones or speakers to evaluate the sound quality.
Checking the headset via Skype
To check the functionality of the microphone using this method, you must call the Echo/Sound Test Service after installing the program that automatically appears in your Skype contacts.
Once the connection is established, the system will ask you to wait for a signal and say any text for ten seconds, and then play it back. If the user hears the system prompts well, but his own message sounds unsatisfactory or inaudible at all, you need to turn to the microphone settings.
To make changes, you need to go to “Tools”, select “Settings”, then “Sound Settings”. Manually adjusting the volume of the microphone or speakers involves canceling their automatic adjustment by unchecking the corresponding boxes.
Checking the headset with online programs
Another way to find out if the microphone on your headset is working is to check it using online programs. These are resources such as MicTest, Online Voice Recorder, Speech Pad, Online Microphone and others. With their help, the functionality of the device is determined very simply: you just need to give the site access to the microphone and run the test. If everything is in order, the user will see a corresponding notification.
Important! Speech Pad is a resource designed to translate voice to text. The read message will appear on the screen, and the quality of the microphone can be judged by how correctly the spoken words are recognized.
How else can you check
You can make sure your headset is working using the Microphone Test app. You need to download it to your computer and run it, no installation required. After launching the utility, the user will see a sound scale. If the microphone is working properly, it will fluctuate depending on the volume of sounds being picked up. If the device is not functioning, there will be a straight line on the screen.
You can also use Snooper Standart to check if the microphone on your headset is working. This application provides features such as dictating text or recording sounds while the user is away. In addition to the basic functions, the utility allows you to check and configure the microphone for subsequent work. To use the program, you will need to install it on your computer.
Verification methods
There are some ways to check not through a special website, but using the operating system and other software already installed on the computer:
- using the “Windows Sound Settings” section;
- in the “record” option;
- via Skype.
All these methods allow you to verify the functionality of the device, as well as determine how well it perceives and registers air vibrations. Because when you use the “record” option, you can listen to the sound recorded by the system.
In Windows OS sound settings
One way to diagnose performance in Windows 7 is to go through the control panel to the section called “Sound”.
Next you need to follow these steps in strict order:
- open the standard “Record” program;
- make sure that there is a green checkmark next to the connected equipment;
- select the required item and click the “Properties” button;
- make sure that:
- o the required controller is selected;
- o in the “Device Use” section, the “Use this device” option is selected;
- o in the “Listen” tab, check the “Listen to this device” checkbox.
If all operations can be completed successfully and the recording quality is completely satisfactory, then the device is configured and connected correctly. This method also allows you to verify the functionality of the headphones or speaker system through which sounds are reproduced.
Record option
Another reliable way to check the microphone in headphones on a computer is to use the option that allows you to save received sounds from a connected device. This application is quite easy to find.
To do this you need to do the following:
- press the “Start” button;
- go to the “All programs” section;
- open the “Standard” tab;
- Click on the “Sound Recording” item (for Windows 7).
After completing all of the above steps, a window will open containing a button called “Start sound recording.” By clicking on it, you can record the sounds perceived by the computer. After finishing recording, a window will appear allowing you to save the recorded data.
Skype
Also, if necessary, you can easily check the audio recording through a communication program called “Skype”.
To do this you need:
- Having entered the application, you should find the item “Tools” -> “Settings”;
- in the left half of the window that opens, you should find the “Sound Settings” section;
- in the “Microphone” section, exactly the equipment that needs to be checked must be selected.
After all of the above steps have been completed, you should make a follow-up call on Skype.
You can do this as follows:
- Signing in to Skype;
- you should find Echo in the contact list (this contact can also be called SkypeTestCall, SoundTestService);
- Next, you need to click the “Call” button - it is located on the call panel
If the test proceeds normally, and all instructions from the automatic service can be followed without difficulty, then the microphone is fully operational.
The nuances of connecting to a computer or laptop
There are several ways to connect headphones with a microphone to the device, depending on the available connectors on your computer or laptop.
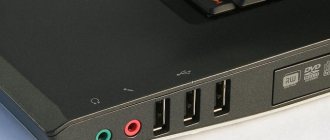
- Two plugs of pink (microphone) and green (headphones) are connected to the corresponding sockets on the back or front panel of the computer.
- If you have a combined plug and input (they are usually typical for laptops), then to connect headphones with a microphone to them you should buy a headset for mobile devices with one combined plug, or a regular one, but with an adapter included.
- Connection via USB. This plug can be plugged into any working USB connector.
When connecting the headset to the device, you should make sure that all plugs are connected correctly: in accordance with the color and symbols near the inputs.
Advice! When setting up the microphone, it is not recommended to set its volume to maximum, otherwise the interlocutor will only hear wheezing.
For headphones, you need to adjust the optimal volume, but you need to do this based on the music, and not on the voice of your interlocutor. If, while using the headset, you discover that another person’s microphone sensitivity is set incorrectly and his voice sounds soft or loud, you can let him know about it. In this case, you won’t need to change your own settings and won’t have to be afraid of sharp sounds when you turn on music or a movie after a conversation.
How to check the microphone on a laptop?
Use the built-in Sound Recorder program or any other audio recording program and try to record, for example, the sound of your voice. Then play back what you recorded.
Is the microphone on your laptop quiet?
This means that the setup is not completely completed. Go back to “Control Panel” and then to “Hardware and Sound”. The “Recording” tab and right-click on the picture of your microphone, then select “Properties”. The following window will open:
Here you can check the properties to see if the driver is working correctly. If everything is in order, then we continue. If not, it is recommended to reinstall it.
Follow the "Levels" tab. There you can adjust the microphone recording level (Microphone slider) and, if this is not enough for you, even increase its level (Microphone Gain slider). In the “Advanced” tab, you can adjust the recording quality by selecting the bit depth and sampling frequency.
Setting up a microphone on a laptop with the Windows 7 operating system should not cause any particular difficulties, because Windows 7 and Windows 8 are very similar in their interfaces. Perhaps the only difference is that on Windows 7 there is an “Enhancements” tab, in which you can enable echo suppression mode and automatic signal level control mode.
Windows 8 owners are encouraged to look for these settings directly in the program that accompanies the installed driver.
If, after all the ordeals, the sound still does not appear, then you should check the following things.
Headset hardware problems and how to fix them
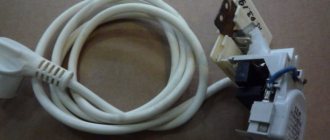
Sometimes, after connecting to a device, the headset may not work. This occurs due to both hardware and software faults. At the same time, hardware repairs involve directly repairing headphones or a microphone, which is a laborious and labor-intensive process, and is also not always economically feasible.
If you suspect that your headphones are broken, you should first check their functionality, for example, on your phone . If there is no sound, you should take another headset and connect it to the same phone to make sure its settings are correct.
If you discover that the headset does not work even after connecting to the phone, you need to carefully inspect it. The wire near the plug may be damaged; this often occurs as a result of constant bending. If a visual inspection does not reveal any damage, you can use a tester (or multimeter) and test the cable.
Advice! If you find damage to the wire, you should try to repair it. But if you don’t have the appropriate skills, and the headset is inexpensive, then it’s easier to buy a new one.
No sound may be due to a dirty plug. To eliminate the problem, just clean it with an antiseptic.
Some headphones with a microphone have a volume control. You need to inspect the slider, perhaps it is in the off position or the sound is turned down to minimum.
If the headset is working properly, but checking your computer or laptop for software errors has not brought any results, we can talk about a malfunction of the headphone jack. In this case, you should contact a service center, where for a fee they will carry out diagnostics, identify the problem and fix it.
Why the microphone on the headphones does not work and how to check it
Publication date: October 25, 2021. Category: Articles.
Computer peripherals include a huge number of modern gadgets that allow you to play, listen to music and communicate without leaving your home. Such devices include gaming headphones with a microphone, headsets, which are “2-in-1” products. Due to the large selection of different models of accessories, many users often encounter counterfeits or gadgets that are simply difficult to use. Most often, the problem is that the computer or laptop does not see the microphone from the headphones, although the “ears” themselves reproduce sound tracks well.
Before blaming the manufacturer for a defective product, you should make sure that the headset really does not work. The easiest way to carry out such a check is to use an online service.
Headset software problems and how to fix them
After making sure that the headset is working properly, you need to check that it is connected to the device correctly: in accordance with the colors or symbols near the inputs.
Connecting to the Outputs on the Front Panel of the Computer
Often the headset does not work when connected to the inputs on the front panel of the system unit. To solve this problem, you need to follow the following recommendations.
- If the front panel connectors are not connected to the system, then you need to run the sound configuration program, usually installed with the drivers. It allows you to select which connectors should be used.
- If the sound does not appear, you need to open “Sounds” and go to the “Playback” tab. If the headphones are not displayed, you need to right-click and select “Show disabled devices.” After the headset appears, click on it and select “Enable”. A checkmark should appear on the headphone logo, indicating that the device is functioning properly.
- If the problem is not resolved, you should disassemble the system unit and make sure that the microphone and headphone jacks on the front panel are connected to the motherboard.
Sound off
There may be no sound from headphones connected to the computer if they are turned off or turned to minimum. You need to click on the speaker icon in the lower right corner, select the volume mixer and check that the sound is turned on everywhere and set to a sufficient level.
Outdated or missing drivers
If the sound card drivers are outdated or missing altogether, the headset may also not work. To eliminate such a malfunction, special applications have been written, for example, “DriverPack Solution” . The program scans the hardware, finds problems and offers to install the necessary drivers.
The update can also be done manually. In the device manager, open “Sound, game and video devices”, find the sound card, click on it to open the menu, select “Update driver” and in the window that appears, run “Automatic search for updated drivers”.
Advice! Another way to install the driver is to download it from the official website of the sound card developer. This will be the best solution, because in the previous cases, any suitable drivers may be installed, which will work unstable.
A headset connected via USB requires a separate driver. As a rule, it is installed automatically upon connection or comes included on a special disk. Otherwise, you can find it yourself and download it from the manufacturer’s official page.
Viruses
One of the rare but common problems is that the computer is infected with viruses. You need to download a special treatment utility (for example, Dr Web Curelt) and diagnose the device. If threats are detected, you should act in accordance with the program's recommendations.
Reasons for a non-working microphone
There can be many reasons why a microphone may not work, ranging from the most trivial. For example, if, before turning on the microphone on the headphones, you did not move the corresponding slider on the device itself. The fact is that now many headset models have begun to be made not only with a volume control, but also with a button responsible for the operation of the microphone.
It is also quite possible that:
Drivers are missing
If you have configured your headphones, but after that you only hear silence, then most likely the problem lies in incorrectly installed or missing sound card drivers.
To test this “theory” you need to go to “Start” - “Control Panel” - “Device Manager”. In the window that opens, find the line “Sound, gaming and video devices” and double-click on this inscription with the left mouse button to get an expanded list. If you do not find your video card in this list or it is displayed as an unknown device, then you need to download drivers from the website of the manufacturer of the motherboard installed on your computer or laptop.
The microphone is not connected to the PC correctly
If, after checking your headphones, you notice that they have sound, but the microphone does not work, then you may have simply connected it to the wrong jack. When it comes to a single-plug headset or USB devices, it’s hard to go wrong. But, in the case of “ears” that are equipped with two plugs, you can get confused.
The microphone, like headphones, is always connected to the sound card in the appropriate sockets. The “ears” must be plugged into the green connector, and the microphone into the pink “plug”. Typically, this color combination works on all laptops.
Healthy! If you are connecting a headset to a laptop, there will be no such prompts, but next to each jack you will find a small icon representing a microphone or headphones.
Settings are wrong
Quite often you have to connect the microphone yourself in the settings of Windows itself. If you don’t know how to check the microphone on Windows 7 or XP headphones, then right-click on the image of the small speaker in the lower right corner of the screen and select “Recording devices” from the drop-down list.
In the window that opens, you should see a connected microphone and a “twitching” green equalizer that shows the sound level. If there is no device or the equalizer is not active, then first right-click anywhere in this window and select “Show disabled devices.” After this, you will see all disabled accessories. If your microphone is among them, then right-click on its name and select “Enable”.
Bottom line
As follows from the above, in order to check the functionality of headphones with a microphone, you need to connect them to a computer and use Windows OS or many other programs: from Skype to special applications for checking the microphone, installed on a PC or working online through a browser. And if the headset does not work, this could be due to a number of reasons: from connection errors to banal viruses. Therefore, do not despair and buy a new accessory - almost all problems can be fixed with your own hands, just like making a microphone out of headphones.