General recommendations on how to connect a printer to a computer in several ways
In most cases, a printer is a universal device and offers its user a lot of additional functions. Accordingly, such equipment can be connected to a PC using different methods:
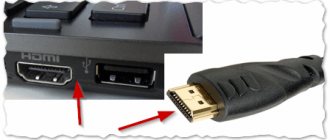
- Wired connection . This method is carried out by connecting two devices using a USB cable. To do this, connect the supplied wire with a standard output to the USB connector of the computer case, and the other to the corresponding socket of the printer.
- Wireless connection. Bluetooth and Wi-Fi modules may be involved here. Of course, this method is available for devices equipped with similar functionality.
- Opening the "Sharing" option . This method is useful if you need to print from an additional PC, and the printing device is programmed for a desktop computer.
- MFPs are connected to a computer in the same way as single devices
- Connect via built-in features . For new home PC models, the easiest way to connect a printer is assumed. To do this, you only need to turn on both devices and connect them with a cable, after which an “installation wizard” will appear on the monitor, which will independently recognize the printer and install the necessary software.
- Using drivers . You can find them on the disk that comes with your printing machine, or on the website of your printer manufacturer. But for this you need to accurately indicate the model of the device.
The methods for connecting your computer and printer to each other may vary depending on the type of operating system installed. Only the most important stages differ.
Connection procedure
Anyone can probably connect a device to the power supply, and this step should not cause absolutely any difficulties. A USB cable is usually included with the device, but it is also sold separately. The cable has two ends with different plugs on them. You need to connect a Type A plug to your computer.
Connecting the printer using a USB cable
- Position the printer so that the cable is long enough to connect to the computer.
- Plug the printer into a power outlet and press the power button. Turn on your computer.
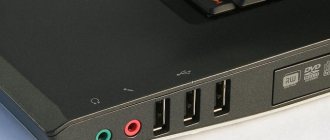
- Connect the printer to one of the USB connectors located on the computer system unit.
- Depending on your device model, the system may automatically begin the installation process, in which case you only need to follow the on-screen instructions. If this does not happen, proceed to the next step.
- Open the Start menu and select the Settings button at the bottom left of the menu.
- In Settings, select the Devices button at the top of the window that opens.
- Select the "Printers and Scanners" tab on the left side of the window and click the "Add a Printer or Scanner" button at the top of the window.
- Click on the name of your printer and the “Add Device” button.
- If the printer name is not displayed, click the "The printer you want is not listed" button and follow the on-screen instructions.
- Next, the Printer Installation Wizard will launch and the process will be carried out automatically. When prompted, insert the software CD. If the disk is missing, the necessary software should be downloaded from the printer manufacturer's website.
The printer can be connected to any free USB port
Wireless connection
The printer can connect to a computer via Bluetooth or Wi-Fi modules. Depending on the model, the device can be connected directly to the router via an Ethernet cable.
- Place the printer close to the Wi-Fi router.
- Connect the printer to a power source and turn it on. Turn on and unlock your computer.
- Connect the printer to the router via an Ethernet cable, if provided by the device settings.
- Some models must first be connected to a computer using the instructions you will find above, and some connect directly to a wireless network. In this case, use the menu on the printer screen to search for a network, select the one you need and enter the password.
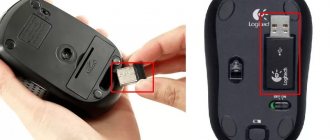
- To connect using a Bluetooth connection, you must turn on the pairing button, marked with the corresponding icon, on both your computer and printer.
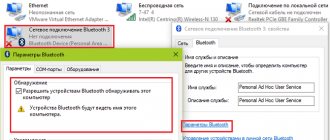
- Open the Settings tab in the Start menu, select Printers and Scanners or Bluetooth and Other Devices, depending on your connection type.
- Click "Add a printer or scanner" or "Add Bluetooth or more."
Opening network access to the printer
- Connect the printer to your computer using any of the methods described above.
- Select the Network & Internet tab from the Options menu.
- Click the “Status” button and then – “Change network settings” – “Sharing settings”.
- Open the “Home or Work” section, then the “File and Printer Sharing” tab and check the “Enable File and Printer Sharing” checkbox.
- Connect to the shared printer from other networked computers. The computer to which the printer is connected must remain turned on.
Connecting the Printer to a Windows PC: Basic Features
Connecting a printer to a personal computer requires care, because one wrong step can lead to malfunctions of both devices. We bring to your attention the exact connection algorithm:
Stretching the cable connecting two devices cannot guarantee their quality connection
USB to AMBM cable for printer
- We unpack the printer and install it in a designated place not far from the PC. Make sure that the connecting cable is sufficient for a good connection with the connectors. Connect the power cable to a 220 V socket.
- Start the operating system, wait until it is completely loaded, and then click the “Enable” icon on the printing device. In the lower right corner you will see an icon indicating the search and automatic installation of drivers (typical for new PCs).
- Next, go to the Start menu (this is the button in the lower left corner of the screen). Then go to “Settings”, then “Devices and Printers”. If your printer doesn't appear, click Add Device.
- Then select the name corresponding to the brand of your device from the list and follow the instructions, confirming your agreement by constantly pressing the “Next” button.
Each software has a license agreement. You need to familiarize yourself with it to correctly install the printing device.
How to connect a printer to a computer with a software disc
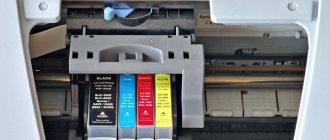
Most printer models that have complex installations come with CDs that contain all the software for the corresponding device. In this case, you need to perform only three steps one by one.
| Stages | Description of actions |
| Connecting all wires | To do this, insert all cords correctly into the appropriate connectors on the printer and computer. Connect power. |
| Opening a CD | Start your computer, insert the CD into the drive and wait for it to load on the screen. |
| Software installation | Following the instructions, complete all the steps by clicking the “Next” button, and also select the installation method: “Automatic” or “Manual”. Once installation is complete, restart your computer. |
Many printer models are compatible with tablets and smartphones, so control is convenient using these gadgets. The functions of such software include: selection of print type, number of copies, sheet orientation, etc.
How to connect a printer to a computer without a disk: use the Internet
If for some reason you do not have the installation disk for the printer, or it was badly worn out and now no longer functions, and you have reinstalled the operating system, then use the following method:
If connecting to a printer is unavailable using one of the methods, you can use another more reliable and convenient one.
- We connect the devices to each other in the same way as for the previous methods. The “Device software has not been installed” icon will appear at the bottom. In this case, we move on.
- We go to Yandex, where in the search engine we select the brand and model of your printing device, as well as the version of the operating system. Choose the site you like and see if the drivers match.
- When you find a suitable option, click “Download” and wait until the download from the file hosting service finishes. Then unpack the file and perform the usual software installation.
Connecting a printer via Bluetooth is only permissible if the two devices are located next to each other, otherwise the signal will be lost
Sharing a printer on a network using a computer
With open access to the printing device, you can operate it from anywhere on your local home network. Now you don't have to turn on your main PC to print a photo or document. To carry out this procedure without restrictions, you need to perform several actions:
- Connect the two devices using a cable and plug them into the network. After starting the devices, go to the “Start” button, then to the “Settings” tab, “Manage networks and sharing”.
- Next, go to the “Status”, “Sharing Options”, “Home or Work” button.
- Check the box next to “Enable file and printer sharing.” Next, connect from any home computer.
Remember that the computer to which the printer is connected by wires must be turned on. Otherwise you won't be able to print.
Setting up an ink jet (laser) for printing
To configure the device, you need to go to “Devices and Printers”, right-click on the desired equipment and select “Printer Properties”. To check the functionality of the machine, click on “Test Print”.
By clicking the “Print Settings” button, you can select the paper size and determine the page orientation, as well as the print quality.
How to turn on the default printer
Sometimes it happens that several printing devices are connected to the computer. But if you use one of them most often, then constantly choosing it from the list is very inconvenient. The problem is solved in a fairly simple way: you need to add the desired inkjet (laser) to the default devices:
- open control panel:
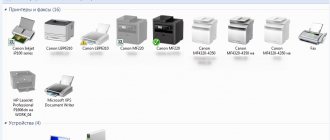
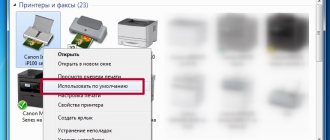
- open the “Printers and Faxes” section;
- Double-click on the required equipment and check the box next to the “Use as default” line.
For convenience, make a shortcut to the “Printers and Faxes” folder and place it on your desktop or pin it to the Start screen in Windows 10.
Setting up a print queue
Print queue management allows the user to control all documents in its list . Thanks to this service, you can re-select and send a document for printing at any time. You can also put it in “Favorites” so that you don’t have to send it for printing next time.
There are 3 types of print queues:
- general - all PC users can perform any tasks;
- direct - you can print out a document from the designated equipment;
- secure—printing the document will not be possible without authorization.
In the event of a failure, the inkjet printer (laser printer) may refuse to print documents from the queue, or will print the same document without moving on to the next one. In this case, the queue can be cleared by double-clicking on the icon of the desired device in the control panel. Next, click on the “Printer” menu and select the “Clear print queue” line.
Setting up color printing
Setting the color profile is a very important step for high-quality color reproduction when printing. You might have seen, for example, in the device settings for printing, the choice of either glossy paper or matte paper. Each type of photo paper has its own color profile in the form of a special file containing specific commands for the inkjet printer.
Color profiles for the ink or paper used can be downloaded from the Internet and installed on your computer.
You can also set up color printing manually, by trial and error, creating your own profile for the highest quality color reproduction. To do this, use the inkjet driver. For example, setting up a Canon inkjet driver will look like this.
- First, open the printer driver window. Click in turn: “Control Panel” and “Devices and Printers”. After that, right-click on the desired equipment and select “Printer Properties”.
- Select the Main tab and select Manual color settings, then click on “Set...”.
- In the manual color settings window that opens, check the box next to “Print a pattern for color adjustment” and click on the “Pattern Print...” button to set the printing parameters.
- After opening the next window, select the options as in the image below. By the way, the paper size may be different, for example, A4. After making changes, click OK.
- Make a test print by clicking OK on the (Main) tab. A sheet will be printed with several images in which the color balance will vary.
- Having looked at the result, you should select the image with the best (natural) color rendition and remember the values that are written under it.
- In the color settings window, enter the color balance values that were indicated under the picture opposite Cyan, Magenta and Yellow.
- Uncheck the box next to “Print a pattern for color...” and print the image you need.
Now printing will be done taking into account color balance adjustments, and images will look better and more realistic. Print driver windows from different manufacturers may differ in the set of commands and button layout. But in general, the algorithm for adjusting the color balance is similar, and its implementation will not cause any particular difficulties.
The nuances of connecting a printer to MacOSX by sharing it over the network
This operating system has some differences, so if you need to share the printer for public use, you need to complete all the steps up to step four from the previous section, after which we move on to the next step:
- Open the Apple system menu and go to “System Preferences”, “Printers and Scanners”, click “+” in the list that appears.
- Go to the Windows tab at the top of the new window that appears. Here, enter the name of the printer that you want to make accessible to all home PCs.
MacOS is a custom system, so connecting your printer to it will be slightly different
Setting up a printer with a computer running an Apple operating system is similar to traditional computers. The difference between connections via cable or wireless network Bluetooth or Wi-Fi for MacOS is obvious. Here it is important to follow the instructions and know the technique for connecting devices on standard WindowsXP.
MacOS
Connecting or adding printing devices on Apple's Mac operating systems is the same. Only names, window design and other small nuances may differ. The methods remain the same.
- Connect the printer and PC with a cable or add other devices to the network directly.
- Wait for the drivers to install automatically. If you need to perform this procedure manually.
- If you are connected to a network network, first “share” it.
Detailed instructions:
- Go to system settings, and there find the “Printers and scanners” section.
- At the bottom of the list, find the plus sign and click on it.
- Depending on the task, select one of the options. 1 - adding a local device, 2 - connecting via IP, 3 - connecting to a printer on a PC running Windows OS.
- At the bottom of the window, specify the name of the printer; the location may not be specified; select the appropriate driver for your model and click “Add.”
Possible connection problems
Many people have encountered errors when trying to connect a printer to a computer. To properly switch devices, it is necessary to urgently solve the problem that has arisen, and therefore find the cause.
If you do not see your device in this tab or it is not working correctly, you need to look for the cause of the failure
If the computer does not see the printer: what could it be?
Have you bought a new printer, but when you try to install the device to work via a computer, it is not visible in the devices? Most likely, the problem is in the installation disk, or more precisely, that the drivers on it are outdated. In this situation, you can download a more recent version of the utilities.
If antivirus is enabled on your OS, the program can also block the connection being created. Therefore, temporarily disable the application and restart your PC. If this action does not help, check your PC for viruses, and, of course, check that all cables and settings are connected correctly (if it is wireless switching).
The printer does not connect to the computer via USB - the OS is to blame
Most likely, this problem is caused by incorrect connection or tight wire tension. Try disconnecting the cable from both devices and connecting again. You can also check the serviceability of the USB connector on your PC. To do this, connect any other device to this output.
Often, due to lack of OS activation, the Windows system does not fully install the printer on the PC.
Go to “Control Panel” and “Devices and Printers”. In the list that appears, select the device, then right-click to open the context menu and check the “Use as default” checkbox.
Sometimes, to solve a problem with printer visibility on a PC, you need to clear the print queue or try to uncheck the “Work offline” or “Pause printing” checkboxes.
Dear readers of our resource, if you have any questions about the topic of the article, ask them in the comments, and also share your methods of connecting a printer to a personal computer.
Connecting a network printer
When setting such a task, you need to understand what exactly needs to be done. There are two options:
- Connect a new device to the network.
- Connect from a new client, which can be a personal computer, laptop or smartphone, to a network printer that is already used by others.
In the first option, you need to select one of the methods (router, Wi-Hi, Ethernet) to add the device to the network, and then connect to it. In the second option - just connect. The connection process is described in detail in the section of this article below.
Ways to add a printer to your network
Router with USB
You can use the router to communicate with the printer in three ways:
- Via USB.
- Wi-Fi.
- Network cable.
It all depends only on the capabilities of the router itself. In this subsection we will consider the first option, and the second and third are performed similarly to the actions in the two subsequent sections.
Instructions for USB connection:
- Turn off the router and printing device.
- Make the connection with a USB cable using the appropriate connectors.
- Turn on the router, and after a while the printer.
- Make individual settings for the router according to the instructions included with it.
Instructions for connecting the printer via an Asus or TP-Link router. Explanations and nuances of the procedure.
We use Wi-Hi
A wireless connection requires Bluetooth or Wi-Hi modules on both devices. The second option is more common than others and is used to organize printing from a laptop, where in almost 100% of cases Wi-Fi is available. If your equipment supports WPS technology, then the task of synchronizing devices is much easier. Otherwise, manual settings must be made.
Connecting a Wi-Fi printer using “Wi-Fi Protected Setup”.
To make a manual connection, you need to know the network name and access code to it. This data is indicated on the router or modem case.
Printer settings:
- Using the display on the device’s body, enter its settings.
- Find the "Network" section.
- It has a Wi-Hi subsection.
- Select connection.
- Using the numeric keypad, enter the name of the network you are connecting to and the access code.
- Wait for the registration procedure to complete and obtain an IP address on the network.
Via Ethernet cable
Many modern devices are equipped with a built-in network card, which allows them to be connected via a patch cord directly to a network outlet. If your model is one of these, then you can take advantage of this opportunity.
- Unplug the printer.
- Select the patch cord of the required length.
- Connect the devices physically with this cable.
- Turn on the printing device.
- Open the Network window on your PC and update it. After some time, the connected printer should appear among network devices.
- If the device was not automatically added to the LAN, then manual configuration is required. Go to the device menu. In the settings section, check for an automatically set IP address. If it is missing, enter manually, taking into account the local network range mask. In 99% of cases it will be 192.168.1.*. The last digit must correspond to the serial number of the device last connected to the network, increased by one. For example, there is a router on the network, three PCs, one laptop, there is already one printer and now there will be another one. We indicate 192.168.1.7. If there is a “Get IP automatically” option, then use it.
All ways to find out the IP address of a printer on the office local network. Detailed instructions for each method with pictures.
Connecting another PC to the printer
You can also connect the printer to your personal computer, which is already in use by another PC, by first “sharing” the printing device and enabling network detection. We wrote how to do this above in the section on settings. In this case, the connection can be made using the PC’s network name or its IP address. Such data can be found on the computer to which the printer is already connected and in use.
Setting up printing on one printer from two network computers. Setting up the main PC, connecting from other clients.
It is important to use this method that both PCs are in the same workgroup. Otherwise, they will not see each other online.
Connecting to a network device
- Through the "Control Panel" go to the "Devices and Printers" section.
- In the top menu, below the address bar, click the “Install” button.
- Select the network option.
- Find your model in the list that opens. If it is missing, then click the “What you need is not in the list” shortcut.
- Option 1, when you can roughly guess the name of the PC to which the printer is connected or the name of the network printing device. The second is if accurate data on names is available. Third, the IP address of the device is known. It is not necessary to know the port name.
- Next, follow the instructions of the installation wizard.
- Agree to install drivers. You may need an installation disk. Prepare it in advance.
What troubles may arise:
- "Windows can't connect."
- Error 0x00000002 when connecting a network printer.
- 0x000006d9: "Unable to save settings."
- Error 0×00000057 when installing network.
- Error 0x00000709.
- The local printing subsystem is not running.