A drill in one version or another - a regular one, with an impact mechanism, a micro-drill (drill) - is familiar to almost everyone. During its normal operation, users do not think about how the device works and what parts it takes apart. But in the event of a breakdown, you have to find out what it is called and how to remove it for replacement or repair.
We will not talk here about the usual method of action called “scientific poking”, but turn to the point of recommendations “If all this does not help, finally read the instructions.”
The structure of a drill and types of cartridges for it
So, the drill consists of:
- an electric motor that creates rotational motion;
- a mechanism that transmits this rotation to the clamping device;
- and the actual clamping device for the drill. It is this device called “cartridge” that interests us.
Before figuring out how to remove the chuck from a drill, let’s find out what they are - the algorithm of actions depends on this.
The most common is the gear-crown type. To secure it, a special toothed wrench is used, inserted into the hole on the chuck. The teeth of the key engage with the teeth of the chuck crown and, when the key is rotated, they strengthen or weaken the clamping of the jaws (cams) of the chuck.
Otherwise, such a chuck is called a clamping drill chuck, and is considered one of the oldest among the drill clamping mechanisms currently in use.
Next come the quick-release chucks - with one or two couplings and a locking ring. They use collets - cone-shaped elements consisting of three or more parts. Moving along the axis of the collet, the coupling compresses the “petals,” thereby securing the drill in them.
Clutches (clips) are metal and plastic, regular or reinforced, with or without automatic locking.
In fact, the drill chuck is a separate unit connected to the main drill mechanism by a shaft. The connection is made using a thread or a tool cone (the so-called “Morse taper”).
An indication of this or that type of fastening can be found in the instructions and/or on the drill body. For example, the designation 1.5-15M13x1.2 - the first two digits mean the permissible diameter of the drill shank (or other tool inserted into the chuck), M13 is the diameter of the thread (metric) connecting the chuck to the shaft, and 1.2 is the pitch of this thread . If the designation looks like 1.5-15 UNF 1/2”, we are talking about an inch thread. Domestic drills use metric threads, while imported ones (not all, of course) use inch threads.
If a cone is used to connect the shaft to the chuck, the marking contains the letter B (for example, B10 - tool cone, shank diameter 10 mm).
Given that different companies label their products differently, it is worth taking this difference into account. So, for a Makita drill-driver the marking will look like this: BDF456. B is present, that is, the chuck is fixed to the cone, D is the type of tool, drill, and F is additional capabilities, in this case a screwdriver.
Let's look at the models of the most significant manufacturers on the market - Bosh, Makita, Interskol - what cartridges they use and how to remove these cartridges.
Main types of clamps
There are two main types of drill clamps:
- Tooth-crown. The shank is clamped with a special key.
- Quick-clamping. The clamping sleeve is actuated by manual rotation.
Jaw chucks, which are installed on modern drills, allow reliable fixation of devices with a shank diameter of 1-25 mm. A device of this type has virtually no disadvantages, the most significant of which is the rather high price.
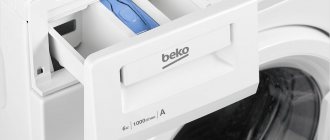
The most popular clamping device installed on modern drills is the BZP, that is, the quick-release chuck. It takes a few seconds to fix the tool in the BZP, and a special key is not needed. The shank is clamped by manual rotation of the adjusting sleeve, on the outer surface of which there is a groove that facilitates screwing. To adjust the mechanical impact on the tool shank, this type of clamp is equipped with a locking device.
Serious disadvantages of BZP include:
- Rapid wear of its elements.
- Insufficiently reliable fixation of the shanks of drills with large diameters, as a result of which the tool rotates during operation.
But gear-rim products ensure reliable fixation. The only significant disadvantage of these devices is that they require a key, which is easy to lose. However, you can save yourself from this problem by securing this part to the drill wire with insulating tape or rope.
A very popular mini-drill clamp, which is installed on compact drilling devices. Mini-drills are preferred by jewelers. The mini chuck is included in the quick-release chuck category. It is made mainly of brass and is used for fixing tools with a shank diameter of 0.1-4.5 mm.
Gear-crown
Classic, refers to cam or collet type clamping devices. They clamp tools with a round shank and cylindrical workpieces for further processing. The main elements of jaw clamps are as follows:
- Cylindrical body.
- An adjusting ring or sleeve that rotates on the outer surface of the housing.
- A collet or cam mechanism in the interior of the housing.
The material used to manufacture the elements of the collet mechanism is hardened steel, and the mechanism consists of three identical cams that move closer to each other when the sleeve or adjusting ring rotates, ensuring reliable clamping of the shank. In the first models, the cams converged due to the rotation of the adjusting wheel, but now this role belongs to the adjusting sleeve.
The clamps on one side are installed on the drill shaft, and on the other side a tool is inserted into them, with the help of which the work is performed. Jaw chucks are mainly used to hold in them:
- cutters;
- drill;
- taps with small diameter shanks.
How to remove a keyless chuck from a threaded drill
A feature of the threaded connection of the chuck with the shaft is the left-hand thread of the fixing screw. This is done so that, by rotating the drill and “biting” into the material, the shaft simultaneously tightens the chuck mount. Therefore, the answer to the question of how to remove a self-clamping chuck from a drill of this type is simple - you need to rotate the chuck, firmly holding the body, clockwise.
Usually, simple rotation is not enough; you have to tap the joint so that the tightly tightened thread opens up a little and makes it possible to rotate the connection freely.
The process of how to remove a self-clamping chuck from a drill is shown in more detail in the video.
- Since there is a retaining screw inside the chuck, it must be accessed. To do this, the jaws (cams) of the cartridge are spread as wide as possible, and a screwdriver is inserted inside. Using clockwise movements, it is unscrewed from the socket. It is impossible to immediately determine the type of head, so you must first illuminate the inside of the cartridge and, most likely, try two or three different screwdriver bits.
- After removing the screw, the cartridge is easily unscrewed from the shaft.
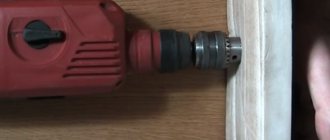
Some models do not have a locking screw. Then the cartridge simply screws together, but more effort will have to be made. It is necessary to secure a key or other part convenient for work in the jaws, and use an open-end wrench to fix the shaft.
Next, we rotate the tools in different directions (as shown in the photo).
WD40 helps a lot in its operation - it is used to spray both the shaft and the fixing screw inside the chuck. This is especially useful if the screw head is clogged and its type (cross slot, straight slot) is not determined. After treating with WD40, the splines are easy to clean, and the threads are better.
How to remove a cone chuck from a drill
In such models, removing the cartridge is even easier than for a threaded connection. Lubrication won't hurt either, and the main algorithm of action is to tap the cartridge and try to turn it after each blow. First you need to unscrew the fixing screw (here it has a regular right-hand thread).
Important: in any case, when working, it is better to secure the drill (screwdriver) in a vice. This makes work easier and frees up your hands.
In some cases, the cartridge “grows” into the mount so much that it is not possible to remove it if it fails. Various removal options are offered - from heating a blowtorch until red and then attempting to remove it, to cutting the cartridge with a grinder or other cutting tool. After this, they are removed from the shaft in pieces.
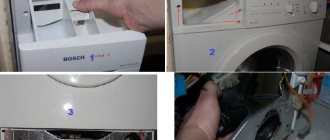
For more information on how to remove the chuck from a Bosch drill and replace it after lubrication, see the video. Here are the differences in the dismantling process, namely, how to remove the cartridge from the Interskol drill.
Is it possible to disassemble a removed cartridge for repair?
Not all types of cartridges are disassembled, but conical ones can usually be tried to disassemble.
There is an interesting way to disassemble a cone cartridge without barbaric methods such as sawing or cutting with a grinder.
- The jaws are brought together inside the cartridge.
- A plate of elastic material - polystyrene foam, polystyrene foam - with a thickness of at least 15...20 mm is pressed to the front surface of the cartridge using a board or thick metal sheet (bar).
- Press the drill itself tightly onto a flat surface (table) and turn on the impact mode. If such a mode is not provided in the tool, the chuck is first screwed (removed) from the drill and mounted on the hammer drill. After 10...15 seconds of operation of the device in impact mode, the cartridge can be disassembled for repair.
Taking into account the fact that after repair the performance of the cartridge is usually not fully restored, it is still better to replace the part with a new one with a similar marking. At the same time, it is important to remember: even if you manage to understand without problems how to remove a cartridge from a Soviet drill of a model from about 1950, you may not be able to install a new imported one on it - there is a mismatch both in the diameter of the thread and in the her pace and type.
As an example, it is shown how to remove the chuck from a Makita drill and what the thread looks like in the connection between the chuck and the shaft.
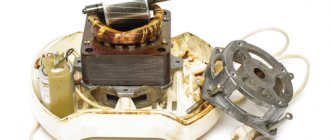
Do-it-yourself repair of a Zubr screwdriver
In this paragraph we will briefly look at the main screwdriver malfunctions that arise both in the structural elements and in the electrical part.
You will have to check the contacts and electrical circuits of the tool if:
- it is impossible to turn on the screwdriver;
- there is no possibility of switching reverse mode;
- it is impossible to regulate the number of revolutions of the tool’s working body per minute.
Having discovered these malfunctions in the device, the first thing you should pay attention to is such an important element as the battery. In the simplest case, you will get away with simply charging the battery. In the rest, you will have to use a multimeter to more accurately detect the problem. The voltage on the battery is measured. If the values do not match those indicated on the case, either the battery or the charger may be faulty. The charging unit is checked using a multimeter. Each battery included in the battery must be tested. If faulty batteries are found, they must be replaced with new ones of similar capacity.
When repairing the start button, you will need some knowledge in the field of electronics and radio engineering, namely: the ability to read circuit diagrams and soldering skills. When disassembling this element, close attention should be paid to darkened or charred contacts and terminals, and if necessary, clean them with sandpaper. A complete replacement of the starting system is possible if it is impossible to regulate the speed of the working element with a button. This can be observed if, with different pressures on the button, the speed does not change synchronously with this force.
If a switch or reverse button breaks, you can repair it yourself. The process of repairing it is similar to repairing the start button. You should pay attention to the condition of the contacts and terminals of the structure.