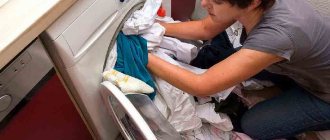
Situations often arise when owners have to urgently do something about the washing machine. For example, you need to find out what is broken, and without disassembling it it is almost impossible to do this. But many people disassemble the car incorrectly, and, consequently, subsequently reassemble it just as incorrectly, which may well cause more serious malfunctions.
Today we will find out how to disassemble washing machines of the German brand Bosch, which are of good quality (like other German equipment), but are very expensive.
Where to begin
Despite the fact that we want to get down to business as soon as possible, we must note that the best place to start is by preparing all those tools that may be required during the disassembly and subsequent assembly process. Their list is quite small.
During the work you may need the following tools:
- wrenches and wrenches of different sizes,
- a hammer or several hammers (small, medium and large, depending on the model of the machine and the nature of the breakdown),
- several screwdrivers with Phillips and straight slots (in the washing machine there may be parts screwed with screws of different threads and diameters),
- pliers
Removing the tank
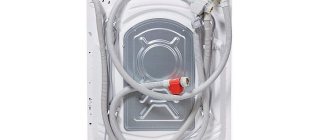
Having dismantled all the main parts on the washing machine, we begin to remove the tank. This is not difficult to do, since all the springs have been removed and the tank is lowered down about thirty centimeters. You need to grab the edges of the hatch and pull the tank towards you along with the drum of the washing machine. If everything is in order, the knot will literally fall out.
All that remains is to disassemble the tank to check the condition of the seals and bearings. All washing machines from Bosch have collapsible tanks, so you don’t have to cut them. After unscrewing several dozen screws, we disassemble the tank into two halves.
READ MORE: Perennial lupins - planting and care
We start by removing the top panel
In general, all washing machines are designed approximately the same, so the disassembly sequence we are describing now can be useful for owners of most modern machines. However, the main hero of our material is the Bosch brand, or more precisely, the washing machines it produces.
We recommend starting disassembly by removing the top cover, because, firstly, this is one of the simplest operations, and secondly, the top cover gives access to many important parts of the washing machine hidden inside, for example, the control panel.
So, first the top panel is removed. To do this, simply unscrew a few screws that hold it and slide it, and then completely remove the cover.
We remove what we usually use to manage
Now things are back to normal again. At the third stage, we dismantle the control panel - the part where all the buttons, indicators and display are located. It is important to be careful not to yank the control panel too much from side to side: we don't just want to disassemble the washing machine and forget about it.
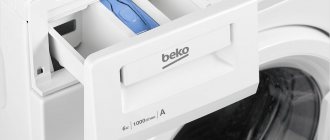
Our goal is to return the assistant of German origin to her ability to work. But before removing the control panel, you need to remove the detergent tray - in Bosch washing machines, the screw holding the panel is hidden behind it. Only after all the screws have been removed can you try to lift the control panel with a slight movement.
Again, everything must be done carefully so as not to damage the wires and contacts. If the panel gives in, then it is enough to hang it on a special hook built into the side of the washing machine for such cases and forget about it until assembly.
In general, you can also disconnect the control panel from all communications, but this is usually only required if the fault affects the control panel itself. There are plenty of detailed instructions on how to disable the control panel on the Internet.
Removing the front panel
After dismantling the control panel, it is the turn of the front panel to separate from the body in order to allow the owner or technician to repair the breakdown. In order to remove the panel itself, you first need to disconnect the cuff - the gray part directly behind the door, but in front of the tank.
Usually, in order to disconnect it, it is enough to find and loosen the spring holding it. In Bosch washing machines, this small part is most often hidden somewhere near the door lock. When the spring is found, the cuff can be removed and tucked inside the tank - this way it will not get lost in the bustle of work.
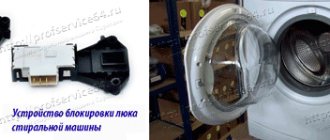
After this, you need to unscrew all the screws on the front panel in order to actually remove it. In addition, you also need to remove the door lock. Simply pry it with a screwdriver and pull it out, and then, if possible, disconnect it from the wires. Now the front panel can be safely removed.
Disassembling the Bosch SMA
Proceed strictly in the sequence indicated below.
Removing the cover
Using a Phillips or hex screwdriver, unscrew the screws (two pieces) located on the back. Slide the top panel towards you and lift it up. But be careful, otherwise you may get hurt by the sharp edges of the lid. Place the removed element away so that it does not interfere.
Removing the control panel
Remove the detergent container. Press the central latch and slide it forward to remove it.
Behind the container you will find bolts. Unlocking the latches and using a screwdriver to help you, remove the control panel. Disconnect all wiring going to it. But first take a photo so that you can connect the wires correctly. You don’t have to disconnect the wires - let the panel hang on the service hook.
Removing the bottom panel
You need to remove the lower front wall - this part of the washing machine is attached using latches. Removing the bottom cover is quite simple - just release the latches.
Removing the front panel
Open the door. Before disassembling the Bosch washing machine door, you should unscrew the screws and remove it - it is held on hinges. Be careful not to damage the glass window. Having tucked the cuff inside and prying the clamp with a screwdriver, pull off the hatch.
After unscrewing the bolted connections on which the locking device is attached, remove the UBL. After disconnecting the wires from the UBL, remove the lock.
Unscrew one by one the screws on which the façade wall is attached. Take it off.
Removing the back panel and counterweights
After unscrewing the bolted connections that secure the wall, remove it. The “insides” of the machine will become visible. Now unscrew the bar connecting the halves of the body. Using a suitable wrench, remove the counterweight located at the top. Then similarly remove the counterweights located near the loading hatch.
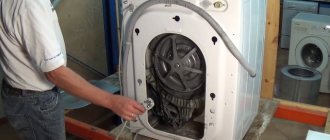
Disassembling the upper part
You have to remove the tank - the part is bulky, so you should clear the space inside the device and dismantle the components that have connections to the tank.
Remove the cuvette by disconnecting the corresponding pipe. Also disconnect the inlet valve from its pipe. Next comes the turn of the pressure switch and filter that suppresses interference. Remove the tube from the pressure switch. All disconnected parts are removed out. There is nothing at the top that prevents the unit from being removed.
Disassembling the rear part
Return to the rear to remove fasteners and parts:
- drive belt;
- wiring leading to the motor;
- bolts holding the electric motor to the suspensions.
While shaking the engine, remove it. Be careful - the motor is very heavy.
Removing the pump
With the washer on its side (on the left side), remove the bottom, if there is one.
- using pliers you need to loosen the clamp of the drain pipe;
- remove the wiring connected to the pump;
- Unscrew the bolts securing the pump - take it out.
Removing the tank
Disconnect the wiring from the heating element - in Boshas it is located in front, at the bottom of the tank.
Do not pull out the heating element so as not to tear the rubber seal - it cannot be restored after damage. Wiring can be attached to the walls, held in place by bundles - cut them using wire cutters. Remove the shock absorbers. Now remove the tank and pull it out through the front.
Remove the last part of the case that needs to be removed - the back panel
Removing the back panel is just as easy as removing the top and bottom covers - you just need to unscrew a few screws and then actually remove the panel. Too simple compared to what needs to be done. The body of the washing machine has been dismantled, now you can begin the main part of disassembly - removing the insides.
We turn off the thermal electric heater - the most important “organ” of the machine
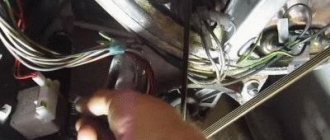
We gained access to the most important parts of the Bosch washing machine. The first one we turn off is the thermal electric heater (TEH), so as not to damage the wires: replacing the heating element will be very expensive, so nothing can be messed up or broken. To be sure, all the wires can be photographed.
The heater can be found somewhere in the tank area, since it is responsible for the temperature of the water in the washing machine tank. There will be no heating element - the washing machine will either refuse to wash at all, or will only wash with cold water. However, the heating element must be turned off during complete disassembly as we indicated: by sequentially disconnecting the wiring, having previously recorded the order.
How to remove the heating element
We move on to the next stage of disassembling the car from the Bosch company. Having removed all the walls and panels from the device, we exposed parts and components that must be carefully dismantled. It would be best to start with the top elements:
- in front of us is a metal strip connecting the walls of the Bosch washing machine. After unscrewing the screws, it must be removed;
- Using a key set to 14, unscrew a pair of bolts holding the upper counterweight and remove it out;
- A little earlier we took out the powder tray and freed the dispensing body, which is held only by the pipes. It is necessary to move the dispenser slightly and remove the clamps located under it that secure the pipe. To do this job you will need pliers. In a similar way, the pipe leading to the water intake valve is dismantled, after which the dispenser is moved to the side so as not to create interference;
- in the upper body of the Bosch machine there is a pressure switch with tubes and wiring connected to it. A power cable with an interference filter is also located here. The listed parts are freed from electrical wiring and carefully dismantled.
READ MORE: Cuttings of chrysanthemums, propagation of chrysanthemums by cuttings at home in the summer, rooting of cuttings and subsequent care
After completing the above steps, you should unscrew the debris filter and drain the remaining water inside. In principle, such work can be done at the beginning of disassembly - there is no difference in the sequence. Cover the floor with rags in advance - there may be more water than you expected. All that remains is to loosen the screws securing the loading door hinges and remove it. To the right of the hatch we find another pair of screws, unscrew them and dismantle the device blocking the door.
Let's move on to the back of the Bosch washing machine. Now you need to remove the drive belt and disconnect the electrical wiring from the engine. To dismantle the motor, we use a 12mm wrench, which is convenient for unscrewing the mounting screws. By pushing the engine away from you and down, holding it with your other hand, you can easily remove this element.
Let's pay a little attention to the lower part of the washing machine from Bosch. If the model does not have a tray, you can immediately remove the pump and dismantle the pipes. If there is a pallet, certain actions must be performed:
- the washing machine is placed on the left side;
- the pallet fastenings are unscrewed;
- the element is pulled off the plastic clips, but your actions must be careful not to damage the wiring of the sensor that monitors possible leaks;
- the wiring is disconnected from the sensor, the pan is removed to the side;
- remove the clamps from the drain pipe and dismantle it from the pump;
- disconnect all wiring from the pump, unscrew the fasteners, and remove the assembly out;
- unscrew the fasteners connecting the racks to the body of the washing machine.
Please note that the water heating element is secured quite firmly - with a plate and a nut. The last element should be unscrewed, a plate should be placed under the plate and hit with a hammer. After this, the heating element will be removed. By the way, before dismantling this element, you should sketch out the connection of the wires so that nothing is confused during assembly.
Turn off the engine
After the heating element, you can begin to turn off another, perhaps the most important part of the washing machine - the engine. Without it, any car, including high-quality ones like Bosch, is just a big basin in a metal box.
Turning off the engine is carried out according to the same scheme as turning off the heater, so we will not describe it again - all this is already in the previous paragraph.
More: Ariston washing machine repair
We finish everything by removing the tank
If all the steps described above have been completed, you can complete the work by removing the tank. To do this, just unscrew the shock absorbers and counterweights, and then try to pull the tank out of the body. If it comes out safely, you can congratulate yourself: you have managed to disassemble the Bosch washing machine yourself!
So, we have described the process of disassembling a Bosch washing machine. Of course, it is not advisable to repair high-quality equipment yourself; it is preferable to entrust all the work to a specialist, but it is still worth knowing what to do in a pinch.
Remember that you perform all the actions described here only at your own peril and risk. No one is responsible for possible damage if you deviate from the instructions. We hope that our material was useful to you.
How to disassemble a washing machine drum
Collapsible tank with drum
Modern models are most often equipped with collapsible tanks. This is convenient when repairing a washing machine and greatly facilitates the work of specialists.
The collapsible tank consists of two halves connected by bolts using sealant or sealing gum.
Disassembling the washing machine drum looks like this:
- Taking a wooden block, you need to lock the drum pulley while the hatch should be located at the bottom.
- You need to unscrew the bolt that secures the pulley to the shaft. In this case, you need to use a head of the required size with a ratchet.
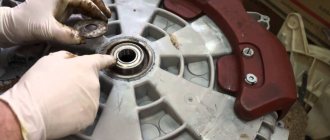
- The bolts connecting both halves of the tank are unscrewed using a key, after removing the pulley.
- After this, lightly hitting the shaft, the rear part of the part is removed.
- The bearings are pulled off; if difficulties arise, then they are heated with a blowtorch and removed using a puller.
How to disassemble a non-separable drum of a washing machine
The principle of operation is similar to disassembling a collapsible tank, the only difference being that it will have to be cut down. This is hard, painstaking and thankless work. There is no suitable tool for such work and this creates a big problem.
It is difficult to cut metal with a hacksaw; it often gets stuck and breaks. But, despite this, it is considered the most optimal and proven option. Experts advise wrapping one edge of the hacksaw with electrical tape for ease of work, which will take at least 3-4 hours.
A wood hacksaw cuts so thickly that in the future it is problematic to ensure sealing of the two halves.
The grinder is generally immediately ruled out due to the high risk of damaging the part and deep penetration.
A jigsaw can help, unless there is a hard-to-reach area where you will have to use a hacksaw.
Please note that before disassembling the washing machine drum, you will have to spend a lot of time removing it from the washing machine. Expect to do a lot of work and have plenty of time.