How to properly start the cooler for the first time:
- The first step is to remove labels, protective stickers, and other foreign objects from the bottle. If this is not done, then during operation they will clog the water supply taps, and you will be forced to contact the service to order repairs and sanitation. Also, many harmful microorganisms and viruses get into the water, along with the labels.
- The second step is to use a damp cloth to wipe the water inlet needle.
- Step three - you should place the water bottle on the dispenser, pressing lightly on it, while avoiding impacts and excessive pressure. Pay attention to the position of the bottle; it should stand level, without the slightest tilt.
- The fourth step - now you need to remove the formed air plug from the system. To do this, you need to open the hot water tap and keep it open until the water starts flowing in a continuous stream.
- Fifth step - now you can connect the device to the power supply system. If the dispenser is plugged in while the system is not yet filled with water, the thermal protection may work (if this device has one); only a service center can remove it. If there is no thermal protection, then the cooler will start working in the wrong mode, and this will most likely lead to failure of the heating tank.
- Sixth step - turn on the toggle switches, which are located on the back panel of the dispenser. After this, you will see the LED lights on the front panel of the cooler start working (2-3, depending on the model), this means that the cooler has started working. The dispenser heats water up to +95°C and cools it from +5°C to +12°C depending on the model (compressor models up to +5°C, electronic models up to +12°C).
- Seventh step - if you purchased a cooler equipped with a refrigerator compartment, then you can use the refrigerator only after 3-4 hours after turning it on.
Precautions for safe use.
Rules for installing a water cooler:
- After unpacking, the cooler is installed on a flat and dry floor area of 0.1 sq.m., if the floor is not level, use a leveling stand made of hard material (wood, plastic, etc.).
- Install the cooler in a well-ventilated place. Make sure that the distance between the cooler and the wall is at least 15 cm - this is necessary for proper air circulation; the distance to an electrical outlet with grounding after installing the cooler should be within an accessible distance.
- Before connecting the cooler to the network, check the plate containing the serial number on the rear panel of the unit to ensure that the voltage in the network corresponds to the specification. If the voltage is incorrectly set, serious damage to the wiring and/or cooler may occur.
- Never use an electrical outlet together to connect other devices, use only a separate three-way electrical outlet!
- Do not install the cooler in a room where the air temperature may drop below zero degrees.
- If for any reason the power goes out, you must wait five minutes before connecting it to the power source again!
- If transportation was carried out at an inclination of less than 45 degrees, do not plug the cooler into the electrical network within 4 hours after delivery, allowing it to stand in an upright position.
- Connect to the electrical network only after filling the cooler tank with water. Connecting cold or hot water to the electrical network without water in the tanks will lead to damage to the cooler (the heating element will burn out)!
- Never connect ground to water, gas, telephone or lighting lines.
- Important note: The water cooler is an electrical appliance and to avoid accidents, unplug the water cooler when you leave the premises for a long time (i.e. more than 3 days).
How to properly use a water cooler.
Operations with the cooler device:
- Place the water bottle on top of the cooler so that no water spills out of it.
- After placing the water bottle on top of the cooler, plug the electrical cord into an outlet. Bubbles appearing inside the bottle indicate that water is flowing into the hot and cold tanks. Keep the hot water tap pressed until water flows out. Turn the hot water switch (located on the back of the machine) to the “ON” position.
- To use cold water only, turn off the hot water switch.
- When the heating and cooling of water is turned on, the LEDs should light constantly.
- After turning on the electrical power, it takes approximately 30 minutes to cool from 30°C to 5°C and approximately 15 minutes to heat from 30°C to 85°C.
Operations with water:
- When refilling water, make sure that water does not get on the surface or inside the cooler. Contact may result in a short circuit or electric shock.
- Fill the water tank in a timely manner so that there is always water in it.
- When preparing for storage and transportation, be sure to drain all water from the cold water tank and hot water tank through the drain hole.
- Never use tap water, boiled water, or any other type of drinking water other than certified drinking water in 19-liter bottles.
How to avoid spilling water from a bottle:
- Remove the sticker from the bottle cap.
- Place the bottle on top of the cooler.
- The needle on which the bottle is attached automatically opens the valve in the cap and keeps it open until the bottle is removed.
- The valve closes automatically when the bottle is removed. Even if the bottle is half empty, the water will not spill.
General precautions before installation:
- Strictly! Under no circumstances should you use a device that has an empty water bottle installed or no water bottle installed at all!
- Do not place the cooler where it may be close to heating appliances or heating systems.
- If the cooler was stored in a room with a temperature below 10°C or was transported during a cold period, then before connecting the dispenser to the power supply, you need to unpack the device and leave it for a couple of hours at a temperature from +10°C to +35°C.
- Compressor units should be transported in a strictly vertical position, otherwise freon (coolant) may leak. If this condition is not met, then upon receipt the cooler should be installed in the desired (vertical) position and not turned on! and leave in this position for at least a day.
- Strictly! It is prohibited to fill the cooler with water of unknown origin and suspicious quality! Also, do not make sure that tap water and water containing carbon dioxide do not get into the device!
- The device can only be used at temperatures from +10°C to +40°C and relative humidity not exceeding 90%!
- Install the device in places where the dispenser and bottle will not be exposed to direct sunlight.
- Install the device so that the distance from the wall to the cooler is more than 20 centimeters.
- Strictly! Do not place foam, paper, etc. under the cooler.
- Coolers with compressor cooling cannot be tilted below 45°.
- Do not leave the cooler in a room with a temperature below 0°C. If for some reason the device was in such conditions and the water could freeze, then you need to turn off the cooling function for at least 4 hours.
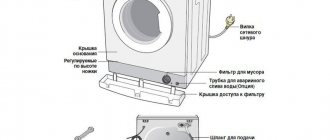
- When transporting and storing the cooler in conditions with temperatures below 10°C, you must drain all water from the dispenser! First, turn off the cooling and heating switches, which are located on the rear panel of the device. Then disconnect the cooler from the power supply. Next, you should drain the water from the supply taps; before draining the water from the hot water supply tap, wait until it cools down. Drain the remaining water remaining in the device through a special drain valve located on the back panel of the dispenser (in the middle or at the very edge, depending on the model).
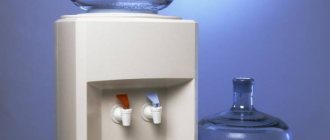
How do you refill water coolers with refrigerators?
The cooler is designed to use purified bottled water. The floor cooler is loaded only from the top, the water then flows into the internal tanks. The most common cooler displacement is 19 liters. Through special adapters you can install 5 liter bottles of drinking water; they are often used in grocery stores.
A water cooler with a refrigerator will make water consumption easier and office lunches even more enjoyable. With this convenient and practical device, you can enjoy chilled water or hot coffee with cream from your handy refrigerator at any time.
Other publications: Shelving and racks for bottles, HotFrost coolers, Guide to coolers, Coolers with electronic and compressor cooling - which is better, Purpose of water coolers, Prevention of coolers
Basic recommendations when using the cooler:
- Do not plug the cooler into the same outlet as other heating devices.
- To turn the heating and cooling functions on and off, use the toggle switches located on the rear panel of the device. Do not use a network cable for this purpose!
- If for some reason the device was disconnected from the power supply, then reconnecting it is allowed only after 2-3 minutes.
- If a water bottle has any mechanical damage, be it chips, cracks or scratches, then such a bottle cannot be installed on a cooler.
- Containers with water should be stored where they will not be exposed to sunlight. The temperature in such a room should not exceed 20°C.
- Cooler performance is not an unimportant factor when choosing. Pay attention to it, especially if you take the cooler to the office or production. To find out how many liters per hour the device can heat and cool, look at the specifications.
- The device should be kept clean and every six months you should order cleaning and sanitization of the cooler from the technical service. So, these services should be performed if you have not used the cooler for a long time.
- If you intend not to use the heating function for some time, you should disable this function using the corresponding toggle switch located on the rear panel of the cooler.
- If, for some reason, you intend to stop using the dispenser for a long time, then the device should be turned off. The first step is to turn off the toggle switches (move from position “l” to position “0”) responsible for cooling and heating the water. Then remove the plug from the outlet. Empty the storage containers by draining the remaining water through the taps - you can drain the water from the cold water supply tap immediately. To empty the hot water tank, wait until the water has cooled before draining the water. Drain the remaining water remaining in the device through a special drain valve located on the back panel of the dispenser (in the middle or at the very edge, depending on the model). Leave the cooler to dry for 24 hours.
- Strictly! Never use steam cleaners to clean or sanitize the device. Do not use abrasive cleaning agents for these purposes. Also avoid using cleaning products that contain active solvents - kerosene, gasoline, acetone, etc.
- In order to install a new bottle on the cooler, turn off the heating and cooling functions using the toggle switches. Then wipe the needle of the water inlet, carefully, as described above, install a new bottle on the device and wait until the internal cooler system is filled with water. Having opened the hot water supply tap, wait until the water flows in a continuous stream - close the tap and turn on the toggle switches.
- If the LED lights on the dispenser are lit, this means that the cooler brings the water temperature to the desired degree. Those. if the light is on above the hot water tap, this means that at the moment you can get water with a temperature below 90°C-95°C; tea and coffee cannot be brewed in such water. If the light is on above the cold water tap, it means that the cold water tank is currently cooling and if you draw water at the moment, the water may be at room temperature. Conclusion: it is better to use the cooler at a time when the LED paws are not lit.
On our website you will find a huge selection of coolers, ranging from the simplest desktop coolers to bottom-loading models.