Operating principle of juice extraction devices
To create a good juicer, it is important to understand how it works. Obtaining fruit, vegetable or berry juice can occur simultaneously or sequentially. Screw models remove it immediately at the time of processing, but their assembly will require time and money. Centrifugal devices first grind the raw materials in a centrifuge, and then pass them through a press.
Based on the principle of operation, juicer designs are divided into the following types:
- hydraulic;
- mechanical;
- pneumatic;
- electrohydraulic.
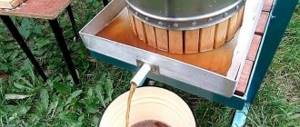
The simplest structure is a mechanical type device. This is what is most often created independently at home. The principle of operation of such a juicer is to apply pressure to the raw material with a piston, which begins to work under the influence of a simple screw mechanism. First, berries and fruits are sent to a perforated container. Next, under strong pressure, juice is squeezed out of the products, which drips into the tray through special holes in the walls of the basket.
It doesn't matter what design of the device was chosen. To make a homemade apple juicer, you will need a basket for raw materials, a mechanism for chopping and squeezing, and a container for the squeezed juice.
Hydraulic Mechanical Pneumatic
Electric juicer
From an activator type machine
A centrifugal juicer can also be made from an activator-type washing machine. The activator and shaft are removed from the bottom of the tank, and a shaft of the required diameter is installed. Three knives are installed on the shaft thread with nuts at an angle of 60 degrees. The drain hole closes. A stainless steel mesh with a mesh size of approximately 1.5 mm is placed on the wall of the centrifuge with an overlap of 40-50 mm. A complete rubber cap, plugged with a stopper, is placed on the bottom. Everything is washed with baking soda. The timer relay is turned off or its toggle switch is jammed.
Several apples are dropped into the tank onto moving knives. The fruits are crushed for 20-30 minutes. At a time, transfer no more than 3 liters of the resulting puree into the centrifuge so that it does not spill out. After 2-3 minutes, the mesh containing the waste is removed.
The assembled apparatus prepares 10-12 liters of juice with pulp per hour and works with juicy fruits. To remove sediment, the juice is allowed to settle and then passed through cheesecloth.
DIY methods
From time to time, apple trees produce crops on a huge scale. In such cases, summer residents do not know where to put the fruits to get the maximum benefit from them. Apples can be processed not only into compote and jam, but also into juice. Many gardeners avoid this type of winter harvesting, considering it too complicated. This is because devices for household use are not able to cope with such a volume of work. Purchasing professional equipment for one season is unprofitable. An excellent alternative to a purchased model is a homemade one. She also quickly and efficiently performs her main task. In addition, you can make a juicer for both apples and pears from scrap materials.
From a horizontal loading washing machine
You can assemble a device for squeezing centrifugal juice from an old washing machine. Such household appliances are equipped with many different modes, one of which is spin. It will allow you to obtain juice from vegetables and fruits.
Instructions on how to make a juicer with your own hands from a washing machine are as follows:
- Check the engine for operation and the drum for integrity.
- Disassemble the machine and remove the drum.
- Wash the device thoroughly. Pay special attention to the rubber seals.
- Places affected by scale and rust must be cleaned with sandpaper.
- Check operation in spin mode using a tester. If this is not possible, find the wire responsible for operating the motor at high speeds. Install a switch in this circuit.
- Remove the drain pump and filter.
- Rinse the old drain hose thoroughly or install a new one.
- To control and control the flow of juice, install a ball valve in the drain.
- Seal any excess drains. There should only be a hole left for the water supply, which is needed to wash the juicer after use.
- Return the drum to its place.
- Fix the machine so that the loading lid is on top.
- Check the housing for leaks. To do this, fill in the water for 15 minutes, closing the drain tap.
Small leaks do not need to be fixed. When they are detected, you must first evaluate the importance of the location of the crack, and then decide whether repairs are needed.
You can create a juicer from a machine without a housing. This makes the device less bulky. In addition, the lid will have to be replaced with a metal one during the conversion. It must have a hole for loading raw materials without stopping the operation of the equipment.
Remove the drive belt Bend back the rubber seal
Disassemble the drum
Insert a grater into the drum
Ready-made juicer
From a mortar mixer
A juicer made for apples may have a simpler design. To complete it, you don’t have to specifically look for the necessary parts that are not at hand. Fruits can be crushed with a construction mixer. The instrument must first be prepared. To do this, several bolts are drilled into its lower part. You will need a large iron bucket. It is necessary to make several holes in its walls through which the juice will come out.
Fruit processing process:
- To increase productivity, the mixer is mounted on a drill. Thus, the number of revolutions increases.
- The fruits are placed in a clean bucket and crushed.
- The resulting mass is sent to a bag, which will separate the cake from the nectar.
- Squeeze under pressure. To get the maximum amount of juice, it needs to be quite heavy.
The complexity of this method lies in the manufacture of the press. It must be very heavy to fully extract the juice. You can use a jack as it.
Mixer for mortars Apple chopping Squeeze chamber Finished product
From a meat grinder
From a manual meat grinder, you can create a screw juicer with your own hands. To do this, you need to install a special attachment that will collect liquid into the bowl when grinding apples. Usually it can be found in a kit or purchased separately in a store.
The material of the product must be given special attention. Its service life directly depends on its quality. They produce a high-quality unit from non-toxic plastic and high-quality steel.
Before starting work, you must install the juice nozzle. Installation instructions:
- Remove the metal attachment that cuts the meat.
- Insert the screen and threaded release sleeve.
- Place the chopping head.
- Secure the installation with a special bolt.
The advantage of a manual meat grinder juicer is its simplicity. The device is reliable; it does not need to be connected to an electrical network to operate. The device has a simple mechanism; its parts are not afraid of water and are easy to clean after use.
The only disadvantage of the device is that it is not suitable for processing apples in large quantities. Although it handles minimal load easily and quickly. You can avoid this drawback if you create a juicer from an electric meat grinder. The engine power allows you to produce much more juice.
Making a juicer from an electric meat grinder step by step:
- The central head for grinding minced meat is removed.
- The filtration mesh and squeeze sleeve are placed in the base.
- The assembled structure is installed to the body along with a bowl for receiving processed raw materials.
Next, the structure is fixed with a rotary lock. The device is ready for use.
From the jack
A 3T car jack is much more efficient than using a screw. This type of press turns out to be more powerful, so you won’t need a nut for fastening. In addition, obtaining juice does not require much physical effort.
Assembling a juicer with your own hands has a number of features. Its design includes a frame that can withstand high pressure. The jack can be mounted from above or below. It all depends on the desire of the user.
After assembly, the raw materials are sent into the container, placing a circle of wood at the bottom. This technique helps the structure not to burst under high pressure. On average, in 5 minutes you can get about 2 liters of apple juice.
Powerful DIY garden juicer
This article will be of interest to owners of a large garden. In it, the author of the channel “1000 CRAFTS AND TIPS” will show how he made a powerful garden juicer.
If you need to squeeze juice out of a couple of buckets of apples, just buy a household juicer.
But, with large volumes of initial products, you will not regret if you do something similar for yourself. The author will collect and test this garden miracle.
A link to drawings, a description of characteristics and advantages is at the end of the article. The frame for the press was welded by the author's father.
His idea is this: the tank for crushed fruit will be at the bottom, and he wants to mount the crusher above. And here the jack will hang. But the author does not like the position of the engine. It is also unclear how to tighten the belt. These are the nice welding seams a pensioner produces.
The author will improve this design, cut off the excess and sand it.
The motor will be attached to this plate.
I made the hinges from pipes, everything will be attached to the frame approximately like this.
From below, for stability, I welded two pieces of square pipe.
The finish line is still far away, but it will be something like this.
I welded the hinges, hung the engine and made a support for the crusher tank and a square pipe.
I used an old steering rod for the belt tensioner.
Everything turned out very simple, cheap and compact. Both shafts are now located below - this is much safer and prettier.
380 volt motor. Later, perhaps, he will convert it to 220. And he connects the engine from the automatic machines with a short piece of cable. The thinnest wire, the ground wire, is cut off.
The rest are connected to the engine.
At the other end, the ground wire is also cut off, and the rest is connected to the machine.
On this side of the machine connects the cable going to the socket. This green-yellow wire is ground. Extends it and screws it to the engine housing.
I welded this visor above the crusher tray. Will shorten it later.
The entire structure was disassembled and prepared for painting.
I cleaned off the rust with a grinder and a cleaning disc and degreased it. Steel parts are coated with acid primer.
Then apply silver metallic. I painted everything, even the stainless steel crusher tank. After painting, I applied varnish, which dried until the morning.
The author's father made the knives from stainless steel; there were great doubts about them.
Many people make knives from circular saws because they don't need to be balanced. But circular saws can rust, especially in an acidic environment. He adapted the shaft and pulley from an industrial sewing machine.
The author will try to balance the knives. To balance, I secured the thread in the center of the shaft and twisted it. Then I looked in which direction the shaft deflects more when rotating. The heavier knife made it a little narrower. The lower knife of the crusher rotates a couple of millimeters from the bottom. The second one is 7 millimeters higher. First, he assembles the crusher, everything is simple.
Installs the shaft, key, pulley, lock washer and nut. Secure the nut with a washer, bending its edges.
He starts assembling and puts the plate in place. It is possible without this nut, but since it is there, it tightens it. Now installs the motor.
The tensioner is screwed in all the way.
And screws it to the plate. Places the crusher tank in place, it is secured on both sides with 10mm nuts.
He puts on the belt and tightens it a little. The machine screws it on, pre-drilled the holes and cut the threads.
The cables are carefully laid and secured with ties to the frame. He checks the crusher, everything works fine, quite quiet.
A tap is screwed to the tank, the juice will flow only when needed.
An oak lattice is placed at the bottom. Now he inserts the oak chainmail. The juice will flow along the walls between these bars.
You need to make an intermediate grid. Although the jack is 5 tons, even without intermediate grates it will not be able to squeeze out the juice well. If the grates are installed every 15-20 centimeters, the apple pulp will be almost dry.
And finally, the final touch. Without protection, apples will fly out of the crusher. Many people make the crusher three times higher. The author decided to adapt the lid from an old juice cooker, which will be attached to the crusher using ordinary rubber bands and hooks.
In addition, it will act as a funnel.
Now everything is ready, the tray protection had to be shortened, it interfered with the jack.
In the beginning, a linen bag was used as a filter. Only those apples that fell were allowed to be pressed. The rot was cut off and washed. The tank should contain about 40 liters of crushed apples. Let's see how long it takes to fill it.
A bucket of apples is crushed in 30 seconds.
Half of the tank has already been crushed. It took a couple of minutes to install the intermediate grid.
Ten minutes later the tank was full. They pulled up the bag, laid the lid and block, and hung up the jack.
He opens the tap and the juice is already flowing. The jack rod is completely out, he places another block, then another. Despite the fact that the bag could not stand it and burst, two and a half buckets of juice were collected.
In several passes, the entire work cycle was debugged. And the author confidently says that this juicer justifies itself by 300%.
Advantages and disadvantages.
The linen bag was replaced with a polypropylene one. Sugar bags performed excellently. The linen bag was difficult to pull out of the chain mail. Polypropylene ones come out with a whistle, and they are also stronger and filter juice well.
The cake is almost dry and shakes out easily. Simply rinse and reapply.
Round tank, tank walls protect the juice from dust, debris and wasps. You can do without a faucet, but not a single drop of juice will be lost with it.
Initially, the author was inclined towards a square tank, but such a chain mail made of oak bars will not stand on its own in a square tank. Again, when there are fewer seams and corners, it is easier to clean.
The jack would probably be enough for 3 tons. It would be a little lighter. The crusher was a pleasant surprise; at three thousand revolutions per minute, real puree is obtained.
The processing speed is also high - a bucket of apples turns into puree in just 30 seconds. Less contact with air means less oxidation.
If desired, you can screw in additional spikes.
The threaded holes were made with a reserve, but it seems to the author that it will not be better.
The disadvantages include the neck of the funnel. When there are not enough apples in the crusher, drops of puree fly out of the neck; no apples fly out.
This problem can be solved by making a spring or rotary damper. Or increase the height of the crusher by 20 cm. But by making the crusher higher, you will have to raise the bucket of apples higher.
There is a special slot left in the canopy above the tray; a flap is not inserted into it. After installing the damper, the crusher will be able to crush corn, wheat, and so on.
Its undeniable advantage is its performance. It would take a whole day to get 50 liters of juice from a household juicer. In addition, apples need to be cut for it; they won’t fit whole.
This processor makes 50 liters of juice effortlessly in 30-40 minutes. Complete assembly and disassembly takes no more than 10 minutes. The frame can be left in the garden over the winter; the remaining parts can be stored in a large tank.
The press crusher cost $67 to make. For some, the materials will cost less, for others more.
It is important to understand that it can pay for itself in one season. With it you can travel to dachas and provide services at home. And over the years, this press will not become cheaper.
In conclusion, a few words on the characteristics. Height is exactly one meter, width 57X45cm, total weight 68kg. Thanks to the author for the useful idea, it will clearly be useful for summer residents and small farms! Good ideas everyone!
Source
This post may contain affiliate links. This means I earn a small commission from links used at no additional cost to you. See my privacy policy for more information.
DIY juicer
What is an apple press?
Depending on your skills and knowledge, you can create several types of press with your own hands. Each of them has its own manufacturing and operating characteristics.
Common types:
- Mechanical. The most popular among amateur gardeners. It's easy to create with your own hands. Does not require large expenses. You can assemble such a press in just a day, but it will last at least 10 years.
- Hydraulic. You don't need to put a lot of effort into using it. The most popular press of this type is made from a jack. By pressing the handle, the mechanism comes into action. The device is capable of squeezing up to 75% of the juice from the total volume of raw materials.
- Combined. The device has a jack and a screw. This feature distinguishes the device from others. First, the raw material is processed using a screw, and then using a jack. This approach reduces the time it takes to obtain a drink, delighting the summer resident with the amount of juice.
Making apple juice at home is very beneficial. The resulting product is more natural than store-bought drinks.
Using an apple press has a number of advantages:
- providing the family with high quality drinks;
- the ability to regularly process the harvest and make preparations for the winter;
- ease of manufacture of the device and its use;
- possibility of operation for several years;
- the mechanism operates silently.
During operation, several disadvantages of the press can be noted:
- achieving great productivity is difficult; it will require a lot of time and effort;
- the device requires constant maintenance;
- all parts of the press must be thoroughly washed under high pressure of water;
- A homemade juicer is quite bulky and requires a lot of space to store it.
Stainless steel sheet blank with drilled holes Bending the blank into a cylinder
The lower part of the frame is made of a profile pipe. The upper part with a nut for the screw.
Ready press
From a horizontal loading machine
There are several ways to make a centrifugal juicer from a washing machine. For one of them you will need a drum, its fastening and a casing from an automatic machine with horizontal loading.
Design of a homemade juicer from a washing machine: 1 - washing machine tank; 2 - centrifuge; 3 — mesh liner; 4 - fruit hopper; 5 - grater; 6 — bushing-axle; 7 — guide pipe; 8 — engine; 9 - car tire.
First, they are cleaned of traces of powder and scale, and then polished with fine sandpaper to a shine. All holes in the drum casing, except the bottom one, are closed with a thin rubber gasket and stainless steel plates using nuts and bolts.
A circle with a radius of 110-115 mm is cut out of a stainless steel sheet, 2-3 mm thick, for the grater. For the lining, we make another circle of the same diameter and from the same material, but with a thickness of 0.5-0.6 mm. The lining provides rigidity. It is secured with three brass posts exactly in the middle of the bottom of the drum. The grater is installed on the lining using five M5 screws.
After two circles, many holes are drilled with a radius of 2.5 mm; centimeter markings are made along the diameter, dividing it into 14-20 sections. The cutting teeth are driven along it with a punch.
The loading tube for apples, corresponding to the diameter of the large hole, is attached to the drum on four sides with aluminum bolted corners. You can use a pipe with a corrugated hose or a polyethylene pipe with walls 5 - 6 mm thick. The MB bolts are inserted from the inside of the casing at the beginning of the process and are clamped from the outside with nuts. The distance between the pipe and the grater determines the degree of grinding of the apples. The corners are secured at the top with lambs.
From a stainless steel mesh with a cell of 1×1 mm, blanks are made with dimensions the size of a drum section (with a margin of one centimeter for bending) according to the number of stiffening ribs. We bend the mesh so that the edges become smooth and safe. Using a rivet gun and an awl, firmly attach the mesh to the drum.
For the pusher, a plywood circle with a diameter of 0.8-0.9 cm is attached to the end of the thick handle of the shovel. A limiter is installed to prevent the pusher from coming into contact with the grater.
The pulley is remade to fit the required dimensions and V-belt. The base frame is welded from a corner. A 1.1 kW motor at 3000 rpm is ideal.
A polyethylene or rubber circle is cut out with a diameter similar to the casing and a hole corresponding to the diameter of the pipe for loading apples. This cover protects against splashes and covers the moving drum. A hose is pulled to the bottom hole of the drum for the escaping juice, under which a pan is placed.
All elements are firmly clamped, the motor and wires are insulated, and the voltage in the network is taken into account. The parts of the container are thoroughly washed.
During a test run, the empty drum of a properly assembled homemade apple juicer should not beat or make any foreign noise.
Apples are placed in it 2-3 pieces. Using a pusher, they are pushed close to the grater. Centrifugal force distributes the cake over the mesh. If the device starts to vibrate, then, without adding apples, wait until the juice stops flowing. If you add the product systematically and constantly, a bucket of apples will be processed until vibration (in 7-10 minutes).
After turning off the engine, use a plastic spatula to remove the cake from the grid. Then wash and dry all the parts. The device is stored disassembled.
Tips for work
After creating an apple juicer with your own hands, an equally important stage begins - fruit processing. Harvesting and preparing the fruit for it takes time.
For the assembled device to operate effectively, the following sequence of actions must be followed:
- The apples are carefully sorted, washed and dried to remove excess moisture.
- Large fruits are cut into smaller pieces. The core should be removed.
- Rotten parts of the fruit are thrown away. Otherwise, they will spoil the taste of the finished drink.
- The chopped fruits are placed in the working basket of the unit. The smaller the pieces, the easier it will be to squeeze out the juice.
- They put the mechanism into action.
After the juice extraction process is completed, dry pulp remains. It can be used as livestock feed or left to ferment. Don't be alarmed if the drink contains pulp. In this case, the juice should be allowed to brew. After this, it is filtered and boiled.
A DIY juicer is a useful invention. With its help, you can bring your engineering ideas to life and save money. The device will last for many years, allowing you to preserve all the beneficial substances contained in apples.