What homemade products can you make from a microwave?
A broken microwave can be given a second life and used to make homemade items. The housing from an old microwave can be easily adapted for storing vegetables and food, and also as a wall cabinet.
It is often much more expensive to repair a microwave than to buy a new one.
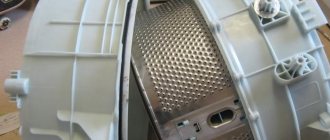
Therefore, you can either install a heating element in the microwave and use it as an oven, or disassemble it into spare parts, and this is: a transformer, from which you can make spot welding, an engine, from which you can easily make a 220-volt generator and a fan, which can easily be used for a homemade incubator.
So, let’s look at the top microwave homemade products on the site, which are sure to come in handy in every craftsman’s household.
How to hang a microwave on the wall: procedure
The microwave oven is attached to the wall in two ways. It is fixed directly on the wall surface or built into a kitchen cabinet, in which it will also take up little space and can function normally.
The installation procedure begins with the selection of the element to which the fastening will be made. Most often it looks like two metal or plastic supporting parts parallel to each other, on which the fixation takes place.
It is possible to mount the supports on a beam for stronger mounting and support of a microwave oven with a large weight.
To select the type of fastening, you should compare the weight of the microwave with the technical parameters of the fastener on which it is installed.
To carry out installation work, you will need a drill or hammer drill, which will be used to drill holes for dowels. But, before that, it is recommended to take measurements of the product itself and the wall on which it will be installed. Draw a preliminary installation location with a pencil in order to attach the microwave evenly and efficiently.
Install the dowel into the base that is drilled for it.
When attaching a plastic dowel, use your hands; if it is metal, you will need special equipment in the form of a dowel gun. Next, place the part in the form of a microwave bracket on the wall and hammer it in with nails. Check the connection strength.
If you are concerned that these fasteners will not be able to support the weight of the microwave oven, it is better to replace the nails using anchor bolts.
If you plan to install a microwave oven in the design of a kitchen cabinet, you will need to purchase a special frame that can secure it in the cabinet.
To save on buying a frame, make it yourself using metal corners welded or bolted together. Paint the structure to match the color of the cabinet. Fix it to the wall surface using dowels or anchor bolts, as in the first option.
1. The first option for building a microwave shelf on the wall involves the use of purchased materials in the form of a furniture panel of the desired color and size.
For example, with a standard cabinet width of 60 cm, the bottom shelf is equipped on three sides. To provide additional space on which the microwave oven will be installed. Among the disadvantages of this type of construction, the following should be noted:
2. The second option is to install the microwave oven on a TV shelf. Their acquisition will not be difficult, and installation work is carried out very quickly.
3. The most optimal option for mounting a microwave oven is the installation and preliminary construction of a free-standing shelf. Among the advantages of this type of installation we highlight:
A standard microwave oven has a size of 50x41x30, we will focus on these numbers. If your microwave is larger or smaller, you may need to adjust the shelf size.
In the areas indicating the horizontal plane, mark the points at which the flange connectors will be attached: 3x3 cm from each corner. For the middle shelf, holes are drilled with a diameter of 2.2 cm. A rod will be installed in this hole.
But first you need to attach flanges to it. To do this, use self-tapping screws. To fix the rod on the surface of the panel, use the clamping screw, which should be turned towards the wall to avoid damaging the appearance of the shelf.
To obtain a shelf of the correct shape, you need to cut off four equal sections from the main rod, measuring from 60 to 70 cm. To assemble the shelf, just install the rods in the shield and connect all the other parts.
220 Volt microwave generator
In this case, you will need to remove the motor from the microwave, the one that rotates the bowl. The uniqueness of the electric motor from a microwave oven is that it is capable of generating decent voltage, over 110 Volts, and has a power of 50 W.
To make a simple generator from a microwave, you will need to take a small cream jar with a lid in which the motor will actually be installed. Next, on one side of the cover you will need to drill a hole for the handle, which is then connected to the motor. Thus, by rotating the handle, you can set the motor from the microwave in motion, which will produce electrical voltage.
Be sure to provide a small socket or just an outlet on the back side of a homemade microwave generator to which current consumers could be connected. Without a doubt, a homemade generator from a microwave engine will be an excellent helper on hikes where there is no electricity.
In addition, the microwave motor can be used to make an effective turning mechanism for an incubator.
Here's what you can make from an old microwave
Let's assemble a device from an old microwave to create Lichtenberg figures. It sounds mysterious, but let’s figure out in order what can be done from this powerful and dangerous device. This device is for careful and experienced experimenters. Be extremely careful and do not work yourself. 3 people participated in the filming of this video. What are Lichtenberg figures? This amazing phenomenon was discovered more than 200 years ago and named after the scientist. This effect occurs between two contacts on the surface of conductive materials. For example, wet wood.
Scientists use this principle to study lightning. Helps establish the polarity and strength of the discharge. Used in art to create magnificent fractal shapes of volumetric figures inside plexiglass. All this is very interesting and educational. Let's get straight to the experiment. And we will make our own device. As you can see, the transformer has already started working and the grounding has been created. To do this, we cleaned one of the edges of the base. Connect the terminal, creating one of the contacts. The power is connected to the primary winding, and the second to the secondary. Most of the wires and terminals are from the microwave itself. It is working, but outdated. Bought it for less than $20. They did not skimp on the remaining wires and contacts. We took high-quality and expensive ones for maximum safety. Often these high voltage converters produce around 2000 volts. So it’s worth taking all precautions!
Browse products for inventors. Link to the store.
By the way, about fractals that have the property of self-similarity. At least that's what Wikipedia says. What is most fascinating is that you can see nature itself in them: leaves, the arrangement of plants, and even human blood vessels. This is a magnificent order hidden in chaos.
DIY electronics in a Chinese store.
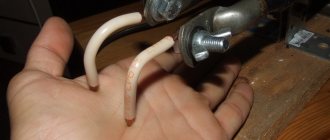
To work, in addition to the microwave and other parts, you will also need a solution of soda and water. Mix in the proportions of 1 glass of water to at least two tablespoons of soda. Nails were used for contact in the first experiment. I also needed a small board. We hammer it in lightly and connect the contacts. All this time the transformer is not even close to the outlet. By the way, gloves came in handy. Afterwards, generously wet the surfaces between the contacts. How does a surge protector work? At the same time there is a fuse.
Is everything in place? Go! As you can see, by contacting even at such a distance, an arch is formed. So, we stay away. I didn't like the first result. Let's try a stump. But the best result, oddly enough, was obtained from pieces of fiberboard. Although not the first time. The secret is that you need to moisten more abundantly. As you can see, each small figure repeats the entire figure as a whole. This, in essence, is a fractal. So we got interesting patterns. Science does not dictate the rules of our world, but tries to explain them and apply them for the benefit of everyone. Use your imagination to create great and beautiful things, surprise your family and friends, and most importantly yourself, with how beautiful the world is around and inside.
Microwave welding machine
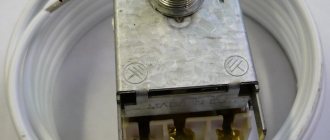
If not everything in the microwave burned completely, and the power transformer remains intact, then you can use it to make a homemade charger for a car battery.
You can also make a welding machine for spot welding from a microwave transformer. To do this, you just need to get rid of the secondary winding of the transformer, instead of which you will need to wind several turns of thick copper wire.
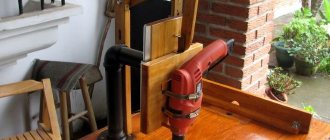
DIY microwave bracket on the wall
This part of the article is devoted to how to make a microwave bracket for the wall with your own hands.
The easiest way to do this is with a jigsaw. The edges are rounded by marking the corner with a plate, giving a suitable shape. Using the resulting marking, a corner is cut out with a jigsaw. Sand the corners with sandpaper. Next comes the preparation of the bars to serve as the angle of support. A similar radius is made on the block using a plate in order to subsequently saw it. After preparation, begin to assemble the structure.
This is done using hexagon anchor screws. Drill holes in the side where the screws will be screwed in. Insert the screws and screw the self-tapping screws into them using a hex key.
It is important here that the screws fit into the end that is not covered with laminate. The corner fasteners are also screwed in. Corner fasteners must be secured on both sides. Next is cutting out the screed. This will bring the two corner support bars together.
First mark it according to the size obtained from the distance between the corner strips. Subsequently, the plank is sawn and inserted. Afterwards, all ends can be covered with trim tape to improve the appearance of the product. Attaches both to dowels and to other types of fasteners to the wall.
Microwave battery charger
When making a car charger, you will also need to remove the secondary winding on the microwave transformer. Next, by winding a certain number of turns from the previously removed wire, you should achieve a stable 12 Volts. In this case, you can make a simple charger from a microwave.
As you can see, homemade products from a microwave and a transformer with a motor from it turn out pretty good. However, you should understand that some microwave parts can be very dangerous, so when using them you should follow safety precautions as much as possible and not do what you don’t know.
As easy as pie
If you are not going to tinker with spare parts, wires, or make at least some kind of device, it is quite possible to create a storage facility for bread. To do this, you need to remove all the insides and cut off the cord. The box will become much lighter.
To give it a presentable look, the top can be decorated to your taste. Some people use the decoupage technique, others solve the problem even simpler - they cover it with self-adhesive wallpaper.
What is important is that here any bakery products can be perfectly stored in paper bags without drying out. What else can you make from a microwave with your own hands?