You can go to any grocery store and buy fresh bread without any problems. Many retail outlets offer several varieties of this product. However, modern housewives have an excellent alternative. You can make bread that perfectly suits your family's tastes or your doctor's orders. All you need is to buy a modern machine, an automatic bread maker. However, no equipment is immune from breakdowns. A malfunction in your home bakery can take you by surprise. You can, of course, take it to a service center, but some faults that arise in the bread maker can be eliminated yourself.
Bread machine device
When operating an automatic bread machine, the housewife is required to make a mixture of dough ingredients and place them in a bucket in the machine body. And then just choose your preferred work program. During its execution, the device can stop if the recipe requires adding raisins or other components to the bread. Or it will simply notify you when baking is complete.
The bread maker consists of several functional blocks, some of them are unique and exist only in this class of devices.
Structural elements of a bread machine
Frame
The machine body is made of heat-resistant plastic. It serves as a supporting structure for other system components. Monitoring, management, and programming devices are mounted on its walls. The engine and other functional parts are fixed here.
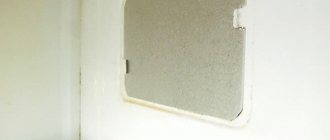
A viewing window made of transparent plastic is made in the hinged lid of the housing. Through it, the housewife can monitor the baking process. In particular, it has the ability to pause the execution of the program or adjust the time of one or another stage of its execution.
In inexpensive bread machines, the body is made only of plastic. In products that claim luxury, it is coated with metal or decorated with inserts. In the segment of expensive cars, there are models whose body is made entirely of steel.
Heating chamber
A bucket of dough is placed in the heating chamber. Its walls transfer heat to the future bread. This part of the design completely encloses the bucket so that baking occurs evenly. The assembly may contain one or more heating elements.
Bucket
The dough bucket is an element that everyone can understand. At the bottom of the bucket there is a spatula (one or a pair). At a certain stage of the work program, it rotates, mixing the dough. But there is no trace of the spatula on the finished bread. This phenomenon, incomprehensible to some housewives, is caused by the special design of the spatula: it folds up after the mixing stage is completed. This can occur when the rotation of the drive motor is reversed. Or the blade is removed by a separate actuator.
Bread maker inside
The remaining parts of the bread machine design do not require special description.
- A motor that rotates the blade.
- A control system containing executive commands for sets of baking programs.
- Temperature control units, power supply, visual and audio warning devices.
- The cable that the housewife plugs into a socket in her kitchen.
General operating principle
The general operating principle of a bread machine can be described in several points.
- A mixture of ingredients is placed in a bucket.
- The housing cover is closed to activate the protection systems.
- The baking program is selected or set manually.
- The device kneads the dough.
- Time is allowed for the dough to rise. Sometimes, if the program requires it, the specified temperature is maintained inside the bucket.
- A secondary kneading is performed to remove the formed gases from the dough.
- The machine pauses again to rise the dough.
The program may also have intermediate steps, such as stopping to add raisins. But it always ends the same. The machine turns on the heaters and bakes the dough at controlled temperatures.
What can break
Like any complex device, a bread machine can suffer from breakdowns or failures in individual components. The operating instructions for each machine contain a list of typical faults and methods for eliminating them. Briefly this list looks like this:
- the machine does not turn on due to the fuse tripping, a broken network cable or a simple lack of voltage in the socket;
- the stirrer may dry to the shaft and not be removed;
- if the drive belt breaks, the relay breaks, or the motor fails, the dough does not mix;
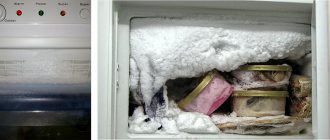
- bread is not baked, the dough does not rise if there is a failure in the heating element control system;
- the bread is raw, burns due to malfunctions in the temperature sensors;
- the bucket leaks when the bearings are jammed or the seals are worn out;
- When the seals wear out, the bread may not be baked due to moisture loss; the same problem occurs when the network voltage is low.
Also, do not neglect the manufacturer's recommendations. If you use metal objects to mix the dough or remove the finished bread from the pan, there is a risk of damaging the non-stick coating on the surface of the bucket.
How to disassemble a bread machine
Some types of bread machine repairs can be done with your own hands. For example, replace the drive belt, install a new fuse, or clean the printed circuit boards from accumulated dirt. For work you will only need Phillips and straight screwdrivers. Disassembly is carried out in the following order.
- The device is disconnected from the network.
- A bucket for dough is pulled out of the machine.
- The device is turned over to access the mounting screws.
- The screws are unscrewed.
Screws on the bottom cover of the bread machine housing
- The machine turns over into working position. Now you can remove the top cover.
- The screw securing the heating element from the side wall of the chamber is unscrewed.
- The screws at the bottom of the camera are unscrewed, after which it can be removed.
Screws inside the camera
- After dismantling the working chamber, you can raise the upper segment of the housing. This must be done carefully, sequentially disconnecting the power supply and control board wire blocks.
After these operations, access to all structural elements is available. You can detach the chassis by unscrewing the screws on the bottom. Or remove the control board, motor, seals and drive belts. The machine must be reassembled in reverse order.
It is especially worth noting that different models of bread makers may differ in design and have their own unique disassembly method. Therefore, it is recommended to search for reference materials before starting work.
Repair
Like any other household electrical appliance, a bread maker can fail. You can repair it either in specialized workshops or yourself. There are three types of repairs.
- Easy repairs - when you need to change the power cord, indicator light, fuse or attachment, as well as clean and lubricate the mechanism. Such work is easy to do with your own hands, since it does not require complete disassembly of the product.
- Repair of average complexity, requiring replacement of temperature sensors, various components (resistors, capacitors, etc.), drive gears, etc.
- Complex repairs, including replacement of the heating element, electric motor, bearings, etc.
Advice! If the bread machine fails, you need to carefully diagnose the defect, evaluate your skills in performing plumbing and electrical work, and only then decide whether to fix the problem yourself or contact qualified specialists.
Troubleshooting
Frequently occurring malfunctions and the causes that cause them are given in the table:
| Type of malfunction | Possible reason |
| The bread maker does not turn on. | — There is no voltage in the power outlet; — the fuse has blown; — power cord defect. |
| After completion of work, the stirrer is not removed. | The stirrer has dried to the shaft. It is recommended to fill the bucket with water and leave the bread maker to soak for 1.5-2 hours. |
| The stirrer does not spin. | — The toothed drive belt is torn; — the electric motor has failed; - relay failure. |
| The dough does not rise and the bread does not bake. | The heating element is faulty. |
| The bread is not baked or is burnt. | Temperature sensor failure. |
| The bearing is stuck in the baking pan. | The bucket is leaking. |
| The baking pan is leaking. | The oil seal installed between the electric drive mechanism and the baking pan has worn out. |
| The bread is underbaked. | — Moisture leakage through the seal installed between the bucket and the electric drive mechanism; — voltage drop in the electrical network. |
| Damage to the non-stick coating of the baking pan. | — Using hard objects when removing baked goods or cleaning the bucket; — long service life; — use of a hand mixer; - poor quality coating. |
Disassembly algorithm
When deciding to repair a bread machine yourself, you need to remember that to eliminate many types of malfunctions, you must disassemble the device completely or partially. Moreover, despite the wide variety of products of this kind, the disassembly algorithm is the same for them. This process is not difficult to complete if you have a set of a wide variety of screwdrivers on hand (phillips, flat, split-blade, etc.) . The work must be performed in the following order.
- Unplug the bread maker and remove the baking pan.
- Turn the device upside down and unscrew the screws located in the recesses of the bottom cover.
- Return the bread maker to operating position and remove the top cover.
- Unscrew the top screw securing the heater. It is located on the inner side wall of the working chamber.
- Unscrew the screws securing the side walls of the working chamber to the metal base.
- Carefully lift the top of the device and disconnect the electrical wiring harness present there that goes to the control unit from the power board.
- Disconnect the power cord and remove the screw that secures the grounding tab.
- Remove the screws that secure the metal chassis to the plastic base of the bread machine.
- Release the wires on the power board and remove the chassis on which the electric motor, heating element and power board are installed.
Advice! Different models of bread makers may have design differences and be understood somewhat differently. However, the disassembly principle is intuitive and the same for almost all devices - we unscrew all the screws that connect the body parts, the metal chassis and the base. In this case, special care is required when handling the heating element and wires.
Having completed all the above operations, we gain access to almost all components of the bread machine. After completing the repair work, assembly is carried out in the reverse order.
Troubleshooting common problems
Most often, consumers encounter malfunctions caused by a leaky oil seal located between the baking container and the electric drive mechanism that rotates it. Structurally, the oil seal is a small washer made of rubber.
The reason for the failure of the oil seal is severe operating conditions, during which it constantly interacts with the metal shaft of the electric motor, and is also subjected to cyclic exposure to high temperature (baking mode) and moisture (cleaning and washing the bucket mode). In addition, upon completion of washing the baking dish, the seal dries out. As a result, the part wears out quite quickly and begins to let moisture into the bread maker, which can cause a number of malfunctions.
To replace the seal, you need to remove the baking pan from the body, find the rubber part on its back side and replace it. There are models in which the bucket is fixed to a base with a rotating unit. In this case, the fasteners (rivets or screws) are dismantled and the container is removed. The seal remains on the bucket and is easy to replace.
Another common malfunction is wear or breakage of the timing belt. In these cases, the part is replaced with a new one, for which the metal base with the electric motor must be placed on its side, the new belt must be put on the motor pulley and thrown over the large pulley. By turning the large pulley by hand, the belt is put in place.
Important! Owners of bread makers should know that repairing a bucket if the non-stick coating is damaged at home is impossible. The application of such a coating is carried out in several stages, using special chambers where high temperatures are maintained.
There are organizations capable of restoring the coating (repairing) of bread machine bowls, but finding them is quite difficult. It is easier to purchase a new baking dish and install it in place of the damaged one.
Thermal sensor malfunction
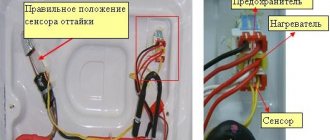
The quality of baked bread depends on the correct operation of the temperature sensor. If the thermostat is faulty, the bread will burn or, conversely, remain unbaked. It is this sensor that regulates the temperature in the bread maker during the baking program. The figure below shows, for example, what the temperature sensor of a Kenwood bread machine looks like.
Often thermal fuses are located near the thermistor. They prevent the temperature from exceeding a certain temperature if the thermostat fails.
After disassembling the baking unit, it will not be difficult to find these parts by external signs. It will also be easy to replace them with new ones, having previously purchased them on the Internet or a service center.
Contacting the service center
You can repair the bread machine yourself, but to prevent it from being too expensive, experts recommend contacting a service center. Professionals will be able to determine by external signs whether the temperature sensor or the unit responsible for the torque of the bowl has broken. Or maybe the bread machine belt has failed? At home, it is extremely difficult to determine the cause of the breakdown. Extensive experience, high professionalism, long-term work of experts with household appliances are the reasons why you should contact the service center.
Another reason to take a broken unit to professionals is that you don’t have to run to all the stores looking for a spare part for repair. Sometimes restoring equipment is extremely expensive. It’s easier to buy a new unit than to look for a belt for a bread machine that will fit exactly this model. Even if you were able to successfully fix the breakdown at home, this is not a guarantee of a long service life.
A home bread maker is an extremely necessary thing in everyday life. Therefore, if it is broken, you can take the risk of repairing it at home. As an option (if the warranty card issued upon purchase is still valid), take the device to a professional.
Heating element burnout
It is very easy to suspect that the heater is not working: the bread simply will not bake . In order to check this, you need to disassemble the device:
- unscrew the screws on the bottom of the stove and inside it, opening the lid;
- then carefully disconnect the bottom from the body without breaking the wires;
- disconnect the wires from the terminal block;
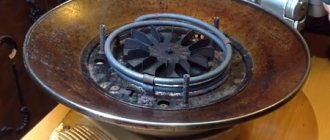
- you will see a large metal tubular ring.
This is a heating element (tubular electric heater). In some bread machine models, it may be located inside an iron bucket container. It can be checked for burnout with a tester. If burnout is confirmed, it must be replaced with a new one.
LG bread machine repair stages
Very often there are problems with touch controls. The control buttons on the panel stop working, and an error appears on the screen. These unpleasant effects occur due to moisture getting under the film. You can deal with this problem yourself.
In order to properly repair the stove, experts recommend performing all the steps step by step.
Namely:
- Place the bread maker on a flat surface.
- Clean off the grease and peel off the panel. This should be done very carefully so as not to spoil the appearance of the device.
- Use a knife to pry up the sticker and carefully pull it up.
- Don't forget about the cable; on LG bread machines it is located on the right.
- Then carefully wipe the contacts with a soft cloth. They are located on the body of the bread machine and on the back of the control panel.
We use alcohol for cleaning. Wipe carefully and thoroughly to remove dirt and grease that gets on the contacts. To prevent dirt from getting back under the control panel during further operation, you can stick double-sided tape to the case around the perimeter of the connection between the panel and the case.
After cleaning the contacts, close the touchpad. Checking the operation of the control panel. Typically, such a repair brings the bread machine panel back to life, and the buttons begin to respond to pressure.
For many, bread machines have long become indispensable helpers. Modern household bread makers are compact and can easily fit in a small kitchen. A wide range of these household appliances allows you to purchase the optimal model in terms of price and characteristics. But, despite the variety of brands and models, bread machines have a similar operating principle and are assembled from the same parts.
Belt slipped
If, after turning on the device, you can hear the noise of a running motor, but the oar does not spin, or when adding ingredients they do not mix well, this may be caused by wear or slippage of the toothed belt from the pulley.
The bread machine belt can be found by removing the bottom of the unit. The degree of wear of the bread machine drive belt determines whether it needs to be replaced with a new one.
No power supply
A common reason when a bread maker simply does not turn on is a lack of power. First you need to check the electrical plug and the cord itself. Next, you need to check the power supply, usually a switching one. It has its own fuse. But you shouldn't rush and change it. If, after connecting a 100 W light bulb to the circuit, it lights up, then immediately turn off the power to further search for a short circuit. When the power supply is working, the light should not light up, it may only blink. The power supply usually consists of a rectifier and a capacitor. This is where the problem lies.
In this case, repairing a bread maker with your own hands is possible if you have at least a little knowledge of radio technology.
How to disassemble a Mulinex bread machine (video)
The procedure for disassembly and repair is the same for almost all household bread makers. And you can deal with many problems yourself at home. Very often, the cause of device malfunction is the breakdown of simple parts. It is quite possible to repair or replace them with your own hands and without contacting a service center. This will save money and time, because it is very difficult to do without the usual fresh bread baked according to your own recipe.