How to convert a gas stove to bottled or natural gas
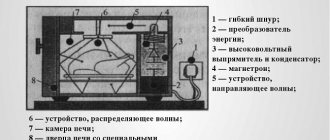
Natural gas, usually NG G20, is supplied to the kitchen from the central gas supply system, which is supplied to the device at a pressure of 20 mbar. Liquefied gas is used for cylinders, the most common is LPG G30. It enters the device at a pressure of 50 mbar. The combustion of gas-air mixtures is not the same due to differences in composition and pressure. To level the flame and prevent the appearance of soot, jets of certain sizes are installed in the burners.
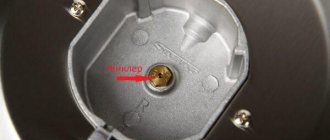
The jet (nozzle or nozzle) is usually made of bronze or brass. It looks like a threaded bolt, but only has an internal hole through which fuel is supplied. The larger it is, the more gas flows through it. At the end of the nozzle there are numbers stamped out that indicate the diameter of the hole in hundredths of a millimeter. For example, the number 75 means the hole diameter is 0.75 mm, and the number 115 means the diameter is 1.15 mm.
The size of the hole depends on the type of gas and the power of the burner. Since the pressure of liquefied and natural gas is not the same, different sets of nozzles have been developed for them. For bottled gas, nozzles with a smaller diameter are used, since its pressure is higher than that of natural gas.
Each burner (small, medium, large, oven) has its own jet, which corresponds to a number determined by the manufacturer. The smaller the burner, the lower its power. For its operation, less gas-air mixture is needed, which means that the diameter of the hole should be small.
Reference. Jets from different manufacturers may differ in shape, configuration and external thread diameter.
Nozzles are replaced if it is necessary to convert a gas stove from natural gas to liquefied gas and vice versa. But this is not the only reason. Jets are changed if:
- the fuel burns unevenly and the stove smokes during operation;
- the flame hisses and comes off the burner;
- the color of the flame is not blue, but yellow-white with red highlights.
These signs indicate that the gas stove has unsuitable nozzles. When the equipment does not work correctly, it is recommended to replace not just one injector, but the entire set. When switching to bottled gas, this is even necessary.
The differences between nozzles for natural fuel and nozzles for cylinders are as follows:
- shortened bolt body;
- fewer threads;
- increased hole diameter.
Manufacturers usually supply household appliances with two types of nozzles. But if they are not there or the device was purchased a long time ago, the jets can be purchased in the store or ordered on the manufacturer’s website.
Before purchasing, you need to determine what hole diameter is needed. It is important to approach the choice of nozzles for bottled or natural gas responsibly, since the safety of users depends on it. When the gas from the nozzle flows crookedly, some of it accumulates under the hob. This may cause an explosion. The technical data sheet for household appliances contains data on jets for central gas supply and cylinder. If it has been lost, you can find it on the Internet by indicating the brand of the device.
It is not recommended to change the dimensions of the jet holes yourself (try to drill them out or reduce them). Is it dangerous.
The ratio of hole diameters (in mm) to different types of fuel is given in the table.
| Burner type | Gas type (pressure) | |||
| NG G20 (20 mbar) | LPG G30 (50 mbar) | NG G25 (20 mbar) | LPG G30 (30 mbar) | |
| Small burner | 0,75 | 0,43 | 0,70 | 0,50 |
| Middle burner | 0,92 | 0,55 | 0,92 | 0,65 |
| Large burner | 1,15 | 0,60 | 1,15 | 0,75 |
| Oven burner | 1,20 | 0,65 | 1,15 | 0,75 |
| Grill burner | 0,95 | 0,60 | 0,95 | 0,65 |
When converting the stove to liquefied gas, it should be taken into account that not only the nozzles are changed, but also a reducer is installed. It is used to regulate the pressure of incoming fuel.
How to replace jets yourself
As a rule, injectors rarely fail, and many people do not even suspect that they can be replaced at home. One of the cases where it is necessary to change injectors is when changing the type of fuel, as mentioned above. But the need to replace jets on a gas stove also appears in the following cases:
- the color of the flame has changed: yellow and red inclusions appear instead of the usual blue color;
- there is soot or uneven combustion;
- there is a hissing sound, and at the same time the flame separates from the burner or goes out;
- When the burner is ignited, a popping sound is heard.
If you are going to fix the problem yourself, then we will consider the whole process step by step.
Disassembling the burner
First, of course, you need to shut off the gas supply. In general, working with gas equipment requires special care and compliance with safety precautions. After this, remove the grate from the cooking surface. The burners themselves can be removed without effort. To replace the jets, in some models of gas units you will need to unscrew the top panel of the hob. But more often the nozzle is visible right under the burner.
If you have an older model of equipment, and the jet is located in the housing, you will have to disassemble it. In this case, you need to unscrew the bolts at the corners of the hob. There may be other assembly options where the panel will have to be pryed off to separate it from the main body. In this case, of course, it is better to look in the documentation where exactly the required elements are located and how to get to them.
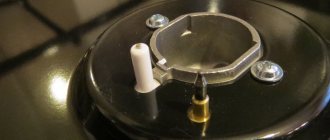
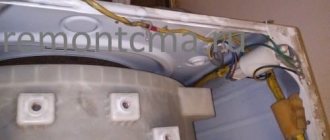
The internal structure may look like this. A pair of parallel metal strips is a traverse, onto which the burner bodies are attached. The gas supply to the burner is similar for all units. The burner body contains the nozzle itself, to which the gas pipeline is connected. Through the tip, the fuel is supplied to the nozzle, from where the gas flows to the burner.
Unscrew the jet
To unscrew the jets in a gas stove, you will need an open-end wrench or a tubular wrench, depending on the model. It should be said that in older models of such equipment, getting to the nozzle can be extremely difficult, since it is located in the burner body and it will not be easy to unscrew it with a key. It may be necessary to disassemble almost the entire unit. In this case, it is better to remember the sequence of actions and prepare different small containers for the parts that you will remove.
For more modern models, the process should not cause difficulties. When replacing, you need to take into account the size and thread of the nozzle. Some kitchen appliances are equipped with nozzles for converting to liquefied gas, and all replacement steps are clearly stated in the instructions, for example, in the Darin 1A GM 441 002W model.
Checking the channel
If your goal was not to change the nozzles to use a different fuel, but only to eliminate the combustion problem, then it is quite possible that the hole was simply clogged. And cleaning it will save you from replacing it. You can do this with any thin sharp object, such as an awl or a knitting needle. It is important that the diameter of the object is not wider than the diameter of the hole. Otherwise, you can deform it, which is unacceptable. For the same reason, cleaning must be done with caution.
READ MORE: DSP boards: sizes, prices and material characteristics
Replacing the jet
As already noted, in modern models it is not difficult to get to the injector and replace it. In a more complex situation, it is located in the burner body. And to change it, you will have to remove the tip with the nozzle from the burner body. To do this, you will need to remove the latch, which is located directly under the body and looks like a clothespin. It is worth remembering that when performing such actions you should not make too much effort so as not to break individual parts.
Assembling the burner
After replacing all the nozzles, you will need to reassemble the burner in the reverse order. After this, you can switch from natural gas to bottled gas. But before that, you need to remember to change the nozzle in the oven.
Burner is ready
After the burner is assembled, it is too early to start checking the flame of the fire. Below we will look at replacing oven jets in a gas stove with our own hands.
Required Tools
Replacing jets should be entrusted to gas service specialists who have the necessary knowledge and qualifications and will be able to correctly adjust the gas supply when switching to another fuel. It is not recommended to remodel a gas stove yourself.
If the user decides to change the nozzles with his own hands, he will need the following tools:
- crosshead screwdriver;
- set of open-end and ring wrenches.
How to change nozzles on a gas stove
First, the stove is disconnected from the gas, if it was connected. After this, they proceed according to the following algorithm:
- Remove the top cover of the gas stove by unscrewing the screws to get to the burner.
- Then they find the latch, squeeze its ends and carefully remove it. After this, the tips with nozzles are removed from the traverse with burners.
- The tip is released from the socket and removed from the gas pipeline tube. The o-ring is removed from it and placed on the tube.
- Use a socket wrench to unscrew the jets counterclockwise. New ones are installed in their place.
- Carry out reverse installation. The accuracy of reassembly determines how smoothly the burner will burn.
It is easier to change modern models of gas stoves to use a different fuel. To gain access to the burner, only the grates with burners are removed. Then remove the tips and install new nozzles.
Replacing the jets in the oven is carried out as follows:
- open the oven door and the lower compartment of the device;
- pull out the floor of the oven compartment;
- unscrew the burner fastenings;
- carefully, so as not to break the thread, unscrew the nozzle (it is located on the left in a special housing);
- install a new nozzle and reassemble.
If the jet has become stuck during operation, unscrew the three fastening screws and remove the left side wall. Using a 17 wrench, unscrew the nut and move the pipeline to the side. Then unscrew the two screws that secure the nozzle body to the wall. The stuck thread is treated with WD-40 or kerosene and the nozzle is unscrewed. A new one is installed in its place and the oven is installed in the reverse order.
After replacing the nozzles, the stove is connected to a cylinder or central gas supply using a flexible connection. If the equipment is connected to a gas main, one end of the hose is connected to the gas pipe through a plumbing fitting or fitting. The thread of the drive is pre-winded clockwise. An O-ring is inserted into the hose nut. The parts are connected and tightened using a gas wrench. The other end of the flexible liner is connected to the thread of the plate outlet, using flax or fum tape for fastening.
If the device needs to be connected to a cylinder, one end of the flexible hose is connected to the stove nozzle through a fitting and secured with a worm clamp. The other end is attached to the gearbox and also tightened with a clamp. The reducer is connected to the cylinder using paronite gaskets; it must be positioned horizontally. The fasteners are tightened using an open-end wrench.
Then check the tightness of the connection. All connections are coated with a soapy solution and gas is released. If the soap does not foam, then there are no leaks. After this, the gas is lit in the burners one by one. A blue flame without yellow or red tints indicates that the job was done correctly.
Symptoms of incorrect selection of gas injectors
Incorrect operation of the gas stove burners can be judged by the following signs:
- A balanced burner ignites without popping, does not go out, burns evenly and without buzzing.
- With an optimal ratio in the mixture of gas and air, the fire acquires a blue color with a greenish tint.
- With too much air, the flame becomes low and burns with a hiss. In this situation, it is also possible for the flame to come off the burner and go out.
- A milky-yellow fire with soot indicates insufficient oxygen supply and incomplete combustion of gas.
READ MORE: Which is the best septic tank for a dacha, depending on the conditions of the site
The information discussed about jets for gas stoves is advisory in nature. It is very important to understand that the use of gas for domestic purposes does not forgive neglect. If you have the slightest suspicion of unstable operation, do not engage in amateur activities and immediately consult with specialists.
Safety precautions when using a stove with bottled gas
Gas is a source of increased danger, so safety rules and precautions should be followed:
- the gas stove is installed in a well-ventilated room;
- the cylinder is placed outside in an iron box;
- if there is a smell of gas, ventilate the room and turn off all electrical appliances;
- during cooking, regulate the fire so that it does not go beyond the limits of the cookware, in order to avoid the formation of carbon monoxide;
- hoses and gearbox are periodically inspected;
- a gas stove that is turned on is not left unattended.
This is interesting:
How to connect a gas hob yourself
What temperature should the freezer be?
What to do if the oven does not bake evenly
Connection and setup
After installing nozzles for liquefied gas, which differ from those for natural gas, you can begin connecting the cylinder itself.
You can install the cylinder indoors with a stove, but it is recommended to take it out to a shady place outside, in a metal box adapted for this purpose. In this case, the distance from the window should be at least 0.5 meters. It is always better to turn off the tap after cooking.
The connection to bottled gas is similar for all similar equipment, for example, the Hephaestus stove. The reducer is screwed onto the cylinder. A gasket must be installed. A fitting is screwed onto the inlet pipe of the plate. It can be included with the unit. A gasket is also needed here. Now a gas hose is connected to the outlet of the reducer and connected to the fitting on the stove.
The following requirements apply to the hose:
- should be no longer than one and a half meters;
- it is advisable to carefully secure it to ensure its immobility as much as possible;
- it should not break or bend;
- it must be a special hose designed for such gas;
- do not use beyond the prescribed service life;
- Be sure to check it over time for damage.
After connection, it is necessary to check all elements for leaks. To do this, the gas supply is opened, and all joints are coated with soap foam. The presence of leaks is eliminated by tightening the nuts, harnesses, and replacing gaskets. After replacing the cylinder, this check must also be performed.