Despite the improved ignition technology of modern gas stoves, many housewives use older versions. Older stoves require ignition with matches, but the use of lighters is becoming increasingly popular. Manufacturers offer a wide range of these products, which greatly simplifies the cooking process. Soviet electric lighters for gas stoves have been replaced by more modern and easier to use ones.
Types and features of lighters
Modern lighters for gas stoves are adapted for specific purposes. To prevent injuries to the fingers when setting fire, the manufacturers made the tip of the chikfire elongated. Even containers standing on the burner will not interfere with lighting the burner. There is a button on the edge of the device that, when pressed, produces a spark. Compared to matches, a gas lighter for a stove is much safer in terms of fire protection. In addition, this device solves an unbearably annoying problem for housewives - black stains from matches on the surface of dishes.
Domestic gas
Most often, igniters are purchased for household needs, the fuel for which is propane or butane. In rare cases, it is possible to use gasoline in devices of this type. The spark for a gas stove in such igniters is most often obtained by friction in the body of the lighter of silicon particles.
The shape of the igniters (elongated spout) helps to reach hard-to-reach places: oven, burner with dishes, fireplace. Manufacturers place a canister filled with gas inside the chikfire body. Often, such devices are small in size, which allows them to be taken for use outside the home. Gas ignition devices are in demand due to their compactness and convenience.
Types and features of lighters for a gas stove
The implementation of the correct process of gas combustion is facilitated by its purity. In addition, it affects the heating of water.... A gas stove breakdown is not only unpleasant, but also dangerous. If such a problem occurs, you need to turn off the gas supply to the pipe and call a gas stove specialist. If you live in Moscow, then you can…. It's not just about water itself, which is required for washing dishes or showering, but also for heating. The need for heating... Replacing a gas stove in an apartment Installing and repairing a gas stove in Moscow You should not do this work on your own; repairing gas stoves in an apartment should be trusted to specialists with extensive experience and certain skills, they will do...
On piezoelements
Piezo lighters for gas stoves are also considered not little known. Their operating principle is quite simple: piezocrystals are placed inside the device body, which are compressed when the button is pressed. Due to their compression, a low level current arises, which gives a spark. The contact of gas with the resulting spark causes ignition. The main advantages of such a device include:
- convenient and compact body;
- 100% safety during operation;
- absence of wires and batteries, unlike electronic and electric lighters of a gas stove;
- Possibility of use outside the home.
Despite the fairly large number of advantages of arsonists of this type, they have one big drawback. In case of any breakdown or even the slightest failure of the crystal, the device cannot be repaired. Perhaps this factor was the reason why piezo lighters were not particularly popular.
Electric lighters
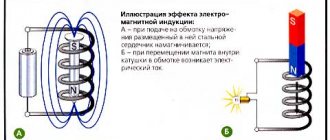
These lighters are powered from a standard electrical outlet. The operation is based on the sequential closing and opening of the circuit under the influence of an electromagnetic field on the rod. Activation of a special button results in a powerful short-term discharge. The formation of a spark allows the flame to ignite.
Like a piezo lighter for a gas stove, the electric device is easy to use, durable, and can instantly ignite a flame without the need for matches.
Among the disadvantages of electric lighters, it is worth noting that they are tied to a power source and cannot be used during a power outage. Additionally, there is the potential for a hazardous situation to occur if electrical contacts are exposed to flame. Such negligence during operation can cause a short circuit.
Electrical
The electric lighter device for a gas stove was at the peak of popularity for some time, but it seems that it did not live up to the hopes of housewives. This is due to the following disadvantages of this type of igniter:
- Presence of wire. Impossibility to work if there is no outlet nearby.
- Use outdoors and in places without power supply is not possible.
- High risk of electric shock.
- Relatively high price.
Some people exclusively use electric lighters because of their long service life and ease of use. To ensure the operation of an electric lighter for a gas stove, you must have a 220V outlet. When you press a key, an electric arc occurs, which ignites the gas in the burner.
Compliance with the operating rules will help extend the life of the electric lighter. If you do not use the lighter for more than 10 seconds per lighting, it will last much longer.
Electronic
Electronic chikfires have recently begun to appear on sale. To create a spark, batteries and basic electronics principles are used in this case. These devices can be used not only at home, but also outdoors. The quality and service life pleasantly please users of electronic lighters for gas stoves. The main thing is that no liquid or grease gets on the device, as this can cause damage. After such a breakdown, it will not be repairable. The main disadvantage of this type of igniter is the constant need to replace batteries. I'm glad that most stores have them.
TOP best lighters
When it comes to choosing a household igniter, it is important not to make a mistake and choose the most suitable device. All devices have various characteristics that you should read carefully. The rating of the five best igniters will help you decide.
Tefal K00511
One of the best piezo lighters for a gas stove. It can rightfully be called a universal device, because it can be used both at home and outdoors. For convenient storage, the manufacturers have placed a loop on the igniter by which it can be hung. The convenient handle allows you to ignite the gas with complete safety. In Moscow, a lighter for a gas stove is provided with a 24-month warranty.
| MAIN CHARACTERISTICS | |
| MATERIAL | PLASTIC/STAINLESS STEEL |
| LENGTH | 260 MM |
| MANUFACTURER COUNTRY | ITALY |
| COLOR | BLACK |
Irit IR-9066
An excellent solution for those who need a durable piezoelectric lighter for a gas stove. The Irit IR-9066 piezo lighter is a unique model that combines both crystal and gas. Its long service life makes it possible to refuel with gas. The flame intensity is adjustable and the button can be locked to prevent accidental activation. The body of the product is made of blue plastic and metal. The flame conductor has an elongated shape and can bend; the fire power is adjustable.
Wisen 47052 WB-4
One of the best piezo lighters for a gas stove is Wisen 47052 WB-4. It is convenient to use, the color of the igniter can have different variations. A nice feature is the light weight of the lighter (100 g), the length of the product reaches 130 mm.
Polaris PGL 4001
Polaris PGL 4001 is a universal lighter with a piezoelectric element and a gas cartridge. If necessary, you can refuel with gas. The color scheme of these devices consists of yellow, green and gray. The design of the lighter is very stylish, since the body of the product is translucent. The strength of the fire produced is adjustable, the ignition button has a locking function. A piezoelectric lighter for gas stoves can last quite a long time with proper operation and refilling with propane.
Nova Home Flexy
This model is a device with enormous capabilities. The flexible ignition part ensures easy use of the device in hard-to-reach places, for example, in an oven, water heating columns. The crystals in the lighter are special: they do not break down. This ensures a long service life of the product. Perfect for a home with kids as it has a button lock. If necessary, you can refill the lighter with gas.
When choosing stove lighters, especially electric ones, pay attention to the warranty period and conditions. When purchasing a device with gas, check whether it is possible to refuel in the future.
The best lighters
Tefal K00511
Price in Moscow from 390 rubles, made of high-quality plastic and stainless steel, length 260 mm, handle color black. French development, made in China, 12 month warranty.
High quality product, professional design, comfortable handle with soft inserts, has a ring for hanging. The use is simple: press the button, the gas lights up. Tefal works without any problems, but you have to pay extra for the brand.
Irit IR-9066
Cost 250 ₽, material - plastic, color red, dimensions: length 210 mm, weight 110 g. Type - with piezoelectric elements, designed for 5-6 thousand clicks.
Excellent quality, even though the assembly is yellow; when you press the button, it produces a sheaf of sparks, everything is done conscientiously - it fits perfectly in the hand and does not creak when used. Normal ratio of cost and quality. No complaints.
Wisen 47052 WB-4
The price is only 155 rubles, dimensions 15x32x129 mm, weight 100 g, runs on gas - ignition from a piezoelectric element. Material: plastic and stainless steel tube. German quality, but made in China.
A universal lighter with good mobility, can be used to light a fireplace or fire in the country. Simple design, high-quality assembly, works like a Swiss watch, no drawbacks were identified during use.
Polaris PGL 4001
Cost from 200 rubles, width 65 mm, length 205 mm, weight 110 g. Type: gas version with a piezoelectric element, refilling the can, adjusting the flame, the nozzle is placed at the optimal distance from the handle.
An excellent quality lighter from a domestic manufacturer, it has a child lock, it lights everything. Convenient transparent case, you can see how much gas is left. During operation for 3 years, no complaints.
Nova Home Flexy
Cost from 269 rubles, weight 180 g, flame adjustment, protection against child intervention by locking the control key, a valve for refueling, a gas volume control window, a flexible tube with a nozzle at the end. The development is domestic, but made in China.
Excellent quality, high reliability, a good filling valve does not allow gas to pass through, as is the case with budget products. Convenient to use - flexible tube accepts any configuration. There are no cons.
Price policy
On the modern market you will no longer find electric lighters for a gas stove from the times of the USSR. The price of Soviet devices is an order of magnitude lower than modern ones. Outdated models are practically not used in everyday life. They do not have the convenient features that new models have improved. Some of the cheapest igniters are electronic lighters for gas stoves. Their price can start from 130 rubles. This is an excellent option for people with little financial resources. The quality fully justifies the price of the product, the main thing is not to get it wet so that the electronic part does not fail.
A good gas igniter is an electric lighter for a gas stove. The price of such a device is slightly higher than electronic lighters. It can fluctuate between 200–300 rubles. The specific price depends on the model and its characteristics, as well as on the manufacturer.
Do-it-yourself electric gas lighter
Radio amateurs and people who understand electronics do not buy igniters, because they know that they can make a plasma electric lighter for a gas stove at home. At first glance, this may seem difficult, but if you figure it out, everything is much simpler than it seems. To make a homemade product, you need to take only 3 things: a non-working high-voltage module, a 3.7-volt battery and a plug. Such a device is capable of igniting even raw materials; it ignites much better than matches and even some cheap models of lighters.
The action plan for creating a homemade electric lighter for a gas stove is as follows:
- It is necessary to measure 5 cm from the edge of the high-voltage module housing.
- Carefully cut off the remainder along the marked lines.
- The cut off part can be thrown away, and on the remaining part you can see two wires (voltage output from the transformer).
- We screw two small screws into these wires, slightly drilling the holes.
- Contacts must be made from wire.
- We return the screw to the module.
- Carefully solder the button and power supply.
- Use electrical tape to secure the module to the battery.
The homemade lighter is ready. You can try it on paper products or a gas stove. Such a device can last a long time. In this way, you can give new life to a broken high-voltage module, and even do it with benefit.
DIY gas stove lighter
Of course, buying an electric lighter for a gas stove today is not difficult.
There are plenty of them on the market, and the price allows anyone to buy it. In this article we will look at how you can assemble such a lighter yourself. This will be very useful, as it will allow you to learn its principle and possibly apply it in other homemade products. The main idea here is to obtain high voltage with high frequency, resulting in a hot spark between the electrodes. This spark can ignite gas, cigarettes or paper. Let's consider in order how to do it.
Materials and tools for homemade work: - soldering iron with solder; — charging for li-ion batteries; — li-ion battery (18490/1400 mAh); — field effect transistor IRFZ44; — transformer for 50 W halogen lamps (or other similar); — 0.5 mm wire (must be in the transformer); - frame; — power button and other little things.
Lighter manufacturing process:
Step one. Preparing the charger
To charge the Li-ion battery, the author used a special board with protection. There are two indicators on the board, one lights up when charging is in progress, and the second lights up when the battery is low. Using such a device, the battery can be charged with a current of up to 1A through any 5V source. Alternatively, this can be done via a regular USB port.
Step two.
Battery The homemade battery is suitable for any size and capacity.
As an example, the author installed a standard 18490 battery with a capacity of 1400 mAh. Its peculiarity is that it is somewhat shorter than the ordinary 18650. In general, the choice depends on the size of the lighter. Step three.
Converter A transistor of the IRFZ44 type, as well as a high-voltage transformer, was used as the basis for the converter. The most difficult thing is with the transformer; you will have to wind it yourself.
The transformer will need a core from an electronic transformer for halogen lamps with a power of 50 W. A standby voltage transformer from a computer power supply is also suitable for such purposes. First, the transformer must be carefully desoldered and the installed windings removed. You need to leave the network wiring, it will be useful for homemade work. To disconnect the halves of the transformer, they need to be heated with a soldering iron.
The primary winding has 8 turns and is tapped from the middle. The author measures everything roughly using his finger.
The wiring is wound in two busbars, with each busbar having 4 strands of 0.5 mm wire. The wire that was useful was the one that was used as the network winding in the previously disassembled transformer.
After the primary winding is wound, 10 layers of adhesive tape are wound on top for insulation. Then the author winds a secondary or step-up winding on top. The secondary winding was wound with wire from the relay coil. As for the relay, any small 12-24V will do. The diameter of the wire should be within 0.08-0.1 mm.
First, you need to solder a piece of stranded wire to the thin winding wire, and then start winding. The wire does not need to be cut at any stage of winding. You need to wind it in layers, with each layer containing 70-100 turns. On top of each layer there is insulation, which is also made from tape. In conclusion, there should be approximately 800 turns.
Now you can fix the halves of the core, and you need to solder a piece of stranded wire to the second end of the secondary winding. You can also test the winding with a multimeter to check its integrity. The final insulation is electrical tape.
Finally, you need to do the phasing of the primary winding. The beginning of one arm is connected to the end of the other. As a result, a middle point is formed, to which the plus from the power source is connected. Then you can assemble the oscillator circuit and check if everything works. The arc should form at a distance of 0.5 cm, and it can be stretched up to 1 cm. If this is the case, then the inverter is working correctly.
That's all, now all the parts are installed in the body. The author did not install a heat sink for the field-effect transistor, but it is recommended to do so. You should try to hide all exposed parts of the circuit under heat shrink. That's all, after assembling the button installation, you can test your homemade product. Source
Become the author of the site, publish your own articles, descriptions of homemade products and pay for the text. Read more here.