Connecting a gas stove is a complex and time-consuming process. It's no surprise that many are facing problems. This equipment is included in the list of equipment with an increased level of danger. Therefore, it is more advisable to have specialists handle the installation. You can try to do everything yourself, provided that you understand the process. Operating rules are regulated by law. Now we’ll figure out how to install the stove yourself and not run into a fine.
Rules for connecting a stove in an apartment
It is more rational to entrust the installation of a gas stove in an apartment in a multi-storey building to specialists. This work is carried out by specialized services that control gas supply. An agreement is previously concluded between the consumer and the organization, in accordance with which fuel is supplied. Payment is transferred to the personal account specified in the agreement.
A contract is required when an apartment is purchased. It is also necessary to collect a list of documents in order to connect a gas stove in the apartment in accordance with current legislation:
- a certificate confirming that you are the owner of the apartment;
- technical passport of the apartment;
- old contract for technical service;
- passport for new equipment and gas meter.
If the book for the old stove remains, then it is better to provide it too. As an alternative to a certificate of ownership, you can use a certificate that confirms the registration of the apartment.
When all the documents are collected, submit them to the gas service. Staff will provide you with forms to fill out. A contract must be concluded. The organization will provide you with permission to install new equipment.
ATTENTION! We strongly recommend calling a gas service to connect your gas stove. You perform all actions described below at your own peril and risk.
Connection rules
If the gas model of the stove in the kitchen is replaced simultaneously with the renovation of the room, then it may be necessary to move it to another place. It is important to follow the following rules for installing the stove:
- The maximum permissible distance from the device to the gas supply pipe is 4 meters, ideally no more than 2.
- The room must have high-quality exhaust ventilation.
- Modern units contain electric ignition and oven lighting functions, so you need to provide a grounded socket nearby. If you select a model with an electric oven, you will have to draw a separate power line from the distribution board (with the installation of an additional 16 A RCD) using a 3 × 5 cable.
Requirements for the installation of household stoves are specified in SNiP 2.04.08-87- “Gas supply” and SNiP 2.08.01-89 “Residential buildings”.
To connect the stove to the gas pipeline, a flexible hose is used (it differs from the water pipe by yellow marks on the braid), the maximum length of which is 5 m, and the internal diameter is more than 10 mm.
USEFUL INFORMATION: How to choose the right location for kitchen outlets
There are several types of such hoses:
- Rubber-fabric. Soft and flexible, non-conductive, but not rigid enough.
- Rubber with metal braid, the most common variety previously.
- Standards for installing a modern gas stove in an apartment recommend using a bellows hose when connecting, which is a stretchable metal sleeve in a protective sheath.
Note! When installing a new slab, it is better to immediately change the connecting hose, regardless of its service life, since it may have invisible defects that appear as a result of use.
Rules for connecting a stove in a private house
The operation of gas equipment in an apartment and a house is significantly different. For example, the equipment (meters and stoves) of residents of multi-storey buildings is checked by gas supply employees several times a year. This is a mandatory measure. Homeowners from the private sector will be able to make their own decisions regarding gas supply. There are several main options:
- connection to the central highway;
- use of autonomous gas supply;
- combined connection type.
In many ways, connecting the equipment will depend on which of these options is chosen by the homeowner. In the first case, the connection of equipment and subsequent maintenance are controlled by the relevant services. If you use cylinders or another type of autonomous gas supply, then you will have to do everything yourself.
Be sure to learn how to properly connect this equipment, since the safety of your family depends on the final result. If you have engaged a commercial organization, be sure to check whether their specialists have certificates confirming their professionalism.
Stages of connecting a gas stove yourself
Is it possible to connect a gas stove in an apartment yourself? Yes, but first contact Gorgaz, and be sure to provide them with all the necessary documents. Remember that you will need special equipment. Carefully study the intricacies of connecting a gas stove yourself. Conventionally, the process is divided into the following stages:
- Preparatory work.
- Dismantling of old equipment.
- Installing a new device.
- Checking the correct connection.
- Exploitation.
So that you know how to connect a gas stove in an apartment with your own hands, carefully study the instructions offered by experts.
Selecting a location
The equipment manufacturer indicates the recommended distance from the walls and partitions of kitchen furniture. This information is indicated in the instructions or technical documentation. There you will also find the basic rules for installing a gas stove in an apartment. The most common mistake beginners make is that they do not take into account the height of the equipment. The height is calculated according to the distance from the ceilings. You especially need to be careful with kitchens that have a sloping ceiling. The ceiling material also affects the height of the equipment.
Quite often, natural ventilation fails to remove combustion products. Therefore, experts strongly recommend installing hoods.
Preparing tools and consumables
Before installing a gas stove, you need to disassemble and dismantle the old equipment, as well as prepare a list of special equipment and all kinds of consumables. Optimal set of tools:
- set of wrenches: gas, adjustable and wrench;
- ball valve 1/2' – provided that replacement is required;
- FUM tape;
- Screwdriver Set;
- hose of appropriate diameter;
- concentrated soap solution.
Of course, the installation process for electric and gas models will be significantly different. Give preference to a trusted equipment manufacturer. Little-known companies may produce equipment with a short service life. Popular brands, on the contrary, produce high-quality equipment. For example, Hephaestus gas models showed their best performance during use.
Removing the old stove
Replacing a gas stove is not difficult. The main thing is to adhere to the basic provisions of the step-by-step instructions, while observing safety precautions. Algorithm for dismantling outdated equipment for subsequent installation of a new slab:
- Turn off the valve that regulates the gas supply.
- Check if you managed to turn off the tap, try to light the burner.
- Unscrew the locknut and push the coupling down.
- Move appliances away from the wall to extend the equipment.
- If new equipment will not be installed now, but the kitchen will be renovated in the near future, be sure to install a special plug on the faucet.
Old slabs connected to the gas pipeline by a metal pipe are much more difficult to dismantle. It is difficult to remove the nut and coupling due to the paint. Therefore, the eyeliner is cut off with a grinder. The remains are dismantled using a gas wrench.
Replacing the faucet
Often, before installing a new gas stove, you have to change the tap. This must be done as quickly and accurately as possible. After dismantling the old tap, gas will flow from the pipe into the room. It is important that after removing the old valve, basic safety rules are followed: there is no source of open fire, the windows are wide open.
Before you start installing new equipment, you need to prepare several additional devices:
- a small piece of fabric - you need to make a temporary plug from it that will plug the gas pipe. Be sure to pre-moisten the cloth with water;
- new ball valve - before installation, move it to the closed position, and also remove the handle to facilitate the installation process;
- prepare a set of wrenches, as well as a special sealant that will be applied to the threaded connection.
Instructions for replacing the faucet:
- Open the window as wide as possible, or even better, the window. This is necessary to ensure proper ventilation.
- Unscrew the faucet from the lower side, and then insert a damp rag into the pipe hole as quickly as possible.
- Be sure to remove any remaining old sealant from the threaded joint and then apply new one.
- Remove the rag from the pipe that served as the plug, and then screw the new tap onto the thread. Tighten the valve with a wrench.
- Make sure that all elements are connected tightly. Apply the concentrated solution to the connected areas. If bubbles appear and inflate, this indicates a lack of proper tightness and, accordingly, there is a gas leak. Unscrew the valve to apply an additional layer of thread sealant.
The crane has been replaced, which means we can move on to installing the equipment.
Installing a new slab
As mentioned earlier, installing a gas stove in an apartment with your own hands is only possible if you have some experience in carrying out such work, as well as special equipment. In other situations, it is better to entrust such difficult work to professionals.
If you don’t know how to install a gas model in the kitchen, but want to do it yourself, then follow these instructions:
- Remove the product from the original packaging. Remove the baking tray and other accessories. It is better to remove the protective film after installation is complete.
- Place the equipment in a previously prepared place, maintaining the correct distance from the wall, which is indicated in the accompanying documentation.
- Use a level and leveling feet to level the work surface horizontally.
The equipment is installed, it’s time to connect the equipment to the gas supply system.
Connecting the stove
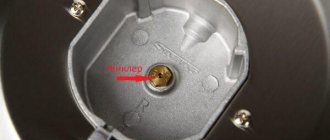
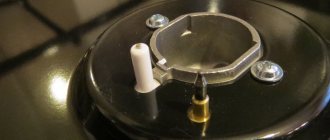
Connect the flexible hose to the gas line. To do this, you need to wrap FUM tape or any other suitable sealant around the thread. Tighten the connection using the appropriate wrench. The gas hose must be connected to the stove. Use a sealant, and then tighten the locknut with open-end wrenches. Practice shows that the output thread from the plate has a pitch of 3.8'. Install the adapter. It should be included in the basic equipment package.
When the plate is connected to a pipe, a special gasket is used, the diameter of which is 13 millimeters. Mostly this gasket is also included in the basic package of the stove. It is equipped with a special metal mesh that acts as a barrier filter. Using a gasket will extend the service life of the equipment.
Now you know what connections are needed to connect a gas stove in an apartment. You almost never have to buy additional adapters and filters, since they are included in the basic equipment package. Take a soap solution prepared in advance to check the tightness of the connection. Apply foam to joints with a brush or hand. Are there any bubbles? This means there is a leak. It needs to be redone. When everything is done correctly, check the functionality of the burners and oven.
Connecting electric ignition
When connecting the electric ignition, you need to follow a few simple rules that will help you avoid unpleasant consequences:
- Bring the gas stove into your house or apartment and wait a little; you don’t need to connect it right away. The equipment must adapt to the new temperature regime. This advice is especially relevant if you brought in new equipment from outside in the winter. Pre-inspect the equipment for visual damage.
- The places where the gas network is connected must also be carefully checked for damage and deformation. All switches must be in working order. It is important that the supply from the hose to the stove is carried out at full capacity.
- We are talking about equipment with electric ignition. This means that you will need access to a power source, i.e. electricity. A regular outlet will be more than enough. It must be grounded. Incorrect connection can lead to serious consequences.
- Old electrical wiring is characterized by its cross-section. It will not allow you to fully use the electric oven. Therefore, for the equipment to operate correctly, the old wiring must be changed.
- The choice of gas hose is another important point. Equipment that supports the electric ignition option will work correctly if you buy a white hose with a yellow stripe. Inspect the hose carefully. Possible leakage must be ruled out. Securely secure and tighten the threaded connection between the stove and gas pipes.
- The position of the surface also plays an extremely important role. Be sure to adjust the legs so that the equipment stands level. The hob should not be tilted to one side. Pre-level the area where the equipment will be located.
When all this is done, be sure to check the functionality of the equipment in all available modes. Now you know how to replace conventional gas equipment with equipment with an electric ignition function. The installation process is virtually the same, except that you will need access to a grounded outlet.
Features of connecting the stove to a gas cylinder
Let's imagine that the installation has already been completed. It is necessary to install a gas cylinder. It is advisable that it be located in another room or at least distant from the stove. The minimum distance is 5 meters. Pre-prepare the place where the cylinder will be located. The best option would be to create a special mount. The structure can be built from ordinary wooden slats.
The stove is installed, you need to connect the cylinder itself to the equipment. This is a safe job provided you follow the instructions. Screw the cylinder onto the gas surface hose. Tighten the connection with a clamp. FUM tape must be wrapped around the inlet fitting. The connection must be strong and reliable.
Install the reducer on the gas cylinder. It screws onto the adapter. For wrapping you need to use FUM tape. During the connection process, carefully inspect each component:
- First remove dirt from the reducer and cylinder, especially at the threaded connections. Ignoring this rule will result in a gas leak.
- Special attention should be paid to the hose. It must be of appropriate length. There should also be no cracks or narrowings. It is important that it is not twisted. Replace the hose as soon as you notice damage.
- During operation, rust appears on the clamps; remove all contaminants. Since rust eats away at the clamps, over time they will simply break. Today you can purchase special clamps that are treated with an anti-corrosion coating.
There is nothing complicated, just follow the rules.
Checking for correct connection
When all the requirements are taken into account, and the gas stove is connected with a hose to the pipe, you need to make sure that there is no leakage. Carefully examine all joints, this will allow you to quickly determine the leak. The optimal verification method has already been discussed earlier. Make a concentrated soap solution. Apply it to the threaded joint with your hands or a brush. A sign of a leak will be the appearance of inflated bubbles. To correct the situation, remove the faucet, and then apply an additional layer of sealant to the threads.
Be sure to check the functionality of all burners, oven and its basic modes. There is an alternative way to check if the connection is correct. When all the work is completed, carefully unscrew the tap of the gas cylinder. You will hear a characteristic hissing sound, indicating that the gearbox is working properly. This means that gas is already entering the stove.
Typical connection instructions
Ideally, it is better to invite a specialist to install gas and gas-electric stoves, but if you are still determined to make the connection yourself, then the installation instructions will help with this. By following it in detail and carefully observing the mandatory points, it is quite possible to cope with this task yourself.
USEFUL INFORMATION: Fashionable kitchen: choosing ceramic tiles for the backsplash
The standard sequence of actions is as follows:
- Free the “object” from packaging materials and all components (baking tray, tray, dividers, etc.), leaving only the protective film, which must be removed after completing all repair work.
- Install the stove in the intended place, maintaining the distance from the wall specified in the attached documentation.
- Using a level and adjustable feet, the working surface is leveled horizontally.
- A flexible hose is connected to the gas pipeline. To do this, the threaded connection is wrapped with a sealant (FUM tape) and tightened with the appropriate wrench.
- Then the gas hose is connected to the device in the same way, using a seal and tightening the locknut with two open-end wrenches. It often happens that the thread at the outlet of the plate has a pitch of 3/8′, then an adapter is installed that comes with the device.
When connecting the hose to the unit, be sure to install a gasket with a diameter of 13 mm, which is sold along with the stove. It contains a metal mesh that acts as a barrier filter for debris and extends the life of the expensive device.
- The last step is to check both connections for leaks, which is carried out using a soap solution. In this case, thick foam is generously applied to the joints (with a brush or hand) and the gas supply valve is opened on the lower side. If bubbles appear at the joint, the tap is turned off and the defective connection is redone. If the surface remains level, then there is no gas leak, which means the new stove is installed correctly.
- At the end, the functionality of the burners and oven is checked.
The video will help you understand more clearly how to properly install a gas stove yourself.
Safety Rules and Tips
You must install the equipment yourself in accordance with safety regulations. Failure to comply with standards leads to negative consequences. Therefore, you first need to study the regulations. Useful tips and rules for connecting a gas stove:
- A flexible hose ensures the connection between the equipment and the gas supply system. It is important that it is located in an easily accessible place. Access to it must not be blocked. It is necessary to carry out scheduled replacement of the flexible hose.
- The gas hose is created in accordance with current regulatory documentation. It is strictly forbidden to exceed the recommended size.
- It is strictly forbidden to paint the connecting sleeve itself, as this may damage the surface. It is the coloring that causes premature cracking of the sleeve surface.
- The hose is directly connected to the tap and equipment. Adapters are used exclusively in situations with non-standard threads. As noted earlier, adapters are included in the basic package of the stove.
- Before starting installation work, the gas supply must be shut off. To do this, turn the shut-off valve on the pipe all the way. All family members should know that work is underway to replace the stove in the apartment or house.
- In the process of installing and connecting new equipment, it is necessary to use professional tools, special consumables, and components designed to interact with the gas system.
- During the connection process, the pipes open, they must be immediately plugged with plugs. An ordinary wet rag can be used as a plug. Fabric that has absorbed water is characterized by excellent gas impermeability.
- To temporarily close the 1/2" threaded connection pipe, use a stopper from a regular wine bottle. Cut it into a cone shape using sandpaper. Then the plug is screwed into the pipe as tightly as possible. If the plug gets stuck in the pipe hole, use a corkscrew to remove it.
When the work is completed, check the tightness of the connection.
Installation and connection of new equipment
The gas stove replacement scheme is as follows:
- dismantling obsolete or unusable equipment;
- faucet replacement;
- installation of a new slab;
- its connection;
- leak testing;
- acceptance of work by the Mosgaz service in Moscow, Lenoblagaz in St. Petersburg, and so on.
Dismantling a gas stove
To dismantle outdated equipment, you must:
- close the tap located on the pipe to turn off the gas supply;
- check the absence of gas by turning on one of the burners;
- disconnect the gas supply;
- Disconnect the stove from electricity (if necessary).
After completing these operations, the stove can be removed from the kitchen.
Disconnecting old equipment from gas and electricity supplies
Replacing the faucet
If the gas valve does not meet safety requirements or does not completely shut off the gas supply, then before installing new equipment, it is recommended to replace the valve.
As a rule, the equipment is installed and connected by the gas service, since in order to increase the level of safety, it is recommended to disconnect the entire entrance from the gas supply. However, if it is possible to cover it in an individual living space, then having certain skills and all the necessary equipment, you can do the work yourself.
The valve is replaced according to the following scheme:
- crane dismantling. In most cases, threaded valves are installed on gas systems in apartment buildings, the dismantling of which is quite easy. However, in old houses, welded valves can also be installed, the dismantling of which is carried out using a grinder (exclusively after turning off the media supply);
If the work is carried out without turning off the gas and by one person, then after dismantling the tap, a special plug is installed on the pipe. If there are two or more workers, you can plug the pipe with your hands.
- if the thread on the gas pipe is damaged or missing because welded equipment was installed, then at the next stage the thread is cut using special equipment;
- thread sealing;
- removing the plug and installing a new faucet.
Sequence of actions when replacing a gas valve
Installation and connection of a new gas stove
A new slab is installed in the prepared area. When installing, you must level it horizontally. To achieve this, most modern Hephaestus stoves are equipped with adjustable legs. In the absence of such a function, alignment is carried out using various spacers.
Alignment by level
Next, the flexible line is connected to the plate and pipe. For this:
- the thread on the liner (pipe) is sealed with the selected material;
- the eyeliner is fixed;
- Connection to a gas stove is made in a similar way;
Gas hose connection
- if necessary, the stove is connected to the power supply system.
How to install and connect a gas stove yourself, watch the video.
Leak test
After completing all work, you need to check the connections for leaks. The operation is performed in the following order:
- preparing a soap solution;
- applying the solution to the connecting nodes.
If the solution begins to form bubbles, the connection is not sealed and the problem must be corrected before putting the system into operation. The absence of bubbles indicates that the system is completely sealed.
Presence of a leak in the gas supply system
Where to go for help
You have purchased a model that is suitable for you, but you have absolutely no idea how it is connected. Where should I go to have my gas stove connected by professionals? There are several options, each of which you can use:
- installation services are provided by stores selling gas equipment;
- organizations that have permission to work with gas systems. Upon completion of installation, you will be issued a certificate confirming that the installation of the equipment was carried out in accordance with the standards;
- calling a specialist from a specialized organization that controls the gas supply process to your home.
It is more rational to contact the specialized service. According to the law, employees of such organizations must record the changes and also make a corresponding note in the technical passport. The gas stove must be connected by a specialist who has permission to work in this area. Therefore, it is better to refuse the services of private contractors. They will not issue a certificate. Because of this, you may face a large fine in the future.
What else should the owner know?
There are several important rules for installing and connecting a gas stove, which every homeowner without exception should become familiar with:
- maintain the regulated distance between the slab and the wall. It is indicated in the accompanying documentation. Mostly the optimal distance is 7 centimeters;
- When connecting hoses, pipes, and plates, do not use excessive force. Twisting will cause kinks;
- the hose does not look the best, so it spoils the interior of the kitchen. It is prohibited to paint it; the best way out of the situation is to decorate it with self-adhesive film;
- It is strictly forbidden to hide gas pipelines and hoses in all kinds of structures made of plasterboard and other materials. Easy access is a must. If you have any problems, be sure to contact the gas service.
Is it a violation to install the stove yourself?
Despite the fact that replacing one appliance with another (equivalent in number of burners) is not in itself a violation, it is strongly recommended that you call a gas service representative before using it to check the correct installation, make the necessary changes to documents and register the appliance. If, during a scheduled inspection, gas workers discover that the owner installed his unit on his own and did not notify the relevant service, he may face administrative liability in the form of a fine and even shut off the gas.
Note! If you connect a gas stove with your own hands, the warranty period of the new device does not count from this moment, but from the date of purchase. In addition, if the device passport does not contain marks made by the technician after installation or verification of its correctness, the warranty will be considered invalid.
Also, despite its apparent simplicity, the initial installation of gas stove modifications in new buildings with your own hands is strictly prohibited and is carried out by certified specialists, so the question of whether you are allowed to do this yourself does not arise.
USEFUL INFORMATION: How to properly install a hood over a gas stove?
Required permitting documents
To change equipment connected to the gas network, you must act in accordance with the procedure established by law:
- Write a statement addressed to the head of the REU of Gorgaz with a corresponding request. A sample application can be obtained from the district office.
- Gas service employees will determine the complexity and specifics of the work, and then issue an invoice that must be paid.
- Upon completion of equipment installation, specialists will make an entry in the technical. passport.
Before writing an application, you will have to provide: an apartment passport and documents for a new gas stove. Upon completion of installation, you will be issued a service agreement.
Service cost
There is no clear tariff for installing a gas stove. The cost is calculated individually by specialists. Therefore, it is extremely problematic to say how much Mosgaz will charge you for installing new equipment. Pricing depends on the region and complexity of the work. On average, the cost varies in the range of 1000-3000 rubles. Payment will be charged to you only after the new stove is installed in the apartment.
Keep in mind that if you use the services of a store or a certified commercial organization, whose employees will install the stove taking into account all the standards, you will still have to call city gas workers. In this case, you will have to pay extra for their departure.