What to do before starting work
Before you start using the device, you must clearly understand what type of laser levels you will be working with. Although if you bought this device yourself, then you should have known about it at the stage of choosing a laser level.
All laser levels can be divided into:
Static line builders (other names are crossliner or multiprism builder).
Rotary line builders (other names: multi-prism line builder, level).
Static axis builders (other names: pointer, point laser).
In principle, most manufacturers write in the instructions (usually included in the kit) how to prepare the device for operation. As a rule, no special “dancing with a tambourine” is required - everything is simple and clear.
- If the level model is a battery type, then before using it you need to charge the battery.
- If the device runs on batteries, then insert them into the power compartment.
- We check the functionality of the level by turning it on. If a laser beam appears, then everything is in order. You can begin installing the device.
Horizon Projection mode in the laser level
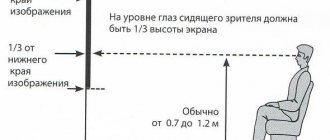
This mode of operation of the laser level should be clear to every novice builder - the line projected onto the surface of the wall clearly indicates the horizon, relative to which all the necessary markings are made. In this regard, the laser level has only one drawback, if, of course, it can be called that - the height of the tripod on which the laser is installed does not allow projecting the horizon line at a height of more than one and a half meters.
But this shortcoming can be easily eliminated if you have an ordinary tape measure at hand. With its help, the horizon line is easily transferred to any wall height.
The required mark is set on one side of the wall, the distance between it and the level projection is measured, after which, using the same tape measure, the required mark is transferred to the other edge of the wall. Then it’s simple - the chop cord completely draws the horizontal line you need. As you can see, a low tripod for a laser level is not a hindrance to your work.
Working with a laser level
How to bring the laser level into working position
This is important - the quality of the marking directly depends on how correctly the laser level is positioned. Therefore, you need to find a suitable place for it and install it properly. There are a number of requirements necessary for full operation of the device:
Step 1. There should be no obstacles in the path of the laser beams. Otherwise, the refraction effect will cause the projected line to be interrupted.
Step 2. The laser level should be positioned at the optimal distance to the object. The permissible maximum is indicated in the instructions and should not be exceeded. Reducing the distance reduces the likelihood of error, so if possible, try to place the device closer. The permissible maximum can be increased by using a special beam receiver. This option is used when the object is at a great distance.
Step 3. During operation, the level should be on a flat surface (a table surface will do), a tripod or a special holder. It should be securely fixed, since complete immobility of the device is a guarantee of obtaining accurate data. No shaking or movement is allowed.
Step 4. Before starting measurements, level the level with the horizon. To do this, we use the bubble level built into the device. Some models have a self-leveling function. It works like this: until the device stands level, a signal is given. There is no signal - that means everything is fine and the device is installed level.
Step 5. First you need to warn people nearby about the upcoming work. Animals should also be removed or removed. After all, accidental contact with a laser in the eyes can injure them.
Step 6. That, in fact, is all the recommendations. When they are met, you can turn on the level and carry out the necessary work.
How to check a laser level for accuracy
To be able to unconditionally rely on the readings of the laser level, it must be checked. The technical characteristics of the model indicate the maximum permissible error for this device. It is indicated in mm/m (millimeters per meter). Naturally, the smaller it is, the better, and this is one of the key parameters that are worth paying attention to. But even when comparing different devices of the same model, you can see a significant difference in the readings.
For a normal repair result, the deviation should be minimal, and it can be determined by inspection. In theory, this check should be done before purchasing, but few stores will give you this opportunity. Then you can check the laser level at home, and if it does not pass the test, return it or exchange it (don’t lose the receipt). The verification procedure itself is in the video. There are quite a lot of manipulations, but they are not complicated.
How to set up a laser level
The instructions included with the device also contain information on how to properly configure the device. The manufacturer describes this process in some detail, but it is not always clear. In general, setting up a laser level is a standard procedure for most models.
Let's start with the simplest levels. Usually they have two or three bubble levels - these devices should be adjusted according to them. This is done by tightening the screws.
However, even if the device is equipped with a self-leveling function, this does not mean that it actually levels itself. This will happen only with a tiny deviation - no more than 10 - 15 degrees. When the surface is more uneven, you have to manually tighten the screws (as when working with a simple device).
A prism-type laser level allows you to create two beams during operation, projecting vertical and horizontal lines onto the object. They can be emitted simultaneously, and it is also possible to select only one of them. In addition, some models create plumb lines and laser points (zenith, nadir). They can also be turned on and off.
A rotary laser level, in addition to the above, has two more settings. This is the scanning angle and the rotation speed of the laser beam. In this case, it projects the beam only in one plane, but some models can project a vertical axis.
Professionals, when giving advice on how to work with a laser level, recommend that when using it, turn on only the functions that are necessary at the moment. For example, when checking how vertical a doorway is, the horizontal component is completely useless. It is quite possible to leave only the vertical beam - this way the battery will last longer and less energy will be consumed.
What is a laser level for?
Videos about how to properly use a laser level show that the device is most in demand in construction.
When constructing buildings, it is necessary to carry out voluminous work on marking with high accuracy in a short period of time. But the device is also used in home repairs. It turns out to be useful:
- when laying the foundation and pouring a concrete screed;
- when assembling and welding metal structures, installing walls and partitions;
- when installing cladding panels, windows and doors;
- when drawing up layouts indoors;
- when assembling and hanging furniture;
- when gluing wallpaper and laying tiles;
- when applying dimensional markings to walls and floors.
Important! You can use a laser level when arranging an outdoor landscape, although in bright light the red and green lines are always less visible than indoors.
Additional devices that make working with the level easier
Laser beam receiver - increasing the range of the laser beam
A laser receiver can be a big help if you work outdoors. With it you will see a clear projection of the beam even in blinding sunlight. Moreover, the distance that the laser “reaches” will double. Just buy both the laser level and the receiver from the same manufacturer, otherwise there may be cases of incompatibility between devices from different brands.
If your level is not designed to work with a receiver, then in this case you can find a way out. There is a very simple device - a reflective plate. By attaching it to an object, you can get a slight increase in the beam range.
Target - we hit the target exactly
The target is a simple accessory that is included with almost all laser levels. The plastic plate with concentric circles drawn on it looks exactly like the paper shooting targets provided at the shooting range. After all, both of these targets have the same goal – to hit the bull’s eye. Well, you can shoot not only bullets, but a laser beam.
This thing is very useful when the distance between the level and the object is quite large. For example, you need to make a hole in the wall a few centimeters higher than in the opposite one, while the distance between the walls is 40-50 meters. Try to see traces of a pencil or marker at this distance! If you attach a target instead, then aiming the beam at it will not be difficult. Even if the shooter is not particularly accurate.
Some levels include another device that improves the accuracy of the laser “shot”. This is a kind of optical sight located on the body of the device. It is called an optical sight, and with its help you can easily “reach” a target even at a hundred-meter distance.
Rake - drawing perfectly straight lines
A rod is useful when you need to draw several parallel lines on the surface of an object, the distance between them being the same. They also use a staff to change the height of the level mounted on a tripod. Then it can be returned to its original position.
How to work with a level
Laser levels can have different sets of functions. In the basic version, it is possible to obtain vertical and horizontal planes, as well as include them together and obtain an intersection. In some models it is possible to obtain a point at the zenith and below the device (plumb, point - nadir), there is also a function of constructing two parallel vertical planes. Additional features are useful, but their presence increases the cost as the system becomes more complex. Some manufacturers add tripods or platforms to the basic package that can be mounted on the wall with a screw or magnet.
The main functions of a household-grade level (plane builder)
The models also differ in the possible angle of the plane aligned in the horizontal surface (sweep angle). It can be from 110° to 360°. The easiest way to work is with the one that gives a complete plane, but it is a professional model and costs a lot. You can get a complete plane even with a small plane of luminescence. To do this, the device is rotated around its axis.
When using the device outdoors, the laser catcher may be useful. It is usually purchased separately. When purchasing, you need to check whether this model is compatible with your laser. Special glasses may be helpful. Firstly, they protect the eyes from accidental exposure to the laser, and secondly, they allow you to see the beam more clearly.
Use when working on the floor
It is convenient to use a laser level when leveling the floor. Place it approximately in the middle of the room and turn on the construction of a horizontal plane. A straight line is marked on the walls, along which it is convenient to make markings.
The horizontal plane is displayed on the walls
The laser beam is also displayed on any object that you place in its path. Using this property and a ruler (tape measure), you can find the most protruding and most “recessed” part of the floor. Using this data, you will determine at what minimum level you can screed the floor. Next, based on the found height, make marks on the walls and begin installing the beacons. They can also be placed along the beam. Having set the laser beam to the desired height, set the back of the lighthouse so that it is evenly illuminated by it.
Using the same horizontal surface, you can check how evenly the concrete is laid in the screed. The beam will be visible on the hillocks, and the depressions can be found using a rod.
How to use a laser level to lay floor tiles
You can also use a laser level when laying tiles on the floor. To do this, you need to get the intersection of the rays on the floor. Set the required mode, choose the direction in which you will lay the tiles and, along the line visible on the floor, align the seam.
What can it do on the walls?
Now let's look at how to use a laser level on walls even more actively:
- Check how crooked the wall is. Parallel to it, at a distance of several centimeters, beat off a horizontal plane with a laser. Using a ruler or tape measure, measure the distance from the beam to several points on the wall. This determines how littered the wall is and in what place you can find recesses and bumps. This procedure is necessary when leveling walls.
- Using the same technique, you can check the verticality of the corners.
- Mark a horizontal line for fastening something: furniture, a profile for a gypsum board ceiling, etc.
- Get a crosshair for laying tiles on the wall.
- Have a vertical line to properly apply the first sheet of wallpaper. horizontal to evenly stick a border, etc.
- Check the vertical slopes of windows or doors.
- Mark the line for wiring.
You often have to use a laser level during repairs, and later in everyday life, for small jobs you often need it: to hang something straight, to set up household appliances (a washing machine, for example), etc.
Video lessons on working with a laser level (level)
Laser level in practice: several specific examples of use
By asking an experienced craftsman how to use a laser level, you can find out that this device can be used almost anywhere. And the boundaries that determine the possibilities of its use are the boundaries of your imagination. And now - a little specifics.
Leveling the surface - vertical projection
It is this area of application that clearly shows how outdated all kinds of rulers, roulettes and bubble-type levels are.
To find out how smooth your floor or walls are, you need to direct a laser beam along their surface. At the same time, we put several control marks along the wall (if we are checking the wall).
The line drawn by the beam will show the deviation from the vertical at each mark. In accordance with these data, we select the thickness of the leveling layer at all control points.
Application when finishing tiles - cross projection
We turn on both beams - vertical and horizontal. When they intersect, they project a cross on the wall of the object. We combine the center of this cross with the central seams of the tiles we are laying. And along the lines of the laser beams we align the sides of the tile.
Construction of inclined planes
Not all elements of the house consist only of horizontal and vertical lines. Sometimes a designer wants to experiment with planes located at an angle. When implementing such bold projects, a laser level will come in handy. Read the instructions for your device carefully and you will understand how to make the beam go at an angle.
In those levels where an automatic leveling system is used, it is necessary to enable the blocking of this system. Some levels are equipped with a system for automatically changing the beam angle. For example, if you turn off the tilt compensation lock, then it is quite possible to mount the level on a tripod at the angle that is required. The laser beam will go at an angle.
We glue wallpaper and other decorative elements
And for this simple operation a laser level is useful. So, by turning on the vertical beam, we can easily align the vertical edge of the wallpaper. And the horizontal beam will help you make the perfect border, which often turns out crooked without using a tool.
We install furniture and integrate household appliances
An unevenly hung shelf or wall cabinet can cause a lot of grief - it spoils the entire look of the room. Of course, you can re-weight them using a regular bubble level or even a ruler. But this is long and troublesome. Whether it’s a laser level or not. It will help you install the cabinet evenly, hang the cornice, and accurately position the built-in appliances. The main thing is that all this is done very quickly.
Installation of partitions and layout of premises
Having a laser level, you can “redraw” a room in a short time. To mark the location of the partitions, you don’t have to take a stepladder or crawl on the floor. It is enough to make a projection of the laser beam in the place where the future partition will be located.
Measurement applications
It is not possible to measure anything directly with a level. But it can significantly facilitate and speed up this work. Take, for example, a room whose walls are not vertical. If you need to find out its height, a problem arises - this cannot be done along the wall. It's a good idea to use a laser rangefinder, but you may not have one.
If you have a laser level that projects a plumb line, that can also help. Having received two points - on the floor and ceiling - we take a tape measure or ruler and measure the distance between them. This results in a very accurate height of the room.
How to use?
Laser levels are distinguished according to the following parameters:
- type of power supply , rechargeable or from replaceable batteries;
- the presence of a remote control that switches modes from afar;
- self-leveling mechanism;
- beam dispersion angle , the ability to project marks in a circle.
Comparing the characteristics, choose the most suitable option.
For floor
The laser level is useful for floor installation, starting from installing beacon slats when pouring screed or when installing a self-leveling floor. The projected lines will help you level the first row of laminate or floorboards and check the planes of the walls.
Lines crossed at right angles check the position and quality of the seams of ceramic floor tiles.
For walls
Horizontal lines are laid for tiling with ceramic tiles, installing a suspended ceiling, and hanging cornices . If for some reason it is impossible to place the device high, a parallel line is manually drawn above the projected line using a tape measure and a plumb line.
Vertical lines are convenient for gluing wallpaper, attaching a frame made of metal profiles for drywall, and installing window and door blocks. The circular mode will help when marking interior partitions, as well as for leveling and plastering walls.
Lines crossed at right angles achieve a combination of two operating modes - horizontal and vertical. In this way, the correct installation of ceramic or PVC tiles is monitored.
To obtain inclined lines , as, for example, when marking a flight of stairs on a wall, change the angle of inclination of the device using adjusting screws. The self-leveling mode is disabled.
For the ceiling
Marking single-level and multi-level ceilings is not complete without a laser level.
Recommended: How to choose a good quality bubble level? Setting and adjustment, how to set the level during operation
Built-in lamps are marked as follows:
- mark the installation points of lamps on the floor;
- transfer the points to the ceiling, directing the beam upward from the marking point.
Using the device as an electronic plumb line, they mark free-standing columns and holes for utility pipes in the ceiling.
Surface leveling
The laser level is capable of leveling the surface.
Leveling determines the position of the surface height at different points in the room.
The device is attached to the wall or floor using a bracket, directing the beam along the plane of the structure.
Using a ruler or a construction square differences and irregularities are measured , identifying plane errors or setting beacons for plastering work or screeds.
DIY laser level repair
The level may be subject to shaking and falling. This affects the accuracy of the work. A large error appears or the laser beam disappears completely. You can disassemble the device yourself and inspect it for visible defects. If there are none, make adjustments.
- Remove the batteries or battery. Unscrew the mounting bolts. Carefully separate the housing parts.
The level wiring is very thin
Shift all planes to the left
Horizontal line shifted
Hexagons and holes for adjustment
Arc instead of line
Adjustment screws for arc formation
Video: Restoring lost laser level settings
By following the rules for preparing for work, checking and adjusting the device, you will be able to make accurate markings. More detailed recommendations for your level model are in the instructions. By following them, you will avoid mistakes, further rework and get a good result. Studying the instructions for the first time may take a long time. But then you will learn the algorithm. Your actions will become automatic, which will allow you to make markings very quickly.
We bought a laser level on a tripod, but it does not indicate the correct level. How do we configure this level?
Recommendation one: if you are not a specialist, then it is better not to do this at all and contact a company that does this, but it is better to return such a laser level and get a new one. But if you have nowhere to turn, then you need to perform the following steps.
Read also: Grooving brake discs with your own hands video
General laser level settings involve adjusting the vertical direction of the laser beam, which is carried out using a plumb line. If an arched line is detected, you need to open the beam formers, then use the screws to obtain a straight beam of light. After obtaining an ideal laser line, marks are made on the plumb line of all parts relative to the adjustment made.
This is corrected first and only then they move on to horizontal settings.
The horizontality needs to be adjusted only by very small movements of the block contained in the laser. First, you need to slightly unscrew the fixing screws and move the block with a thin plate, using it as a lever. Once the result is achieved, all rotating parts must be placed on glue. There is no need to use the fixing screws at all. Otherwise the whole setup will go wrong.
The use of a laser level when renovating an apartment greatly speeds up the entire work process and we can say that all professional renovation teams have it. At the same time, the presence of an expensive level of a master does not at all indicate the level of his qualifications - the simple crooked Fedya, having shown the customer a tool for 20K, will still fill the screed or make a suspended ceiling only due to his abilities. The majority of teams, without much concern, use inexpensive laser levels, while fully relying on the accuracy of Chinese junk. And almost all craftsmen, after purchasing a laser level, never check it for accuracy, and all errors in setting the level begin to come to light during the work process, when all the jambs of the work done come out. Crooked partitions, blocked openings, screeds poured into a slope, crookedly pasted wallpaper will immediately show the narrow-mindedness of such crooked hands. And there is no particular difference between an expensive and a cheap level in terms of trust in accuracy - the entire final adjustment of any laser level is mechanical and very clearly depends on the assembler in production.
Using the most high-precision tools with zero deviations at any distance (water level and plumb line), you can check your laser level without any problems and, if possible, adjust it almost perfectly (0.00 mm at 15 meters). When renovating an apartment, a greater distance is usually not required, and the laser emission line itself begins to blur at long distances.
If there is no water level, you can check the laser level by ordinary counter measurements at a preferably large distance (6-10 meters), which will provide a more accurate detection of the error.
With a plumb line, everything is simpler: having attached it to the ceiling, you will immediately see how the vertical of the level shines - along the plumb line or with an offset.
And now that all the initial information in three main areas is known, you can begin to configure the Chinese laser level and make it a real tool with almost zero tolerances.
Remove the device from the tripod and unscrew the 3 screws in the stand.
Remove the locking ring on the rotary axis of the tool and unscrew the 4 screws at the base.
There is a magnet fixed inside the stand, which is simply useless there - because... The pendulum itself is made of aluminum alloy, and the screw screwed on from below is made of brass. Quickly calming the pendulum with such materials simply does not work, which of course is a plus in this case. A super strong neodymium magnet would in any case prevent the pendulum from aligning properly and would also be part of the cause of the error. Instead of removing the magnet, it is advisable to simply increase the weight of the pendulum, which will make its alignment more stable, but will of course result in a longer settling time.
Next, unscrew 4 more screws on the body itself.
We remove the front part and see the pendulum itself and laser blocks with glass tubes that form a line from the laser point.
Read also: Operating instructions for saw Stihl 180
In general, two through screws in the pendulum are the entire center for setting up the laser level. One adjusts the accuracy of the beam into the distance, the other vertical or horizontal - it’s up to you to decide what you need. Simply adjusting the vertical and horizontal at the same time will not work - when examining several such specimens, it was discovered that the inserted blocks, which are fixed with two screws, do not allow the lines of the cross to be scanned at an angle of exactly 90 degrees.
The setup itself is done in this form, with the front part removed. The half-disassembled instrument is installed back on the tripod, with parts of the base better secured so that the level does not accidentally fall while dragging for adjustment.
The entire setup begins with adjusting the vertical beam of the laser beam using a screw in the pendulum. In this case, if the line has an arc, then you will have to pick out the glue that fixes the beam formers and adjust the screws to achieve a straight line of glow along the entire length of the plumb line. Immediately after setting the ideal display of the laser beam on the plumb line, it is necessary to fix with glue all the details related to the adjustment.
The next step is to check the horizon using counter measurements or using hydraulic level marks, and if you additionally pull the cord from the edges of the line, you can also determine the arc shape of the glow, which is corrected first. Of course, if the horizon turned out perfect after previous manipulations, then you can simply rejoice. If not, then you can start adjusting it, during which the screws in the pendulum can no longer be touched because this will disrupt the newly configured vertical.
And therefore, adjusting the horizon is possible only by small movements of the entire block in which the laser is located. Before this, it is necessary to slightly loosen the fixing screws and carry out the shift itself with an awl, acting as a lever. After obtaining the desired result, it is also necessary to fix all the parts that were spinning with glue, but it is not advisable to touch the fixing screws, because when they are tightened and, accordingly, a sliding load is placed on the block itself, which they fix, all the adjustments made may disappear. Of course, it’s worth trying to tighten the fixing screws, and if you succeeded without knocking it down, then after congratulating yourself once again, you can proceed to the last stage - adjusting the horizon into the distance.
This adjustment can be made simply by taking counter measurements at two simultaneously visible corners of the walls at a distance of 5-6 meters from each other or using hydraulic level marks. If there are no such corners in the room, then you can use almost any thing to set it up: stepladders, or something leaning against the wall. All adjustments are made by a screw in the pendulum, which, when unscrewed or tightened, changes the center of mass of the pendulum and, accordingly, the angle of inclination of the laser luminescence line into the distance. Of course, you can use a hydraulic level to create marks, but you will still need to find it, fill it with water, check the correctness of the marks, and you will need an assistant. This sequence takes a lot of time, unlike simple counter measurements, in which the error is immediately shown. Once all tightening is completed, the screw on the pendulum must also be fixed with glue, which will maintain the setting during a wide variety of impacts during operation or transportation.
After this adjustment, the error of the laser level at the distance you specify will be practically zero. The accuracy of the water level and the plumb line will make the PG almost a standard of accuracy and you can easily wipe out critics or bullies with expensive laser levels