The bubble level is one of the most common and constantly used tools of the builder. But what should a beginner do who is holding this device in his hands for the first time? It is important not only to use the building level correctly, but also to know what tasks this or that device can solve. Learning the basics of using such a tool is easy. It is not difficult to understand how to choose the right product with good characteristics in order to work with the construction level with high accuracy and predictable results.
What are bubble levels?
All models of bubble levels are divided into several significant groups. But regardless of the functionality of the device, in all versions it will have a number of key characteristics. The main one is the design of the body. This is necessarily a strong frame, made in the form of a box-shaped structure, an I-beam, profiled by milling an all-metal billet or cast from aluminum.
The second key characteristic of a bubble device is the measuring flasks. These are cylindrical plastic containers with a slight bend along the axis. Inside there is a non-freezing liquid, usually alcohol-based. It does not completely fill the volume of the flask. An air bubble is formed, which is used to measure the horizon.
Today you can buy the following types of products.
- With one flask. You can use a building level of this type only to check one horizon. Usually this is a horizontal surface.
- With two flasks. This tool is designed to control both vertical and horizontal surfaces. Each of the flasks performs a separate task.
- With three flasks. The device of this class is the most popular. In addition to vertical and horizontal control, inexpensive products allow you to measure the inclination of a plane at an angle of 45 degrees. Having purchased a more expensive model, the user receives a third flask in the rotary block. It allows you to measure arbitrary angles with a fixed step.
Professional products are worth considering separately. For example, there are devices with six flasks. Each of them serves to control a specific horizon. Models of this class are designed to perform special measurements. In particular, devices were produced specifically designed to control the laying of pipelines and its compliance with standard requirements.
What do the divisions on the flasks mean?
Most of the divisions at the construction level are quite understandable to a novice user. On various models there is a familiar ruler for measuring distances or marking segments. Some manufacturers offer offset blocks for marking holes according to a template.
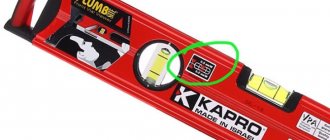
The most questions are raised by divisions at the construction level, seen on cylinders with bubbles inside. Let's look at what these marks are below.
- Marking marks needed to determine the accuracy of the horizon. When the device is placed on a flat surface, the air in the corresponding flask will be placed strictly between the marks, the edges of the bubble will come close to them.
- Error marks. They are located behind the horizon accuracy marks, closer to the edges of the bulb. Present in products of the middle and expensive categories. Each of them comes with instructions that indicate the division price. When the bubble is displaced to such marks, the slope of the surface can be determined in millimeters per linear meter.
Important! In levels with rotary flasks, on which the risks of determining the error are marked, it is proposed to measure angular deviations. All data necessary for calculations is given in the operating instructions for a particular device.
How to use the meter
Before you start using a three-bubble bubble level or other product, you should pick it up and inspect it carefully. Having freed the device from its packaging, you will notice that its edges differ in color and structure. Each level has a so-called working side: the metal on it looks somewhat rough, as if cut with a circular saw.
Inexpensive devices have one working side. It is with this that you need to apply the level to the surface being tested. If you use another side of the case, most likely nothing bad will happen. However, the measurement error will be greater. For precision work this plays a significant role.
Advice! Before applying the level, it is advisable to clear the surface being tested of debris.
Horizontal control
For ease of understanding, the process of hanging a bookshelf is suitable. First they make the markings. A hole for the first side fastening is marked. Then the edge of the level is applied to the drilling point. While maintaining its position, move the second end of the body. As soon as the air bubble in the horizontal control bulb is located between the inner edges or is positioned exactly on the central mark, you can draw a marking line. This means that the level was shot correctly, as professional builders say.
Control can be carried out in several directions. For example, when installing a window sill, it is important to align it lengthwise and crosswise. To do this, the level can be placed according to the desired direction of control. The bubble in the flask will show how to tilt the window sill or rotate it along its axis.
Vertical control
Using a level it is easy to check the quality of the plaster. Having placed the device with its working side against the wall, you should look at the position of the bubble in the vertical flask. If it goes to the plaster, then you need to make a thicker layer of finishing on top, and vice versa.
Important! The level must be applied to the wall so that the vertical flask is at the top when taking measurements. Some models require its position at the bottom. However, such products must have a corresponding mark on the body and instructions in the operating instructions.
Tilt control
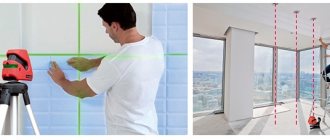
Using a device with three bubbles, you can not only set the level horizontally or vertically, but also check the slope of the surface. A regular, inexpensive model with rigidly fixed bulbs will only allow you to measure an angle of 45 degrees. Products with a rotating block offer control of an arbitrary tilt rate.
Using a level for such purposes is not difficult. The rotary bulb is set to the desired control angle. It must have a graduated scale, and the rotations of the block are fixed with a latch with a certain step. The device is applied to the controlled surface, and the correctness of its inclination is studied by the position of the bubble in the flask.
What not to do
It is worth remembering that the level is applied only with the working side to the surface being checked . That is, always with a long edge. If you apply it sideways, it is impossible to obtain correct data about the horizon. In fact, in this case a non-existent surface is being controlled. The device does not have bubbles that can correctly show its location.
How to use a building level
A building bubble level, or, more correctly, a spirit level, is a tool that is a strip of plastic, wood or metal with transparent inserts - bulbs with “eyes”. At construction sites it is simply called “spirit level”.
There are other types - a hydraulic level (a tube with water), called a “water level” at a construction site, a plumb line and a laser level, abbreviated as “laser”. How to use other types of building levels is described in the relevant sections. But in this article we will analyze in detail the bubble option.
“Eyes” are flasks with a colored liquid (alcohol) in which a bubble floats. Special indicative marks are applied to their body. Levels with a metal body are preferable - they are both reliable in operation and not afraid of water, because they are made mainly from corrosion-resistant alloys, and are less sensitive to mechanical damage, which, as you understand, is practically impossible to avoid at a construction site.
Although there are also plastic options - usually cheaper, of course, and less accurate, they are most often provided as a bonus complete with some other tool. Sometimes you can also find wooden rarities from the times of our grandfathers. They are more valuable as antiques than as tools.
Construction level device
Most often, the bubble level has two or three “eyes”. The correct name for the “eye” is the sight.
Each such sight is designed to check a specific plane:
- one – horizontal (180 degrees);
- one – vertical (90 degrees);
- the third - at a certain angle (45 degrees) to the horizon.
The visor is designed as follows - it is a transparent insert, inside of which there is a cavity - like a tube with sealed ends.
Inside the cavity there is a liquid - usually a brightly colored alcohol solution, in which an air bubble floats. Filling the flasks with ethanol alcohol is explained by the fact that this liquid does not freeze at sub-zero temperatures, and also has a fairly low viscosity, which facilitates the rapid movement of the air bubble.
There are also markings on the walls of the visor - risks. In professional instruments, to determine a more accurate angle of deflection, at least two marks are applied to the eye. They serve as a guide to determine whether the bubble is in the correct position. The horizontal and vertical planes are measured by moving an air bubble along the alcohol flask, and its position should be achieved exactly in the middle between two marks on the flask.
Levels are used in a very wide range of jobs - that's why this tool comes in many types and sizes. This tool is used by masons, plasterers, carpenters, drywallers, roofers and installers for various installation and fastening work, as well as for checking the results of work already carried out.
The most common types of tools:
- “Profile level” – is made on the basis of a rectangular aluminum profile. It is designed for various types of work. The main advantage: the rigidity and strength of the body.
- “Rail” is a lightweight body shaped like a rail. Used for all types of work. Plus: light weight.
- “Torpedo” is a small case made of plastic, in most cases 225 mm. There is a magnet on one side to allow installation and measurement of metal surfaces. Used in everyday life. Positive point: small size.
- “Shock” – a level with a special striking platform for the possibility of delivering hard blows with a rubber hammer. Used when laying ceramic tiles. The main advantage: a very durable body that can withstand heavy impacts.
Remember! If you want to purchase a bubble level, then buy it not on the construction market, but in a specialized store. Choose a level of reliable and well-known manufacturers, this will help you save your money in the future without spending much on measurement accuracy.
How to apply the tool correctly?
It is also important to remember that the spirit level has a working surface. The working surface is the side on which you need to apply the level to the place that is being checked. Usually it is “sharpened” - not painted, but processed as if it had been sawed off with a circular saw (maybe with a magnetic insert).
If you apply the instrument with the opposite side, this is usually not a problem, but it happens that there may be a slight error. Some levels have two working surfaces. Never work with a level, applying it to the surface with its side - all the results will be incorrect, because in this case, in fact, you are measuring a non-existent surface.
Most often, a viewfinder located in the middle of the level is designed to check horizontal surfaces, and one located near the end is used to check vertical surfaces. I think there is no need to explain that horizontal planes are a surface parallel to the horizon - floors and ceilings, window sills and tabletops and everything that “lies”. And the vertical is everything that is located at an angle of 90 degrees to the horizon - walls, slopes, doors, pillars and everything that “stands”.
The length of the construction tool is chosen solely based on the work to be done with it.
It can be from 20 cm to 4 meters:
- The 20 cm long tool is usually used to measure the accuracy of small planes, for example, the location of sockets, switches, shelves, etc.
- Levels longer than 20 cm to 1 meter are used when performing larger-scale work, this could be, for example, laying bricks or laying ceramic tiles on the floor or walls, etc.
- Long bubble levels are used as control slats.
How to use a level correctly?
How to use a bubble level? Let's consider three main tasks - checking the horizontal and vertical planes, as well as checking the tilt.
Horizontal check
Let's say we need to install a window sill - this is horizontal. Place a level on it with the working surface facing down. The air bubble in the corresponding “eye” should be exactly in the middle between the risks - even fractions of a millimeter play a role; here you cannot be content with the estimate “approximately in the middle”; every tenth of a millimeter by which the bubble has deviated will turn out to be an error of several millimeters at a distance of a meter.
If the bubble is tilted to the left, then you need to lower the left side a little (or raise the right). If it’s the other way around, then we act accordingly. That is, you need to lower the edge where the bubble has deviated, or raise the opposite one. When the window sill is exposed, firmly fix it in this position.
Pay close attention when choosing a building level; as a rule, it must have precisely adjusted, tightly secured flasks, which must be firmly built into the metal body of the tool itself. If the flasks are secured with simple bolts, then ideally accurate measurements will be very difficult to achieve.
Vertical check
Now about how to use a construction bubble level on vertical surfaces. For example, consider checking a plastered wall. Place the level against the wall using the work surface. The vertical sight should be at the top (very rarely it happens at the bottom - but then there should be a corresponding inscription or pointer on the instrument).
If the bubble in the “eye” deviates “from the wall”, it means that the bottom of the wall is sticking out, that is, there is not enough mortar for the plaster at the top. If the bubble deviates from the center towards the surface, it means that the wall is tilted towards you - there is not enough plaster from below.
Tilt check
Using a spirit level with three bubbles, it is possible not only to measure the level horizontally or vertically, but also to determine the inclination of the surface. A simple, affordable model with rigidly fixed bulbs can only measure an angle of 45 degrees. More expensive models with a rotating block are able to control an arbitrary level of the required tilt.
It is not difficult to use such a device for such purposes. It is necessary to set the rotary flask to the desired control angle. There should be a special graduated scale on it, and the rotations of the block with the flask are latched with a latch with the required step. The spirit level is applied to the controlled surface, and the correctness of its inclination is determined by the location of the air bubble in the sight.
How to check a building level for accuracy?
To check the level for the accuracy of its measurements, you should place it on a flat horizontal plane and consider the position of the air bubble relative to the first two marks located in the center of the flask. After the spirit level, you need to turn it horizontally 180 degrees and take a second measurement of the location of the air bubble.
If the device is defect-free and serviceable, then the air bubble should be in the same position as during the initial measurement.
How to adjust?
To adjust (calibrate) the flask (as a rule, it should be fixed with adjusting screws on the body of the instrument), you need to alternately rotate the spirit level 180 degrees in the horizontal plane and gradually adjust the location of the eye until its readings become identical when the level is rotated. For such adjustment, it is not necessary to have a perfectly horizontal or vertical surface.
Working with any level is a painstaking task. Be patient and don't rush. And everything will work out for you!
Video: How to choose a bubble building level
Electronic levels
The electronic level is a more advanced, improved version of the bubble device. It has two familiar blocks to control horizontal and vertical. The third role is played by an electronic unit with gyroscopes. When the level is placed on the control surface, the amount of its inclination is displayed on the screen. It is equal to zero in the horizontal plane and 90 in the vertical plane.
The electronic level has a calibration system. It can be automatic in expensive models. Budget ones have a separate button for setting them up. When a level is bought in a store, its readings are not ideal. Depending on the direction in which the device is applied to the surface, the display shows different angles of inclination.
Calibrating the electronic level takes less than a minute. The procedure is carried out according to the manufacturer's instructions. To guarantee measurement accuracy, you will have to find a perfectly horizontal plane. In an apartment, this could be a sheet of polystyrene foam immersed in the bathroom. At the construction site it is placed in a mortar trough.
How to test a normal level
In order not to encounter a situation where a regular bubble level gives incorrect readings, it is worth checking it directly in the store. To do this, you need to set the level horizontally. Since neither a bathtub with a sheet of foam plastic nor ideal surfaces can be found in the store, they resort to the following verification method:
- the level is installed on the countertop;
- the position of the edge towards which the bubble in the horizontal flask goes is noted;
- sheets of paper are placed under the other edge until the ball placed on the upper edge of the device stops rolling.
If after such a procedure the level shows an ideal horizontal, you can already trust it. But it’s still worth rotating it 180 degrees, placing the edge on the previously made mark. If the position of the bubble has not changed, then the device has excellent accuracy. Otherwise, you can try to calibrate it.
What not to do
When using a bubble building level, you should adhere to some rules for working with it. Among them are the following:
- Do not apply the level to the working surface with its side or top.
- Do not use the tool without first adjusting it. To do this, you need to prepare a level, pencil, ruler and nail:
- Perform adjustments on as level a surface as possible. This can be the left corner of the wall with convenient access to it;
- retreat from the corner 3-5 cm;
- drive a nail into the wall;
- bring one side of the level to the nail, resting it against the surface of the wall;
- draw a line on the wall;
- lean the other side of the level against the nail;
- draw another line.
If the lines completely match, this indicates that the level is set correctly. If the lines diverge, a mark must be placed at the place where they intersect. After this, repeat the application procedure again. In this case, it is necessary to tighten the flask little by little. The adjustment should be repeated until the lines match completely.
- You should not buy levels that cannot be adjusted. There is a misconception that manufacturers produce tools to certain standards, which eliminates the need for customization. Each purchased building level requires preliminary configuration.
- Do not use the tool without checking that it works correctly.
- It is better not to buy levels whose design does not have adjusting screws located near each flask, 2 on each side. The screws should have wide heads: this makes adjustments easier and faster.
- It is not recommended to store the level without a cover. Foamed polystyrene foam is suitable for its production. In this case, you can be sure that the level flasks will not be damaged.
- The level should not be allowed to fall from a height. This may cause the bulb to crack or the instrument to become out of tune.
- It is better not to buy a level whose body is made of fragile material. Experts advise giving preference to levels whose body is made of wood, aluminum or durable plastic. The duration of use of such levels is several orders of magnitude longer.
- It is not recommended to buy inexpensive models of instruments. The period of their use will be short, and their data will not be accurate.
A construction bubble level is a tool without which it is impossible to carry out construction and installation work.
Bubble level calibration
It is convenient to calibrate only the level in which the bulb blocks are secured with screws or have a system for turning them . The procedure looks like this:
- the level is installed on a foam sheet immersed in a bath or trough filled with water;
- there is a displacement of the bubble;
- the flask is rotated until the air bubble is placed clearly between the risks of the horizon;
- the level is rotated vertically 180 degrees and placed back on the sheet.
Adjustments continue until the device in any direction begins to show the correct horizon with the same position of the bubble. After this, the flask blocks are fixed by fully tightening the screws.
Important! This calibration procedure is also carried out for long-used levels. The fact is that due to shock, vibration, and temperature influences, over time the device may give incorrect readings.
Inexpensive models that do not have screws to adjust the position of the flasks are practically impossible to calibrate, but there is a barbaric method. Once installed on a floating sheet of foam, mark the edge of the flask towards which the bubble goes. They take out the level and try to displace the element in the fastenings or deform it with light blows of a hammer and screwdriver. In this way you can break the flask. But if this did not happen and it was possible to slightly improve the accuracy of the device, after adjustment the cylinder is tightly filled in the socket with superglue.
How to check the level readings?
If the tool is required for one-time work, then you should not spend several thousand on it; you can get by with cheaper models. The main thing is that the readings are accurate. How to check them?
Horizontal check
Before you check the building level when purchasing, remember two important rules:
- A level can lie, even if it is completely new.
- The level can lie, even if its cost is higher than other instruments.
For this reason, it is always worth checking the tool, despite its cost and the assurances of the seller. To check the accuracy of the level, find at least a relatively flat surface, i.e. the one with which the tool will touch the entire plane. Before doing this, make sure that the plane of the rail is flat and not deformed. To do this, just apply a metal ruler and see that there are no gaps. After this, attach the device to the surface and mark the landmarks with a pencil. They are required so that the level can be installed in the same place every time.
Next, remember all the readings and the position of the bubble. After this, you should turn the tool 180 degrees and put it back along all the marks. If the readings remain unchanged, then you can safely buy this level.
Check if there is no flat surface
If you are not completely sure that the surface chosen for testing is smooth or it is difficult to orient by eye by the distance of the bubble from the scratches, use the drill or match method. To do this, place a building level on the counter (it does not have to be level). Next, you should slip a thin drill or match under one side. Next, move it so that the edge of the bubble comes close to the risk. Now all that remains is to make a mark with a pencil and rotate the level 180 degrees horizontally and put everything in its place according to the marks. The drill must remain where it was before. If the instrument is of high quality, then the readings will be identical.
Tool working surface
It should be noted that in most building levels, especially in the budget segment, only one side is working. This is due to the fact that the inner surface of the cone is not symmetrical and has the shape of a barrel. For this reason, I calibrate such levels relative to the side opposite the flask. Because of this, performing calibration and checking the building level on the ceiling is not the correct method. On expensive models, calibration is carried out on each side, and each has its own errors, they are indicated on the case. Remember - if the visor bulb has a cylindrical shape, then the bubble level will be more sensitive. If the flask had a strictly cylindrical surface, then the bubble will go left and right, since there are simply no ideal horizontal surfaces in everyday life (the exception is a water surface at rest).
How to check vertical
After the horizontal check has been completed, the vertical comparison should also be made. To do this, place the tool against a vertical surface and make marks along the edges of the body. The readings should be remembered, and then, using everything you need to know about the working surface, turn the level 180 degrees relative to the vertical. If the readings match, then everything is in order, but if not, then calibration will be required.
Performing a Level Calibration
Calibration is quite simple. To do this, secure the flask with screws and do everything strictly according to the instructions:
- Attach the strip to the wall and place the bottle exactly in the center. You need to mark and draw a line from below.
- Turn the level over to the other side and align it with one of the ends of the segment. Again, make sure that the bubble is strictly in the center and draw another line.
- To check the construction bubble level and adjust it, divide the resulting angle in half and draw a third line between them (i.e., a bisector).
- Attach the rack to this line and adjust the flask using the screws so that the vial should be centered.
The correct vertical can be calibrated using a plumb line, and the plumb line must be made of non-ferrous metal. If you use steel, then if the cord is long, it can be affected by magnetic fields, and magnetized sawdust often sticks to the plumb line itself, and this will also create unnecessary errors and deviations. If the bulb is glued in, then try to adjust it by gently tapping it with a screwdriver, which will come into contact with the edges of the bulb.
You should hit the high ground often, but achieving increased accuracy with this method will not be so easy. In any case, you have little to lose if your building level is shamelessly lying. If the method helps, then glue all the joints of the cone with superglue.