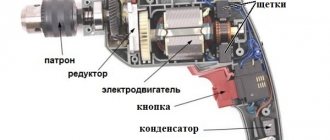
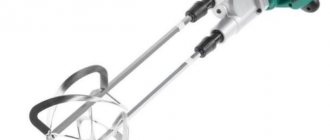
An electric barrel organ is an indispensable assistant in all types of home repairs: you can use it to perform a number of tasks, from mixing paints, gluing wallpaper, to its main purpose - drilling various holes. The product's power button wears out quickly and has to be repaired or reorganized with a new one quite often. To carry out this rather simple operation, the user needs the drill button connection configuration and knowledge of the most common malfunctions of this important part.
Breakdown test
This simple-looking device gives signals to the user when in use; soon he will need repairs, but not everyone understands them. When the drill begins to work with temporary interruptions, or the button requires pressing harder than before, these are the first symptoms of incorrect operation of this part.
When you use a cordless drill, the first thing you need to do is measure the battery voltage with a tester - if it is less than the nominal value, then it must be charged.
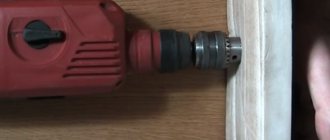
In this case, we are especially interested in the state and functionality of the factory on/off button. Let's look at the procedure for checking a key using a classic impact drill as an example. To avoid removing the casing, you will need a Phillips and flathead screwdriver, and for direct diagnostics, a template tester (multimeter).
Be sure to unplug the power cord from the outlet before disassembling the instrument.
Removing the button:
- Unscrew the bolts on the drill body.
- Loosen the screws holding the network cable.
- Disconnect the side.
- Carefully remove the starting block.
Most often, the reverse is attached using ordinary clips: bend them slightly and pull out the element. If the lover is out of order, then there will be no problems with a replacement. A reverse block for a drill is sold in almost every specialized store.
To check the drill power button you will need a multimeter
Button ringing:
- Turn on the multimeter and set the knob to beep.
- We press one probe to the core, and the other to the screw, one or the other holds the network wire.
- We press the button.
- Sound signal (y)consume - the key is working, if not - it is faulty.
Regular on/off button
Maintaining or replacing the drill button is considered a simple process, but it is advisable to have certain skills - if you open the side wall carelessly, many parts can spread in different directions or fall out of the case.
As it was written through. Ant. below, the button may not function due to oxidation or burnt contacts. To fix this, you need to disassemble it for cleaning, following the order mentioned below.
- Carefully unhook the protective cover latches and open it.
- Remove stains on the contacts with alcohol, or clean them with sandpaper.
- Therefore, assemble and check.
If everything works fine, then it follows that the reason was in the contacts, otherwise the button needs to be replaced.
It is good to know that the special layer that is applied in front of the rheostat slider during manufacturing often wears off - in this case the button also needs to be replaced.
Quite often, the drill button connection diagram is used to check the functionality of the entire structure: if it is available, you can perform partial repairs or make the correct connection of the button if it is replaced. The diagram should go along with the product’s operating instructions, but if for some reason it is not there, then you can search on the Internet.
How to determine whether a button is working?
To do this, you will need a regular multimeter (tester) and a screwdriver.
The diagnostic process itself is carried out as follows (using the example of the common drill model DWT SBM-500):
- Remove the drill housing cover by unscrewing several fastening bolts;
- Unscrew the two screws on the power cord clamp;
- We remove the start button block, disconnect the reverse switch (it is usually attached to clips that just need to be slightly bent). The reverse itself is sold separately and can also be replaced if necessary;
- Take a multimeter and set the switch to the beep position. We close the contacts of the tester to make sure that it is working (the device should beep);
- We call the button. To do this, we place one contact of the tester in position 2 (it should be in contact with the wire), and place the second contact on the screw that presses the 220 volt wire. When you press the button all the way, the device should emit a beep. If this does not happen, the button does not work.
How to replace a button?
To do this, you will need a flat-head screwdriver and a regular pin or thin awl.
- The button replacement process itself is carried out in the following sequence (using the example of the DWT SBM-500 drill):
- Unscrew the two screws holding the power cord in place and remove it;
- We insert the awl into the hole in the wire coming from the stator, and remove the wire along with the awl.
- We carry out a similar manipulation to remove the second wire. If you are afraid of mixing up the wires when connecting a new button, we recommend drawing a schematic diagram for connecting the drill power button;
- We take a new button and connect the power cord wires to it in accordance with the drawn diagram. Then we connect the drill itself to the button block. The wires from the stator are simply inserted into the holes until they stop;
- We attach a reverse button to the block;
- We install the block into the seat in the drill body, carefully lay the wires, and press the power cord with two screws;
- We close the cover of the drill housing and conduct a test.
VIDEO INSTRUCTION
Connecting a drill button with a speed controller
Many modern drill models, in addition to reverse, have a motor speed regulator built into the button. This function is very useful because it allows you to set different operating modes for the tool when performing different operations.
As for replacement, the whole process is no different from that described above. It is enough to purchase a new button for a drill with a speed controller and replace it with the old one in accordance with the instructions given.
By the way, if you wish, you can always install a button with speed control on a regular drill - just choose a block that is suitable in shape and size, as well as corresponding to the power of the tool.
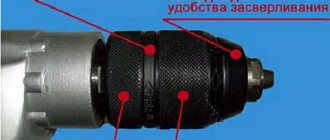
Power button with reverse/speed control
The drill button shown in the photo, in addition to reverse, has a built-in electric motor speed controller. This design is highly complex, so it is not possible to disassemble it without special skills: as soon as you open the block, all the parts will “scatter” in different directions, because they are supported by springs. Without knowing their correct location, it is quite impossible to put the entire structure back together - it’s easier to buy a new one and make the connection by consulting a special diagram, which can be found on the Internet.
Modern drills are produced with reverse, so the button performs several functions at once:
- backbone inclusion of the product in work;
- adjusting the rotation speed of the electric motor;
- turning on reverse—modifying the direction of rotation of the engine rotor.
Attention! The reverse control and the speed controller are located in different housings - they should be checked separately.
It must be remembered that in modern products the speed controller is located on a special substrate, and during manufacture it is filled with a compound - an insulating composition, which, after hardening, protects all parts from mechanical, temperature and chemical influences. Because of this, it cannot be repaired.
As can be seen from the connection diagram, when it contains a drill button along with reverse, the rotation is reversed using a special toggle switch. In this case, positive or negative torque is supplied to different brushes, so the motor armature rotates in different directions.
Button substitute
For the procedure you will need a flathead and Phillips screwdriver, as well as alcohol. In the absence of the latter, a bag needle or any other needle with something to hold on to will do. If the model is small in size, then for a larger toilet you can also take tweezers.
Button replacement:
- Loosen a couple of screws holding the network cable.
- We insert the awl into the stator next to the wire and carefully remove the core.
- We pull out the other cable in the same way.
- If the button is not on the clips, then unscrew the screws and take it out.
- We put a new key in place and connect the wires using an awl.
- We install the batch on the drill, not forgetting about reverse.
- Carefully lay the wires and press them with screws.
- Close the box.
Interskol drill power button
In a good half of cases, the cable coming from the stator differs in color. If they are of the same color, then they will need to be marked so as not to be confused next to the connection.
Checking the electric motor: causes of breakdowns and repairs
There are several reasons for damage to the armature or stator of a drill. First of all, this is illiterate operation of the device. For example, many users simply overload the tool, working without interruption. This leads to the fact that the drill motor does not have time to “rest”. The second reason lies in poor coil wire, which is often found in cheap models. That is why breakdowns of cheap tools are much more common. In this case, repairs must be carried out using specialized tools. And it will be better if you entrust this work to professional specialists.
Read also: How to increase the power of a metal detector with your own hands
However, if you decided to carry out the repairs on your own, you will definitely have a question - how to do everything right? As you already understand, an electric drill “suffers” from damage to the armature and stator, and this can be checked with several signs, for example, when the tool suddenly sparks during operation. If there are no “bright” signs, you can use an ohmmeter.
The stator is changed like this:
- First, carefully disassemble the device body;
- Remove the wires and all internal parts;
- After finding out the causes of the breakdown, we replace the spare part with a new one and close the housing again.
Tool operation without a button
The drill can be connected directly, except for the control unit . In addition to flathead and Phillips screwdrivers, you will also need electrical tape and a utility knife. For more extensive connections, you can use a soldering iron.
Carefully remove the starter charger. Ant. final block according to the instructions above. We disconnect the wires connected to the button and connect them between ourselves. If the tool is expected to be actively used, the wires should be soldered. For one-time work, ordinary twisting and insulation is sufficient. It is better to cover the solder with cambric.
The winding includes two evaporating wires. We connect those wires that run diagonally (from the coils) to the brushes and isolate the joints. We connect the other pair to the power cable.
Means a lot! If, after switching on, the cartridge begins to spin in the wrong direction, the pairs need to be swapped: brushes to power, or vice versa.
Connect a drill directly without a button: is it real?
You can repair a power tool such as a drill on your own at home, without resorting to outside help and without spending money on it. Often, during operation, the drill begins to work worse and stops starting.
The reason for the breakdown of an electric drill is wear of the brushes, failure of the motor and the start button. In this case, as a rule, the switch often breaks? due to which further use of the power tool becomes impossible.
To solve this problem, the old, faulty button is replaced or the electric drill is connected directly to the power supply.
Is it possible to connect a drill without a button?
A drill is one of the most used power tools in everyday life. Often, during its operation, an element such as the power button fails.
This is due to the fact that the switch responsible for turning the device on and off is subject to mechanical stress, as a result of which it quickly wears out.
It is for this reason that most people who use an electric drill have a completely logical question: is it possible to connect the drill directly without a power button and how to do it?
As a rule, in most cases, a similar question arises among people when the on/off switch of an electric drill fails, and it is not possible to purchase a new one.
It should be noted right away that it is quite possible to connect power to an electric drill and start it without a button.
However, during such a connection, you must follow all the rules and instructions for connecting the contacts of the device’s electric motor to the wires that supply power from the electrical network.
How to connect?
Connecting a drill directly to an electrical outlet without a switch is not as difficult a task as it might seem at first glance. Before you start connecting the electric drill and dismantling the power button, you need to stock up on the appropriate tools:
- screwdriver;
- soldering iron;
- insulating tape;
- sharp knife or blade (for stripping wires).
Before connecting the drill motor directly, the device's power button is removed.
To do this, use a screwdriver to unscrew the screws located on the side of the electric drill.
Then, after the screws have been removed, you need to dismantle (remove) one part of the power tool body. Then, when access to the switch is open, it must also be dismantled.
It is strongly recommended to solder the wires together using a soldering iron, and then the soldering points must be properly insulated using electrical tape.
As an alternative to soldering, you can use a terminal block (blocks), thanks to which the wires are connected to each other. You can also use a cambric to insulate the connection point.
The field winding consists of four wires. Two wires located diagonally from the coils must be connected to the wires that are connected to the brushes. The connection points must be insulated. Then the other two wires need to be connected to the power cord that powers the power tool.
If the electric drill chuck, after connecting the device to the power supply, starts to rotate in the wrong direction (reverse mode), then the connection wires just need to be swapped.
That is, the wires that go directly to the brushes need to be connected to the electrical network, and those contacts that were previously connected to the network need to be connected to the brushes.
Pros and cons of working without a button
When using an electric drill without a power button, there are many more disadvantages than advantages. The only advantage of such a power tool connection scheme is that there is no need to change or repair the switch. However, if the drill is connected directly to the network, many problems arise. For example, the functionality of the device suffers.
Without a switch, it is impossible to adjust the speed or turn on the reverse mode.
In addition, with this connection, the soft start function, which is equipped with most modern models of high-power electric drills, will not be available.
Also, before each use of the drill, you must constantly plug in the power cord and turn it off after completing the work, which is not entirely convenient.
In addition, the contact groups of the switch, when turning on the power tool, took on part of the load. If it is absent, both the motor winding and the brushes will be subject to increased load.
As a result, the motor of the power tool will wear out greatly and quickly fail.
Pros and cons of direct connection
The only serious advantage of this connection format is the absence of the need to hold the button. So, during long-term work, the operator is focused only on drilling, without being distracted by control. For long-term processing of hard surfaces, such as concrete or wood, this approach is completely justified.
In all other respects, they are complete minuses. In many models, the button is responsible for adjusting the speed of the cartridge. Soft start can also be forgotten, which makes it difficult to work with finicky materials such as plastic or drywall. There can be no talk of any kind of jewelry drilling here.
Before each startup and shutdown of the tool, you will have to wander to the outlet. This format grossly violates safety regulations. In the event of an emergency, the barrel organ will be turned off only after a few seconds, not moments, as if the button had been pressed.
The contact group of the power supply switch takes on part of the load. Now the winding with brushes will take over 100%. Moreover, after switching on, the engine immediately begins to work at full power, which will affect the performance of the drill already in the first moments.
Important! Experts strongly do not recommend removing the button from the circuit unless absolutely necessary.
Our assistant can drill different materials, so there is often a lot of dust and waste. After (a year) of each use, you should clean the drill, then the next time you use it, your body will work like a Swiss watch: without failures or annoying stops.
Future plans for drill button connection diagrams - on ZdavNews.ru
Long gone are the days when all housework was done manually. Household skills have become our reliable assistant in housekeeping. Tireless electric “workers” help prepare food, wash clothes, wash dishes, restore order and cleanliness, making our lives one hundred percent easier. However, in order for homework to continue and progress without interruptions, it is important to select the right devices, paying attention to efficiency, speed, functionality, number of modes and other performance characteristics. How to avoid common mistakes when purchasing this or that equipment, how to use it correctly, which models are considered the best, (how) to find the cause of the breakdown and repair the device yourself. Comprehensive information is presented on all types of equipment: both small and large, budget and expensive, both domestic and foreign. Read useful articles and replenish your original knowledge about household appliances with new valuable information!
Share the link and your bros will know that you know the answers to all questions. Praiseツ