Classification of cartridges
The following types of cartridges exist:
- quick-release or self-clamping device;
- collet-type sds devices;
- cam
On a drill with a quick-release chuck, you can change a drill or other attachment quite quickly, without the need to use any additional devices. The cartridges of the first option are divided into single- and double-coupling devices.
Single-coupling devices have a shaft locking system that is activated during tool replacement. They have a significant negative point - very low strength of the fixation elements; the external parts of the cartridge are made of plastic, which greatly increases their damage and breakdown of the entire device.
Repair of this type of cartridge is not provided - only replacement.
Manufacturers use cam-type products on impact models and hammer drills because their design is stronger - they mainly use key-type chucks to securely fasten the drill.
The collet-type chuck was created back in the 70s of the last century; its design differs in that there are two grooves in the tail part, and the drill must be deepened by screwing movements by 40 mm. There are 4 grooves: 2 fixing, 2 for guiding the wedges, the cutting tool is fixed with locking balls.
With a classic gear device, the tightening is adjusted using a chuck key that comes with the drill. To properly unscrew the cartridge, you must follow the recommendations of an experienced technician; to do this, watch this video:
How to disassemble a drill chuck
Not all varieties require disassembly; in most cases, they are conical. There is a fun way to access without sawing into pieces. Process:
- The fists move inward.
- A flexible material (foam plastic, expanded polystyrene - 10-20 mm wide) is pressed against the front side with a board or iron sheet.
- The drill is leaned against a flat surface and the hammer is engaged. If the model does not provide for this mode, then the cartridge is previously dismantled and fixed on the hammer drill. After 20 seconds of operation, the part can be disassembled for repair and cleaning.
READ How to Correctly Drill a Concrete Wall with a Hammer Drill
Even after repair, performance is not fully restored, so it is recommended to replace the part.
Useful articles, announcements and reviews on our Yandex Zen channel
Mounting methods
The chuck is attached to the shaft of an electric or manual drill in two ways - a cone connection and a thread, so there are a minimum of varieties here. In practice, there are devices with metric or inch threads, and on the body of the product, even the smallest one, there is always a marking.
For example, a designation of this type 1.5-15M13x1.2 is deciphered as follows:
- 1.5-15 is the diameter of the tail part of the cutting tool in millimeters;
- M13 - metric thread with a diameter of 13 mm;
- 1.2 - thread pitch.
When using a thread in inches - UNF and the diameter is indicated: 1/2”. This type of connection is considered international and is used in all instruments from foreign manufacturers. For special reliability, a stopper is placed on the shaft, in the form of a screw on the left thread - this must be taken into account when you are confused about how to disassemble the chuck of an imported drill. It only needs to be unscrewed clockwise.
The second method uses a Morse cone, which today is more often called an instrumental cone. The shaft has a conical part at the end onto which the device is mounted, and a small force must be applied for a tight connection. The marking is as follows: B10, where the letter indicates the use of a cone, and the number indicates the diameter of the tail of the cutting tool. This type of fastening is common with screwdrivers.
Morse cone
Some drills are equipped with an adapter for the clamping mechanism, which allows drilling with maximum accuracy.
Types of fastenings for screwdriver attachments
Mounting options also affect how screwdrivers are used. If there is a conflict between the mechanisms, a problem may arise in correctly screwing the screws into a hard surface. Therefore, it is recommended to purchase cartridges only with the type of mount that is provided on the tool itself.
Type "Morse Cone"
This fastening option has been used on devices with a rotating mechanism for decades. It can rightfully be considered one of the popular ones. If you look closely at the design, its shaft resembles a cone, exactly the same as that of the cartridge. Thanks to the identical base, it is easy to connect the two parts together by hand. All pneumatic models of screwdrivers are equipped with this mechanism.
Threaded fastening
This switching option is the presence of larger and smaller threads on the shaft and chuck that fit together. The base of the cylinder is screwed onto the shaft.
Fixing screw
The screw has a Phillips head, which can be seen by moving the jaws apart. The screw fastenings have a cross head and left-hand threading. Such a screw can be easily unscrewed using a regular flat-head screwdriver, provided that its size matches the diameter of the inlet hole.
For your information!
Do not try to halve the screwdriver to unscrew the screw (if it has such a fastening method) immediately after work. At this moment, the tool is very hot, so it may jam. And a screwdriver will only “lick” the edge.
How to determine the mounting method on your instrument
Studying the working mechanism of the cartridge and the head of the electrical device itself will help you quickly understand how the fastening of the moving structure is organized. Look carefully at the markings that are indicated on the body of the device or on the removable head itself. Usually the following symbols are written on it: 1-6 B10, where:
- 1-6 — shank size in diameter;
- B10 - cone size (you can find it in any reference book);
As for the threaded connection, its marking usually looks like this: 1.0−11 M12×125. Where M12×125 are the parameters of the metric thread, and 1.0−11 are the maximum dimensions of the tool that can be fixed in the chuck. Please note that if you purchased a foreign-made device, then all numbers should be converted into inches, while for domestic devices everything is measured in mm.
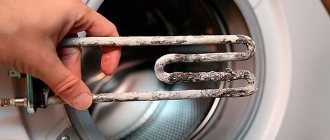
Cartridge mechanism problems
In modern drill models, such as Interskol or Makita, the drill or other attachments are secured by a chuck with a cam mechanism: 3 or 4 cams securely hold the cutting tool; they can only move along the axis of the drill shaft. The keyless chuck is adjusted manually; more complex designs used in modern drills are adjusted using a key.
During operation, a beating of the clamped bit may occur; the cause is wear of the cams during long-term operation. The tool is repaired as follows: you need to remove the device from the shaft; the same actions are necessary when the drill jams, because it can only be removed after completely disassembling the cartridge part of the product.
The following malfunction also occurs: the chuck rotates relative to the tool shaft. The reason for this behavior is damage to the threaded part of the device mount, or subsidence has occurred at the landing cone. The way out of this situation is to replace the cartridge with a working analogue.
Drill chuck - problems with replacement, repair and ways to solve them
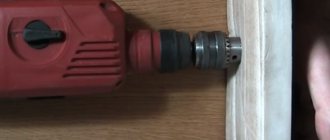
Electronic drills use a special device called a chuck to securely hold drills. In household drills, jaw chucks are more widely used. With intensive use, they can fail and require replacement or repair. During these operations, obstacles often arise. Because how to remove the chuck from the drill shaft, disassemble it into its component parts and replace it with a new one?
The part falls off
Does the cartridge fly off? This problem quite often occurs even on new drills with a conical fit of the jaw chuck, when the deepest hole is drilled. It is necessary to lift the drill to free it from the chips, and at this moment the chuck flies off the cone. The position can be corrected by increasing the tension in the cone joint. To do this, the cartridge is heated in oil or oven to a temperature of 100–10 degrees and placed on the cool mandrel of the drill.
Sources:
https://moy-instrument.ru/instrumenty/kak-snyat-patron-s-dreli-makita-video.html https://tehznatok.com/kak-polzovatsya/sverlilnyiy-patron-problemyi-pri-zamene-remonte .html
Tool for work
Replacing a drill chuck is easy if you know the design of this unit and the methods for attaching it. To carry out repairs you will need a simple set of tools:
- bench vice, you can use not the standard one, but a smaller version for home needs;
- steel hammer;
- carpenter's mallet;
- pliers or pliers;
- medium size pipe wrench;
- set of wrenches;
- calipers;
- screwdriver;
- file;
- sandpaper for sanding.
The list shows the minimum set; there are situations when other plumbing equipment may be required.
Dismantling the cartridge
Depending on how the chuck mechanism is mounted, disassembly methods will vary.
Threaded connection
This structure must be disassembled in this order.
- Carefully unscrew the locking screw.
- We unscrew the cartridge counterclockwise, if the thread is tightened properly, we clamp the tool shaft in a vice. A gas wrench is used to unscrew it. Then we remove the device and inspect it for integrity and serviceability.
- If the drill is jammed in the jaws, then we apply not strong, but precise blows with a hammer using a drift on the cams from above.
Installation is carried out in reverse order. When screwing in a new device, the shaft must be secured against rotation with your free hand. Lastly, tighten the locking device. Video to help home crafters:
Cone connection
Removing the cartridge from the tapered part of the shaft is quite easy. The drill kit should have a special device for these purposes, but many experienced craftsmen use this method: they turn the tool over with the drill down, secure it, and evenly hit the back side with a hammer to knock the device out of the shaft.
After dismantling, you need to sand the conical surfaces using an emery cloth; if there are surface burrs, remove them with a file. The new cartridge is installed in place even easier - by hitting it with a mallet on top, it fits tightly into the joint.
Users need to remember that removing a drill or other attachment when it is jammed in a chuck requires certain skills and ability to handle plumbing tools, but in any case the device must be dismantled. If the chuck on the drill fails, it must be replaced.
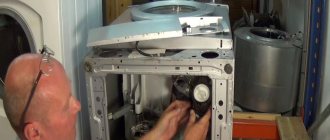
How to remove a chuck from a drill - instructions with description
Quite often, during the operation of drills, wear of various structural parts appears. One of these parts is the cartridge, when worn out a number of different problems are observed. Chuck wear often manifests itself in the form of unreliable fixation of replaceable drill attachments. To eliminate such a malfunction, it will be necessary to dismantle the product and also replace or repair it. How to remove the chuck from a drill, purposefully examine more carefully.
Removing and replacing the cone chuck
Now let's look at how to remove a cone-type chuck from a drill. Such products are also called Morse cone, in honor of the founder. Typically, dismantling such options does not cause problems, but for removal you will need to use a special device. With its help, you can easily and easily remove the cone chuck from the drill.
READ How to Disassemble a Drill Chuck Video
Even if there is no such device, then it is possible to do without it. The dismantling process consists of the following steps:
- The tool is securely fixed in a vertical position so that the drill is oriented downward.
- Using a hammer, you need to apply light blows to the entire surface of the device to disengage it.
- Knockout is carried out until the device is completely removed from the cone.
After removal, it is replaced with a new one. This is done by hammering the product into place using a mallet and hammer. In most cases, replacement is carried out in case of damage to one of the cams or springs.