Windows operating systems
20.03.201953200
At least once in their life, almost every person is faced with the need to update a flash player on a computer or “convert” a document or photo into electronic form. However, not everyone has sufficient skills to cope with the task without outside help. Today we will look at how to scan a document onto a computer using a printer - the instructions presented will allow you to perform the action as quickly as possible and without additional difficulties, even if the manipulations are performed by an inexperienced PC owner.
What should you use at work?
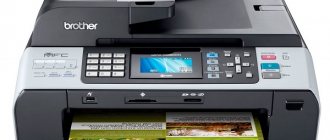
You will need two devices. This could be: a PC or laptop and a scanner or MFP, a scanning device with a USB connector and a flash drive. The latter option will allow you to scan and save it to a flash drive. It is not difficult to purchase any equipment. It’s easy to choose in city stores or on the Internet. Another option is to consider purchasing abroad. For example, in China or the USA. The following manufacturers are popular on the market: Samsung, Ricoh, Kyocera, HP, Epson, Canon, Brother. For home use, products in the mid-price range are sufficient.
What is scan and scan?
A scan can have two meanings. The first is a digital copy of a paper document in the form of a file on a computer disk. The second is short for “scanning.”
How does the scanner work and what does it do? We'll tell you in detail.
Scanning is the process of “translating” text or images on a sheet of paper into electronic form using special equipment. In this case, a scanner or multifunction device.
The scan is...
A scan is a digital version of a real paper document. Digital “images” are created by carrying out the scanning process with a special device - a scanner. The result is saved on computer disks or flash drives in the form of images as pdf, jpg, png and other files.
What is a scanner and what is it for? Detailed information about the device.
Plain paper sheets are easy to lose and also lose their quality over time. In the digital era, document management is increasingly being saved in scans. This saves space in archives, where large areas for storing paper are no longer needed. Thousands of files can be stored on one hard drive of a PC or server.
The use of this storage format has found its popularity in various sectors of human life. And most often in accounting, medicine, law. At the same time, paper versions of important documentation are also saved. But working with digital ones is much more convenient and easier.
When scanned in good quality, the company's seals and person's signatures will be clearly visible on the image. This makes it possible to fully use a scan of a document instead of the original. Already, a digital copy of a passport allows you to get a small cash loan or use many government services. Together with a digital signature, they can completely replace the originals.
Preparing your computer and printer for scanning
To start scanning on your PC and a separate scanner or MFP, you first need to connect the equipment and configure it properly. Devices from different brands are structurally no different from each other, as is working with them.
Proceed like this:
- Make sure your printer has a scanner. Regular printing devices cannot scan. You need an MFP or just a scanner. This information can be found in the specifications of the equipment.
- Connect the scanning device to your personal computer with a USB cord, through a wall outlet or via Wi-Fi. If this has been done previously, check the connection is secure. not be in color and without exclamation marks or warning triangles.
- Install or update the driver - special software for “communicating” equipment with each other. You can and should download it from the manufacturer’s website. Install the software according to its instructions.
- Plug the MFP into the outlet and “give” power by pressing the corresponding button on the case. The Ready light should be lit. In most cases, green.
- Place a sheet of paper with the document that you want to receive digitally, focusing on the marks near the scanner glass. They are depicted in the corners as arrows.
The MFP can scan without a cartridge in the printer, and therefore, if the “consumable” is missing or is being recharged, the scanner can still be used for its intended purpose. You should not pay attention to the blinking indicators on the case. Unfortunately, you won't be able to print.
Features of scanning a document to a computer
Even if your device is an MFP and has a scanner, this is not enough to start printing right away. Each piece of hardware in a computer has its own software. It should show the PC how to operate the given equipment. If you are the owner of a printer, then the kit should include a floppy disk with a driver. You need to install it in your computer's disk drive and install the program.
Printer driver disk
When the necessary software is installed and the printer is ready to use. Now you can easily scan the documents you need.
Press the Power or On/Off button
Plug the printer's power cord into a power outlet and press the "Power" button.
Further procedure:
- You need to open the cover that hides the scanning canvas; Open the scanner lid to place a document
- Next, place the picture or text at the bottom of the paper from which you want to scan the information; Place the document on the scanner canvas
- Close the printer lid to press down and thus straighten the paper in front of the scanning beam; Close the printer cover
- Now you need to go to your computer to set up the process. To open the Control Panel on any Windows, press WIN+PAUSE together and select “Control Panel” at the top;
- Next, find the item called “Device and Printers.” If it's not there, you can enter it in the search bar above;
- When you get to the section with printers, you need to select the one with which you want to work with the mouse cursor; Select the desired printer from the suggested ones
- Click the “Start Scan” button at the top of the panel. If there is no button, right-click on the printer icon and select this option from the context menu; Click on the “Start Scan” button
- In the new window you can configure some scanning parameters. When the setup is complete, click on the “Scan” button at the bottom. Setting Scan Settings
The progress of the process will be visible on your computer screen. When it completes, you will need to give the new file a name and also indicate the path where it should be saved. This way, important papers are scanned onto the PC screen.
This may be useful: How to update driver online.
Scanner Wizard
To scan a sheet of text, you can use the Scanner Wizard built into the operating system. Below are detailed instructions for user actions:
- Turn on the equipment and make sure everything works. Check that there is nothing unnecessary on the scanner glass (other documents, paper clips, debris, etc.).
- Place the document you want to scan with the image side facing the glass. Be sure to close the lid tightly.
- Now let's move on to our PC.
- Now you need to go to the “Devices and Printers” section. This can be done in several ways: using the “Start” button, through the “Control Panel”, searching on the PC, entering a command in the execution window.
- Among all devices, select your model with the left mouse button, and with the right mouse button, call up the context menu.
- In it, click on the “Start Scan” shortcut.
- In this window you can configure the quality of scans and where to save digital copies of documents. Here, select the format in which the file will be saved.
- Click the “View” button to see the preliminary result and “Scan” to receive the document in electronic form.
How to scan into one pdf file Fast, easy and correct.
Method 1
On Windows
1. Place the document face down in the scanner. You'll need to make sure your scanner is turned on and connected to your computer before proceeding.
2. Click the Windows logo in the lower left corner of the screen.
3.Enter Fax and Scan into Start. The Windows Fax and Scan application will be searched for.
4.Click Windows Fax and Scan. It is located at the top of the start window.
5.Click New Scan. This option is located in the upper left side of the Fax and Scan window. A new window will open.
6.Make sure the scanner name is correct. If you don't see your scanner's name at the top of the window, or the wrong scanner is listed, click "Change..." in the top right corner of the window, and then select your scanner's name.
7.Select the document type. Click the Profile drop-down list, then select a document type (for example, photo) from the drop-down list.
8. Decide on the color of your document. Click the Color Format drop-down box and select Color or Black and White. This is also where your scanner may have different color options.
9.Select a file type. Click the File Type drop-down box, then click the file type (such as PDF or JPG) you want to use to store the scanned document on your computer.
- When scanning anything other than a photo, PDF is the best choice.
10.Change any other settings on the page. Depending on your scanner, you may have other settings (such as Resolution) that you can change before scanning your document.
11.Click Preview. It is located at the bottom of the window. This will bring up a preview scan to show you what your scanned document will look like.
- If your document looks warped, uneven, or cropped, you can adjust it in the scanner and then click Preview again to see if your adjustments fixed the problem.
12.Click Scan. It is located at the bottom of the window. Your document will begin scanning to your computer using the settings and format you selected.
13.Find the scanned document. For this:
- Open the start image called Windowsstart.png.
- Open the Explorer image called Windowsstartexplorer.png.
- Click Documents on the left side of the window.
- Double-click the Scanned Documents folder.
We use software from the device manufacturer to scan the document
- Xerox Easy Printer Manager. The utility is specifically designed for use with Xerox equipment. The program has a simple and intuitive interface. It also allows you to very flexibly adjust the quality of scanned documents. The advanced mode will allow you to specify the resolution in which the document will be saved, the full storage path on disk, file format, color.
- Epson Scan. The program was created to work with MFPs and scanners from the Japanese company Epson. Before the scanning process itself, you can specify the necessary settings in the appropriate section. If the quality of the scan is not at an appropriate level, then it should be corrected using the utility.
- HP Scan . Proprietary software is used when working with new and old models of devices from this American company. You can download the version for any Windows OS. The program has a standard set of tools, but this is enough for most tasks. Can save in PDF and JPG formats.
- Canon MF ToolBox . From the name it is clear that this is a development by Canon engineers. Users note obvious advantages: light weight of the installation file, speed of scanning, variety of formats for saving. The only drawback is the lack of a Russian interface.
Other manufacturers (Canon, Samsung, Kyocera) also have similar developments in their arsenal. Their capabilities, settings, design and operating logic are almost identical.
Scanning software from manufacturers
To ensure easy operation of equipment, manufacturing companies develop special software. All possible functions for controlling a specific device model are available in the software interface.
Features may vary slightly depending on brand. But the basic set of settings/parameters is almost always identical. You can set the scan resolution, select color (black and white or color scan), format (png, jpeg, jpg, pdf and others).
List of scanning utilities:
- HP Scan;
- Epson Scan;
- Xerox Easy Printer Manager;
- Canon MF ToolBox.
There is also software for Kyocera and Samsung; you can download it from the official websites or install it from the included CD.
Making scans in Paint
Few people know that the standard program for working with drawings in Windows, the Paint editor, also allows you to receive scans of documents and save them in the desired format. As a rule, these are png, jpg, bmp graphic files. To use the scanner in conjunction with Paint, you need to do this:
- Click the Start button and find the program shortcut. It can be immediately visible or “hidden” in the “Standard” section. Click on it to launch.
- Activate the menu to the left of the “Home” tab. And in it select the item “From a scanner or camera”.
- Next, in the new window, specify the type of document to be scanned and click the “Scan” button.
- The result will be like this.
- We use the “File” menu again, but now the “Save As” tab. We indicate the format of the document being saved and the location on the PC disks where it will be stored.
Other programs that can scan
- FineReader. A very popular utility. Its main advantage is the ability not only to scan, but also to recognize text on a document. And then save it in formats that allow you to make edits to the scanned file. Supports work with a large number of different languages. The program is paid, but has free trials and an online option.
- ScanLite. Installing the program does not take much time and is reduced to minimal steps. The launch is made by a shortcut from the desktop, which will be created automatically. To carry out scanning you need a minimum of settings. You only specify the file name of the scanned document and the disk path to the storage location.
- RiDoc. If support for scanning into different formats is relevant to you, then it makes sense to use RiDoc. Otherwise, it is better to use other options or a standard operating system application.
- WinScan2PDF. A simple, fast, reliable application for working with a scanner to produce high-quality PDF scans. Often used when working with network devices. The program is free.
- VueScan. Easily adapts to work with many models of scanners and MFPs. It has a built-in text recognition system, also known as OCR. The default scan settings can be changed by the user. You can specify: the final result file name, saving folder, format (PDF, JPEG, PNG).
- CuneiForm. Free software for scanning documents to a computer from a printer equipped with a scanner. Has a large set of settings to improve the quality of scanned images. Can recognize text, fonts and tables in different languages.
Several useful lifehacks
Making a copy of your passport
Peculiarities:
- Remove everything unnecessary from your passport. Make sure there are no foreign objects in it.
- In the scan settings, specify the color type as “Grayscale”, and select the highest quality available.
- Save scans in tiff or bmp format.
Photocopy without copier
To make a photocopy, you do not need to have a photocopier. You can do this by first scanning the document on a regular scanner to your computer, and then you can print it on a printer. The result will be no different if you used a photocopier.
Troubleshooting problems with a scanner or MFP
You can launch the standard “tool” for searching for errors and problems through the device’s context menu. Go to the "Printers" section in the control panel. Find your scanner model. Click on "Troubleshooting". Then follow the instructions and follow the instructions of the program.