Until now, karaoke remains one of the most popular leisure options for small and large groups. This ingenious invention continues to delight and bring pleasure to millions of people around the world.
At the same time, it is not at all necessary to go to the establishment, pay for a table and pay for each song in order to be able to sing. Having a Smart TV at your disposal, you can organize karaoke at home.
But for this you will need not only to install the application, but also to connect a microphone.
How to choose a microphone
Technology definitely does not stand still. But the problem with even the most advanced Smart TVs is that in most cases you won’t be able to connect a microphone and immediately start singing.
Even with the appropriate connector, the display does not respond to the connection.
A solution can be found. The first step is to find out whether a microphone can be connected to a specific TV model. Some TVs do not provide this. But even in this situation there is a loophole. Even if you have to use auxiliary devices.
To get home karaoke on your smart TV, you will need to purchase a suitable microphone.
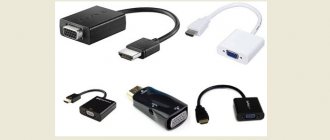
The microphones themselves are offered in several versions when it comes to connections:
- 3.5 mm wired connector;
- 6.3 mm wired connector;
- wired connection via USB port;
- wireless connection using Bluetooth technology.
If Smart TV does not provide 6.3 or 3.5 mm connectors on the back or side panel, then there is no point in spending money on such devices.
If you have a USB port, there is still no guarantee that you will be able to organize karaoke with a microphone connected via USB. Here you will need to additionally look into the technical documentation and study the characteristics.
A wireless microphone is rightly considered the most practical and convenient to use. It connects extremely simply, and is used regardless of wires.
Some Smart TVs initially have a karaoke function. In this case, just connect the microphone according to the instructions, select the appropriate mode from the menu that appears and start having fun.
Connection, practice
Physically, the connection is quite simple: just insert the microphone plug directly or using an adapter into the corresponding preamplifier connector, and connect the cord from the device to the microphone input on the PC sound card. In most cases, it is pink or blue (if pink is not available) in color. If all the inputs and outputs on your motherboard are the same (this happens), then read the instructions for it.
The assembled structure can also be connected to the front panel, that is, to the input with a microphone icon.
Connection
Now directly to the question of how you can connect a karaoke microphone to your TV and what you will need for this.
To sing at home while reading the text on the screen, you don’t have to own the most modern Smart TV. Even on old TVs this was possible. But it was additionally required to use a DVD player. It was he who made it possible to play musical compositions and display text on the screen.
Nowadays, it’s not difficult to figure out how to properly connect a microphone to a Smart TV. Here you will need the TV panel itself, connected to the Internet, a microphone and an application for playing karaoke.
As a result, to enjoy singing along with pop-up text, you need to:
- download a special application and install it on your TV;
- connect a suitable microphone to the TV;
- turn on the equipment;
- play your favorite song;
- sing.
The recipe seems extremely simple. But in fact, there are some nuances regarding how you need to connect microphones to Samsung TVs and Smart TVs from other manufacturers, such as Sony, Philips, BBK, etc.
If you don't know how to connect a microphone to your TV to sing karaoke, you must meet the following conditions:
- The microphone device must match the brand of the TV. Otherwise, incorrect operation may occur. It is best to select a device based on the brand and model of the TV panel.
- In the Smart TV itself, the connection will be configured automatically. That is, the TV will find the necessary drivers and install them. This will ensure interaction between it and the connected device.
- When installation and configuration are complete, you should not change anything in the application properties. Usually this is not necessary.
The microphone itself for a TV, such as Samsung or LG Smart TV, for example, can be wired or wireless. The connection method largely depends on this.
Wired microphones
A wired connection is considered the most reliable and inexpensive. Compared to wireless models, microphones with a cord are much cheaper.
They have a standard connector for connection, available on any TV, including Smart panels. Or you can use an auxiliary DVD set-top box if you can’t play and sing karaoke directly through TV. To turn on the device, you will need to select the appropriate mode in the sound settings.
The best option to connect a wired microphone to a Samsung TV is a USB connection. This connector is present on all Smart TV models, regular TVs and DVD players.
ATTENTION. If the user prefers to dance and move actively while singing, then if there is a wire there is a risk of touching it, damaging it and breaking it.
Another wired connection option involves using tulip-type plugs. The vast majority of TV models have these connectors. And even if they are not there, special adapters are available for sale.
Despite its reliability and ease of connection, a wired microphone is inferior to its main competitor.
Wireless microphones
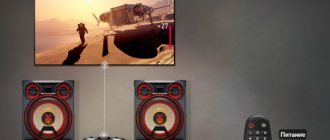
A wireless microphone is now the best option for organizing home karaoke. By the way, the same devices are increasingly used in establishments where you can sing. After all, then there is no need for visitors to go on stage. The microphone is fed directly to the table.
To connect a more convenient wireless microphone to your TV, you need to:
- download and install the application for singing to the text;
- insert the battery, after charging it, into the microphone;
- turn on Bluetooth on your gadget;
- activate Bluetooth on the smart panel;
- find devices and synchronize them.
In this way it is quite easy to connect a wireless microphone to a modern Smart TV.
But there are old-style TV panels that are simply not adapted for creating home karaoke. In this case, you will need to use additional elements. Most often this is a laptop, less often a personal desktop computer. A singing program is installed on them. You will also need to find and install a driver that will ensure the creation of a connection between the laptop and the microphone itself.
If your laptop has a built-in Bluetooth module, it makes sense to use it. Bluetooth can be installed by purchasing a special external module. All that remains is to connect the TV to the computer using a cable.
ATTENTION. With this connection, control will be carried out via a computer. And the TV will become a display device. In fact, it will turn into a regular monitor, only large.
If there is no other way to create home karaoke, this option is also quite suitable. After all, the main thing is that text is displayed on the screen, and the microphone correctly reproduces sound through separate speakers or the built-in speakers of the TV.
Wireless microphone connection has a number of objective advantages:
- wires do not get in the way;
- the range of the device increases;
- such microphones are not difficult to find and buy;
- relatively affordable cost, depending on the model and manufacturer;
- long work without recharging.
Usually one battery charge in the microphone is enough to continuously work for an entire evening, and sometimes for several days.
ADVICE. If you plan to sing and use the microphone occasionally, there is no point in spending money on devices with high-capacity batteries.
The better and more efficient the battery, the more expensive the microphone itself will end up being. There are also models that run on regular batteries. This is less convenient, since the battery can simply be connected to the charger at any time. And new batteries are not always at hand.
Connecting karaoke on TV
You can connect a microphone to the TV to perform songs through a DVD player, laptop/PC, or through the Smart TV function, if your television equipment provides such a feature.
Connection via DVD
This method is considered the simplest, but such players are losing their relevance due to the widespread use of other storage media, including audio and video content (flash drive, smartphone, etc.). And for those people who still have such devices, they also have karaoke discs
, this method is the most convenient.
To set up a microphone for singing songs, you need to:
- connect the device to the TV using a connecting cable (tulips, SCARD, HDMI - depending on the connectors available on the equipment, or using appropriate adapters);
- connect a microphone to the player;
- turn on the television panel, use the remote control to select the input through which the signal from the DVD is sent to the screen;
- turn on the player, insert a disc with karaoke music.
The connection is complete, now you can play your favorite song and have fun.
Advice! Instead of DVD, you can use a Blu-Ray player or home theater with karaoke support.
Connection via PC
You can also sing karaoke songs through a laptop or computer. In this case, the microphone is connected to the PC connectors
, and the TV is used as a second monitor. The karaoke application runs on the laptop and is displayed on the TV screen. To do this, you need to go to “Screen Resolution” by right-clicking on the desktop, and select the preferred method of displaying the image from the options presented:
- first screen;
- expand;
- repetitive;
- second screen.
With this connection method, sound is output through the laptop speakers (or through the TV panel if it is connected via an HDMI cable). If the sound seems quiet, you can purchase a microphone amplifier
or do it yourself if you have the appropriate skills and a soldering iron. There are a large number of diagrams and assembly instructions on the Internet.
Connection via Smart TV
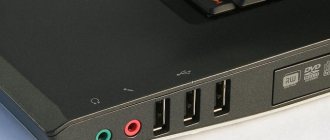
Setting up karaoke on a Smart TV is more difficult. First you need to select a jack (connector) for the microphone
.
To do this, you should inspect the television panel to understand what outputs are available for connection. A special 3.5 mm or 6.3 mm connector is required, but if there are none, you can connect the device via a USB port
.
Important! You need to download karaoke applications from trusted sources so as not to introduce a virus or damage your equipment.
What to do without Smart TV
There are practically no problems connecting karaoke to Smart TV.
Therefore, owners of regular TVs are somewhat worried that karaoke may be an inaccessible entertainment for them. Actually this is not true.
If there is no smart function, you can always use a DVD player or purchase a Smart set-top box to turn a regular TV into a smart TV.
In the case of a smart set-top box, after connecting it, all actions are performed by analogy with the previous instructions.
If you are using DVD, then you need:
- connect the DVD set-top box and the TV panel;
- insert a flash drive or disc with karaoke songs;
- connect a microphone;
- choose a composition;
- sing.
The devices have the necessary connectors with markings. Therefore, the connection should not cause any problems.
Selecting and connecting a microphone
The biggest connection challenge is choosing a good microphone. For convenient use, follow these simple tips:
- If possible, buy wireless models.
- check the integrity of all wires by purchasing a microphone with a USB connector;
- test the settings for correctness.
How to connect a Huayu universal remote control to a TV: codes, instructions
Wireless microphones are much more practical because they do not require a huge number of adapters that get underfoot.
If you are looking for a more affordable option in price, then pay attention to a microphone with a USB connector. If you can’t connect it to the TV, before changing the device or taking it in for repairs, check its operation on your computer.
If you have any questions or complaints, please let us know
Ask a Question
Any malfunctions in most cases are associated with errors in the software. Check on the official website if there is new firmware and update it.
Methods for connecting a microphone to a home TV depend on its type.
The following step-by-step instructions are suitable for USB microphones:
- unplug the TV from the outlet;
- connect the microphone cord to the console;
- connect the yellow, red and white RCA cable that come from the microphone;
- turn on the TV;
- Use the buttons on the microphone to select a song to view and start the lyrics.
Make sure your microphone has fresh batteries.
Bluetooth models - wireless microphones work after:
- purchasing a converter that converts digital sound into an analog signal;
- Connecting the red and white RCA cables from the converter to the audio input of the mixer.
Next, use the TV remote control to select “Sound Settings” / “Audio Format” / “PCM”.
After performing these steps, the sound is sent to the speakers of the karaoke system.
Emerging problems
Connecting a microphone to your TV for karaoke can sometimes be difficult.
This mainly applies to the following situations:
- the equipment does not connect;
- the TV does not recognize the devices;
- there is no sound.
If such problems occur, you can use the following recommendations:
- Turn off and restart the equipment. Sometimes after such manipulations everything is restored and functions normally.
- Update software. On Smart TV, this can be done through the corresponding section in the settings. For regular TVs, you need to download the latest software and install it using a flash drive.
- Use the signal amplifier. It happens that the signal between devices is too weak, and therefore its power is not enough for normal operation.
- Check that the microphone and TV match. Alas, quite often the inability to sing karaoke is due precisely to the fact that the device is not suitable for a particular TV.
- Check the microphone itself for functionality. To do this, it can be connected to a laptop or computer. If it doesn't work there either, the device is probably faulty and needs to be replaced.
- Carry out input resistance diagnostics. It is not so easy to do this on your own. But it is the difference in these device indicators that sometimes causes incorrect operation. You can correct the situation with a special amplifier.
- Check the battery level of the wireless microphone. The reason is trivial, but sometimes people don’t pay attention to it. Especially on those devices where there is no charge level indicator.
By following the connection sequence and recommendations for creating a connection between the TV and the microphone, in just a few minutes the user will be able to enjoy singing his favorite composition.
Problems do occur, and they are not uncommon. But this is mainly due to incompatibility of devices, their malfunctions, or non-compliance with connection rules.
Samsung service center in Moscow official website
Computer forums and portals, without exaggeration, “blush” at such questions. Some users, despairing of unsuccessful attempts, do not know whether such a connection is possible at all, while others do not know how to do it. What can you say about this? Modern TVs that support the Smart TV function can really be used as a convenient karaoke system, since they can install and actively use programs for this type of singing. However, the main obstacle that arises in the way of lovers of such singing is the lack of the necessary microphone jack on this device. It is for this reason that the task of “how to connect a karaoke microphone to a Samsung Smart TV” seems impossible at first glance. The attempts of many people who are trying to do this in different ways, unfortunately, do not have a positive result, but this does not mean that you should fold your arms, because if there is a problem, then there must be a method for solving it.
Methods for connecting a microphone to Samsung Smart TV
Method one
If you do not have certain skills, then this method will seem difficult to you. In this case, it would be wiser to contact professionals at a Samsung TV repair service center.
So, take a regular microphone from a DVD player with a so-called Mini Jack 3.5 millimeter plug. Now we need to amplify the sound signal on the microphone, since the TV does not have a microphone amplifier. The amplifier circuit can be found on the Internet. After all manipulations, connect the microphone to the DVI AUDIO IN jack located on the back wall of the device. If you did everything right, then turn on the karaoke application and enjoy singing.
Method two
If the first option did not work for you, that is, the microphone was not activated, you can try another way. Find the SCART socket on the back of your TV. You can use it for a tulip adapter. Next, take the switch and set it to “INPURT” mode. Then take a regular plug and the tulip adapter that was just mentioned, connect them together. Then connect this creation to the TV, then use the remote control to press the “SOURCE” key and select an external item. Well, that's all, the mission is completed, there is very little left: test, launch the program and sing.
Method three
The Samsung Smart TV has a function for connecting to a DVD player. Therefore, as one option, you can connect your microphone through the player, and connect it directly to the TV.
Method four
This is the simplest method listed. All you need to do is purchase a microphone with a USB plug. This connector is available on all Samsung Smart TV models.
If none of the methods work, you may have done something wrong. Try turning to professionals for help. They will probably tell you what the problem is and how to solve it quickly and effectively.
Did the article help you?
Karaoke via Philips TVs with Smart TV
Every singing person was delighted when televisions with built-in DVD players and microphones appeared on sale. In principle, practically nothing has changed compared to the version of the removable DVD player, except for its size and the fact that the device was able to be placed in the TV case.
But this was also a breakthrough for all music fans who did not have the opportunity to regularly go to karaoke bars and did not want to entangle their apartment with many wires in order to connect all the necessary components. In addition, sometimes as many as two microphones were included in the standard kit, and powerful speakers also built into the TV allow you to reproduce sound without other devices. Very comfortably.
But as soon as the Smart TV service appeared, and therefore the ability to access the Internet directly from the TV, there was no need to connect a laptop to search for songs. The program is already there, all that remains is to connect the microphone, find your favorite songs and enjoy life.
Special karaoke applications for Smart TV are published on the Internet, which allow you to enjoy singing around the clock. But they have one significant drawback - they are paid. The money is small, and the payment is monthly, but I still wanted to use free content, which is more difficult to find.
In addition, connecting and setting up the system on a Smart TV can be difficult. To avoid damage, it is better to let a master configure the circuit. Then you are guaranteed to have access to a huge amount of karaoke content for every taste.